随笔记录
目录
1, 新建用户
2. 给用户设置密码相关操作
3. 为新用户添加sudo 权限
4. 配置Git
4.1 配置Git
4.2 查看id_ras.pub
5, 登录Git 配置SSH 秘钥
6. Centos7 登录Git
7. clone 指定branch到本地
8. 将新代码复制到指定路径
9. 上传指定代码
9.1 上传
9.2 添加comments
9.3 提交Git
11. Gti 上检查是否上传成功
12. 下载最新代码
13. 下载指定分支代码
1, 新建用户
# 新建用户
root@localhost home]# useradd magx

#查看是否创建成功,去用户的家目录 home 里面去查看

[root@localhost home]# pwd
/home
[root@localhost home]# ll
total 4
drwx------. 13 magx magx 4096 Dec 12 14:32 magx         # 用户添加成功
drwxr-xr-x.  5 root root   84 Jun  4  2023 TestEvn
drwxr-xr-x.  2 root root    6 Dec 11 14:08 Tools
drwxr-xr-x.  2 root root   24 Apr 26  2023 zhangwk
[root@localhost home]#
2. 给用户设置密码相关操作
[root@localhost home]# su magx         # 切账户

[magx@localhost ~]$ passwd             # 修改当前账户密码
Changing password for user magx.
Changing password for magx.
(current) UNIX password:
New password:
3. 为新用户添加sudo 权限
[root@localhost home]# cat /etc/sudoers
## Sudoers allows particular users to run various commands as
## the root user, without needing the root password.
##
## Examples are provided at the bottom of the file for collections
## of related commands, which can then be delegated out to particular
## users or groups.
##
## This file must be edited with the 'visudo' command.

## Host Aliases
## Groups of machines. You may prefer to use hostnames (perhaps using
## wildcards for entire domains) or IP addresses instead.
# Host_Alias     FILESERVERS = fs1, fs2
# Host_Alias     MAILSERVERS = smtp, smtp2

## User Aliases
## These aren't often necessary, as you can use regular groups
## (ie, from files, LDAP, NIS, etc) in this file - just use %groupname
## rather than USERALIAS
# User_Alias ADMINS = jsmith, mikem


## Command Aliases
## These are groups of related commands...

## Networking
# Cmnd_Alias NETWORKING = /sbin/route, /sbin/ifconfig, /bin/ping, /sbin/dhclient, /usr/bin/net, /sbin/iptables, /usr/bin/rfcomm, /usr/bin/wvdial, /sbin/iwconfig, /sbin/mii-tool

## Installation and management of software
# Cmnd_Alias SOFTWARE = /bin/rpm, /usr/bin/up2date, /usr/bin/yum

## Services
# Cmnd_Alias SERVICES = /sbin/service, /sbin/chkconfig, /usr/bin/systemctl start, /usr/bin/systemctl stop, /usr/bin/systemctl reload, /usr/bin/systemctl restart, /usr/bin/systemctl status, /usr/bin/systemctl enable, /usr/bin/systemctl disable

## Updating the locate database
# Cmnd_Alias LOCATE = /usr/bin/updatedb

## Storage
# Cmnd_Alias STORAGE = /sbin/fdisk, /sbin/sfdisk, /sbin/parted, /sbin/partprobe, /bin/mount, /bin/umount

## Delegating permissions
# Cmnd_Alias DELEGATING = /usr/sbin/visudo, /bin/chown, /bin/chmod, /bin/chgrp

## Processes
# Cmnd_Alias PROCESSES = /bin/nice, /bin/kill, /usr/bin/kill, /usr/bin/killall

## Drivers
# Cmnd_Alias DRIVERS = /sbin/modprobe

# Defaults specification

#
# Refuse to run if unable to disable echo on the tty.
#
Defaults   !visiblepw

#
# Preserving HOME has security implications since many programs
# use it when searching for configuration files. Note that HOME
# is already set when the the env_reset option is enabled, so
# this option is only effective for configurations where either
# env_reset is disabled or HOME is present in the env_keep list.
#
Defaults    always_set_home
Defaults    match_group_by_gid

# Prior to version 1.8.15, groups listed in sudoers that were not
# found in the system group database were passed to the group
# plugin, if any. Starting with 1.8.15, only groups of the form
# %:group are resolved via the group plugin by default.
# We enable always_query_group_plugin to restore old behavior.
# Disable this option for new behavior.
Defaults    always_query_group_plugin

Defaults    env_reset
Defaults    env_keep =  "COLORS DISPLAY HOSTNAME HISTSIZE KDEDIR LS_COLORS"
Defaults    env_keep += "MAIL PS1 PS2 QTDIR USERNAME LANG LC_ADDRESS LC_CTYPE"
Defaults    env_keep += "LC_COLLATE LC_IDENTIFICATION LC_MEASUREMENT LC_MESSAGES"
Defaults    env_keep += "LC_MONETARY LC_NAME LC_NUMERIC LC_PAPER LC_TELEPHONE"
Defaults    env_keep += "LC_TIME LC_ALL LANGUAGE LINGUAS _XKB_CHARSET XAUTHORITY"

#
# Adding HOME to env_keep may enable a user to run unrestricted
# commands via sudo.
#
# Defaults   env_keep += "HOME"

Defaults    secure_path = /sbin:/bin:/usr/sbin:/usr/bin

## Next comes the main part: which users can run what software on
## which machines (the sudoers file can be shared between multiple
## systems).
## Syntax:
##
##      user    MACHINE=COMMANDS
##
## The COMMANDS section may have other options added to it.
##
## Allow root to run any commands anywhere
root    ALL=(ALL)       ALL
magx    ALL=(ALL)       ALL                # 为新用户添加 sudo 权限
## Allows members of the 'sys' group to run networking, software,
## service management apps and more.
# %sys ALL = NETWORKING, SOFTWARE, SERVICES, STORAGE, DELEGATING, PROCESSES, LOCATE, DRIVERS

## Allows people in group wheel to run all commands
%wheel  ALL=(ALL)       ALL

## Same thing without a password
# %wheel        ALL=(ALL)       NOPASSWD: ALL

## Allows members of the users group to mount and unmount the
## cdrom as root
# %users  ALL=/sbin/mount /mnt/cdrom, /sbin/umount /mnt/cdrom

## Allows members of the users group to shutdown this system
# %users  localhost=/sbin/shutdown -h now

## Read drop-in files from /etc/sudoers.d (the # here does not mean a comment)
#includedir /etc/sudoers.d
[root@localhost home]#
4. 配置Git
4.1 配置Git
[magx@localhost ~]$ cd git_test/
[magx@localhost git_test]$ ls
[magx@localhost git_test]$ ll
total 0
[magx@localhost git_test]$
[magx@localhost git_test]$ git init
Initialized empty Git repository in /home/magx/git_test/.git/
[magx@localhost git_test]$
[magx@localhost git_test]$ git config --global user.name "magx"
[magx@localhost git_test]$ git config --global user.mail "maguox14@hotmail.com"
[magx@localhost git_test]$ git config --global --list
user.name=magx
user.mail=maguox14@hotmail.com
[magx@localhost git_test]$
[magx@localhost git_test]$ ssh-keygen -t rsa -C "maguox14@hotmail.com"
Generating public/private rsa key pair.
Enter file in which to save the key (/home/magx/.ssh/id_rsa):
/home/magx/.ssh/id_rsa already exists.
Overwrite (y/n)? y
Enter passphrase (empty for no passphrase):
Enter same passphrase again:
Your identification has been saved in /home/magx/.ssh/id_rsa.
Your public key has been saved in /home/magx/.ssh/id_rsa.pub.
The key fingerprint is:
SHA256:KtSQ7V6FScA3IJ2FZTPnU0p5GTgcPo7FXjxYOvnq8vY maguox14@hotmail.com
The key's randomart image is:
+---[RSA 2048]----+
|    .ooBB.+++o   |
|     +=oo@=Oo    |
|    o ..o.#o+    |
|     +   * * .   |
|    . o S o .    |
|   . . o   .     |
|    . o   .      |
|     .  ...      |
|         +o.E    |
+----[SHA256]-----+
[magx@localhost git_test]$
4.2 查看id_ras.pub
[magx@localhost git_test]$
[magx@localhost git_test]$
[magx@localhost git_test]$ cat /home/magx/.ssh/id_rsa.pub
ssh-rsa AAAAB3NzaC1yc2EAAAADAQABAAABAQDCELdrSXB29lX0u0kVIKekTAc1c8+8Ss9vHe9XwOpk2sq8UcWpdNHfL9nLUnN.......
.......
UTicjdzzEO8DIGWQNLjHbub5TxRV6k8jWOY5bxqGtc3dAPbAZ3n maguox14@hotmail.com
[magx@localhost git_test]$
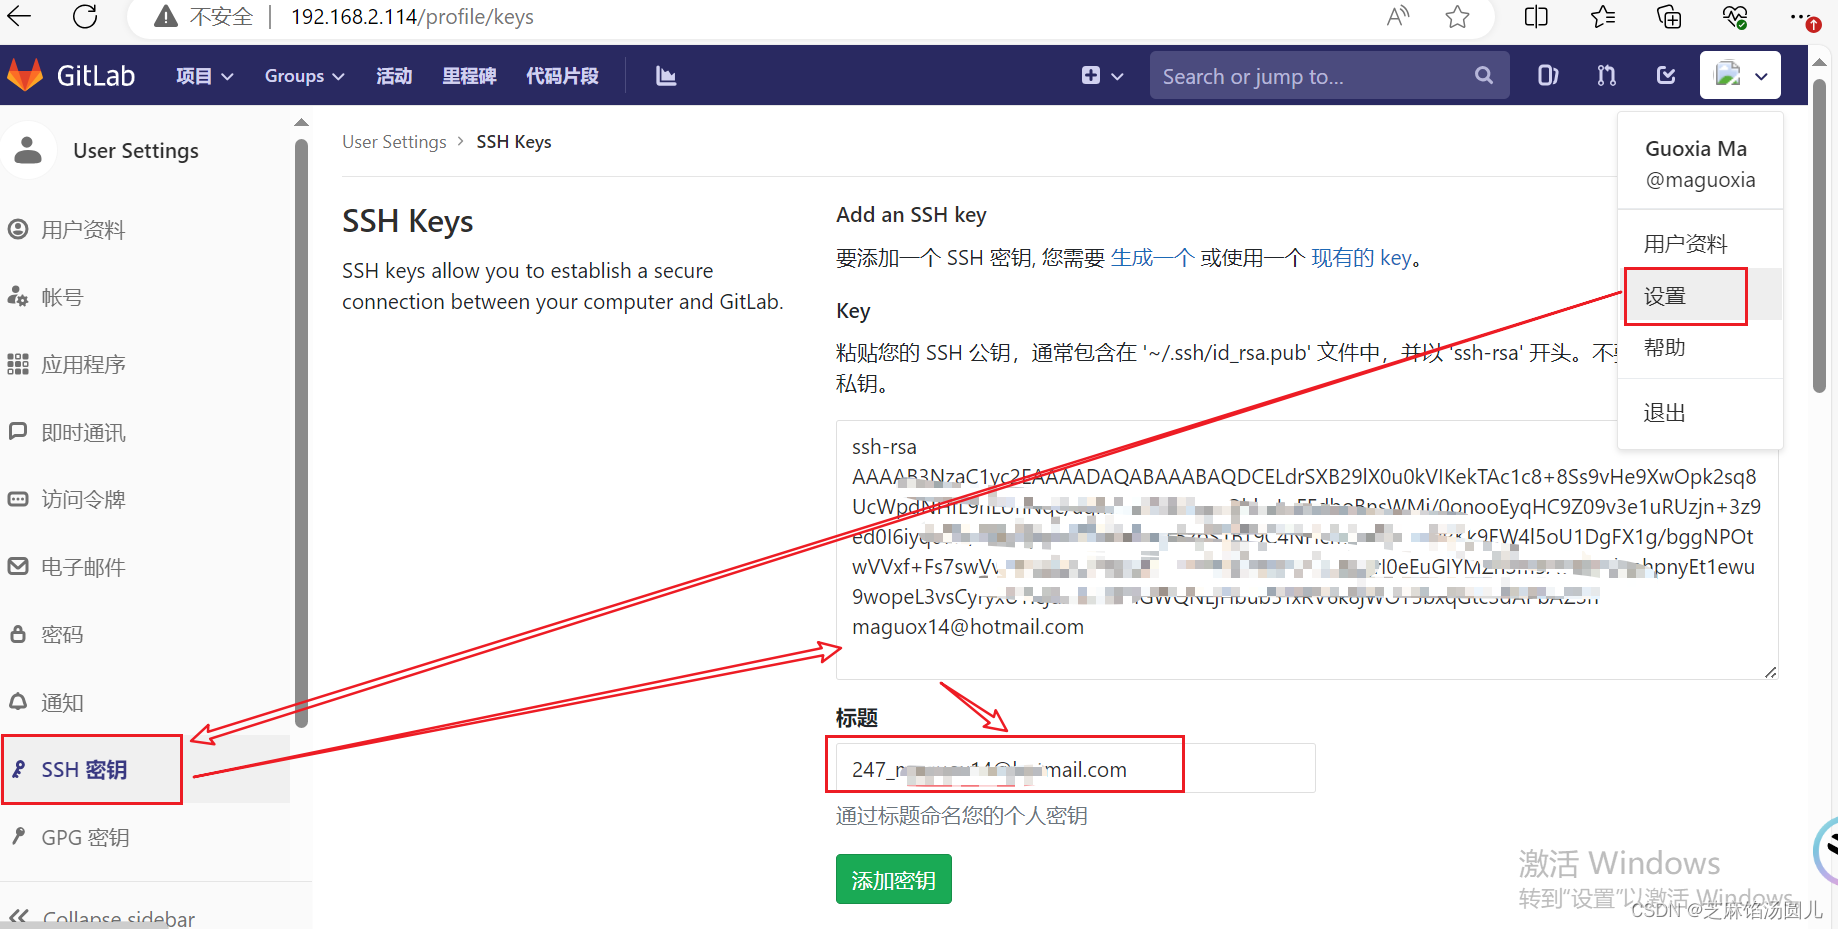
5, 登录Git 配置SSH 秘钥
将4.2id_ras.pub 秘钥 贴入 Git
6. Centos7 登录Git
[magx@localhost git_test]$ ssh -T git@192.168.2.114
Enter passphrase for key '/home/magx/.ssh/id_rsa':   # 输入id_ras
Welcome to GitLab, @maguoxia!
[magx@localhost git_test]$
[magx@localhost git_test]$
7. clone 指定branch到本地
[magx@localhost git_test]$ git clone -b V2 git@192.168.2.114:zhangwk/riskcop.git
Cloning into 'riskcop'...
Enter passphrase for key '/home/magx/.ssh/id_rsa':
remote: Enumerating objects: 561, done.
remote: Counting objects: 100% (561/561), done.
remote: Compressing objects: 100% (224/224), done.
remote: Total 5063 (delta 347), reused 521 (delta 322)
Receiving objects: 100% (5063/5063), 638.23 MiB | 24.08 MiB/s, done.
Resolving deltas: 100% (3329/3329), done.
Checking out files: 100% (1731/1731), done.
[magx@localhost git_test]$
[magx@localhost git_test]$
8. 将新代码复制到指定路径
将git 项目分支 V2:riskcop clone 到本地后,将要上传代码文件复制到 此路径

[root@localhost TestEvn]# cp -r Dyn_Init_Scripts/ /home/magx/git_test/riskcop/
[root@localhost TestEvn]#
9. 上传指定代码
9.1 上传
[root@localhost riskcop]# ll
total 936212
drwxr-xr-x. 9 root root      4096 Dec 12 15:21 Dyn_Init_Scripts
-rw-rw-r--. 1 magx magx        63 Dec 12 15:12 README.md
drwxrwxr-x. 4 magx magx        47 Dec 12 15:12 Risk_Init_V2
drwxrwxr-x. 6 magx magx       114 Dec 12 15:12 V2.1
drwxrwxr-x. 3 magx magx        32 Dec 12 15:12 V2.2
drwxrwxr-x. 4 magx magx      4096 Dec 12 15:12 V2.3
-rw-rw-r--. 1 magx magx 859176960 Dec 12 15:12 Version_testing_0706.tar
-rw-rw-r--. 1 magx magx  99490044 Dec 12 15:12 Version_testing_0706.tar.gz
[root@localhost riskcop]# su magx
[magx@localhost riskcop]$
[magx@localhost riskcop]$ git add /home/magx/git_test/riskcop/Dyn_Init_Scripts
9.2 添加comments
[magx@localhost riskcop]$
[magx@localhost riskcop]$ git commit -m "初始化(V2.2+V2.3 业务测试+性能测试+Djangox                                                                                                     项目)"
[V2 f9b4cc6] 初始化(V2.2+V2.3 业务测试+性能测试+Djangox项目-备份)
 Committer: magx <magx@localhost.localdomain>
Your name and email address were configured automatically based
on your username and hostname. Please check that they are accurate.
You can suppress this message by setting them explicitly:

    git config --global user.name "Your Name"
    git config --global user.email you@example.com

After doing this, you may fix the identity used for this commit with:

    git commit --amend --reset-author

 1415 files changed, 10644475 insertions(+)
 create mode 100644 Dyn_Init_Scripts/Init_V2.2_Basic.tar
 create mode 100644 Dyn_Init_Scripts/Init_V2.2_Basic/.idea/.gitignore
 create mode 100644 Dyn_Init_Scripts/Init_V2.2_Basic/.idea/Init0411.iml
 create mode 100644 Dyn_Init_Scripts/Init_V2.2_Basic/.idea/encodings.xml

.......
.......
.......

 create mode 100644 Dyn_Init_Scripts/supervisorConfig/supervisord.conf
 create mode 100644 "Dyn_Init_Scripts/\345\210\235\345\247\213\345\214\226\350\204\                                                                                                     232\346\234\254\344\273\213\347\273\215.txt"
[magx@localhost riskcop]$


[magx@localhost riskcop]$ git commit -m "初始化(V2.2+V2.3 业务测试+性能测试+Djangox项目)"
# On branch V2
# Your branch is ahead of 'origin/V2' by 1 commit.
#   (use "git push" to publish your local commits)
#
nothing to commit, working directory clean
[magx@localhost riskcop]$
9.3 提交Git
[magx@localhost riskcop]$ git push origin V2:V2            # 提交Git
Enter passphrase for key '/home/magx/.ssh/id_rsa':
Counting objects: 571, done.
Delta compression using up to 80 threads.
Compressing objects: 100% (569/569), done.
Writing objects: 100% (570/570), 376.25 MiB | 1.24 MiB/s, done.
Total 570 (delta 296), reused 12 (delta 1)
remote: Resolving deltas: 100% (296/296), completed with 1 local object.
remote:
remote: To create a merge request for V2, visit:
remote:   http://192.168.2.114/zhangwk/riskcop/merge_requests/new?merge_request%5Bsource_branch%5D=V2
remote:
To git@192.168.2.114:zhangwk/riskcop.git
   7e9b8f0..f9b4cc6  V2 -> V2
[magx@localhost riskcop]$
11. Gti 上检查是否上传成功
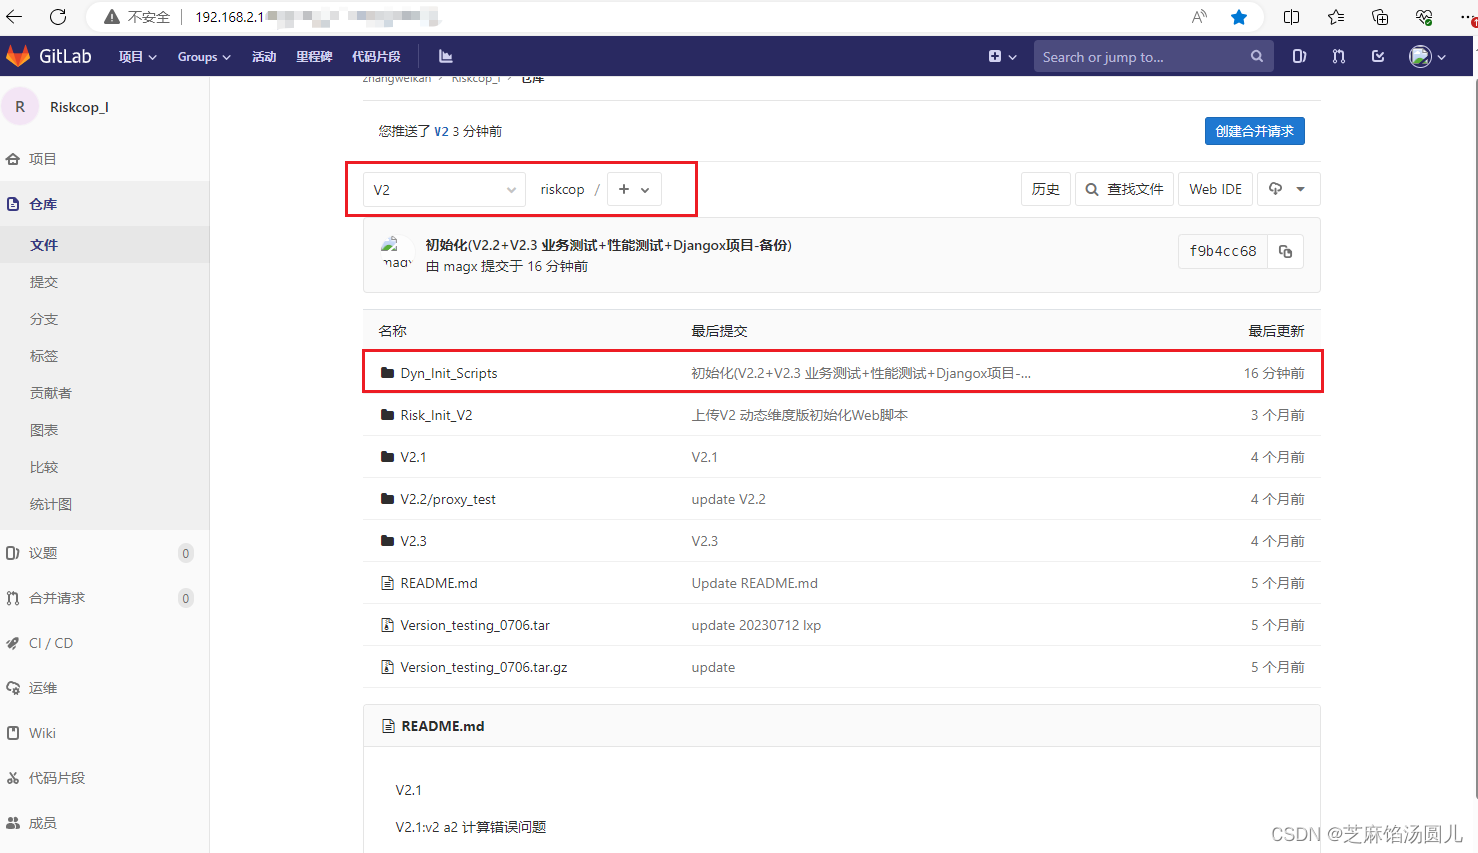
12. 下载最新代码
下载最新
# 先进入已下载的项目分支目录后--> 执行 git pull 下载更新的内容
[magx@server-247 riskcop]$ git branch -a
* (detached from origin/V2)
  V2
  remotes/origin/HEAD -> origin/master
  remotes/origin/V1.0.1
  remotes/origin/V2
  remotes/origin/master
  remotes/origin/riskcop_robotframework
  remotes/origin/v1.0.0
[magx@server-247 riskcop]$ git pull origin V2
Enter passphrase for key '/home/magx/.ssh/id_rsa':
From 192.168.2.114:zhangwk/riskcop
 * branch            V2         -> FETCH_HEAD
Already up-to-date.
[magx@server-247 riskcop]$
13. 下载指定分支代码
#下载 V2 分支代码

[magx@server-247 git_test]$ git clone -b V2 git@192.168.2.114:zhangwk/riskcop.git
Cloning into 'riskcop'...
Enter passphrase for key '/home/magx/.ssh/id_rsa':        #私钥短语 yusur666
remote: Enumerating objects: 543, done.
remote: Counting objects: 100% (543/543), done.
remote: Compressing objects: 100% (182/182), done.
remote: Total 4227 (delta 412), reused 482 (delta 355)
Receiving objects: 100% (4227/4227), 497.75 MiB | 31.78 MiB/s, done.
Resolving deltas: 100% (2718/2718), done.
[magx@server-247 git_test]$
[magx@server-247 git_test]$
[magx@server-247 git_test]$ ll
total 0
drwxrwxr-x 6 magx magx 138 Jul 14 13:49 riskcop
[magx@server-247 git_test]$
[magx@server-247 git_test]$
[magx@server-247 git_test]$ cd riskcop/
[magx@server-247 riskcop]$ ll
total 936208
-rw-rw-r-- 1 magx magx        63 Jul 14 13:49 README.md
drwxrwxr-x 6 magx magx       114 Jul 14 13:49 V2.1
drwxrwxr-x 3 magx magx        24 Jul 14 13:49 V2.2
drwxrwxr-x 4 magx magx      4096 Jul 14 13:49 V2.3
-rw-rw-r-- 1 magx magx 859176960 Jul 14 13:49 Version_testing_0706.tar
-rw-rw-r-- 1 magx magx  99490044 Jul 14 13:49 Version_testing_0706.tar.gz
[magx@server-247 riskcop]$

