一、redis cluster集群规划
Centos7.6部署redis6.2.8 cluster集群资源包
环境信息如下:
| 主机IP | 操作系统 | Redis版本 | CPU架构 | 端口 | 角色 |
|---|---|---|---|---|---|
| 192.168.1.191 | Centos7.6 | 6.2.8 | x86_64 | 7001 | master |
| 192.168.1.192 | Centos7.6 | 6.2.8 | x86_64 | 7002 | master |
| 192.168.1.193 | Centos7.6 | 6.2.8 | x86_64 | 7003 | master |
| 192.168.1.191 | Centos7.6 | 6.2.8 | x86_64 | 7004 | slave1 |
| 192.168.1.192 | Centos7.6 | 6.2.8 | x86_64 | 7005 | slave2 |
| 192.168.1.193 | Centos7.6 | 6.2.8 | x86_64 | 7006 | slave3l |
二、编译打包redis
说明:在任意一台主机上编译打包,目的是为了构建redis的可执行文件。
1、安装环境依赖
[root@localhost ~]# yum -y install gcc systemd-devel
2、安装包下载
[root@localhost ~]# wget https://download.redis.io/releases/redis-6.2.8.tar.gz
3、把redis安装到指定目录
[root@localhost ~]# tar axf redis-6.2.8.tar.gz
[root@localhost ~]# cd redis-6.2.8
[root@localhost redis-6.2.8]# make USE_SYSTEMD=yes
[root@localhost redis-6.2.8]# make install PREFIX=/opt/redis6
说明:这时候,我们就能在/opt/redis6.0下面看到一个bin目录,redis的可执行文件都被复制到这里了,如下图所示:

三、cluster集群目录
说明:根据目录规划,请提前创建好目录,并将编译打包主机上的/opt/redis6.0目录下的bin目录拷贝到相应目录下面。
| 主机IP | 根目录 | 数据目录 | 日志目录 | 配置文件目录 |
|---|---|---|---|---|
| 192.168.1.191 | /data/pkgs/redis/7001 | /data/pkgs/redis/7001/data | /data/pkgs/redis/7001/logs | /data/pkgs/redis/7001/etc |
| 192.168.1.192 | /data/pkgs/redis/7002 | /data/pkgs/redis/7002/data | /data/pkgs/redis/7002/logs | /data/pkgs/redis/7002/etc |
| 192.168.1.193 | /data/pkgs/redis/7003 | /data/pkgs/redis/7003/data | /data/pkgs/redis/7003/logs | /data/pkgs/redis/7003/etc |
| 192.168.1.191 | /data/pkgs/redis/7004 | /data/pkgs/redis/7004/data | /data/pkgs/redis/7004/logs | /data/pkgs/redis/7004/etc |
| 192.168.1.192 | /data/pkgs/redis/7005 | /data/pkgs/redis/7005/data | /data/pkgs/redis/7005/logs | /data/pkgs/redis/7005/etc |
| 192.168.1.193 | /data/pkgs/redis/7006 | /data/pkgs/redis/7006/data | /data/pkgs/redis/7006/logs | /data/pkgs/redis/7006/etc |
四、cluster集群配置文件
说明:将redis6.2.8源码包中的redis.conf分别拷贝到master1、master2、master3、slave1、slave2、slave3主机上的etc目录下。
1、7001节点配置文件
[root@localhost etc]# vim /data/pkgs/redis/7001/etc/redis.conf
bind 0.0.0.0
protected-mode yes
port 7001
daemonize yes
pidfile /var/run/redis_7001.pid
logfile "/data/pkgs/redis/7001/logs/redis_7001.log"
dir /data/pkgs/redis/7001/data
requirepass 1UEJjjGfYZU7dCWy
masterauth 1UEJjjGfYZU7dCWy
cluster-enabled yes
cluster-config-file redis.conf
cluster-node-timeout 15000
cluster-require-full-coverage no
2、7002节点配置文件
[root@localhost etc]# vim /data/pkgs/redis/7002/etc/redis.conf
bind 0.0.0.0
protected-mode yes
port 7002
daemonize yes
pidfile /var/run/redis_7002.pid
logfile "/data/pkgs/redis/7002/logs/redis_7002.log"
dir /data/pkgs/redis/7002/data
requirepass 1UEJjjGfYZU7dCWy
masterauth 1UEJjjGfYZU7dCWy
cluster-enabled yes
cluster-config-file redis.conf
cluster-node-timeout 15000
cluster-require-full-coverage no
3、7003节点配置文件
[root@localhost etc]# vim /data/pkgs/redis/7003/etc/redis.conf
bind 0.0.0.0
protected-mode yes
port 7003
daemonize yes
pidfile /var/run/redis_7003.pid
logfile "/data/pkgs/redis/7003/logs/redis_7003.log"
dir /data/pkgs/redis/7003/data
requirepass 1UEJjjGfYZU7dCWy
masterauth 1UEJjjGfYZU7dCWy
cluster-enabled yes
cluster-config-file redis.conf
cluster-node-timeout 15000
cluster-require-full-coverage no
4、7004节点配置文件
[root@localhost etc]# vim /data/pkgs/redis/7004/etc/redis.conf
bind 0.0.0.0
protected-mode yes
port 7004
daemonize yes
pidfile /var/run/redis_7004.pid
logfile "/data/pkgs/redis/7004/logs/redis_7004.log"
dir /data/pkgs/redis/7004/data
requirepass 1UEJjjGfYZU7dCWy
masterauth 1UEJjjGfYZU7dCWy
cluster-enabled yes
cluster-config-file redis.conf
cluster-node-timeout 15000
cluster-require-full-coverage no
5、7005节点配置文件
[root@localhost etc]# vim /data/pkgs/redis/7005/etc/redis.conf
bind 0.0.0.0
protected-mode yes
port 7005
daemonize yes
pidfile /var/run/redis_7005.pid
logfile "/data/pkgs/redis/7005/logs/redis_7005.log"
dir /data/pkgs/redis/7005/data
requirepass 1UEJjjGfYZU7dCWy
masterauth 1UEJjjGfYZU7dCWy
cluster-enabled yes
cluster-config-file redis.conf
cluster-node-timeout 15000
cluster-require-full-coverage no
6、7006节点配置文件
[root@localhost etc]# vim /data/pkgs/redis/7005/etc/redis.conf
bind 0.0.0.0
protected-mode yes
port 7006
daemonize yes
pidfile /var/run/redis_7006.pid
logfile "/data/pkgs/redis/7006/logs/redis_7006.log"
dir /data/pkgs/redis/7006/data
requirepass 1UEJjjGfYZU7dCWy
masterauth 1UEJjjGfYZU7dCWy
cluster-enabled yes
cluster-config-file redis.conf
cluster-node-timeout 15000
cluster-require-full-coverage no
五、使用systemd管理redis
1、7001节点Service文件
[root@localhost etc]# vim /etc/systemd/system/redis-7001.service
[Unit]
Description=Redis Server
After=network.target
[Service]
User=root
Group=root
Type=notify
LimitNOFILE=65535
ExecStart=/data/pkgs/redis/7001/bin/redis-server /data/pkgs/redis/7001/etc/redis.conf --supervised systemd
ExecStop=/bin/kill -s QUIT $MAINPID
ExecReload=/bin/kill -HUP $MAINPID
[Install]
WantedBy=multi-user.target
2、7002节点Service文件
[root@localhost etc]# vim /etc/systemd/system/redis-7002.service
[Unit]
Description=Redis Server
After=network.target
[Service]
User=root
Group=root
Type=notify
LimitNOFILE=65535
ExecStart=/data/pkgs/redis/7002/bin/redis-server /data/pkgs/redis/7002/etc/redis.conf --supervised systemd
ExecStop=/bin/kill -s QUIT $MAINPID
ExecReload=/bin/kill -HUP $MAINPID
[Install]
WantedBy=multi-user.target
3、7003节点Service文件
[root@localhost etc]# vim /etc/systemd/system/redis-7003.service
[Unit]
Description=Redis Server
After=network.target
[Service]
User=root
Group=root
Type=notify
LimitNOFILE=65535
ExecStart=/data/pkgs/redis/7003/bin/redis-server /data/pkgs/redis/7003/etc/redis.conf --supervised systemd
ExecStop=/bin/kill -s QUIT $MAINPID
ExecReload=/bin/kill -HUP $MAINPID
[Install]
WantedBy=multi-user.target
4、7004节点Service文件
[root@localhost etc]# vim /etc/systemd/system/redis-7004.service
[Unit]
Description=Redis Server
After=network.target
[Service]
User=root
Group=root
Type=notify
LimitNOFILE=65535
ExecStart=/data/pkgs/redis/7004/bin/redis-server /data/pkgs/redis/7004/etc/redis.conf --supervised systemd
ExecStop=/bin/kill -s QUIT $MAINPID
ExecReload=/bin/kill -HUP $MAINPID
[Install]
WantedBy=multi-user.target
5、7005节点Service文件
[root@localhost etc]# vim /etc/systemd/system/redis-7005.service
[Unit]
Description=Redis Server
After=network.target
[Service]
User=root
Group=root
Type=notify
LimitNOFILE=65535
ExecStart=/data/pkgs/redis/7005/bin/redis-server /data/pkgs/redis/7005/etc/redis.conf --supervised systemd
ExecStop=/bin/kill -s QUIT $MAINPID
ExecReload=/bin/kill -HUP $MAINPID
[Install]
WantedBy=multi-user.target
6、7006节点Service文件
[root@localhost etc]# vim /etc/systemd/system/redis-7006.service
[Unit]
Description=Redis Server
After=network.target
[Service]
User=root
Group=root
Type=notify
LimitNOFILE=65535
ExecStart=/data/pkgs/redis/7006/bin/redis-server /data/pkgs/redis/7006/etc/redis.conf --supervised systemd
ExecStop=/bin/kill -s QUIT $MAINPID
ExecReload=/bin/kill -HUP $MAINPID
[Install]
WantedBy=multi-user.target
六、启动各个节点redis服务
1、7001节点启动redis服务
[root@localhost ~]# systemctl daemon-reload
[root@localhost ~]# systemctl start redis-7001
[root@localhost ~]# systemctl enable redis-7001
2、7002节点启动redis服务
[root@localhost ~]# systemctl daemon-reload
[root@localhost ~]# systemctl start redis-7002
[root@localhost ~]# systemctl enable redis-7002
3、7003节点启动redis服务
[root@localhost ~]# systemctl daemon-reload
[root@localhost ~]# systemctl start redis-7003
[root@localhost ~]# systemctl enable redis-7003
4、7004节点启动redis服务
[root@localhost ~]# systemctl daemon-reload
[root@localhost ~]# systemctl start redis-7004
[root@localhost ~]# systemctl enable redis-7004
5、7005节点启动redis服务
[root@localhost ~]# systemctl daemon-reload
[root@localhost ~]# systemctl start redis-7005
[root@localhost ~]# systemctl enable redis-7005
6、7006节点启动redis服务
[root@localhost ~]# systemctl daemon-reload
[root@localhost ~]# systemctl start redis-7006
[root@localhost ~]# systemctl enable redis-7006
七、 使用redis-cli方式构建集群
说明:2018年十月Redis发布了稳定的5.0版本,推出了非常多的新特性,其中一点是放弃Ruby的集群方式,改为使用C语言编写的redis-cli 的方式。因为我用的是redis6.2.8,如果说你要用ruby,那你还需要安装ruby语言的一些东西,所以这里我就用redis-cli的方式启动集群。
构建cluster集群操作,如下所示:
[root@localhost etc]# /data/pkgs/redis/7001/bin/redis-cli -a 1UEJjjGfYZU7dCWy --cluster create \
192.168.1.191:7001 192.168.1.192:7002 192.168.1.193:7003 \
192.168.1.191:7004 192.168.1.192:7005 192.168.1.193:7006  \
--cluster-replicas 1
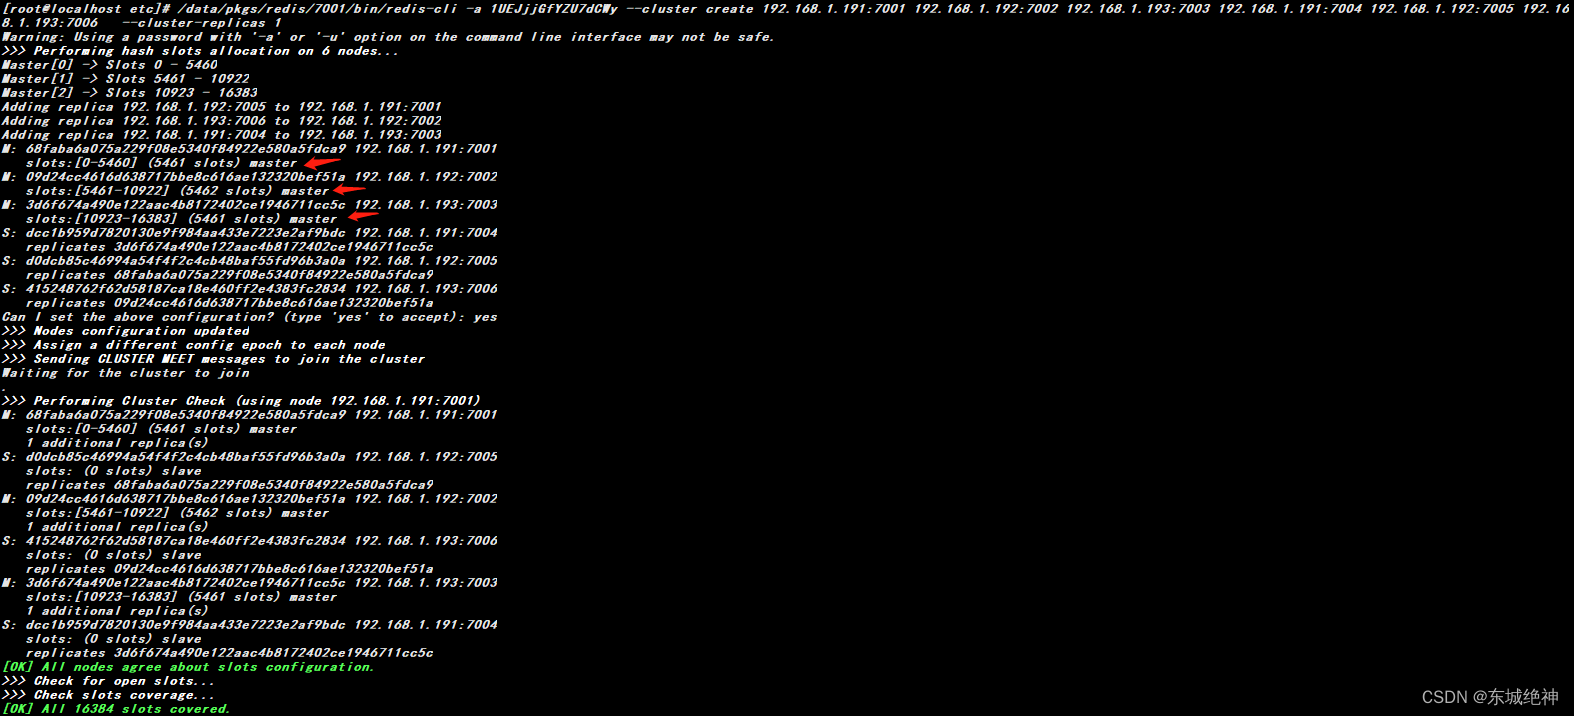
构建cluster集群结果,如下图所示:
八、 查看cluster集群各节点状态
1、7001节点状态,如下图所示:

2、7002节点状态,如下图所示:

3、7003节点状态,如下图所示:

4、7004节点状态,如下图所示:

5、7005节点状态,如下图所示:

6、7006节点状态,如下图所示:

7、任意一节点,查看cluster集群信息,如下图所示:

九、 验证cluster集群是否可用
1、往集群里面写入10条数据
[root@localhost etc]# for line in {1..10};do /data/pkgs/redis/7001/bin/redis-cli -h 192.168.1.191 -p 7001 -c -a 1UEJjjGfYZU7dCWy set ops_${line} ${line}; done
如下图所示:

2、读取数据看一下是否能读取到
[root@localhost etc]# for line in {1..10};do /data/pkgs/redis/7001/bin/redis-cli -h 192.168.1.191 -p 7001 -c -a 1UEJjjGfYZU7dCWy get ops_${line}; done
如下图所示:

3、关闭前,7001节点为master节点,且从节点为192.168.1.1.192:7005节点

4、关闭后,等待2分钟,7001节点为slave节点,且主节点变为192.168.1.1.192:7005节点

总结:整理不易,如果对你有帮助,可否点赞关注一下?
更多详细内容请参考:《Linux运维篇:Linux系统运维指南》


