Vue 的 _update 是实例的一个私有方法,它被调用的时机有 2 个,一个是首次渲染,一个是数据更新的时候;由于我们这一章节只分析首次渲染部分,数据更新部分会在之后分析响应式原理的时候涉及。_update 方法的作用是把 VNode 渲染成真实的 DOM,它的定义在 src/core/instance/lifecycle.js 中:
Vue.prototype._update = function (vnode: VNode, hydrating?: boolean) {
    const vm: Component = this
    const prevEl = vm.$el
    const prevVnode = vm._vnode
    const prevActiveInstance = activeInstance
    activeInstance = vm
    vm._vnode = vnode
    // Vue.prototype.__patch__ is injected in entry points
    // based on the rendering backend used.
    if (!prevVnode) {
        // initial render
        vm.$el = vm.__patch__(vm.$el, vnode, hydrating, false /* removeOnly */)
    } else {
        // updates
        vm.$el = vm.__patch__(prevVnode, vnode)
    }
    activeInstance = prevActiveInstance
    // update __vue__ reference
    if (prevEl) {
        prevEl.__vue__ = null
    }
    if (vm.$el) {
        vm.$el.__vue__ = vm
    }
    // if parent is an HOC, update its $el as well
    if (vm.$vnode && vm.$parent && vm.$vnode === vm.$parent._vnode) {
        vm.$parent.$el = vm.$el
    }
    // updated hook is called by the scheduler to ensure that children are
    // updated in a parent's updated hook.
}
_update 的核心就是调用 vm.__patch__ 方法,这个方法实际上在不同的平台,比如 web 和 weex 上的定义是不一样的,因此在 web 平台中它的定义在 src/platforms/web/runtime/index.js 中:
Vue.prototype.__patch__ = inBrowser ? patch : noop可以看到,甚至在 web 平台上,是否是服务端渲染也会对这个方法产生影响。因为在服务端渲染中,没有真实的浏览器 DOM 环境,所以不需要把 VNode 最终转换成 DOM,因此是一个空函数,而在浏览器端渲染中,它指向了 patch 方法,它的定义在 src/platforms/web/runtime/patch.js中:
import * as nodeOps from 'web/runtime/node-ops'
import { createPatchFunction } from 'core/vdom/patch'
import baseModules from 'core/vdom/modules/index'
import platformModules from 'web/runtime/modules/index'

// the directive module should be applied last, after all
// built-in modules have been applied.
const modules = platformModules.concat(baseModules)

export const patch: Function = createPatchFunction({ nodeOps, modules })
该方法的定义是调用 createPatchFunction 方法的返回值,这里传入了一个对象,包含 nodeOps 参数和 modules 参数。其中,nodeOps 封装了一系列 DOM 操作的方法,modules 定义了一些模块的钩子函数的实现,我们这里先不详细介绍,来看一下 createPatchFunction 的实现,它定义在 src/core/vdom/patch.js 中:
const hooks = ['create', 'activate', 'update', 'remove', 'destroy']

export function createPatchFunction(backend) {
    let i, j
    const cbs = {}

    const { modules, nodeOps } = backend

    for (i = 0; i < hooks.length; ++i) {
        cbs[hooks[i]] = []
        for (j = 0; j < modules.length; ++j) {
            if (isDef(modules[j][hooks[i]])) {
                cbs[hooks[i]].push(modules[j][hooks[i]])
            }
        }
    }


    return function patch(oldVnode, vnode, hydrating, removeOnly) {
        if (isUndef(vnode)) {
            if (isDef(oldVnode)) invokeDestroyHook(oldVnode)
            return
        }

        let isInitialPatch = false
        const insertedVnodeQueue = []

        if (isUndef(oldVnode)) {
            // empty mount (likely as component), create new root element
            isInitialPatch = true
            createElm(vnode, insertedVnodeQueue)
        } else {
            const isRealElement = isDef(oldVnode.nodeType)
            if (!isRealElement && sameVnode(oldVnode, vnode)) {
                // patch existing root node
                patchVnode(oldVnode, vnode, insertedVnodeQueue, removeOnly)
            } else {
                if (isRealElement) {
                    // mounting to a real element
                    // check if this is server-rendered content and if we can perform
                    // a successful hydration.
                    if (oldVnode.nodeType === 1 && oldVnode.hasAttribute(SSR_ATTR)) {
                        oldVnode.removeAttribute(SSR_ATTR)
                        hydrating = true
                    }
                    if (isTrue(hydrating)) {
                        if (hydrate(oldVnode, vnode, insertedVnodeQueue)) {
                            invokeInsertHook(vnode, insertedVnodeQueue, true)
                            return oldVnode
                        } else if (process.env.NODE_ENV !== 'production') {
                            warn(
                                'The client-side rendered virtual DOM tree is not matching ' +
                                'server-rendered content. This is likely caused by incorrect ' +
                                'HTML markup, for example nesting block-level elements inside ' +
                                '<p>, or missing <tbody>. Bailing hydration and performing ' +
                                'full client-side render.'
                            )
                        }
                    }
                    // either not server-rendered, or hydration failed.
                    // create an empty node and replace it
                    oldVnode = emptyNodeAt(oldVnode)
                }

                // replacing existing element
                const oldElm = oldVnode.elm
                const parentElm = nodeOps.parentNode(oldElm)

                // create new node
                createElm(
                    vnode,
                    insertedVnodeQueue,
                    // extremely rare edge case: do not insert if old element is in a
                    // leaving transition. Only happens when combining transition +
                    // keep-alive + HOCs. (#4590)
                    oldElm._leaveCb ? null : parentElm,
                    nodeOps.nextSibling(oldElm)
                )

                // update parent placeholder node element, recursively
                if (isDef(vnode.parent)) {
                    let ancestor = vnode.parent
                    const patchable = isPatchable(vnode)
                    while (ancestor) {
                        for (let i = 0; i < cbs.destroy.length; ++i) {
                            cbs.destroy[i](ancestor)
                        }
                        ancestor.elm = vnode.elm
                        if (patchable) {
                            for (let i = 0; i < cbs.create.length; ++i) {
                                cbs.create[i](emptyNode, ancestor)
                            }
                            // #6513
                            // invoke insert hooks that may have been merged by create hooks.
                            // e.g. for directives that uses the "inserted" hook.
                            const insert = ancestor.data.hook.insert
                            if (insert.merged) {
                                // start at index 1 to avoid re-invoking component mounted hook
                                for (let i = 1; i < insert.fns.length; i++) {
                                    insert.fns[i]()
                                }
                            }
                        } else {
                            registerRef(ancestor)
                        }
                        ancestor = ancestor.parent
                    }
                }

                // destroy old node
                if (isDef(parentElm)) {
                    removeVnodes(parentElm, [oldVnode], 0, 0)
                } else if (isDef(oldVnode.tag)) {
                    invokeDestroyHook(oldVnode)
                }
            }
        }

        invokeInsertHook(vnode, insertedVnodeQueue, isInitialPatch)
        return vnode.elm
    }
}
createPatchFunction 内部定义了一系列的辅助方法,最终返回了一个 patch 方法,这个方法就赋值给了 vm._update 函数里调用的 vm.__patch__。
在介绍 patch 的方法实现之前,我们可以思考一下为何 Vue.js 源码绕了这么一大圈,把相关代码分散到各个目录。因为前面介绍过,patch 是平台相关的,在 Web 和 Weex 环境,它们把虚拟 DOM 映射到 “平台 DOM” 的方法是不同的,并且对 “DOM” 包括的属性模块创建和更新也不尽相同。因此每个平台都有各自的 nodeOps 和 modules,它们的代码需要托管在 src/platforms 这个大目录下。
而不同平台的 patch 的主要逻辑部分是相同的,所以这部分公共的部分托管在 core 这个大目录下。差异化部分只需要通过参数来区别,这里用到了一个函数柯里化的技巧,通过 createPatchFunction 把差异化参数提前固化,这样不用每次调用 patch 的时候都传递 nodeOps 和 modules 了,这种编程技巧也非常值得学习。
在这里,nodeOps 表示对 “平台 DOM” 的一些操作方法,modules 表示平台的一些模块,它们会在整个 patch 过程的不同阶段执行相应的钩子函数。这些代码的具体实现会在之后的章节介绍。
回到 patch 方法本身,它接收 4个参数,oldVnode 表示旧的 VNode 节点,它也可以不存在或者是一个 DOM 对象;vnode 表示执行 _render 后返回的 VNode 的节点;hydrating 表示是否是服务端渲染;removeOnly 是给 transition-group 用的,之后会介绍。
patch 的逻辑看上去相对复杂,因为它有着非常多的分支逻辑,为了方便理解,我们并不会在这里介绍所有的逻辑,仅会针对我们之前的例子分析它的执行逻辑。之后我们对其它场景做源码分析的时候会再次回顾 patch 方法。
先来回顾我们的例子:
var app = new Vue({
    el: '#app',
    render: function (createElement) {
        return createElement('div', {
            attrs: {
                id: 'app'
            },
        }, this.message)
    },
    data: {
        message: 'Hello Vue!'
    }
})
然后我们在 vm._update 的方法里是这么调用 patch 方法的:
// initial render
vm.$el = vm.__patch__(vm.$el, vnode, hydrating, false /* removeOnly */)
结合我们的例子,我们的场景是首次渲染,所以在执行 patch 函数的时候,传入的 vm.$el 对应的是例子中 id 为 app 的 DOM 对象,这个也就是我们在 index.html 模板中写的 <div id="app">, vm.$el 的赋值是在之前 mountComponent 函数做的,vnode 对应的是调用 render 函数的返回值,hydrating 在非服务端渲染情况下为 false,removeOnly 为 false。
确定了这些入参后,我们回到 patch 函数的执行过程,看几个关键步骤。
const isRealElement = isDef(oldVnode.nodeType)
if (!isRealElement && sameVnode(oldVnode, vnode)) {
    // patch existing root node
    patchVnode(oldVnode, vnode, insertedVnodeQueue, removeOnly)
} else {
    if (isRealElement) {
        // mounting to a real element
        // check if this is server-rendered content and if we can perform
        // a successful hydration.
        if (oldVnode.nodeType === 1 && oldVnode.hasAttribute(SSR_ATTR)) {
            oldVnode.removeAttribute(SSR_ATTR)
            hydrating = true
        }
        if (isTrue(hydrating)) {
            if (hydrate(oldVnode, vnode, insertedVnodeQueue)) {
                invokeInsertHook(vnode, insertedVnodeQueue, true)
                return oldVnode
            } else if (process.env.NODE_ENV !== 'production') {
                warn(
                    'The client-side rendered virtual DOM tree is not matching ' +
                    'server-rendered content. This is likely caused by incorrect ' +
                    'HTML markup, for example nesting block-level elements inside ' +
                    '<p>, or missing <tbody>. Bailing hydration and performing ' +
                    'full client-side render.'
                )
            }
        }
        // either not server-rendered, or hydration failed.
        // create an empty node and replace it
        oldVnode = emptyNodeAt(oldVnode)
    }

    // replacing existing element
    const oldElm = oldVnode.elm
    const parentElm = nodeOps.parentNode(oldElm)

    // create new node
    createElm(
        vnode,
        insertedVnodeQueue,
        // extremely rare edge case: do not insert if old element is in a
        // leaving transition. Only happens when combining transition +
        // keep-alive + HOCs. (#4590)
        oldElm._leaveCb ? null : parentElm,
        nodeOps.nextSibling(oldElm)
    )
}
由于我们传入的 oldVnode 实际上是一个 DOM container,所以 isRealElement 为 true,接下来又通过 emptyNodeAt 方法把 oldVnode 转换成 VNode 对象,然后再调用 createElm 方法,这个方法在这里非常重要,来看一下它的实现:
function createElm(
    vnode,
    insertedVnodeQueue,
    parentElm,
    refElm,
    nested,
    ownerArray,
    index
) {
    if (isDef(vnode.elm) && isDef(ownerArray)) {
        // This vnode was used in a previous render!
        // now it's used as a new node, overwriting its elm would cause
        // potential patch errors down the road when it's used as an insertion
        // reference node. Instead, we clone the node on-demand before creating
        // associated DOM element for it.
        vnode = ownerArray[index] = cloneVNode(vnode)
    }

    vnode.isRootInsert = !nested // for transition enter check
    if (createComponent(vnode, insertedVnodeQueue, parentElm, refElm)) {
        return
    }

    const data = vnode.data
    const children = vnode.children
    const tag = vnode.tag
    if (isDef(tag)) {
        if (process.env.NODE_ENV !== 'production') {
            if (data && data.pre) {
                creatingElmInVPre++
            }
            if (isUnknownElement(vnode, creatingElmInVPre)) {
                warn(
                    'Unknown custom element: <' + tag + '> - did you ' +
                    'register the component correctly? For recursive components, ' +
                    'make sure to provide the "name" option.',
                    vnode.context
                )
            }
        }

        vnode.elm = vnode.ns
            ? nodeOps.createElementNS(vnode.ns, tag)
            : nodeOps.createElement(tag, vnode)
        setScope(vnode)

        /* istanbul ignore if */
        if (__WEEX__) {
            // ...
        } else {
            createChildren(vnode, children, insertedVnodeQueue)
            if (isDef(data)) {
                invokeCreateHooks(vnode, insertedVnodeQueue)
            }
            insert(parentElm, vnode.elm, refElm)
        }

        if (process.env.NODE_ENV !== 'production' && data && data.pre) {
            creatingElmInVPre--
        }
    } else if (isTrue(vnode.isComment)) {
        vnode.elm = nodeOps.createComment(vnode.text)
        insert(parentElm, vnode.elm, refElm)
    } else {
        vnode.elm = nodeOps.createTextNode(vnode.text)
        insert(parentElm, vnode.elm, refElm)
    }
}
createElm 的作用是通过虚拟节点创建真实的 DOM 并插入到它的父节点中。 我们来看一下它的一些关键逻辑,createComponent 方法目的是尝试创建子组件,这个逻辑在之后组件的章节会详细介绍,在当前这个 case 下它的返回值为 false;接下来判断 vnode 是否包含 tag,如果包含,先简单对 tag 的合法性在非生产环境下做校验,看是否是一个合法标签;然后再去调用平台 DOM 的操作去创建一个占位符元素。
vnode.elm = vnode.ns
    ? nodeOps.createElementNS(vnode.ns, tag)
    : nodeOps.createElement(tag, vnode)
接下来调用 createChildren 方法去创建子元素:
createChildren(vnode, children, insertedVnodeQueue)

function createChildren(vnode, children, insertedVnodeQueue) {
    if (Array.isArray(children)) {
        if (process.env.NODE_ENV !== 'production') {
            checkDuplicateKeys(children)
        }
        for (let i = 0; i < children.length; ++i) {
            createElm(children[i], insertedVnodeQueue, vnode.elm, null, true, children, i)
        }
    } else if (isPrimitive(vnode.text)) {
        nodeOps.appendChild(vnode.elm, nodeOps.createTextNode(String(vnode.text)))
    }
}
createChildren 的逻辑很简单,实际上是遍历子虚拟节点,递归调用 createElm,这是一种常用的深度优先的遍历算法,这里要注意的一点是在遍历过程中会把 vnode.elm 作为父容器的 DOM 节点占位符传入。
接着再调用 invokeCreateHooks 方法执行所有的 create 的钩子并把 vnode push 到 insertedVnodeQueue 中。
if (isDef(data)) {
    invokeCreateHooks(vnode, insertedVnodeQueue)
}

function invokeCreateHooks(vnode, insertedVnodeQueue) {
    for (let i = 0; i < cbs.create.length; ++i) {
        cbs.create[i](emptyNode, vnode)
    }
    i = vnode.data.hook // Reuse variable
    if (isDef(i)) {
        if (isDef(i.create)) i.create(emptyNode, vnode)
        if (isDef(i.insert)) insertedVnodeQueue.push(vnode)
    }
}
最后调用 insert 方法把 DOM 插入到父节点中,因为是递归调用,子元素会优先调用 insert,所以整个 vnode 树节点的插入顺序是先子后父。来看一下 insert 方法,它的定义在 src/core/vdom/patch.js 上。
insert(parentElm, vnode.elm, refElm)

function insert(parent, elm, ref) {
    if (isDef(parent)) {
        if (isDef(ref)) {
            if (ref.parentNode === parent) {
                nodeOps.insertBefore(parent, elm, ref)
            }
        } else {
            nodeOps.appendChild(parent, elm)
        }
    }
}
insert 逻辑很简单,调用一些 nodeOps 把子节点插入到父节点中,这些辅助方法定义在 src/platforms/web/runtime/node-ops.js 中:
export function insertBefore(parentNode: Node, newNode: Node, referenceNode: Node) {
    parentNode.insertBefore(newNode, referenceNode)
}

export function appendChild(node: Node, child: Node) {
    node.appendChild(child)
}
其实就是调用原生 DOM 的 API 进行 DOM 操作,看到这里,很多同学恍然大悟,原来 Vue 是这样动态创建的 DOM。
在 createElm 过程中,如果 vnode 节点不包含 tag,则它有可能是一个注释或者纯文本节点,可以直接插入到父元素中。在我们这个例子中,最内层就是一个文本 vnode,它的 text 值取的就是之前的 this.message 的值 Hello Vue!。
再回到 patch 方法,首次渲染我们调用了 createElm 方法,这里传入的 parentElm 是 oldVnode.elm 的父元素,在我们的例子是 id 为 #app div 的父元素,也就是 Body;实际上整个过程就是递归创建了一个完整的 DOM 树并插入到 Body 上。
最后,我们根据之前递归 createElm 生成的 vnode 插入顺序队列,执行相关的 insert 钩子函数,这部分内容我们之后会详细介绍。
总结
那么至此我们从主线上把模板和数据如何渲染成最终的 DOM 的过程分析完毕了,我们可以通过下图更直观地看到从初始化 Vue 到最终渲染的整个过程。
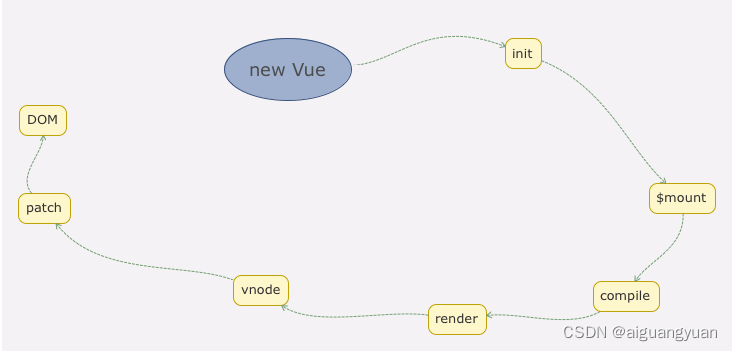
我们这里只是分析了最简单和最基础的场景,在实际项目中,我们是把页面拆成很多组件的,Vue 另一个核心思想就是组件化。那么下一章我们就来分析 Vue 的组件化过程。



![[足式机器人]Part2 Dr. CAN学习笔记-自动控制原理Ch1-1开环系统与闭环系统Open/Closed Loop System](https://img-blog.csdnimg.cn/direct/c8b811d78b0c43c7be47bd44f76ded14.png)
