文章目录
- 1 前言
- 2 django.contrib.auth
- 3 使用django的用户认证系统
- 3.1 创建一个新的django项目
- 3.2 做数据库迁移
- 3.3 auth_user表结构
- 3.4 创建一个新用户
- 3.5 User对象
- 3.5.1 创建用户 create_user
- 3.5.2 request.user
- 3.5.3 用户在视图函数中登录
- 3.5.4 关键函数
- 3.6 保护视图函数的方法
- 3.6.1 方式一
- 3.6.2 使用login_required装饰器
- 3.6.3 使用CBV
- 4 密码验证与修改
- 5 自定义认证系统
1 前言
Django是一个大而全的python web框架,Django 自带一个用户验证系统。它负责处理用户账号、组、权限和基于cookie的用户会话。
一般用户验证系统有两方面的功能,分别是认证和权限:
-
认证
判断这个用户是不是本系统的用户
-
权限
权限决定已经认证后的用户具备哪些权限,可以完成哪些操作
2 django.contrib.auth
通过命令行新建一个django项目:
django-admin startproject project_name
settings文件中会自动安装auth app
在INSTALL_APPS 配置中:
‘django.contrib.auth’ 包含了验证框架的内核和它的默认模型。
‘django.contrib.contenttypes’ 是 Django content type system ,允许你创建的模型和权限相关联。
# Application definition

INSTALLED_APPS = [
    "django.contrib.admin",
    "django.contrib.auth",
    "django.contrib.contenttypes",
    "django.contrib.sessions",
    "django.contrib.messages",
    "django.contrib.staticfiles",
    'app01.apps.App01Config',
]
在MIDDLEWARE 配置中:
SessionMiddleware 通过请求管理 sessions 。
AuthenticationMiddleware 使用会话将用户和请求关联。
	MIDDLEWARE = [
    "django.middleware.security.SecurityMiddleware",
    "django.contrib.sessions.middleware.SessionMiddleware",
    "django.middleware.common.CommonMiddleware",
    "django.middleware.csrf.CsrfViewMiddleware",
    "django.contrib.auth.middleware.AuthenticationMiddleware",
    "django.contrib.messages.middleware.MessageMiddleware",
    "django.middleware.clickjacking.XFrameOptionsMiddleware",
]
3 使用django的用户认证系统
3.1 创建一个新的django项目
3.2 做数据库迁移
PS E:\coding\django_demo_20221230> python .\manage.py makemigrations
No changes detected
PS E:\coding\django_demo_20221230> python .\manage.py migrate
Operations to perform:
  Apply all migrations: admin, auth, contenttypes, sessions
Running migrations:
  Applying contenttypes.0001_initial... OK
  Applying auth.0001_initial... OK
  Applying admin.0001_initial... OK
  Applying admin.0002_logentry_remove_auto_add... OK
  Applying admin.0003_logentry_add_action_flag_choices... OK
  Applying contenttypes.0002_remove_content_type_name... OK
  Applying auth.0002_alter_permission_name_max_length... OK
  Applying auth.0003_alter_user_email_max_length... OK
  Applying auth.0004_alter_user_username_opts... OK
  Applying auth.0005_alter_user_last_login_null... OK
  Applying auth.0006_require_contenttypes_0002... OK
  Applying auth.0007_alter_validators_add_error_messages... OK
  Applying auth.0008_alter_user_username_max_length... OK
  Applying auth.0009_alter_user_last_name_max_length... OK
  Applying auth.0010_alter_group_name_max_length... OK
  Applying auth.0011_update_proxy_permissions... OK
  Applying auth.0012_alter_user_first_name_max_length... OK
  Applying sessions.0001_initial... OK
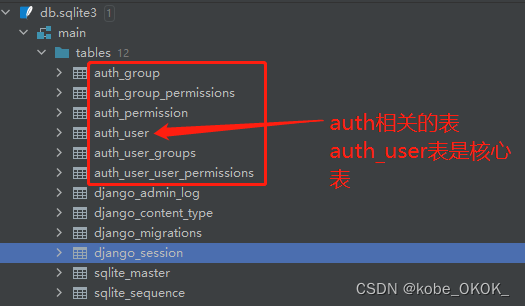
3.3 auth_user表结构
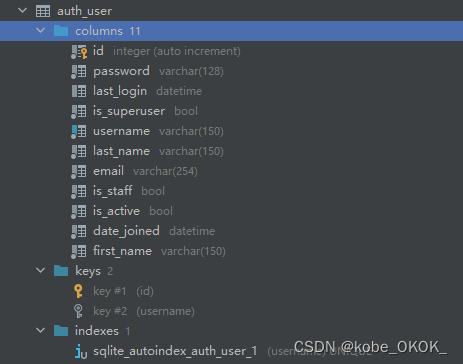
id:自增主键
password:密码
last_login:最后一次登录时间
is_superuser: 是否为超级用户
username 用户名
last_name 姓氏
email 邮箱
is_staff 是否为员工
is_active 是否激活
data_joined 创建时间
first_name 名字
3.4 创建一个新用户
注意: django使用命令行只能创建超级用户。
PS E:\coding\django_demo_20221230> python .\manage.py createsuperuser
Username (leave blank to use 'administrator'): kobe
Email address: kobe@qq.com
Password:
Password (again):
This password is too short. It must contain at least 8 characters.
This password is too common.
This password is entirely numeric.
Bypass password validation and create user anyway? [y/N]: y
Superuser created successfully.
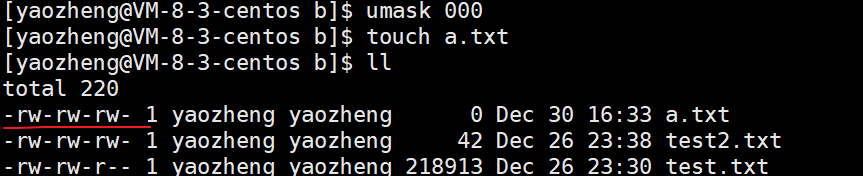
查看数据库表中新增的记录

注意:这里的时间是UTC时间,创建用户的时候都是英文的。通过修改配置文件实现中文和中国时区
配置文件settings.py:
默认:
# LANGUAGE_CODE = "en-us"
# TIME_ZONE = "UTC"
# USE_TZ = True
调整为:
LANGUAGE_CODE = 'zh-Hans'  #改语言为中文
TIME_ZONE = 'Asia/Shanghai'   #改时区为上海
USE_TZ = False   #为False时,存到数据库的时间不使用标准时区
再次创建一个用户
PS E:\coding\django_demo_20221230> python .\manage.py createsuperuser
用户名 (leave blank to use 'administrator'): james
电子邮件地址: james@qq.com
Password:
Password (again):
密码长度太短。密码必须包含至少 8 个字符。
这个密码太常见了。
密码只包含数字。
Bypass password validation and create user anyway? [y/N]: y
Superuser created successfully.
这里的提示变成了中文
再看数据库中的新记录

以上都是铺垫,下面开始正题,开始说怎么使用django自带的认证系统。
3.5 User对象
用户对象是认证系统的核心。它通常代表了与你的站点交互的人员,并用于允许诸如限制访问、注册用户配置文件、将内容与创建者关联等功能。Django 的认证框架中用户只有一个类,例如 “超级管理员”或“普通管理员”只是具有特殊属性集的用户对象,而不是用户对象的不同类。
3.5.1 创建用户 create_user
PS E:\coding\django_demo_20221230> python .\manage.py shell
Python 3.8.5 (tags/v3.8.5:580fbb0, Jul 20 2020, 15:57:54) [MSC v.1924 64 bit (AMD64)] on win32
Type "help", "copyright", "credits" or "license" for more information.
(InteractiveConsole)
>>> from django.contrib.auth import User
# 正确用法
>>> user = User.objects.create_user('paul', 'paul@qq.com', '123456')
>>> user.save()
# 错误用法
>>> user = User.objects.create_user("wade")
>>> user.password = "123456"
>>> user.email = "wade@qq.com"
>>> user.save()
注意: 不能使用user.password的方式设置密码,原因是因为在create_user函数的源码中,将密码进行了hash加密处理

3.5.2 request.user
Django 使用 sessions 和中间件将身份验证系统挂接到请求对象中。
它们在每次请求中都会提供 request.user 属性。如果当前没有用户登录,这个属性将会被设置为 AnonymousUser ,否则将会被设置为 User 实例。
认证用户视图函数(FBV)用法
def index(request, *args, **kwargs):
	if request.user.is_authenticated:
		# 认证用户
	else:
		# 匿名用户
实际例子
-
project/urls.py
from django.contrib import admin from django.urls import path, include urlpatterns = [ path("admin/", admin.site.urls), path('index/', include("app01.urls")) # 路由分发 ] -
app01.urls.py
from django.urls import path from . import views urlpatterns = [ path('', views.index, name='index'), path('login', views.login, name='login') ] -
app01.views.py
def index(request, *args, **kwargs):
    if request.user.is_authenticated:
        return HttpResponse(f'welcome {request.user.get_username()}')  # 返回首页
    else:
        return redirect('login') # 重定向到登录页面
def login(request, *args, **kwargs):
    if request.method == 'GET':
        return render(request, 'app01/login.html')
3.5.3 用户在视图函数中登录
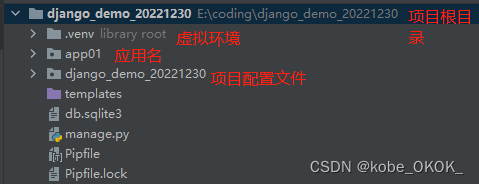
项目结构
├─app01
│  │  admin.py
│  │  apps.py
│  │  models.py
│  │  tests.py
│  │  urls.py  # url路由
│  │  views.py  # 视图
│  │  __init__.py
│  │
│  ├─migrations
│  │  │  __init__.py
├─django_demo_20221230
│  │  asgi.py
│  │  settings.py  # 配置
│  │  urls.py      # 总路由
│  │  wsgi.py
│  │  __init__.py
├─templates
│  └─app01         # 模板
│          index.html  # 首页模板
│          login.html  # 登录模板
-
django_demo_20221230.urls.py 项目级路由
from django.contrib import admin from django.urls import path, include urlpatterns = [ path("admin/", admin.site.urls), path('index/', include("app01.urls")) # 路由分发 ] -
app01/urls.py 应用分路由
from django.urls import path from . import views urlpatterns = [ path('', views.index, name='index'), path('login', views._login, name='login'), path('logout', views._logout, name='logout'), ] -
app01/views.py 视图函数
from django.shortcuts import render, redirect from django.contrib.auth import authenticate, login, logout def index(request, *args, **kwargs): if request.user.is_authenticated: return render(request, 'app01/index.html', context={'user': request.user.get_username()}) else: return redirect('login') def _login(request, *args, **kwargs): if request.method == 'GET': return render(request, 'app01/login.html') else: username = request.POST.get('username') password = request.POST.get('password') user = authenticate(request, username=username, password=password) if user is not None: login(request, user) return redirect('index') else: return render(request, 'app01/login.html', context={'msg': '登陆失败'}) def _logout(request, *args, **kwargs): logout(request) return redirect('index') -
templates/app01/index.html
<!DOCTYPE html> <html lang="en"> <head> <meta charset="UTF-8"> <title>Index</title> </head> <body> <h1>欢迎用户: {{ user }}</h1> <form action="/index/logout"> <input type="submit" value="logout"/> </form> </body> </html> -
templates/app01/login.html
<!DOCTYPE html>
<html lang="en">
<head>
    <meta charset="UTF-8">
    <title>Login </title>
</head>
<body>
<h1>登录界面</h1>
<form action="/index/login" method="post">
    {% csrf_token %}
    <label for="id_username">用户名</label>
    <input type="text" name="username" id="id_username"> <br>
    <label for="id_password">密码</label>
    <input type="password" name="password" id="id_password"> <br>
    <input type="submit" value="登录"/> <br>
</form>
</body>
</html>
3.5.4 关键函数
-
request.user.is_authenticated 判断用户是否认证
判断用户是否是认证过的,返回True 或者 False
-
authenticate 认证函数
user = authenticate(request, username=username, password=password)
user返回None或者User对象 -
login 登录函数
login(request, user)
-
logout 登出函数
logout(request) 没有返回值
3.6 保护视图函数的方法
对于未认证的用户不能让他访问到视图函数,以这种方式来保护系统资源。
3.6.1 方式一
限制访问页面最原始的办法就是检查 request.user.is_authenticated 并重定向到登录页面。
from django.conf import settings
from django.shortcuts import redirect

def my_view(request):
    if not request.user.is_authenticated:
        return redirect('%s?next=%s' % (settings.LOGIN_URL, request.path))
    # ...
或者直接显示一个错误的模板:
from django.shortcuts import render

def my_view(request):
    if not request.user.is_authenticated:
        return render(request, 'myapp/login_error.html')
    # ...
3.6.2 使用login_required装饰器
@login_required(login_url='/index/login')
def index(request, *args, **kwargs):
    return render(request, 'app01/index.html', context={'user': request.user.get_username()})
3.6.3 使用CBV
class IndexView(LoginRequiredMixin, View):

    login_url = '/index/login'
    redirect_field_name = 'redirect_to'

    def get(self, request, *args, **kwargs):
        return render(request, 'app01/info.html')
LoginRequiredMixin的原理很简单:
class LoginRequiredMixin(AccessMixin):
    """Verify that the current user is authenticated."""

    def dispatch(self, request, *args, **kwargs):
        if not request.user.is_authenticated: # 如果没有验证通过直接返回
            return self.handle_no_permission()
        return super().dispatch(request, *args, **kwargs)
4 密码验证与修改
前面通过auth_user表可以发现,密码是通过哈希加密的
没必要关注细节是怎么实现的,知道设置密码、修改密码就可以了
class PasswordView(LoginRequiredMixin, View):
    login_url = '/index/login'
    redirect_field_name = 'redirect_to'

    def get(self, request, *args, **kwargs):
        return render(request, 'app01/password.html', context={'user': request.user.get_username()})

    def post(self, request, *args, **kwargs):
        oldpwd = request.POST.get('oldpwd')
        pwd = request.POST.get('pwd')
        pwd2 = request.POST.get('pwd2')
        #result = check_password(oldpwd, request.user.password)
        result = request.user.check_password(oldpwd)
        if not result:
            return HttpResponse('原密码输入错误')
        else:
            if pwd != pwd2:
                return HttpResponse('两次输入的密码不一致')
            else:
                request.user.set_password(pwd)
                request.user.save()
                return redirect('login')
关键函数
- request.user.check_password(oldpwd)
返回一个布尔型,如果密码正确返回True,否则返回False - request.user.set_password(pwd)
修改密码
5 自定义认证系统
虽然django的auth模块已经能够满足大部分的场景需求,但是有一些场景需要进行定制认证系统。
这里是一个兼容admin的自定义的用户app的例子。这个用户模型使用 email 地址作为username,并且生日是必填字段;除了用户账户上的 admin flag之外,它本身不提供权限检查。除用户创建的表单外,此模型和所有内置的身份验证表单和视图兼容。此例只是说明了大多数组件如何协同工作,不要直接复制到生产环境里。
这段代码将一直存在于 models.py 文件中,用于自定义身份验证 app:
from django.db import models
from django.contrib.auth.models import (
    BaseUserManager, AbstractBaseUser
)


class MyUserManager(BaseUserManager):
    def create_user(self, email, date_of_birth, password=None):
        """
        Creates and saves a User with the given email, date of
        birth and password.
        """
        if not email:
            raise ValueError('Users must have an email address')

        user = self.model(
            email=self.normalize_email(email),
            date_of_birth=date_of_birth,
        )

        user.set_password(password)
        user.save(using=self._db)
        return user

    def create_superuser(self, email, date_of_birth, password=None):
        """
        Creates and saves a superuser with the given email, date of
        birth and password.
        """
        user = self.create_user(
            email,
            password=password,
            date_of_birth=date_of_birth,
        )
        user.is_admin = True
        user.save(using=self._db)
        return user


class MyUser(AbstractBaseUser):
    email = models.EmailField(
        verbose_name='email address',
        max_length=255,
        unique=True,
    )
    date_of_birth = models.DateField()
    is_active = models.BooleanField(default=True)
    is_admin = models.BooleanField(default=False)

    objects = MyUserManager()

    USERNAME_FIELD = 'email'
    REQUIRED_FIELDS = ['date_of_birth']

    def __str__(self):
        return self.email

    def has_perm(self, perm, obj=None):
        "Does the user have a specific permission?"
        # Simplest possible answer: Yes, always
        return True

    def has_module_perms(self, app_label):
        "Does the user have permissions to view the app `app_label`?"
        # Simplest possible answer: Yes, always
        return True

    @property
    def is_staff(self):
        "Is the user a member of staff?"
        # Simplest possible answer: All admins are staff
        return self.is_admin
然后,在 Django 管理后台里注册这个用户模型,下面这些代码必须在 app 的 admin.py 文件里:
from django import forms
from django.contrib import admin
from django.contrib.auth.models import Group
from django.contrib.auth.admin import UserAdmin as BaseUserAdmin
from django.contrib.auth.forms import ReadOnlyPasswordHashField
from django.core.exceptions import ValidationError

from customauth.models import MyUser


class UserCreationForm(forms.ModelForm):
    """A form for creating new users. Includes all the required
    fields, plus a repeated password."""
    password1 = forms.CharField(label='Password', widget=forms.PasswordInput)
    password2 = forms.CharField(label='Password confirmation', widget=forms.PasswordInput)

    class Meta:
        model = MyUser
        fields = ('email', 'date_of_birth')

    def clean_password2(self):
        # Check that the two password entries match
        password1 = self.cleaned_data.get("password1")
        password2 = self.cleaned_data.get("password2")
        if password1 and password2 and password1 != password2:
            raise ValidationError("Passwords don't match")
        return password2

    def save(self, commit=True):
        # Save the provided password in hashed format
        user = super().save(commit=False)
        user.set_password(self.cleaned_data["password1"])
        if commit:
            user.save()
        return user


class UserChangeForm(forms.ModelForm):
    """A form for updating users. Includes all the fields on
    the user, but replaces the password field with admin's
    disabled password hash display field.
    """
    password = ReadOnlyPasswordHashField()

    class Meta:
        model = MyUser
        fields = ('email', 'password', 'date_of_birth', 'is_active', 'is_admin')


class UserAdmin(BaseUserAdmin):
    # The forms to add and change user instances
    form = UserChangeForm
    add_form = UserCreationForm

    # The fields to be used in displaying the User model.
    # These override the definitions on the base UserAdmin
    # that reference specific fields on auth.User.
    list_display = ('email', 'date_of_birth', 'is_admin')
    list_filter = ('is_admin',)
    fieldsets = (
        (None, {'fields': ('email', 'password')}),
        ('Personal info', {'fields': ('date_of_birth',)}),
        ('Permissions', {'fields': ('is_admin',)}),
    )
    # add_fieldsets is not a standard ModelAdmin attribute. UserAdmin
    # overrides get_fieldsets to use this attribute when creating a user.
    add_fieldsets = (
        (None, {
            'classes': ('wide',),
            'fields': ('email', 'date_of_birth', 'password1', 'password2'),
        }),
    )
    search_fields = ('email',)
    ordering = ('email',)
    filter_horizontal = ()


# Now register the new UserAdmin...
admin.site.register(MyUser, UserAdmin)
# ... and, since we're not using Django's built-in permissions,
# unregister the Group model from admin.
admin.site.unregister(Group)
最后,在项目配置文件中的 AUTH_USER_MODEL 里指定自定义的用户模型为默认的用户模型。
AUTH_USER_MODEL = 'customauth.MyUser'