文章目录
- 创建域
- 1.创建域
- 2.输入配置
- 部署选项
- 数据节点
- 网络
- 精细访问控制
- 访问策略
- 获取域端点
- 数据如何插入到OpenSearch Service
- Java连接OpenSearch Service
- spring-data-opensearch
- elasticsearch-rest-high-level-client
- opensearch-rest-client
- opensearch-java
因为是开发测试使用,所以选的都是低配,单机,便宜的配置。
地址:https://aws.amazon.com/cn/opensearch-service/
价格:https://aws.amazon.com/cn/opensearch-service/pricing/
- 实例小时数 +
- 所需的存储量 +
- 传入和传出 Amazon OpenSearch Service 的数据
文档:https://docs.aws.amazon.com/zh_cn/opensearch-service/
创建域
一般在15-30分钟内创建一个OpenSearch集群,所以请尿完尿再来搞,别憋坏了。
1.创建域

2.输入配置
-
域名:后面用java等客户端连接时会在URL中显示。
-
域创建方法:请选择标准创建。
- 轻松创建:快速创建 OpenSearch 域以实现高可用性 含备用节点的多可用区,我们要自定义标准创建便宜点。可以理解为一个产线的标准套餐。
- 标准创建:就是自选套餐。
-
模板:选择开发/测试。

- 部署选项:选择不含备用节点的域,主打的就是便宜能用就行。
- 可用区:选择一个可用区。
- 版本:请选择最新版本。
部署选项

数据节点
- 实例类型:默认是内存优化 - r6g.large.search,2C16G 价格为USD 0.167/H,下面列几个便宜的。
- t3.small.search 2C2G USD 0.036 ,自己用来个最便宜的,又不是不能用。
- t3.medium.search 2C4G USD 0.073
- 节点数:1个就行。
- 存储大小:40G就行。
忽略其他冷热数据存储,专用主节点,快照配置,以及自定义终端节点部分。

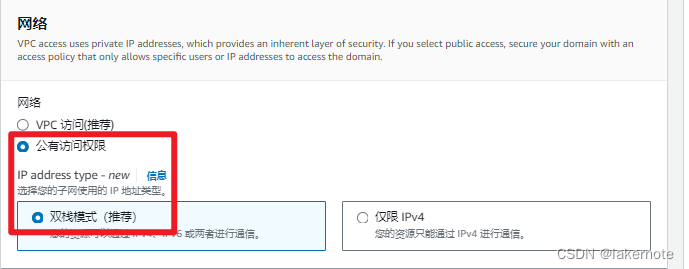
网络
- 网络:选择 Public access(公有访问权限)
- 开发测试环境,选择公共访问权限,生成用VPC访问
精细访问控制
启用细粒度访问控制复选框。选择创建主用户输入用户名和密码,用户名和密码很关键,后面访问dashboard和远程客户端连接都要。
忽略 SAML 身份验证和 Amazon Cognito 身份验证

访问策略
选择 Only use fine-grained access control(仅使用精细访问控制)。
忽略其余设置,然后选择 Create(创建)。新域初始化过程通常需要 15-30 分钟,但可能需要更长的时间,具体取决于配置。

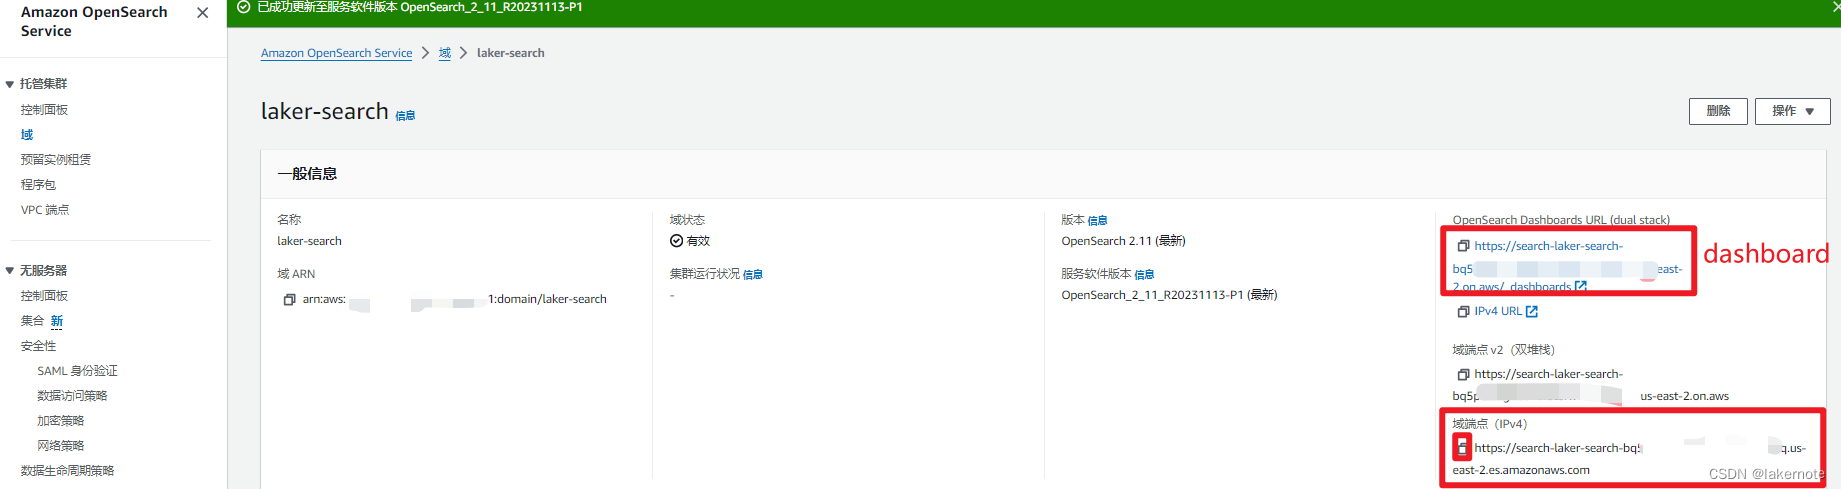
获取域端点
点击创建后,通常需要 15-30 分钟,然后从控制台 -> 域 -> 一般信息 获取域端点。
这里给了IPV6和IPV4的dashboard地址和域端点地址。
数据如何插入到OpenSearch Service
- 对于大规模数据,我们建议使用 Amazon Kinesis Data Firehose,这是一项完全托管的服务,可以自动扩展以匹配您的数据吞吐量,并且不需要进行持续的管理。它还可以在加载数据前对其进行转换、批处理和压缩。
- Amazon OpenSearch Service 支持与 Logstash 的集成。您可以将 Amazon OpenSearch Service 域配置为数据存储,用于存储所有来自 Logstash 的日志。
- 可以使用索引 API 和批量 API 等原生 Elasticsearch(7.10 及更低版本)或 OpenSearch API 将数据加载到域中。
Java连接OpenSearch Service
当使用 Java 连接 OpenSearch 时,有几个选择,包括 Spring Data Elasticsearch/opensearch、原生 Elasticsearch 和 OpenSearch 客户端。下面是每种方式的简要介绍:
- spring-data-xxx
- 原生Elasticsearch
- OpenSearch
建议基本的CRUD用
spring-data-xxx复杂的查询用低级client,如
opensearch-java或
RestClient lowLevelClient = highLevelClient.getLowLevelClient();
lowLevelClient . lowLevelClient.performRequest()
验证分为用户名和密码进行身份验证和AWS访问密钥(Access Key和Secret Key)
我们当前选的精细控制用的是用户名密码验证,后面生产建议改为IAM验证。
spring-data-opensearch
-
Github:https://github.com/opensearch-project/spring-data-opensearch
-
官方示例:https://github.com/opensearch-project/spring-data-opensearch/tree/main/spring-data-opensearch-examples
Spring Boot 3.x
1.添加依赖。
<dependency>
	<groupId>org.opensearch.client</groupId>
	<artifactId>spring-data-opensearch-starter</artifactId>
	<version>1.3.0</version>
</dependency>
2.启动类去除ElasticsearchDataAutoConfiguration自动配置。
@SpringBootApplication(exclude = {ElasticsearchDataAutoConfiguration.class})
public class OpenSearchDemoApplication {
  public static void main(String[] args) {
    SpringApplication.run(OpenSearchDemoApplication.class, args);
  }
}
3.application.yml增加配置
opensearch:
  uris: https://localhost:9200
  username: admin
  password: admin

spring:
  jackson:
    serialization:
      INDENT_OUTPUT: true
4.新增model
import java.math.BigDecimal;
import org.springframework.data.annotation.Id;
import org.springframework.data.elasticsearch.annotations.Document;
import org.springframework.data.elasticsearch.annotations.Field;
import org.springframework.data.elasticsearch.annotations.FieldType;

@Document(indexName = "marketplace")
public class Product {
    @Id
    private String id;

    @Field(type = FieldType.Text, name = "name")
    private String name;

    @Field(type = FieldType.Double, name = "price")
    private BigDecimal price;

    @Field(type = FieldType.Integer, name = "quantity")
    private Integer quantity;

    @Field(type = FieldType.Text, name = "description")
    private String description;

    @Field(type = FieldType.Keyword, name = "vendor")
    private String vendor;
5.新增Repository
import java.math.BigDecimal;
import java.util.List;
import org.opensearch.data.example.model.Product;
import org.springframework.data.elasticsearch.repository.ElasticsearchRepository;
import org.springframework.stereotype.Repository;

@Repository
public interface MarketplaceRepository extends ElasticsearchRepository<Product, String> {
    List<Product> findByNameLikeAndPriceGreaterThan(String name, BigDecimal price);
}
6.新增service
@Service
public class  MarketplaceService {

  private final MarketplaceRepository repository;

  public MyService(MarketplaceRepository repository) {
    this.repository = repository;
  }

  public void doWork() {

    repository.deleteAll();

    Product product = new Product();
    product.setName("xxx");
    product.setxxx("xxx");
    repository.save(product);

    List<Product> results = repository.findByNameLikeAndPriceGreaterThan("Gierke",xx);
 }
}
我们还可以通过RestHighLevelClient获得lowLevelRest()客户端。
  @Autowired
  RestHighLevelClient highLevelClient;

  RestClient lowLevelClient = highLevelClient.getLowLevelClient();

IndexRequest request = new IndexRequest("spring-data")
  .id(randomID())
  .source(singletonMap("feature", "high-level-rest-client"))
  .setRefreshPolicy(IMMEDIATE);
IndexResponse response = highLevelClient.index(request,RequestOptions.DEFAULT);

 // 构建请求
        Request request = new Request("GET", "/your-index-name/_search");

        // 添加请求参数,如果需要的话
        request.addParameter("q", "field:value");

        // 执行请求
        Response response = lowLevelClient.performRequest(request);

        // 处理响应
        int statusCode = response.getStatusLine().getStatusCode();
        String responseBody = EntityUtils.toString(response.getEntity());

        System.out.println("Status Code: " + statusCode);
        System.out.println("Response Body: " + responseBody);
elasticsearch-rest-high-level-client
1.添加依赖
<dependencies>
    <dependency>
        <groupId>org.elasticsearch.client</groupId>
        <artifactId>elasticsearch-rest-high-level-client</artifactId>
        <version>7.10.2</version> <!-- 替换为你使用的OpenSearch版本 -->
    </dependency>
</dependencies>
2.示例代码
import org.elasticsearch.action.index.IndexRequest;
import org.elasticsearch.action.index.IndexResponse;
import org.elasticsearch.action.search.SearchRequest;
import org.elasticsearch.action.search.SearchResponse;
import org.elasticsearch.client.RequestOptions;
import org.elasticsearch.client.RestClient;
import org.elasticsearch.client.RestHighLevelClient;
import org.elasticsearch.common.xcontent.XContentType;
import org.elasticsearch.index.query.QueryBuilders;
import org.elasticsearch.search.builder.SearchSourceBuilder;

import java.io.IOException;
import java.util.HashMap;
import java.util.Map;

public class OpenSearchExample {

    public static void main(String[] args) {
        // OpenSearch连接配置
        String hostname = "your_opensearch_host"; // 替换为你的OpenSearch服务器主机名或IP地址
        int port = 9200; // 替换为你的OpenSearch服务器端口
        String scheme = "https"; // 如果使用HTTPS,否则使用"http"
        String username = "laker";
        String password = "lakerpwd";

        try (RestHighLevelClient client = new RestHighLevelClient(
                RestClient.builder(hostname)
                        .setPort(port)
                        .setScheme(scheme)
                        .setHttpClientConfigCallback(httpClientBuilder ->
                                httpClientBuilder.setDefaultCredentialsProvider(() ->
                                        new org.apache.http.auth.UsernamePasswordCredentials(username, password))
                        )
        )) {
            // 上传数据
            Map<String, Object> jsonMap = new HashMap<>();
            jsonMap.put("field1", "value1");
            jsonMap.put("field2", "value2");

            IndexRequest indexRequest = new IndexRequest("your_index")
                    .id("your_document_id") // 替换为文档的ID
                    .source(jsonMap, XContentType.JSON);

            IndexResponse indexResponse = client.index(indexRequest, RequestOptions.DEFAULT);
            System.out.println("Index created with ID: " + indexResponse.getId());

            // 查询数据
            SearchRequest searchRequest = new SearchRequest("your_index");
            SearchSourceBuilder searchSourceBuilder = new SearchSourceBuilder();
            searchSourceBuilder.query(QueryBuilders.matchAllQuery());
            searchRequest.source(searchSourceBuilder);

            SearchResponse searchResponse = client.search(searchRequest, RequestOptions.DEFAULT);
            // 处理查询结果
            System.out.println("Search hits: " + searchResponse.getHits().getTotalHits());
        } catch (IOException e) {
            e.printStackTrace();
        }
    }
}
opensearch-rest-client
- 文档:https://opensearch.org/docs/latest/clients/java-rest-high-level/
1.添加依赖
        <dependency>
            <groupId>org.opensearch.client</groupId>
            <artifactId>opensearch-rest-high-level-client</artifactId>
            <version>2.11.1</version>
        </dependency>
2.示例代码
import org.apache.http.HttpHost;
import org.apache.http.auth.AuthScope;
import org.apache.http.auth.UsernamePasswordCredentials;
import org.apache.http.client.CredentialsProvider;
import org.apache.http.impl.client.BasicCredentialsProvider;
import org.apache.http.impl.nio.client.HttpAsyncClientBuilder;
import org.opensearch.action.admin.indices.delete.DeleteIndexRequest;
import org.opensearch.action.delete.DeleteRequest;
import org.opensearch.action.delete.DeleteResponse;
import org.opensearch.action.get.GetRequest;
import org.opensearch.action.get.GetResponse;
import org.opensearch.action.index.IndexRequest;
import org.opensearch.action.index.IndexResponse;
import org.opensearch.action.support.master.AcknowledgedResponse;
import org.opensearch.client.RequestOptions;
import org.opensearch.client.RestClient;
import org.opensearch.client.RestClientBuilder;
import org.opensearch.client.RestHighLevelClient;
import org.opensearch.client.indices.CreateIndexRequest;
import org.opensearch.client.indices.CreateIndexResponse;
import org.opensearch.common.settings.Settings;

import java.io.IOException;
import java.util.HashMap;

public class RESTClientSample {

  public static void main(String[] args) throws IOException {

    final CredentialsProvider credentialsProvider = new BasicCredentialsProvider();

    credentialsProvider.setCredentials(AuthScope.ANY,
      new UsernamePasswordCredentials("lakertest", "xxxx"));

    //Create a client.
    RestClientBuilder builder = RestClient.builder(new HttpHost("search-laker-search-xxxx.us-east-2.es.amazonaws.com", 443, "https"))
      .setHttpClientConfigCallback(httpClientBuilder -> httpClientBuilder.setDefaultCredentialsProvider(credentialsProvider));
    RestHighLevelClient client = new RestHighLevelClient(builder);

    //Create a non-default index with custom settings and mappings.
    CreateIndexRequest createIndexRequest = new CreateIndexRequest("custom-index");

    createIndexRequest.settings(Settings.builder() //Specify in the settings how many shards you want in the index.
      .put("index.number_of_shards", 4)
      .put("index.number_of_replicas", 3)
      );
    //Create a set of maps for the index's mappings.
    HashMap<String, String> typeMapping = new HashMap<String,String>();
    typeMapping.put("type", "integer");
    HashMap<String, Object> ageMapping = new HashMap<String, Object>();
    ageMapping.put("age", typeMapping);
    HashMap<String, Object> mapping = new HashMap<String, Object>();
    mapping.put("properties", ageMapping);
    createIndexRequest.mapping(mapping);
    CreateIndexResponse createIndexResponse = client.indices().create(createIndexRequest, RequestOptions.DEFAULT);

    //Adding data to the index.
    IndexRequest request = new IndexRequest("custom-index"); //Add a document to the custom-index we created.
    request.id("1"); //Assign an ID to the document.

    HashMap<String, String> stringMapping = new HashMap<String, String>();
    stringMapping.put("message:", "Testing Java REST client");
    request.source(stringMapping); //Place your content into the index's source.
    IndexResponse indexResponse = client.index(request, RequestOptions.DEFAULT);

    // 查询
    GetRequest getRequest = new GetRequest("custom-index", "1");
    GetResponse response = client.get(getRequest, RequestOptions.DEFAULT);

    System.out.println(response.getSourceAsString());

    // 删除文档
    DeleteRequest deleteDocumentRequest = new DeleteRequest("custom-index", "1"); //Index name followed by the ID.
    DeleteResponse deleteResponse = client.delete(deleteDocumentRequest, RequestOptions.DEFAULT);

    // 删除索引
    DeleteIndexRequest deleteIndexRequest = new DeleteIndexRequest("custom-index"); //Index name.
    AcknowledgedResponse deleteIndexResponse = client.indices().delete(deleteIndexRequest, RequestOptions.DEFAULT);

    client.close();
  }
}
opensearch-java
- 文档:https://opensearch.org/docs/latest/clients/java/
- 示例代码:https://github.com/opensearch-project/opensearch-java/tree/main/samples
- 里面很详细,包含knn部分。
<dependency>
  <groupId>org.opensearch.client</groupId>
  <artifactId>opensearch-java</artifactId>
  <version>2.8.1</version>
</dependency>
@Data
public class IndexData {
    private String title;
    private String text;

    public IndexData() {
    }
    public IndexData(String title, String text) {
        this.title = title;
        this.text = text;
    }
}
import org.apache.http.HttpHost;
import org.apache.http.auth.AuthScope;
import org.apache.http.auth.UsernamePasswordCredentials;
import org.apache.http.client.CredentialsProvider;
import org.apache.http.impl.client.BasicCredentialsProvider;
import org.opensearch.client.RestClient;
import org.opensearch.client.json.jackson.JacksonJsonpMapper;
import org.opensearch.client.opensearch.OpenSearchClient;
import org.opensearch.client.opensearch._types.mapping.IntegerNumberProperty;
import org.opensearch.client.opensearch._types.mapping.Property;
import org.opensearch.client.opensearch._types.mapping.TypeMapping;
import org.opensearch.client.opensearch.core.IndexRequest;
import org.opensearch.client.opensearch.core.SearchResponse;
import org.opensearch.client.opensearch.indices.CreateIndexRequest;
import org.opensearch.client.opensearch.indices.DeleteIndexRequest;
import org.opensearch.client.opensearch.indices.IndexSettings;
import org.opensearch.client.transport.OpenSearchTransport;
import org.opensearch.client.transport.rest_client.RestClientTransport;

import java.io.IOException;

public class OpenSearchClientExample {
    public static void main(String[] args) throws IOException {

        final CredentialsProvider credentialsProvider = new BasicCredentialsProvider();
        credentialsProvider.setCredentials(AuthScope.ANY,
                new UsernamePasswordCredentials("admin", "admin"));

        // 私有 opensearch
        RestClient restClient = RestClient.builder(new HttpHost("localhost", 9200, "https")).
                setHttpClientConfigCallback(httpClientBuilder -> httpClientBuilder.setDefaultCredentialsProvider(credentialsProvider)).build();
        OpenSearchTransport transport = new RestClientTransport(restClient, new JacksonJsonpMapper());
        OpenSearchClient client = new OpenSearchClient(transport);

        //Create the index
        String indexName = "sample-index";
        //Add some settings to the index
        IndexSettings settings = new IndexSettings.Builder().numberOfShards("2").numberOfReplicas("1").build();
        TypeMapping mapping = new TypeMapping.Builder().properties(
                "age",
                new Property.Builder().integer(new IntegerNumberProperty.Builder().build()).build()
        ).build();
        CreateIndexRequest createIndexRequest = new CreateIndexRequest.Builder().index(indexName)
                .settings(settings)
                .mappings(mapping)
                .build();
        client.indices().create(createIndexRequest);

        //Index some data

        IndexData indexData = new IndexData("Document 1", "Text for document 1");
        IndexRequest<IndexData> indexRequest = new IndexRequest.Builder<IndexData>().index(indexName)
                .id("1")
                .document(indexData)
                .build();
        client.index(indexRequest);


        //Search for the document
        SearchResponse<IndexData> searchResponse = client.search(s -> s.index(indexName), IndexData.class);
        for (int i = 0; i < searchResponse.hits().hits().size(); i++) {
            System.out.println(searchResponse.hits().hits().get(i).source());
        }

        //Delete the document
        client.delete(b -> b.index(indexName).id("1"));

        // Delete the index
        DeleteIndexRequest deleteIndexRequest = new DeleteIndexRequest.Builder().index(indexName).build();
        client.indices().delete(deleteIndexRequest);

        try {
            if (restClient != null) {
                restClient.close();
            }
        } catch (IOException e) {
            System.out.println(e.toString());
        }
    }
}