React Router 5
相关理解
SPA
- 单页Web应用(single page web application,SPA)。
- 整个应用只有一个完整的页面。
- 点击页面中的链接不会刷新页面,只会做页面的局部更新。
- 数据都需要通过ajax请求获取, 并在前端异步展现。
路由
-
什么是路由?
- 一个路由就是一个映射关系
(key:value) key为路径,value可能是function或component
- 一个路由就是一个映射关系
-
路由分类
- 后端路由:
- 理解:
value是function, 用来处理客户端提交的请求 - 注册路由:
router.get(path, function(req, res)) - 工作过程:当node接收到一个请求时, 根据请求路径找到匹配的路由, 调用路由中的函数来处理请求, 返回响应数据
- 理解:
- 前端路由:
- 浏览器端路由,
value是component,用于展示页面内容 - 注册路由:
<Route path="/test" component={Test}> - 工作过程:当浏览器的
path变为/test时, 当前路由组件就会变为Test组件
- 浏览器端路由,
- 后端路由:
-
前端路由的基石:history
<!DOCTYPE html> <html lang="en"> <head> <meta charset="UTF-8"> <title>前端路由的基石_history</title> </head> <body> <a href="http://www.atguigu.com" onclick="return push('/test1') ">push test1</a><br><br> <button onClick="push('/test2')">push test2</button><br><br> <button onClick="replace('/test3')">replace test3</button><br><br> <button onClick="back()"><= 回退</button> <button onClick="forword()">前进 =></button> <script type="text/javascript" src="https://cdn.bootcss.com/history/4.7.2/history.js"></script> <script type="text/javascript"> // let history = History.createBrowserHistory() //方法一,直接使用H5推出的history身上的API let history = History.createHashHistory() //方法二,hash值(锚点) function push (path) { history.push(path) return false } function replace (path) { history.replace(path) } function back() { history.goBack() } function forword() { history.goForward() } history.listen((location) => { console.log('请求路由路径变化了', location) }) </script> </body> </html>
react-router-dom
- react的一个插件库;
- 专门用来实现一个SPA应用;
- 基于react的项目基本都会用到此库。
路由的基本使用
原理:点击导航链接引起路径变化,路径变化被router监测到,进行匹配组件;单页面,多组件。
安装React Router 5:
npm i react-router-dom@5
简单案例
组件:
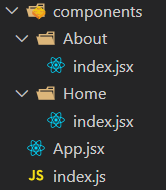
About组件(Home组件同理)
import React, { Component } from 'react'

export default class About extends Component {
  render() {
    return (
      <h3>我是About的内容</h3>
    )
  }
}
App组件
import React, { Component } from 'react'
import {Link, Route} from 'react-router-dom'
import About from './components/About'
import Home from './components/Home'


export default class App extends Component {

    render() {
        return (
            <div>
                <div className="row">
                    <div className="col-xs-offset-2 col-xs-8">
                        <div className="page-header"><h2>React Router Demo</h2></div>
                    </div>
                </div>
                <div className="row">
                    <div className="col-xs-2 col-xs-offset-2">
                        <div className="list-group">
                            {/* 原生html中,靠a标签跳转不同的页面 */}
                            {/* <a className="list-group-item" href="./about.html">About</a>
                            <a className="list-group-item active" href="./home.html">Home</a> */}

                            {/* 在React中靠路由链接实现 --- 编写路由链接 */}
                            <Link className="list-group-item" to="/about">About</Link>
                            <Link className="list-group-item" to="/home">Home</Link>
                        </div>
                    </div>
                    <div className="col-xs-6">
                        <div className="panel">
                            <div className="panel-body">
                                {/* 注册路由 */}
                                <Route path="/about" component={About}/>
                                <Route path="/home" component={Home}/>
                            </div>
                        </div>
                    </div>
                </div>
            </div>
        )
    }
}
index.js
import React from 'react'
import ReactDOM from 'react-dom'
import App from './App'
import {BrowserRouter} from 'react-router-dom'

ReactDOM.render(
    <BrowserRouter><App /></BrowserRouter>,
    document.getElementById('root')
)
注意:
- 整个网页由一个
router管理,即Link标签与Route标签要由同一个BrowserRouter标签包裹,为了方便,可以直接将App组件包裹HashRouter使用#接路由路径,#后面的内容不会传给服务器
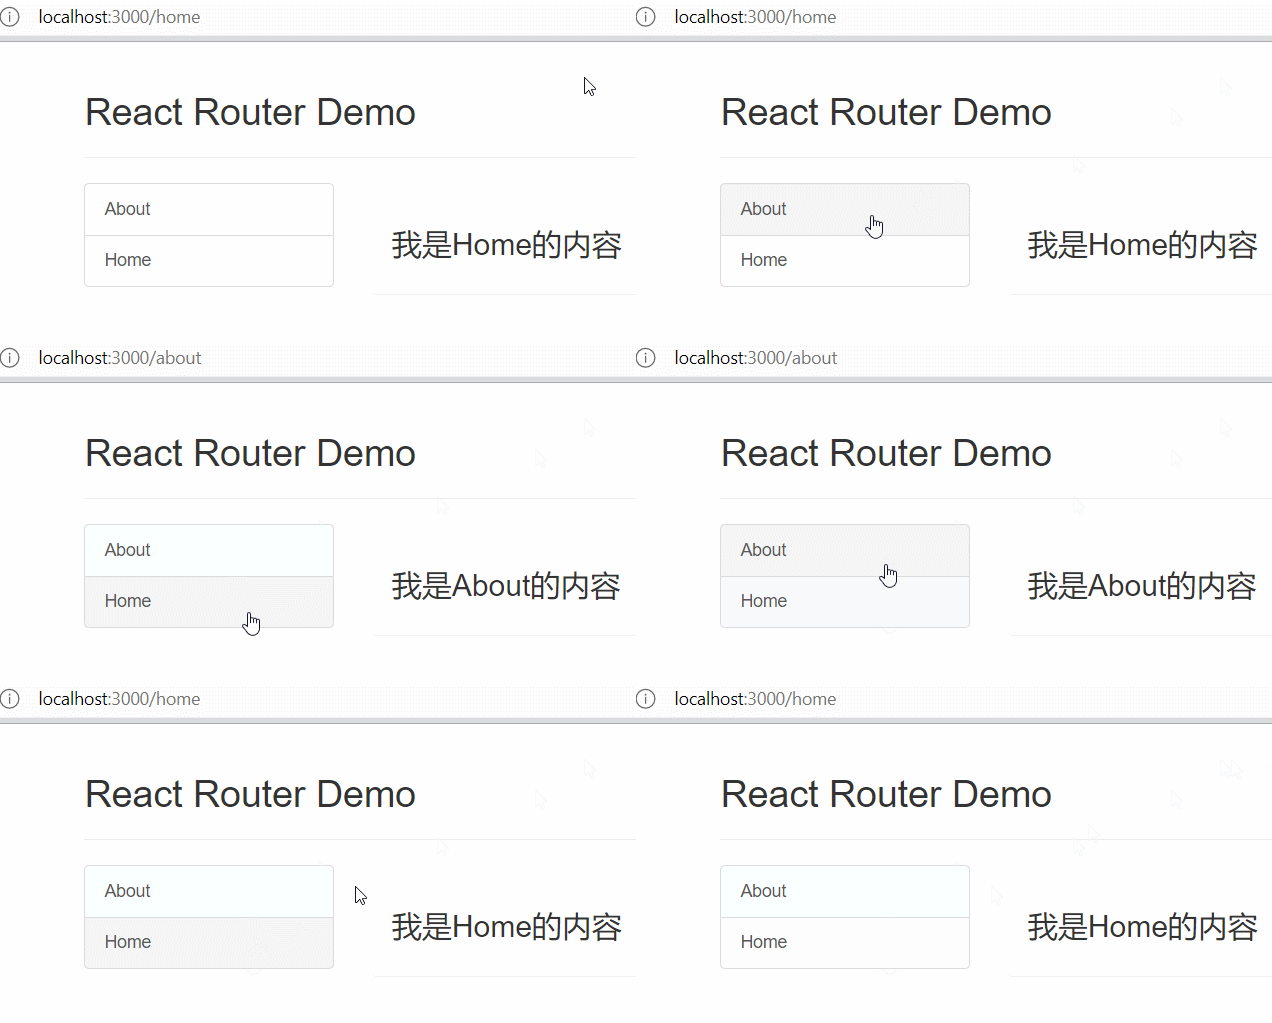
效果:
路由组件和一般组件
import React, { Component } from 'react'
import {Link, Route} from 'react-router-dom'
import About from './pages/About' // About是路由组件
import Home from './pages/Home' // Home是路由组件
import Header from './components/Header' // Header是一般组件


export default class App extends Component {

    render() {
        return (
            <div>
                <div className="row">
                    <div className="col-xs-offset-2 col-xs-8">
                        <Header/>
                    </div>
                </div>
                <div className="row">
                    <div className="col-xs-2 col-xs-offset-2">
                        <div className="list-group">
                            {/* 原生html中,靠a标签跳转不同的页面 */}
                            {/* <a className="list-group-item" href="./about.html">About</a>
                            <a className="list-group-item active" href="./home.html">Home</a> */}

                            {/* 在React中靠路由链接实现 --- 编写路由链接 */}
                            <Link className="list-group-item" to="/about">About</Link>
                            <Link className="list-group-item" to="/home">Home</Link>
                        </div>
                    </div>
                    <div className="col-xs-6">
                        <div className="panel">
                            <div className="panel-body">
                                {/* 注册路由 */}
                                <Route path="/about" component={About}/>
                                <Route path="/home" component={Home}/>
                            </div>
                        </div>
                    </div>
                </div>
            </div>
        )
    }
}
-
写法不同
- 一般组件:
<Demo/> - 路由组件:
<Route path="/demo" component={Demo}/> - 值得注意的是,
React Router 6中component属性已替换为element,参数中可以写为一般组件的形式
- 一般组件:
-
存放位置不同
- 一般组件:
components - 路由组件:
pages
- 一般组件:
-
接收到的
props不同-
一般组件:写组件标签时传递的内容
-
路由组件:接收到固定的属性
history: go: ƒ go(n) goBack: ƒ goBack() goForward: ƒ goForward() push: ƒ push(path, state) replace: ƒ replace(path, state) location: pathname: "/demo" search: "" state: undefined match: params: {} path: "/demo" url: "/demo" -

-
NavLink
NavLink被点击后,会为当前样式追加一个类,默认类名为active,可通过activeClassName修改
例如,在App.css中编写样式(此处使用!important是因为bootstrap的优先级过高:
.my-active {
    background-color: olivedrab !important;
    color: white !important;
}
NavLink如下所示:
<NavLink activeClassName='my-active' className="list-group-item" to="/about">About</NavLink>
<NavLink activeClassName='my-active' className="list-group-item" to="/home">Home</NavLink>
效果:

二次封装NavLink
封装一个MyNavLink,用于指定固定的className与activeClassName,属于一般组件
import React, { Component } from 'react'
import {NavLink} from 'react-router-dom'

export default class MyNavLink extends Component {
    render() {
        return (
            <NavLink activeClassName='my-active' className="list-group-item" {...this.props} />
        )
  }
}
使用时直接写MyNavLink标签即可:
<MyNavLink to="/about">About</MyNavLink> {/* 标签体内容是特殊的标签属性: children */}
<MyNavLink to="/home">Home</MyNavLink>
Switch
注意:在React Router 6中,Switch已被Routes替代
使用<Switch></Switch>将注册的路由包裹起来,匹配路径时只匹配最先出现的组件
<Switch>
	<Route path="/about" component={About}/>
	<Route path="/home" component={Home}/>
</Switch>
- 通常情况下,
path和component是一一对应的关系 Switch可以提高路由匹配效率(单一匹配)
Redirect
当所有路由都无法匹配时,跳转到Redirect指定的路由,一般写在所有路由注册的最下方
{/* 注册路由 */}
<Switch>
    <Route path="/about" component={About}/>
    <Route path="/home" component={Home}/>
    <Redirect to="/about" />
</Switch>
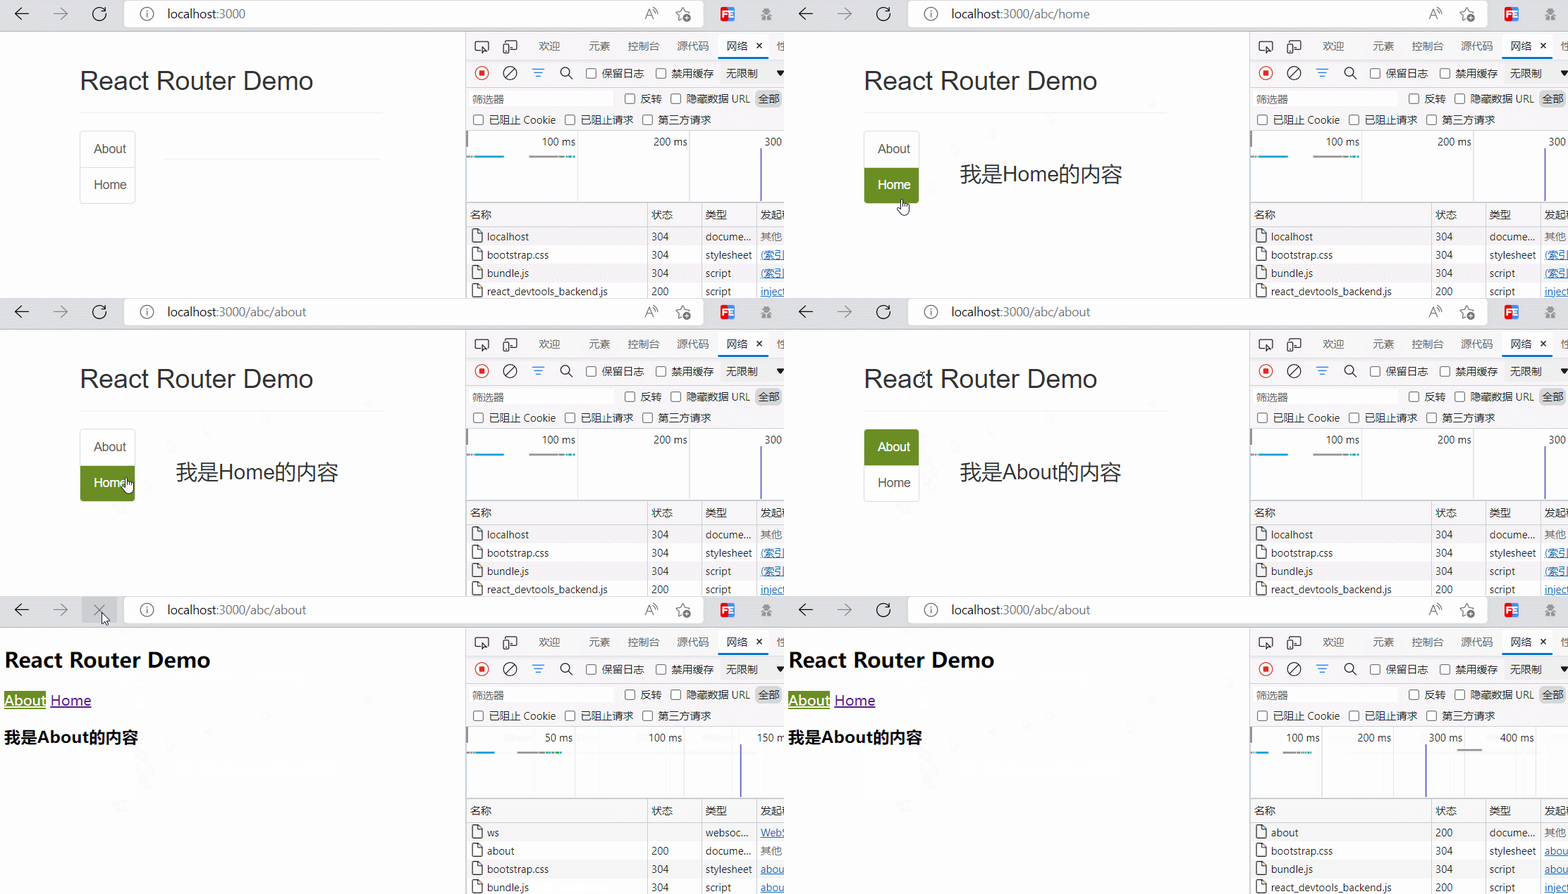
多级路径刷新页面样式丢失
原因:href="./css/bootstrap.css"是从当前路径开始寻找,当多级路径写为如<MyNavLink to="/abc/home">Home</MyNavLink>时,将在/abc下寻找css文件,故刷新后样式会丢失
解决方法:
public/index.html中,css的引入使用<link rel="stylesheet" href="/css/bootstrap.css">- 常用public/index.html中,css的引入使用<link rel="stylesheet" href="%PUBLIC_URL%/css/bootstrap.css">- 常用- 使用
HashRouter
路由的模糊匹配与严格匹配
-
React Router 5默认使用的是模糊匹配,即:输入的路径必须要包含匹配的路径,且顺序要一致 -
开启严格匹配:
<Route exact={true} path="/about" component={About}/> <Route exact path="/home" component={Home}/> -
不要随意开启严格匹配,有需要的时候再使用,开启会导致无法匹配二级路由
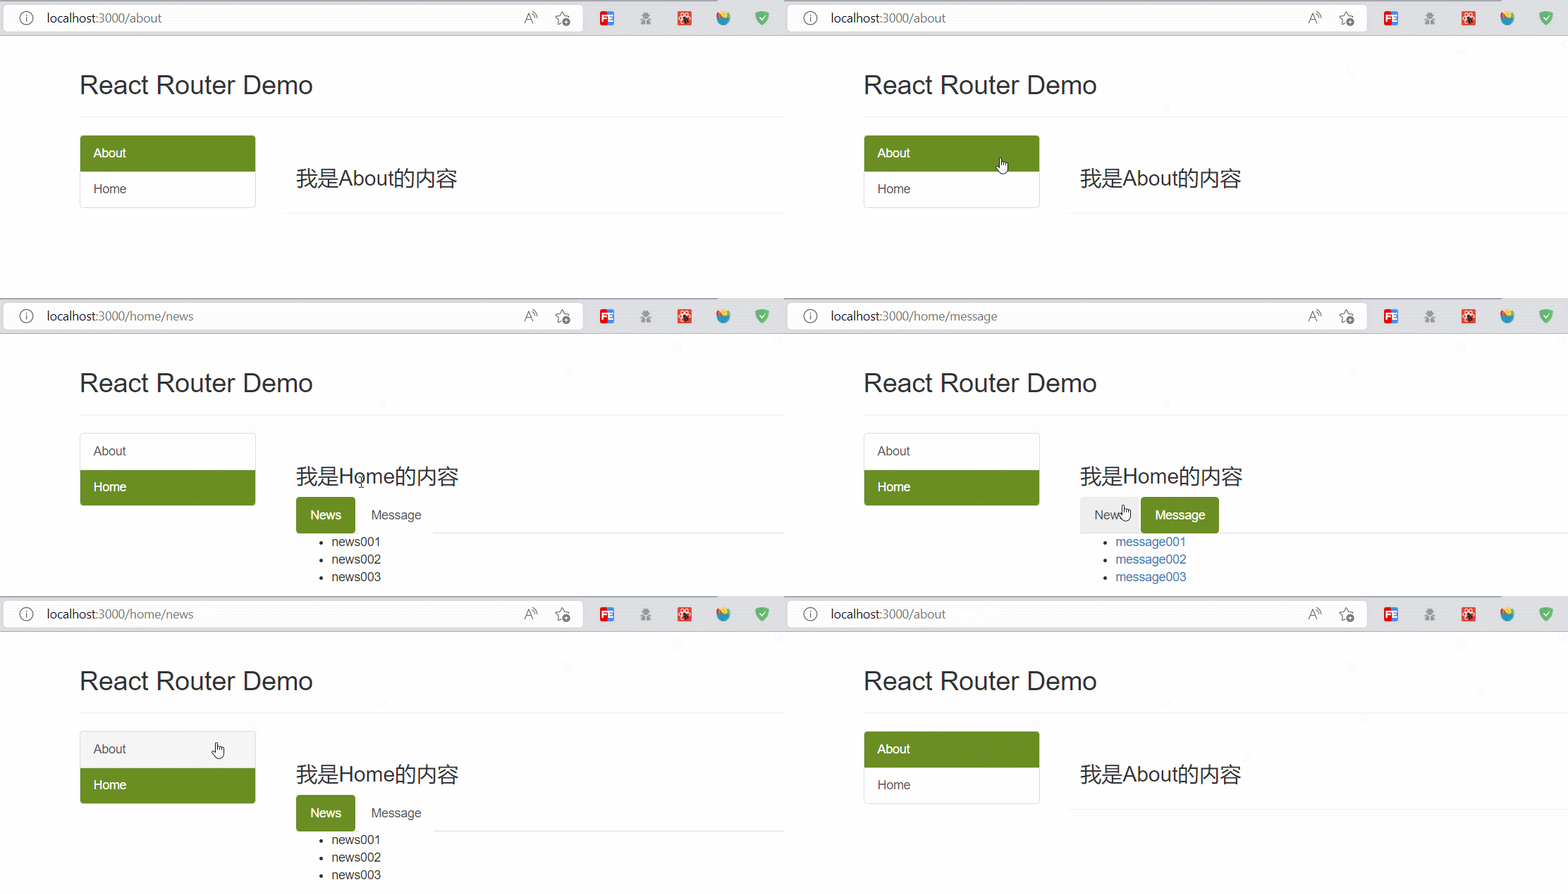
嵌套路由
- 注册子路由时要写上父路由的
path值,否则无法匹配到父级路由 - 路由的匹配是按照注册路由的顺序进行的
Home组件
import React, { Component } from 'react'
import { Switch, Route, Redirect } from 'react-router-dom'
import MyNavLink from '../../components/MyNavLink'
import News from './News'
import Message from './Message'

export default class Home extends Component {
  render() {
    return (
      <div>
        <h3>我是Home的内容</h3>
        <div>
          <ul className="nav nav-tabs">
            <li>
              <MyNavLink to="/home/news">News</MyNavLink>
            </li>
            <li>
              <MyNavLink to="/home/message">Message</MyNavLink>
            </li>
          </ul>
          {/* 注册路由 */}
          <Switch>
            <Route path="/home/news" component={News} />
            <Route path="/home/message" component={Message} />
            <Redirect to="/home/news" />
          </Switch>
        </div>
      </div>
    )
  }
}
向路由组件传参
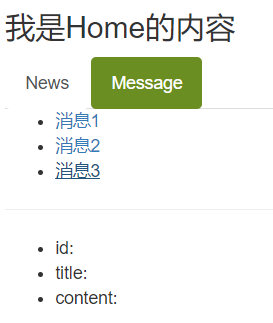
准备工作:声明Detail组件,用来展示message的详情,像这样:
import React, { Component } from 'react'

const detailData = [
    {id: '01', content: '小爱同学'},
    {id: '02', content: '嘿Siri'},
    {id: '03', content: '你好小娜'}
]

export default class Detail extends Component {
    render() {
        return (
            <ul>
                <li>id: </li>
                <li>title: </li>
                <li>content: </li>
            </ul>
        )
    }
}
传递params参数
- 路由链接(携带参数):
<Link to='/demo/test/tom/18'}>详情</Link>- 注册路由(声明接收):
<Route path="/demo/test/:name/:age" component={Test}/>- 接收参数:
this.props.match.params
在Detail组件中console.log(this.props)可以看到如图所示的属性:
Message组件
import React, { Component } from 'react'
import { Link, Route } from 'react-router-dom'
import Detail from './Detail'

export default class Message extends Component {

    state = {
        messageArr: [
            {id: '01', title: '消息1'},
            {id: '02', title: '消息2'},
            {id: '03', title: '消息3'}
        ]
    }

    render() {
        const {messageArr} = this.state
        return (
            <div>
                <ul>
                    {messageArr.map((msgObj) => {
                        return (
                            <li key={msgObj.id}>
                                {/* 向路由组件传递params参数 */}
                                <Link to={`/home/message/detail/${msgObj.id}/${msgObj.title}`}>{msgObj.title}</Link>
                            </li>
                        )
                    })}
                </ul>
                <hr />
                {/* 声明接收params参数 */}
                <Route path="/home/message/detail/:id/:title" component={Detail} />
            </div>
        )
    }
}
Detail组件
import React, { Component } from 'react'

const detailData = [
    {id: '01', content: '小爱同学'},
    {id: '02', content: '嘿Siri'},
    {id: '03', content: '你好小娜'}
]

export default class Detail extends Component {
    render() {
        // 接收params参数
        const {id, title} = this.props.match.params
        const findContent = detailData.find((detailObj) => {
            return detailObj.id === id
        })
        return (
            <ul>
                <li>id: {id}</li>
                <li>title: {title}</li>
                <li>content: {findContent.content}</li>
            </ul>
        )
    }
}
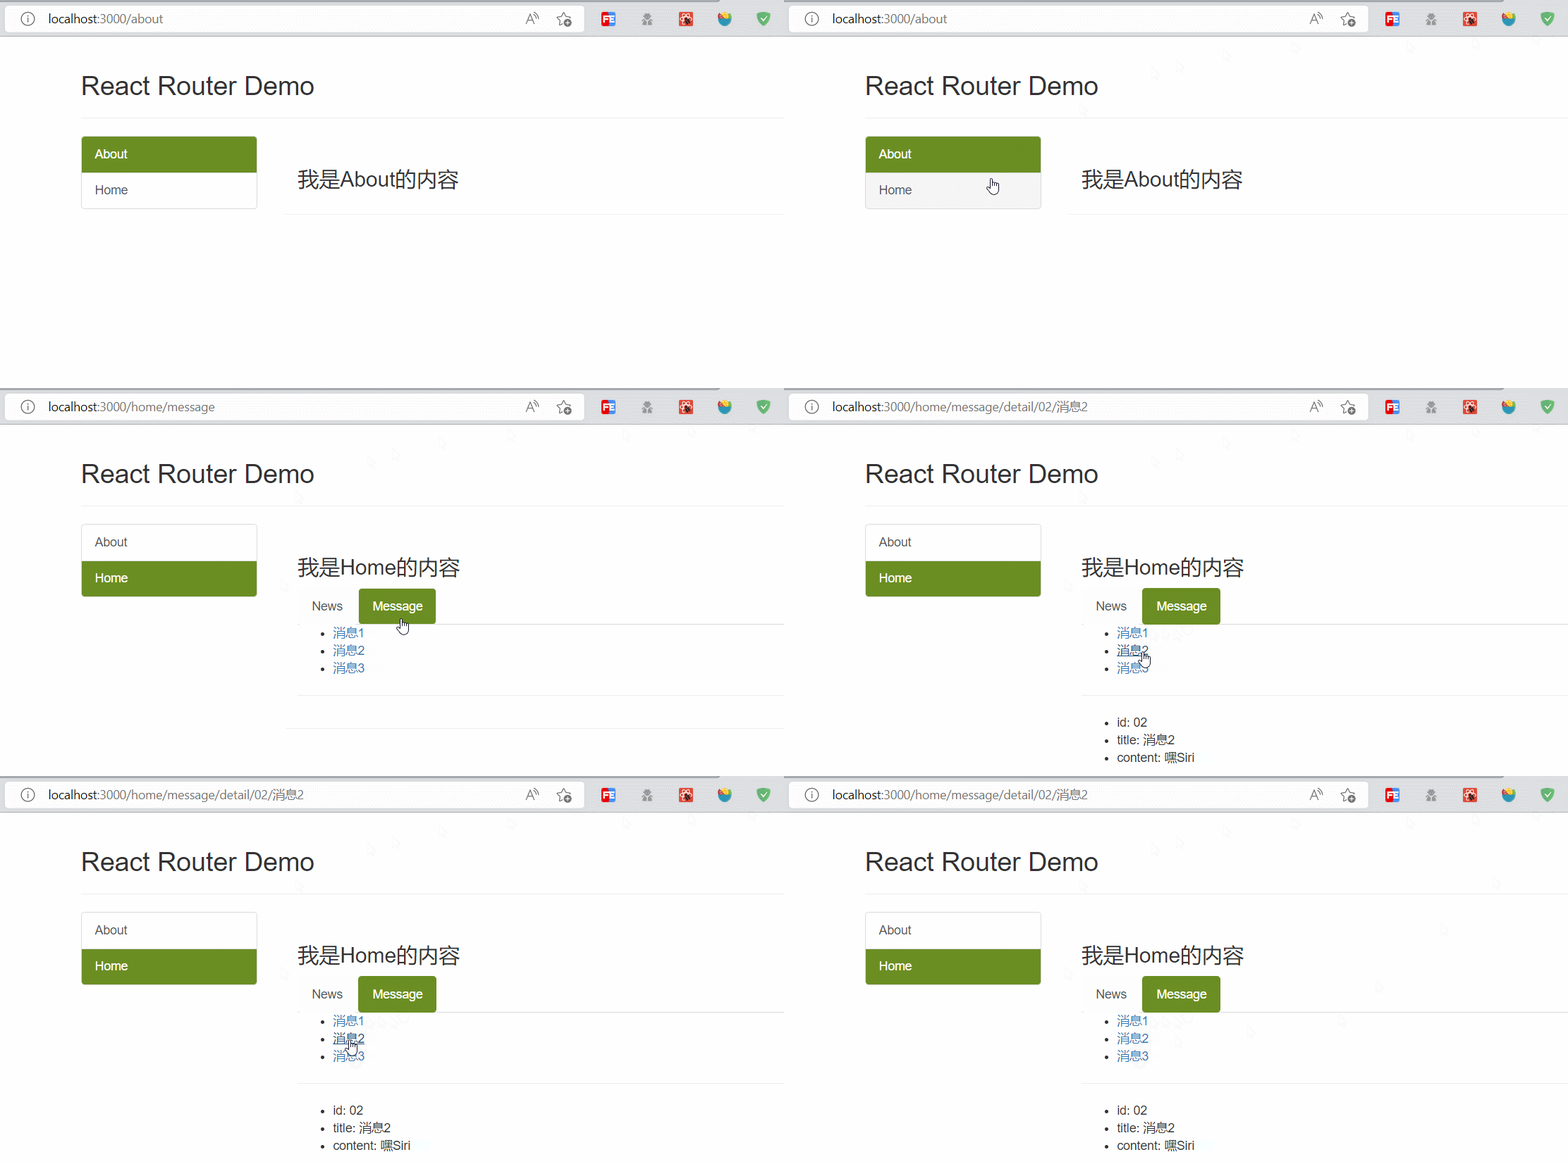
传递search参数
(传递的时候省心一点,接收的时候麻烦一点)
- 路由链接(携带参数):
<Link to='/demo/test?name=tom&age=18'}>详情</Link>- 注册路由(无需声明,正常注册即可):
<Route path="/demo/test" component={Test}/>- 接收参数:
this.props.location.search- 备注:获取到的
search是urlencoded编码字符串,需要借助querystring解析
在Detail组件中console.log(this.props)可以看到如图所示的属性:

Message组件
render() {
    const {messageArr} = this.state
    return (
        <div>
            <ul>
                {messageArr.map((msgObj) => {
                    return (
                        <li key={msgObj.id}>
                            {/* 向路由组件传递search参数 */}
                            <Link to={`/home/message/detail/?id=${msgObj.id}&title=${msgObj.title}`}>{msgObj.title}</Link>
                        </li>
                    )
                })}
            </ul>
            <hr />
            {/* search参数无需声明接收,正常注册路由即可 */}
            <Route path="/home/message/detail" component={Detail} />
        </div>
    )
}
Detail组件
// 接收search参数
const {search} = this.props.location
const {id, title} = qs.parse(search.slice(1))
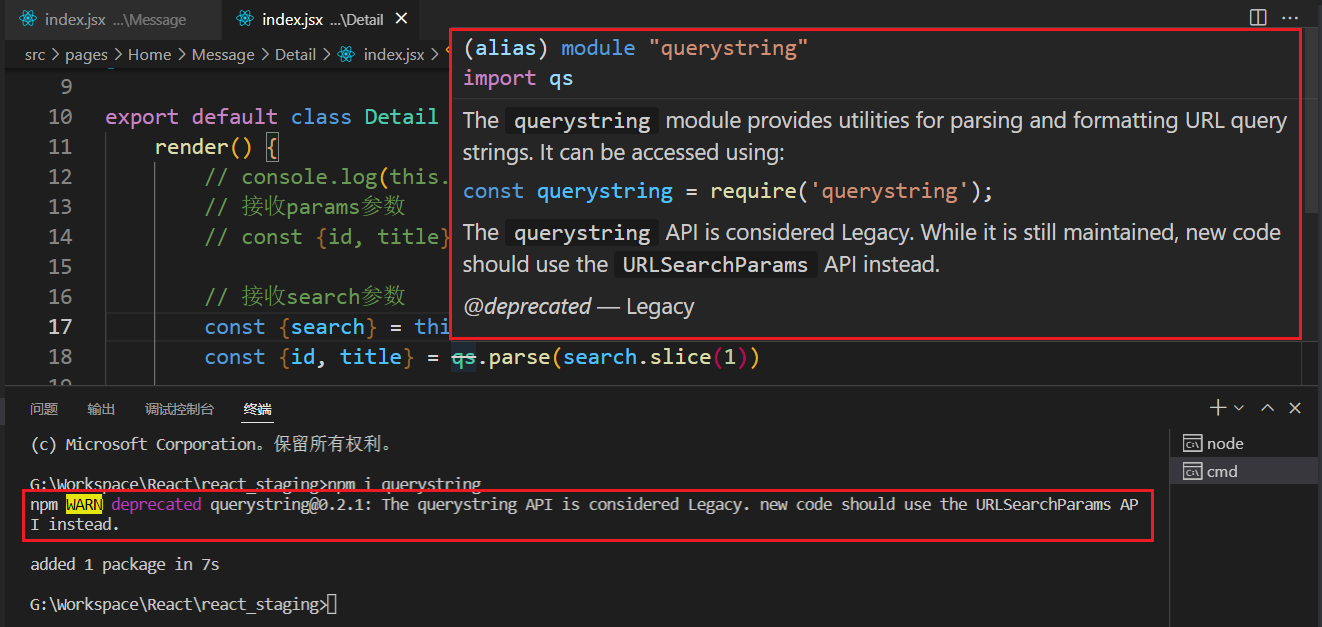
不过qs好像要过时了:
传递state参数
传递的内容不会在地址栏展示,与组件的状态(state)不同
- 路由链接(携带参数):
<Link to={{pathname: '/demo/test', state: {name: 'tom', age: 18}}}>详情</Link>- 注册路由(无需声明,正常注册即可):
<Route path="/demo/test" component={Test}/>- 接收参数:
this.props.location.state- 备注:刷新也可以保留住参数,但清除浏览器数据后不可
- state参数默认
replace=true(猜想)
在Detail组件中console.log(this.props)可以看到如图所示的属性:

Message组件
{/* 向路由组件传递state参数 */}
<Link to={{pathname: '/home/message/detail', state: {id: msgObj.id, title: msgObj.title}}}>{msgObj.title}</Link>

{/* state参数无需声明接收,正常注册路由即可 */}
<Route path="/home/message/detail" component={Detail} />
Detail组件
// 接收state参数
const {id, title} = this.props.location.state || {}
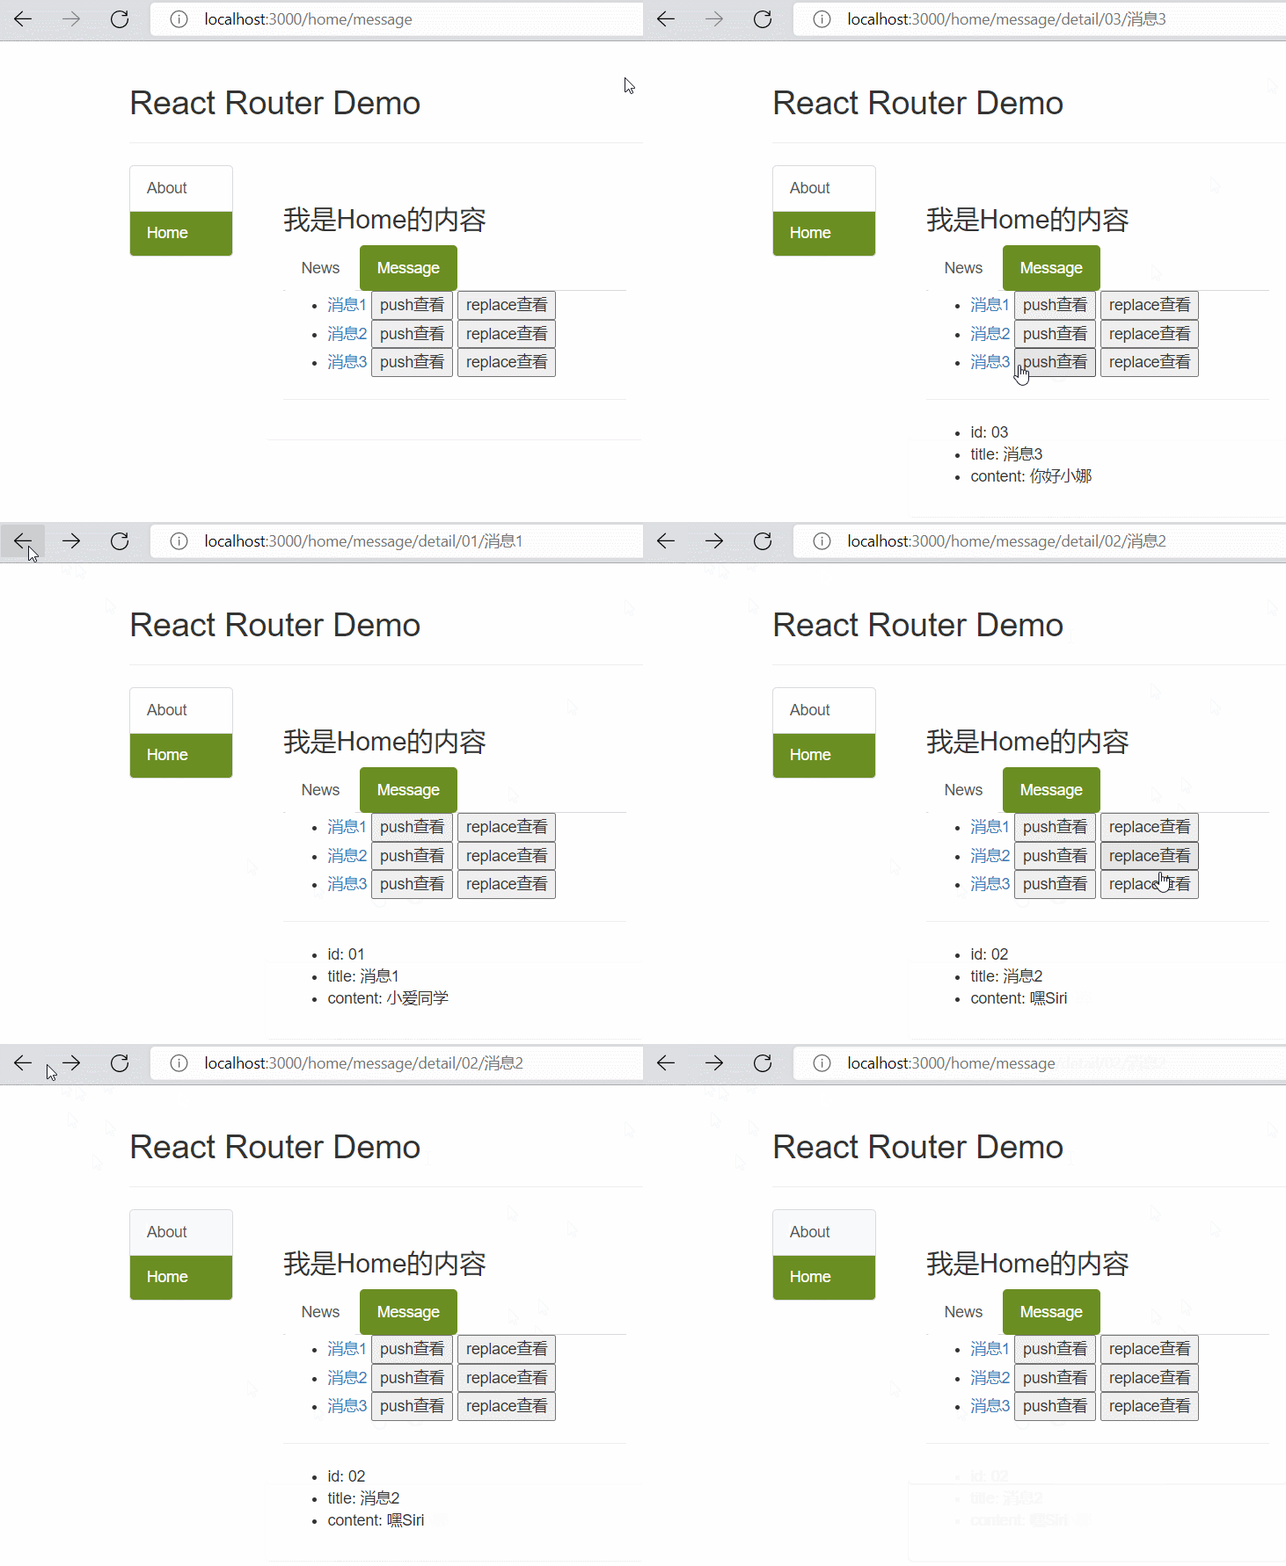
编程式路由导航
借助this.props.history的API实现跳转、前进、后退:
-this.prosp.history.push()
-this.prosp.history.replace()
-this.prosp.history.goBack()
-this.prosp.history.goForward()
-this.prosp.history.go()
import React, { Component } from 'react'
import { Link, Route } from 'react-router-dom'
import Detail from './Detail'
export default class Message extends Component {
state = {
messageArr: [
{id: '01', title: '消息1'},
{id: '02', title: '消息2'},
{id: '03', title: '消息3'}
]
}
pushShow = (id, title) => {
// push跳转 + 携带params参数
// this.props.history.push(`/home/message/detail/${id}/${title}`)
// push跳转 + 携带search参数
// this.props.history.push(`/home/message/detail?id=${id}&title=${title}`)
// push跳转 + 携带state参数
this.props.history.push('/home/message/detail', {id, title})
}
replaceShow = (id, title) => {
// replace跳转 + 携带params参数
// this.props.history.replace(`/home/message/detail/${id}/${title}`)
// replace跳转 + 携带search参数
this.props.history.replace(`/home/message/detail?id=${id}&title=${title}`)
// replace跳转 + 携带state参数
this.props.history.replace('/home/message/detail', {id, title})
}
render() {
const {messageArr} = this.state
return (
<div>
<ul>
{messageArr.map((msgObj) => {
return (
<li key={msgObj.id}>
{/* 向路由组件传递params参数 */}
{/* <Link to={`/home/message/detail/${msgObj.id}/${msgObj.title}`}>{msgObj.title}</Link> */}
<button onClick={() => this.pushShow(msgObj.id, msgObj.title)}>push查看</button>
<button onClick={() => this.replaceShow(msgObj.id, msgObj.title)}>replace查看</button>
{/* 向路由组件传递search参数 */}
{/* <Link to={`/home/message/detail/?id=${msgObj.id}&title=${msgObj.title}`}>{msgObj.title}</Link> */}
{/* 向路由组件传递state参数 */}
<Link to={{pathname: '/home/message/detail', state: {id: msgObj.id, title: msgObj.title}}}>{msgObj.title}</Link>
</li>
)
})}
</ul>
<hr />
{/* 声明接收params参数 */}
{/* <Route path="/home/message/detail/:id/:title" component={Detail} /> */}
{/* search参数无需声明接收,正常注册路由即可 */}
{/* <Route path="/home/message/detail" component={Detail} /> */}
{/* state参数无需声明接收,正常注册路由即可 */}
<Route path="/home/message/detail" component={Detail} />
</div>
)
}
}
路由的跳转更加灵活:
需求:切换到News路由后,等待3秒,自动跳转到Message
import React, { Component } from 'react'

export default class News extends Component {

  componentDidMount() {
    setTimeout(() => {
        this.props.history.push('/home/message')
    }, 3000)
  }

  render() {
    return (
        <ul>
            <li>news001</li>
            <li>news002</li>
            <li>news003</li>
        </ul>
    )
  }
}
withRouter
withRouter可以加工一般组件,让一般组件具备路由组件所特有的API,其返回值是一个新组件
import React, { Component } from 'react'
import { withRouter } from 'react-router-dom'
class Header extends Component {
back = () => {
this.props.history.goBack()
}
forward = () => {
this.props.history.goForward()
}
render() {
return (
<div className="page-header">
<h2>React Router Demo</h2>
<button onClick={this.back}>后退</button>
<button onClick={this.forward}>前进</button>
</div>
)
}
}
export default withRouter(Header)
Browser Router与Hash Router
- 底层原理不同:
- BrowserRouter使用的是H5的history API,不兼容IE9及以下版本。
- HashRouter使用的是URL的哈希值。
path表现形式不同:BrowserRouter的路径中没有#,例如:localhost:3000/demo/testHashRouter的路径包含#,例如:localhost:3000/#/demo/test
- 刷新后对路由
state参数的影响:BrowserRouter没有任何影响,因为state保存在history对象中。HashRouter刷新后会导致路由state参数的丢失!!!
- 备注:
HashRouter可以用于解决一些路径错误相关的问题。
