基于Maven构建OSGI应用。
使用Maven来构建项目,包括项目的创建、子模块buldle的创建等。使用OSGI来实现动态模块化管理,实现模块的热插拔效果(即插即用)。
创建一个Maven项目:helloworld,并在该项目下创建两个Maven 子模块:helloworld-client、helloworld-server。
创建 helloworld maven项目、填写参数及Advanced Settings:

创建 helloworld-server maven子模块:

同样的方式再创建 helloworl-client maven 子模块。
接下来就是 hellworld-server、helloworld-client 编码以及OSGI及编译打包配置。
OSGI及编译打包配置,直接通过修改3个pom文件(1个主pom、2个子模块的pom)来配置,最终配置结果如下:
1)代码结构:

client->Activator.java:
package com.xxx.osgi.helloworld.client;

import com.xxx.osgi.helloworld.server.HelloWorldImpl;
import org.osgi.framework.BundleActivator;
import org.osgi.framework.BundleContext;
import org.osgi.framework.ServiceReference;

import java.util.Objects;

/**
 * @author frank
 * @date 2023/12/8
 */
public class Activator implements BundleActivator {
    public void start(BundleContext bundleContext) throws Exception {
        System.out.println("helloworld-client: start");
        System.out.println("helloworld-client: call server getHelloMsg()");

        ServiceReference<HelloWorldImpl> reference = bundleContext.getServiceReference(HelloWorldImpl.class);
        if (Objects.nonNull(reference)) {
            HelloWorldImpl service = bundleContext.getService(reference);
            if (Objects.nonNull(service)) {
                String msg = service.getHelloMsg("Frank");
                System.out.println("SUCCESS: return msg is:\n" + msg);
            } else {
                System.out.println("ERROR: service not found!");
            }
            bundleContext.ungetService(reference);
        } else {
            System.out.println("ERROR: service reference not found!");
        }
    }

    public void stop(BundleContext bundleContext) throws Exception {
        System.out.println("helloworld-client: stop");
    }
}
server->Activator.java
package com.xxx.osgi.helloworld.server;

import org.osgi.framework.BundleActivator;
import org.osgi.framework.BundleContext;
import org.osgi.framework.ServiceReference;

import java.util.Dictionary;
import java.util.Hashtable;
import java.util.Objects;

/**
 * @author frank
 * @date 2023/12/9
 */
public class Activator implements BundleActivator {
    public void start(BundleContext bundleContext) throws Exception {
        System.out.println("helloworld-server: start");
        HelloWorldImpl server = new HelloWorldImpl();
        Dictionary<String, Object> properties = new Hashtable<String, Object>();
        bundleContext.registerService(HelloWorldImpl.class, server, properties);
        System.out.println("helloworld-server: 服务已发布(注册)!");
    }

    public void stop(BundleContext bundleContext) throws Exception {
        System.out.println("helloworld-server: stop");
    }
}
server->IHelloWorld.java
package com.xxx.osgi.helloworld.server;

/**
 * @author frank
 * @date 2023/12/9
 */
public interface IHelloWorld {
    String getHelloMsg(String name);
}
server->HelloWorldImpl.java
package com.xxx.osgi.helloworld.server;

/**
 * @author frank
 * @date 2023/12/9
 */
public class HelloWorldImpl implements IHelloWorld {
    public String getMethodName() {
        return "[" + Thread.currentThread().getStackTrace()[2].getMethodName() + ":" +
                Thread.currentThread().getStackTrace()[2].getLineNumber() + "] ";
    }

    public String getHelloMsg(String name) {
        return getMethodName() + " HelloWorld " + name;
    }
}
2)主pom:
<project xmlns="http://maven.apache.org/POM/4.0.0" xmlns:xsi="http://www.w3.org/2001/XMLSchema-instance"
  xsi:schemaLocation="http://maven.apache.org/POM/4.0.0 http://maven.apache.org/xsd/maven-4.0.0.xsd">
  <modelVersion>4.0.0</modelVersion>

  <groupId>org.xxx.osgi</groupId>
  <artifactId>helloworld</artifactId>
  <version>1.0.0-SNAPSHOT</version>
  <modules>
    <module>helloworld-client</module>
    <module>helloworld-server</module>
  </modules>
  <packaging>pom</packaging>

  <name>helloworld</name>
  <url>http://maven.apache.org</url>

  <properties>
    <project.build.sourceEncoding>UTF-8</project.build.sourceEncoding>
    <maven.compiler.source>5</maven.compiler.source>
    <parent.maven.bundle.plugin.version>2.4.0</parent.maven.bundle.plugin.version>
  </properties>

  <dependencies>
    <dependency>
      <groupId>junit</groupId>
      <artifactId>junit</artifactId>
      <version>3.8.1</version>
      <scope>test</scope>
    </dependency>
    <dependency>
      <!-- 该版本 maven 仓库找不到,如果要用该版本可以在 Project Structure->Project Settings->Modules 中设置:-->
      <!-- 设置 OSGI:General->Configure OSGI Core Library->Use Library 指定本地 jar 文件静态添加 osgi lib  -->
      <!--
      <groupId>org.eclipse</groupId>
      <artifactId>osgi</artifactId>
      <version>3.18.600.v20231110-1900</version>
      <scope>provided</scope>
      -->
      <!-- 该版本maven仓库可以找到,可以用这个版本。在 pom 中指定 osgi lib 的 dependency 依赖 -->
      <groupId>org.eclipse</groupId>
      <artifactId>osgi</artifactId>
      <version>3.10.0-v20140606-1445</version>
      <scope>provided</scope>
    </dependency>
  </dependencies>
</project>
3)hellworld-client 子模块pom:
<project xmlns="http://maven.apache.org/POM/4.0.0" xmlns:xsi="http://www.w3.org/2001/XMLSchema-instance"
         xsi:schemaLocation="http://maven.apache.org/POM/4.0.0 http://maven.apache.org/xsd/maven-4.0.0.xsd">
    <parent>
        <artifactId>helloworld</artifactId>
        <groupId>org.xxx.osgi</groupId>
        <version>1.0.0-SNAPSHOT</version>
    </parent>
    <modelVersion>4.0.0</modelVersion>

    <artifactId>helloworld-client</artifactId>
    <packaging>bundle</packaging>

    <name>helloworld-client</name>
    <url>http://maven.apache.org</url>

    <properties>
        <project.build.sourceEncoding>UTF-8</project.build.sourceEncoding>
    </properties>

    <dependencies>
        <!-- osgi lib 使用主 pom 中定义的依赖,子模块不再重复定义 osgi lib dependency -->
        <dependency>
            <groupId>org.xxx.osgi</groupId>
            <artifactId>helloworld-server</artifactId>
            <version>${project.version}</version>
        </dependency>
    </dependencies>

    <build>
        <plugins>
            <plugin>
                <!-- osgi 打包配置,使用 maven-bundle-plugin 插件进行 osgi 打包 bundle jar -->
                <!-- 使用maven-bundle-plugin打包方式时指定manifest文件不生效,但可在 instructions 中配置 manifest 参数 -->
                <groupId>org.apache.felix</groupId>
                <artifactId>maven-bundle-plugin</artifactId>
                <version>${parent.maven.bundle.plugin.version}</version>
                <extensions>true</extensions>
                <configuration>
                    <instructions>
                        <!-- 如果要把依赖的 jar 也一起打包进去,在 Import-Package 中指定、并设置 Embed-Dependency -->
                        <!-- <Embed-Dependency>*;scope=compile|runtime</Embed-Dependency> -->
                        <Bundle-Name>${project.name}</Bundle-Name>
                        <Bundle-SymbolicName>$(replace;${project.artifactId};-;_)</Bundle-SymbolicName>
                        <Bundle-Version>${project.version}</Bundle-Version>
                        <Bundle-Activator>com.xxx.osgi.helloworld.client.Activator</Bundle-Activator>
                        <Import-Package>org.osgi.framework,com.xxx.osgi.helloworld.server;version=${project.version}"</Import-Package>
                        <Export-Package>
                            com.xxx.osgi.helloworld.client;version="${project.version}"
                        </Export-Package>
                    </instructions>
                </configuration>
            </plugin>
        </plugins>
    </build>
</project>
4)helloworld-server 子模块pom:
<project xmlns="http://maven.apache.org/POM/4.0.0" xmlns:xsi="http://www.w3.org/2001/XMLSchema-instance"
         xsi:schemaLocation="http://maven.apache.org/POM/4.0.0 http://maven.apache.org/xsd/maven-4.0.0.xsd">
    <parent>
        <artifactId>helloworld</artifactId>
        <groupId>org.xxx.osgi</groupId>
        <version>1.0.0-SNAPSHOT</version>
    </parent>
    <modelVersion>4.0.0</modelVersion>

    <artifactId>helloworld-server</artifactId>
    <packaging>bundle</packaging>

    <name>helloworld-server</name>
    <url>http://maven.apache.org</url>

    <properties>
        <project.build.sourceEncoding>UTF-8</project.build.sourceEncoding>
    </properties>

    <dependencies>
        <!-- osgi lib 使用主 pom 中定义的依赖,子模块不再重复定义 osgi lib dependency -->
    </dependencies>

    <build>
        <plugins>
            <plugin>
                <!-- osgi 打包配置,使用 maven-bundle-plugin 插件进行 osgi 打包 bundle jar -->
                <!-- 使用maven-bundle-plugin打包方式时指定manifest文件不生效,但可在 instructions 中配置 manifest 参数 -->
                <groupId>org.apache.felix</groupId>
                <artifactId>maven-bundle-plugin</artifactId>
                <version>${parent.maven.bundle.plugin.version}</version>
                <extensions>true</extensions>
                <configuration>
                    <instructions>
                        <!-- 如果要把依赖的 jar 也一起打包进去,在 Import-Package 中指定、并设置 Embed-Dependency -->
                        <!-- <Embed-Dependency>*;scope=compile|runtime</Embed-Dependency> -->
                        <Bundle-Name>${project.name}</Bundle-Name>
                        <Bundle-SymbolicName>$(replace;${project.artifactId};-;_)</Bundle-SymbolicName>
                        <Bundle-Version>${project.version}</Bundle-Version>
                        <Bundle-Activator>com.xxx.osgi.helloworld.server.Activator</Bundle-Activator>
                        <Import-Package>org.osgi.framework</Import-Package>
                        <Export-Package>
                            com.xxx.osgi.helloworld.server;version="${project.version}"
                        </Export-Package>
                    </instructions>
                </configuration>
            </plugin>
        </plugins>
    </build>
</project>
注意:
i)OSGI框架(OSGI Library)通过pom配置后自动manve刷新就可以自动在 Project Settings-> Modules 中自动生成 OSGI 配置了,包括OSGI Library也自设置了,这里无需手动修改其他OSGI配置,默认即可。根据pom自动生成的OSGI配置如下:

Configure OSGI Core Library 点击打开显示如下:
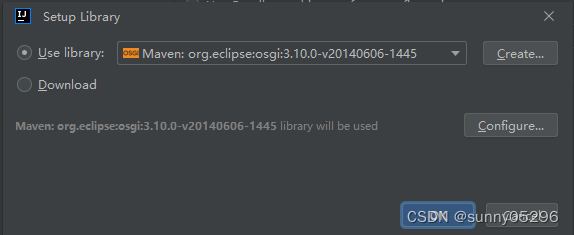
版本号就是pom中指定OSGI dependency 的版本。
ii)pom文件中配置打包插件使用:maven-bundle-plugin 插件,该插件是专门为OSGI打包提供的插件,但是它不能导出 META-INF 中的内容到 Export-Package jar 包中。也就是说使用 maven-bundle-plugin 插件打包导出的 bundle jar 包中的 manifest 只能通过 pom.xml 文件中的 maven-bundle-plugin 打包参数项来配置,不能直接指定使用自己项目中指定的 manifest 文件(指定了也不生效)。另外,Project Settings -> Modules 中的 Manifest Generation 配置也没有用。
另外,maven-bundle-plugin 打包插件支持了一个标签:
<Embed-Dependency>*;scope=compile|runtime</Embed-Dependency>,
有了这个标签,可以直接把依赖的 jar 打入 bundle jar 包中去。
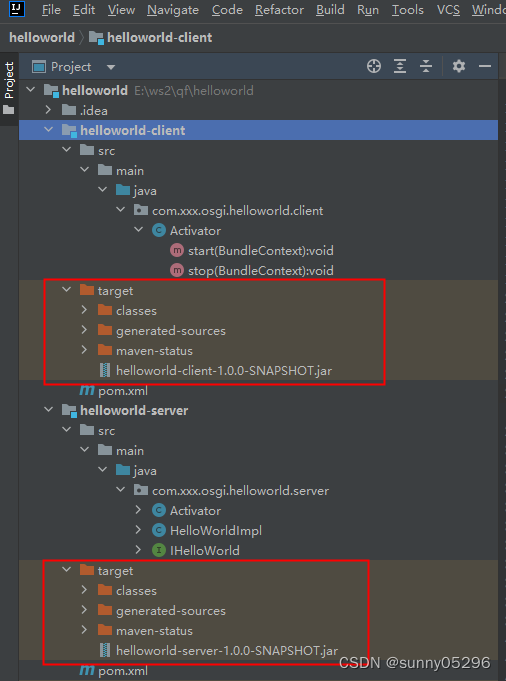
5)编译打包:
mvn clean package
执行命令,就会生成目标jar文件:
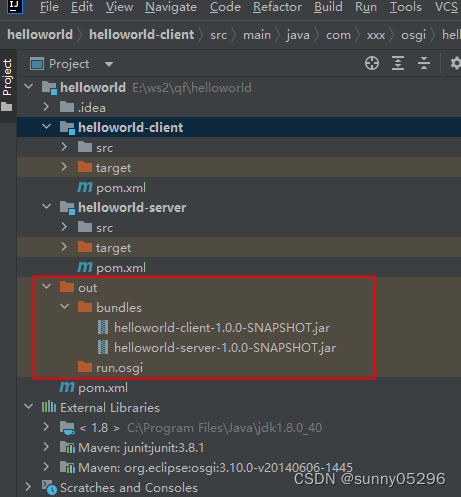
6)添加 debug / run 配置,可在idea中运行或调试:
为client和server分别添加一个 debug/run 配置,Bundle name配置中添加 4个 必须依赖的系统jar和各自子模块的jar:

添加 debug/run 配置并运行后,会自动生成 out 目录:
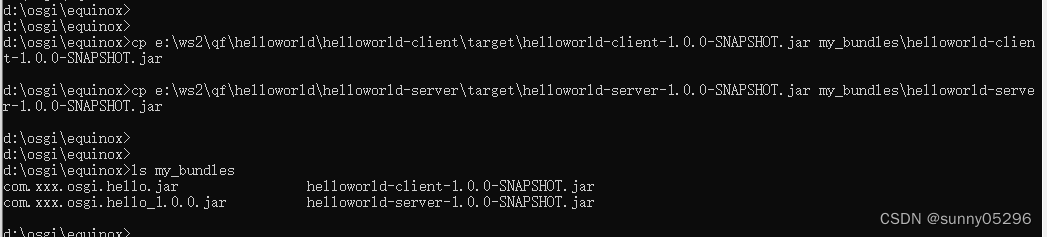
7)拷贝生成的 client & server bundle(jar) 到OSGI环境执行:
我本地Windows配置的OSGI运行环境位于:d:\osgi\equinox\
d:> cd d:\osgi\equinox\
d:\osgi\equinox> ls
org.eclipse.osgi_3.18.600.v20231110-1900.jar
plugins
start.bat
d:\osgi\equinox> mkdir my_bundles
d:\osgi\equinox> cp e:\ws2\qf\helloworld\helloworld-client\target\helloworld-client-1.0.0-SNAPSHOT.jar my_bundles\helloworld-client-1.0.0-SNAPSHOT.jar
d:\osgi\equinox> cp e:\ws2\qf\helloworld\helloworld-server\target\helloworld-server-1.0.0-SNAPSHOT.jar my_bundles\helloworld-server-1.0.0-SNAPSHOT.jar
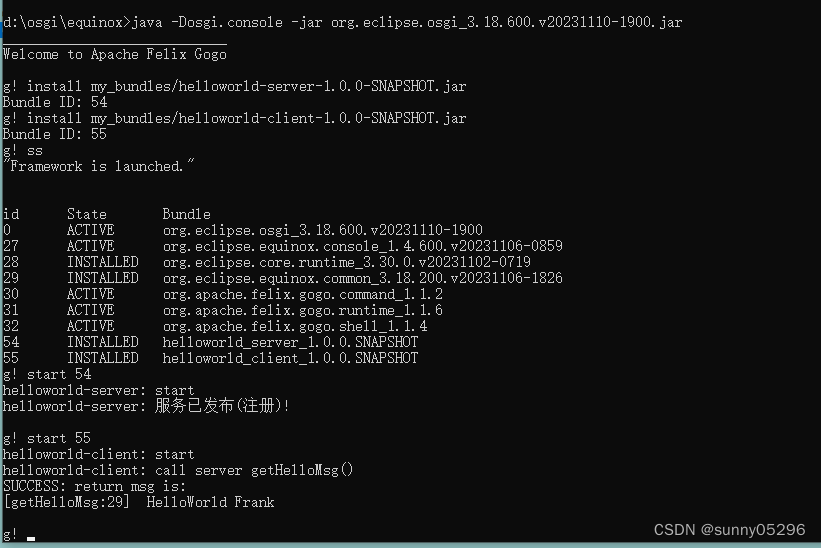
8)执行bundles:
install & start bundles,server需要先启动、再启动client:
![[ROS2] --- service](https://img-blog.csdnimg.cn/direct/8652b5c884374b97b0da282bd24668bd.png)