运行环境
环境:ubuntu 16.04
CUDA: 10.2
执行模型推理
1. 下载yoloV5 repo
git clone https://github.com/ultralytics/yolov5
2. 用conda新建python环境
conda create -n yolo python=3.8
3. 安装需求包
pip install -r requirements.txt4. (requremets中包含pytorch的安装,但是实际操作中我又安装了一次)
conda install pytorch torchivsion -c pytorch5, 运行预编译模型,会自动下载模型,生成yolov5s.pt,并处理图片。
python detect.py6. 在runs/detect/expx文件夹可以看到处理的图片。


模型量化
pytorch模型转onnx
python export.py --weights yolov5s.pt --include torchscript onnx但是会有报错

opset不支持 17,在export.py中把opset 改为11,解决该问题。
![]()
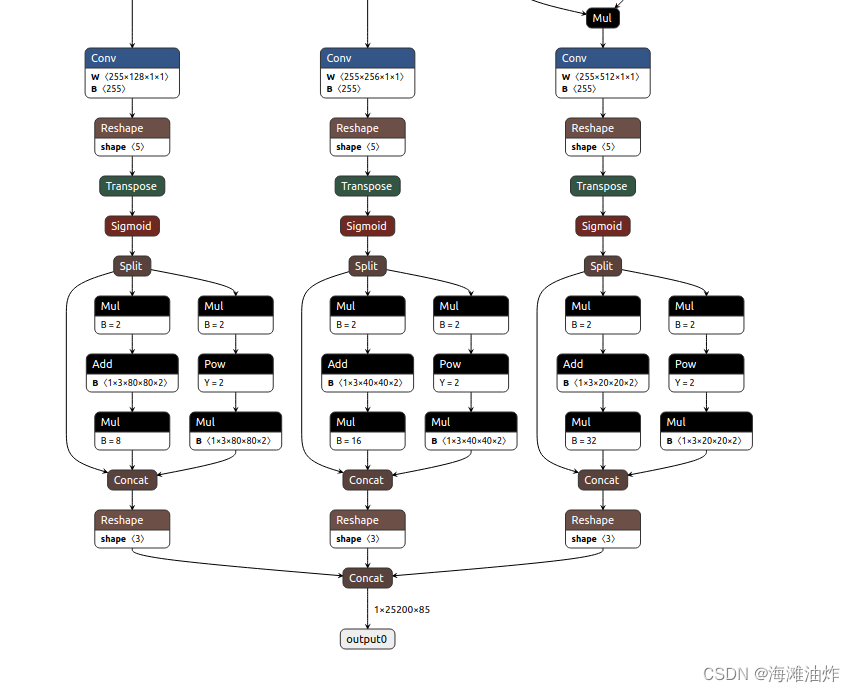
onnx模型可视化
喜闻乐见的可视化环节到了,onnx模型可视化可直接打开网址
Netronhttps://netron.app/然后拖入生成的onnx模型,可以可视化。
tensorrt安装
tensorrt 官网: https://developer.nvidia.com/tensorrt
点击“立即下载”,需要英伟达账号,可以选择任意平台适配你的cuda版本的TensorRT。
需要注意的是,python3.9在TensorRT8之后的版本才支持,因此建议下载TensorRT8.
下载后进行安装。安装步骤可以参考
TensorRT 7.2.2 下载、安装、使用(ubuntu 18.04, cuda 10.2, cudnn 8.0.5)_白小心的博客-CSDN博客_tensorrt官网
中的安装。
CuDNN安装
在试图运行TensorRT/bin文件夹下的trtexec时,会有如下报错。
error while loading shared libraries: libcudnn.so.8: cannot open shared object file: No such file or directory后来确定为cudnn没有安装。CuDNN安装步骤如下
Step 1: Register an nvidia developer account and download cudnn here (about 80 MB). You might need nvcc --version to get your cuda version.
Step 2: Check where your cuda installation is. For most people, it will be /usr/local/cuda/. You can check it with which nvcc.
Step 3: Copy the files:
$ cd folder/extracted/contents
$ sudo cp include/cudnn.h /usr/local/cuda/include
$ sudo cp lib64/libcudnn* /usr/local/cuda/lib64
$ sudo chmod a+r /usr/local/cuda/lib64/libcudnn*
onnx模型转TensorRT
在TensortRT/bin文件夹中运行下列指令,稍等片刻。
./trtexec --onnx '/home/project/yolov5/yolov5s.onnx' --saveEngine=yolov5s.trttensorrt模型生成成功。

![[Java安全]—fastjson漏洞利用](https://img-blog.csdnimg.cn/03ea11af99fb44c19f12a9921b7ce5ba.png)
