本章主要介绍网络时间服务器。
- 使用chrony配置时间服务器
- 配置chrony客户端向服务器同步时间
时间同步的必要性
一些服务对时间要求非常严格,例如,下图所示的由三台服务器搭建的ceph集群。
 这三台服务器的时间必须保持一致,如果不一致,就会显示警告信息。那么。如何能让这三台服务器的时间保持一致呢?手动调整时间的方式肯定不行,因为手动调整时间最多只能精确到分,很难精确到秒。而且即使现在时间调整一致了,过一段时间之后,时间可能又不一 样了。
所以,需要通过设置让这些服务器的时间能够自动同 步,如下图所示。
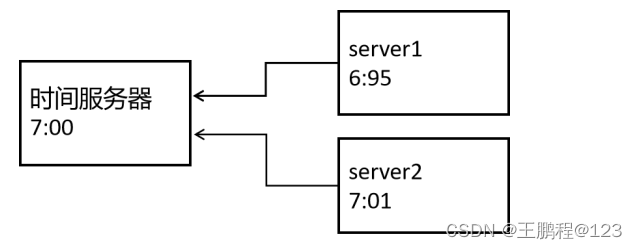 这里假设我们有一个时间服务器时间为7:00,设置 server1和 server2向此时间服务器进行时间同步。 假设server1当前时间为6;59,它与时间服务器一对比,“我的时间比时间服务器慢了一分钟”,然后它主板上的晶体芯片就会跳动得快一些,很快 就“追”上了时间服务器的时间。
假设server2当前时间是7:01,它与时间服务器一对比,“我竟然比时间服务器快了一分 钟”,然后它主板上的晶体芯片就会跳动得慢一些,“等着”时间服务器。
下面就开始使用chrony来配置时间服务器。
配置时间服务器
实验拓扑图如下图所示。 这里把rhel03配置成时间服务器,rhel04作为客户端向rhel03进行时间同步。

在安装系统时,如果已经选择了图形化界面,则默认已经把 chrony这个软件安装上了(如果没有安装,请先看后面的软件包管理章节,然后自行安装上去)。
使用vim编辑器打开/etc/chrony.conf,只修改我们能用的几行。
(1)指定所使用的上层时间服务器。 把pool 2.rhel.pool.ntp.org iburst修改为pool 127.127.1.0 iburst
pool 127.127.1.0 iburstpool后面跟的是时间服务器,因为这里把rhel03作为chrony服务器,没有上一层的服务器,所以上层服务器设置为本地时钟的IP:127.127.1.0。
这里iburst的意思是,如果chrony服务器出问题,客户端会发送一系列的包给chrony服务器,对服务器进行检测。
(2)指定允许访问的客户端。 修改allow所在行,把注释符#去掉,并把后面的网段改为192.168.8.0/24。
allow 192.168.23.0/24
rhel03配置成时间服务器之后,只允许192.168.23.0/24网段的客户端进行时间同步。如果要允许所有客户端都能向此时间服务器进行时间同步,可以写成allow 0/0或allow all。
(3)把local stratum 前的注释符#去掉。
local stratum 10这行的意思是,即使服务器本身没有和时间服务器保持时间同步,也可以对外提供时间服务,这行注释要取消。
保存退出,去除空白行和注释行之后,最后修改完成的代码如下,加粗字是修改的内容。
[root@rhel03 ~]# egrep -v "^#|^$" /etc/chrony.conf
pool 127.127.1.0 iburst
driftfile /var/lib/chrony/drift
makestep 1.0 3
rtcsync
allow 192.168.23.0/24
local stratum 10
keyfile /etc/chrony.keys
leapsectz right/UTC
logdir /var/log/chrony
[root@rhel03 ~]#
然后重启chronyd这个服务(注意,这里是chronyd而不是chrony),并设置开机自动启动, 命令如下。
[root@rhel03 ~]# systemctl restart chronyd
[root@rhel03 ~]# systemctl enable chronyd
Created symlink /etc/systemd/system/multi-user.target.wants/chronyd.service → /usr/lib/systemd/system/chronyd.service.
[root@rhel03 ~]#
chrony用的是UDP的123和323,命令如下。
[root@rhel03 ~]# netstat -nutlp | grep chrony
udp        0      0 0.0.0.0:123             0.0.0.0:*                           2439/chronyd
udp        0      0 127.0.0.1:323           0.0.0.0:*                           2439/chronyd
udp6       0      0 ::1:323                 :::*                                2439/chronyd
在防火墙中把这两个端口开放,命令如下。
[root@rhel03 ~]# firewall-cmd --add-port=123/udp --permanent
success
[root@rhel03 ~]# firewall-cmd --add-port=323/udp --permanent
success
[root@rhel03 ~]# firewall-cmd --reload
success
[root@rhel03 ~]# firewall-cmd --list-port
123/udp 323/udp
[root@rhel03 ~]#
这里加上 --permanent选项的目的是让其永久生效,然后通过reload重新加载防火墙规则, 让其也立即生效。防火墙的具体设置后面有专门章节讲解。
至此,用chrony搭建的时间服务器完成。
配置chrony客户端
把rhel04配置成时间服务器的客户端,也就是chrony客户端。
在rhel04(IP地址为192.168.23.34)上用vim编辑器修改/etc/chrony.conf,修改下面的几行。
(1)修改pool那行,指定要从哪台时间服务器同步时间。
pool 192.168.23.33 iburst这里指定时间服务器为192.168.23.33,即向192.168.23.33进行时间同步。
(2)修改makestep那行,格式如下。
- makestep 阈值 limit
客户端向服务器同步时间有两种方式:step和 slew。
step:跳跃着更新时间,如时间由1点直接跳到7点。
slew:平滑着移动时间,晶体芯片跳动得快一些,就好比秒针的转速“快进”了一样。
如果客户端和服务器的时间相差较多,则通过step的方式更新时间;如果客户端和服务器 的时间相差不多,则通过slew的方式更新时间。那么,时间相差多或不多的标准是什么呢? 就要看时间差是否超过makestep后面的住值了。
举一个例子makestep 10 3的意思是,如果客户端和服务器的时间相差10秒以上,就认为客户端和服务器的时间相差较多,则前三次通过step 的方式更新时间。客户端通过这种方式会更新得很快,有些应用程序因为时间的突然跳动会带来问题。
如果客户端和服务器的时间相差10秒以内,就认为二者时间相差不多,则通过slew的方式更新时间。这种方式更新的速度会比较慢,但比较平稳。
把原来的makestep 10 3改成makestep 200 3
makestep 200 3
如果客户端和服务器的时间相差200秒以上,就认为二者时间相差较多,则通过step的方 式更新时间。
保存退出并重启 chronyd服务,并设置开机自启,命令如下。
[root@rhel04 ~]# systemctl restart chronyd.service
[root@rhel04 ~]# systemctl enable chronyd.service
Created symlink /etc/systemd/system/multi-user.target.wants/chronyd.service → /usr/lib/systemd/system/chronyd.service.
[root@rhel04 ~]#
为了更细致地看到两台机器的时间差,先配置ssh使得rhel04可以无密码登录到rhel03。 先生成密钥对,命令如下。
[root@rhel04 ~]# ssh-keygen -N "" -f /root/.ssh/id_rsa
Generating public/private rsa key pair.
Your identification has been saved in /root/.ssh/id_rsa.
Your public key has been saved in /root/.ssh/id_rsa.pub.
The key fingerprint is:
SHA256:1Sn+0/zkXgLMObB7M/UK8VlsXmo/IzkA5xsiJPFxi48 root@rhel04
The key's randomart image is:
+---[RSA 3072]----+
|                 |
|     . . . . .   |
|      o + = o    |
|     . + = B . . |
|      o S * B . =|
|       E o * O B.|
|        . o @ X =|
|           o X X.|
|              +.B|
+----[SHA256]-----+
[root@rhel04 ~]#
配置到rhel03的密钥登录,命令如下。
[root@rhel04 ~]# ssh-copy-id 192.168.23.33
/usr/bin/ssh-copy-id: INFO: Source of key(s) to be installed: "/root/.ssh/id_rsa.pub"
/usr/bin/ssh-copy-id: INFO: attempting to log in with the new key(s), to filter out any that are already installed
/usr/bin/ssh-copy-id: INFO: 1 key(s) remain to be installed -- if you are prompted now it is to install the new keys
root@192.168.23.33's password:

Number of key(s) added: 1

Now try logging into the machine, with:   "ssh '192.168.23.33'"
and check to make sure that only the key(s) you wanted were added.

[root@rhel04 ~]#
给rhel04上通过date命令设置时间,使得rhel04和rhel03的时间相差200秒,命令如下
[root@rhel04 ~]# date -s  "2023-12-08 11:28:00" ; hwclock -w
2023年 12月 08日 星期五 11:28:00 CST
然后同时显示两台机器的时间,命令如下。
[root@rhel04 ~]# date ; ssh 192.168.23.33 date
2023年 12月 08日 星期五 11:28:41 CST
2023年 12月 08日 星期五 11:26:43 CST
[root@rhel04 ~]#
可以看到,时间相差了约118秒
然后重启rhel04的chronyd服务,等待几秒之后再次查看。
[root@rhel04 ~]# systemctl restart chronyd.service
[root@rhel04 ~]# date ; ssh 192.168.23.33 date
2023年 12月 08日 星期五 11:30:33 CST
2023年 12月 08日 星期五 11:28:39 CST
两台机器的时间相差118秒,这个值低于200秒,即在makestep的阙值范围之内,此时客户端向服务器进行时间同步时只能通过slew的方式同步。
可以看到,并没有同步,因为slew同步的速度比较慢。
此时如果通过执行chronyc makestep命令手动step同步,则会立即同步时间,命令如 下。
[root@rhel04 ~]# chronyc makestep
200 OK
[root@rhel04 ~]# date ; ssh 192.168.23.33 date
2023年 12月 08日 星期五 11:31:02 CST
2023年 12月 08日 星期五 11:31:03 CST
[root@rhel04 ~]#
这样就可以看到立即同步成功了。
再次修改时间,命令如下。
[root@rhel04 ~]# date -s  "2023-12-08 11:50:00" ; hwclock -w
2023年 12月 08日 星期五 11:50:00 CST
[root@rhel04 ~]# date ; ssh 192.168.23.33 date
2023年 12月 08日 星期五 11:50:04 CST
2023年 12月 08日 星期五 11:31:52 CST
[root@rhel04 ~]#
可以看到,时间相差了约20分钟,即1200秒。
然后重启rhel04的chronyd服务,等待几秒之后再次查看。
[root@rhel04 ~]# systemctl restart chronyd.service
[root@rhel04 ~]# date ; ssh 192.168.23.33 date
2023年 12月 08日 星期五 11:32:48 CST
2023年 12月 08日 星期五 11:32:48 CST
[root@rhel04 ~]#
通过chronye -n sources -v查看现在的同步状况,如下所示。
[root@rhel04 ~]# chronyc -n sources -v

  .-- Source mode  '^' = server, '=' = peer, '#' = local clock.
 / .- Source state '*' = current best, '+' = combined, '-' = not combined,
| /             'x' = may be in error, '~' = too variable, '?' = unusable.
||                                                 .- xxxx [ yyyy ] +/- zzzz
||      Reachability register (octal) -.           |  xxxx = adjusted offset,
||      Log2(Polling interval) --.      |          |  yyyy = measured offset,
||                                \     |          |  zzzz = estimated error.
||                                 |    |           \
MS Name/IP address         Stratum Poll Reach LastRx Last sample
===============================================================================
^* 192.168.23.33                10   6    37    15    +25us[ -226us] +/-  668us
[root@rhel04 ~]#
可以看到,rhel04是向192.168.23.33进行时间同步的。
