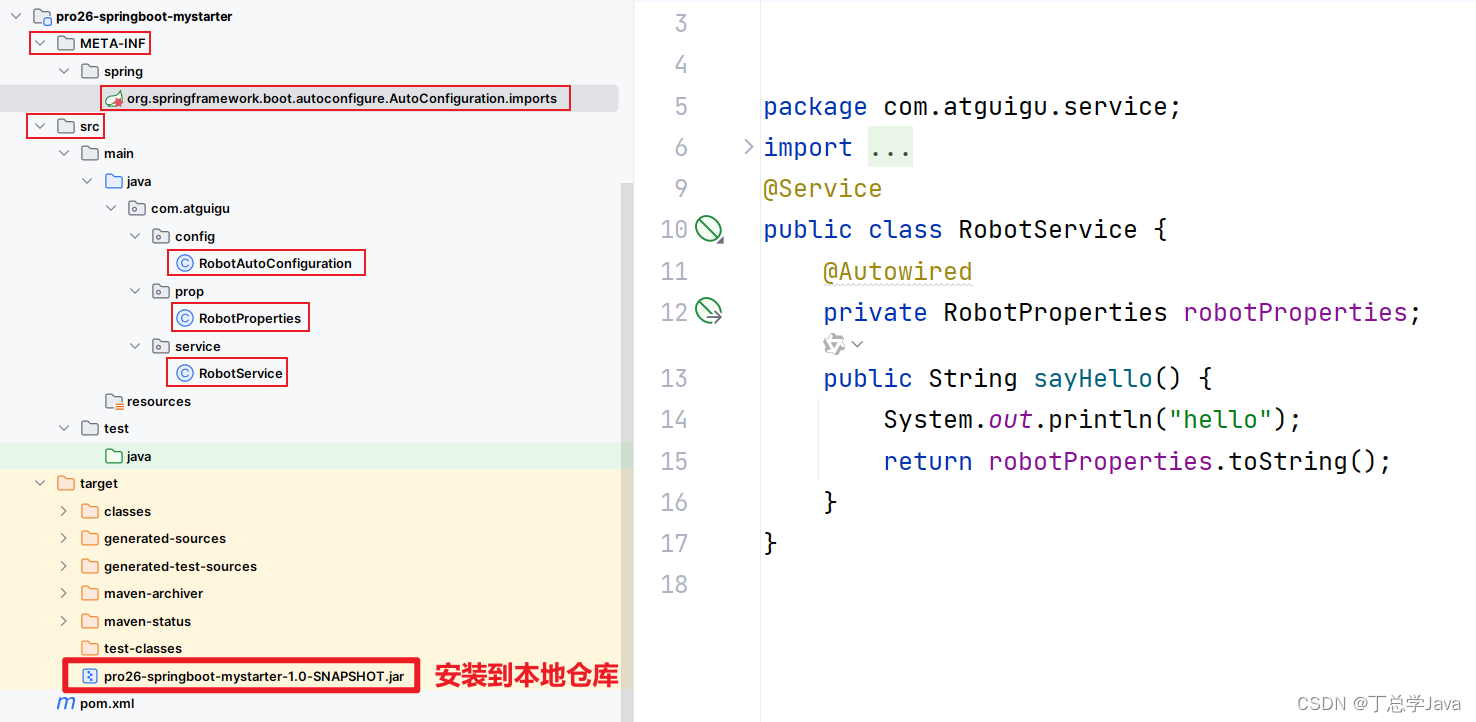
1、创建自定义启动工程pom.xml
<?xml version="1.0" encoding="UTF-8"?>
<project xmlns="http://maven.apache.org/POM/4.0.0"
         xmlns:xsi="http://www.w3.org/2001/XMLSchema-instance"
         xsi:schemaLocation="http://maven.apache.org/POM/4.0.0 http://maven.apache.org/xsd/maven-4.0.0.xsd">
    <modelVersion>4.0.0</modelVersion>

    <groupId>com.atguigu</groupId>
    <artifactId>pro26-springboot-mystarter</artifactId>
    <version>1.0-SNAPSHOT</version>

    <!--所有springboot项目都必须继承自 spring-boot-starter-parent -->
    <parent>
        <groupId>org.springframework.boot</groupId>
        <artifactId>spring-boot-starter-parent</artifactId>
        <version>3.0.5</version>
        <relativePath />  <!-- 根据情况添加 -->
    </parent>

    <properties>
        <maven.compiler.source>17</maven.compiler.source>
        <maven.compiler.target>17</maven.compiler.target>
        <project.build.sourceEncoding>UTF-8</project.build.sourceEncoding>
    </properties>

    <dependencies>
        <!--web开发的场景启动器 -->
        <dependency>
            <groupId>org.springframework.boot</groupId>
            <artifactId>spring-boot-starter-web</artifactId>
        </dependency>

        <!--导入配置处理器,配置文件自定义的properties配置都会有提示-->
        <dependency>
            <groupId>org.springframework.boot</groupId>
            <artifactId>spring-boot-configuration-processor</artifactId>
            <optional>true</optional>
        </dependency>

        <dependency>
            <groupId>org.projectlombok</groupId>
            <artifactId>lombok</artifactId>
        </dependency>
    </dependencies>
</project>
2、RobotProperties.java
package com.atguigu.prop;
import lombok.Data;
import org.springframework.boot.context.properties.ConfigurationProperties;
import org.springframework.stereotype.Component;
@Data
@Component
@ConfigurationProperties(prefix = "atguigu.robot")
public class RobotProperties {
    private String name,age, email;
}
3、RobotService.java
package com.atguigu.service;
import com.atguigu.prop.RobotProperties;
import org.springframework.beans.factory.annotation.Autowired;
import org.springframework.stereotype.Service;
@Service
public class RobotService {
    @Autowired
    private RobotProperties robotProperties;
    public String sayHello() {
        System.out.println("hello");
        return robotProperties.toString();
    }
}
4、RobotAutoConfiguration.java
package com.atguigu.config;
import com.atguigu.prop.RobotProperties;
import com.atguigu.service.RobotService;
import org.springframework.context.annotation.Configuration;
import org.springframework.context.annotation.Import;
@Configuration
@Import({RobotProperties.class, RobotService.class})
public class RobotAutoConfiguration {
}
5、org.springframework.boot.autoconfigure.AutoConfiguration.imports
com.atguigu.config.RobotAutoConfiguration
6、使用自定义启动器pom.xml
<?xml version="1.0" encoding="UTF-8"?>
<project xmlns="http://maven.apache.org/POM/4.0.0"
         xmlns:xsi="http://www.w3.org/2001/XMLSchema-instance"
         xsi:schemaLocation="http://maven.apache.org/POM/4.0.0 http://maven.apache.org/xsd/maven-4.0.0.xsd">
    <modelVersion>4.0.0</modelVersion>

    <groupId>com.atguigu</groupId>
    <artifactId>pro27-springboot-use-mystarter</artifactId>
    <version>1.0-SNAPSHOT</version>

    <!--所有springboot项目都必须继承自 spring-boot-starter-parent -->
    <parent>
        <groupId>org.springframework.boot</groupId>
        <artifactId>spring-boot-starter-parent</artifactId>
        <version>3.0.5</version>
        <relativePath />  <!-- 根据情况添加 -->
    </parent>

    <properties>
        <maven.compiler.source>17</maven.compiler.source>
        <maven.compiler.target>17</maven.compiler.target>
        <project.build.sourceEncoding>UTF-8</project.build.sourceEncoding>
    </properties>

    <dependencies>
        <!--web开发的场景启动器 -->
        <dependency>
            <groupId>org.springframework.boot</groupId>
            <artifactId>spring-boot-starter-web</artifactId>
        </dependency>

        <!--导入配置处理器,配置文件自定义的properties配置都会有提示-->
        <dependency>
            <groupId>org.springframework.boot</groupId>
            <artifactId>spring-boot-configuration-processor</artifactId>
            <optional>true</optional>
        </dependency>

        <dependency>
            <groupId>org.projectlombok</groupId>
            <artifactId>lombok</artifactId>
        </dependency>

        <dependency>
            <groupId>com.atguigu</groupId>
            <artifactId>pro26-springboot-mystarter</artifactId>
            <version>1.0-SNAPSHOT</version>
        </dependency>
    </dependencies>
</project>
7、HelloController.java
package com.atguigu.controller;
import com.atguigu.service.RobotService;
import org.springframework.beans.factory.annotation.Autowired;
import org.springframework.web.bind.annotation.GetMapping;
import org.springframework.web.bind.annotation.RequestMapping;
import org.springframework.web.bind.annotation.RestController;
@RestController
@RequestMapping("/hello")
public class HelloController {
    @Autowired
    private RobotService robotService;

    @GetMapping
    public String h01() {
        return robotService.sayHello();
    }
}
8、application.yml
atguigu:
  robot:
    name: jim
    age: 20
    email: jim@sina.com.cn
9、MyApplication.java
package com.atguigu;
import org.springframework.boot.SpringApplication;
import org.springframework.boot.autoconfigure.SpringBootApplication;
@SpringBootApplication
public class MyApplication {
    public static void main(String[] args) {
        SpringApplication.run(MyApplication.class);
    }
}
10、.yml
在Spring Boot中,
.yml和.yaml文件是用于配置应用的。它们是YAML(Yet Another Markup Language)格式的文件,这种格式是基于Unicode的,容易阅读和与脚本语言交互的编程语言。它以数据为中心,比JSON和XML更适合做配置文件。Spring Boot的配置文件主要分为两种类型:
application.properties和application.yml。这些文件通常放在src/main/resources路径下,可以对默认属性进行修改。具体来说,YAML配置文件的作用主要表现在以下几个方面:
- 修改Spring Boot自动配置的默认值。在底层,Spring Boot已经自动配置好了一些默认属性,通过YAML文件,我们可以修改这些默认配置。
- 添加额外的自定义配置。除了修改默认配置,我们还可以在YAML文件中添加额外的自定义配置。
总的来说,YAML配置文件使得我们能够更灵活地定制Spring Boot应用的行为和属性。
在英语中,“yet”通常表示“仍然”、“但是”或“还”的意思,强调某事尚未完成或仍然存在。在YAML(Yet Another Markup Language)中,“yet”并没有特定的含义,它只是作为一个标识符(或名称)用于区分其他类似的标记语言。YAML的设计者选择这个名称可能是为了强调它是一种新的、与众不同的标记语言,或者仅仅是因为他们喜欢这个单词的发音和拼写。无论原因是什么,这个名称已经成为了YAML的代名词,被广泛使用和接受。
