目录
一、自己封装response
二、在响应头中放数据
HttpResponse
redirect
编辑
render
JsonResponse
三、函数和方法区别 ----》绑定方法区别
四、上传图片和开启media访问
五、页面静态化(解决访问率高的问题)
一、自己封装response
- 第一步,在app01下新建一个py文件 ----> response.py
- 想要传一个字典(({'name':"kevin"})),类加括号必然会触发__init__,由于只有一个参数self,需要用data接受另外一个参数
from django.shortcuts import HttpResponse


import json


class MyResponse(HttpResponse):
    def __init__(self, data):
        res = json.dumps(data, ensure_ascii=False) # 进行序列化

return super().__init__(res) # 将res传进来- 第二步,写视图函数
from django.shortcuts import render

# Create your views here.

from .response import MyResponse  # 相对导入


def index(request):
return MyResponse({'code': 100, 'msg': '请求成功'})- 第三步,配置路由
from django.contrib import admin
from django.urls import path

from app01.views import index

urlpatterns = [
    path('admin/', admin.site.urls),
    path('', index),  # 访问根路径
]- 第四步,启动,结果如下

- 若data传入是字符串('请求成功'),则依然可以

- 可做一个小限制,在第一层判断是不是字典或列表,才能序列化
class MyResponse(HttpResponse):
    def __init__(self, data):
        if isinstance(data, dict) or isinstance(data, list):
            res = json.dumps(data, ensure_ascii=False)  # 进行序列化

            return super().__init__(res) # 将res传入
二、在响应头中放数据
HttpResponse
- 方式一
def index(request):
    return HttpResponse('ok', headers={'xxx': 'xxx'})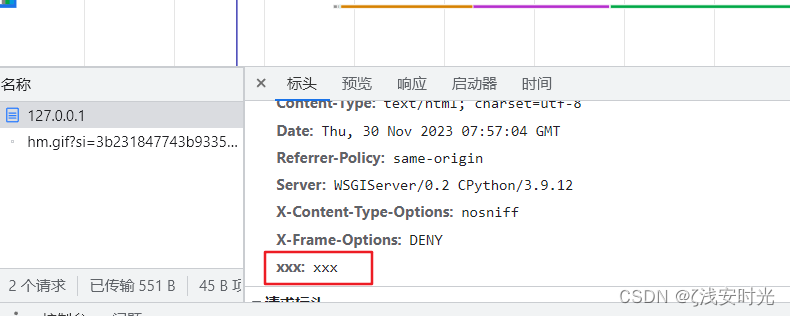
- 方式二
def index(request):
    # return HttpResponse('ok', headers={'xxx': 'xxx'})
    obj = HttpResponse('ok')
    obj['yyy'] = 'yyy'  # 像字典一样放入,最终会放在http的响应头中
    return obj
redirect
- 重定向第三方的网站
return redirect('http://www.baidu.com')- 重定向自己的网站(login)
- 视图函数
from django.shortcuts import render,redirect,HttpResponse,resolve_url

from django.http import JsonResponse
# Create your views here.

from .response import MyResponse


def index(request):

    # return redirect('http://www.baidu.com')
    # res = resolve_url('login')  # 反向解析,通过名字拿到真正的字符串的地址
    # return redirect('/login', headers={'xxx': 'ssss'})  # 不生效
    obj = redirect('/login')
    obj['xxx'] = 'xxx'
    return obj


def login(request):
return HttpResponse('login')- 路由
from django.contrib import admin
from django.urls import path

from app01.views import index, login

urlpatterns = [
    path('admin/', admin.site.urls),
    path('', index),  # 访问根路径
    path('login/', login, name='login'), # 访问login
]
render
    # return render(request,'index.html',headers={'xxx': 'ssss'}) # 不行
    obj = render(request, 'index.html')
    obj['xxx'] = 'xxx'
    return obj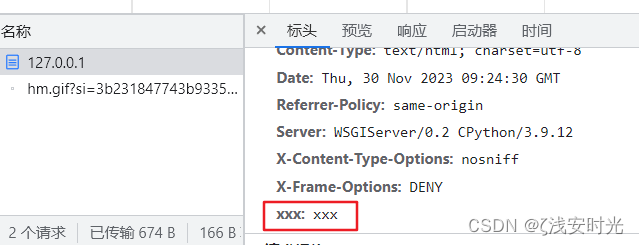
JsonResponse
- 方式一
return JsonResponse({'name': 'lqz'}, headers={'xxx': 'ssss'})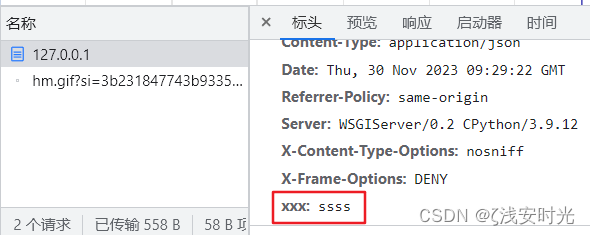
- 方式二
    obj = JsonResponse({'name': 'lqz'})
    obj['yyy'] = 'yyy'
    return obj
三、函数和方法区别 ----》绑定方法区别
- 绑定给对象的方法 ---》对象来调用 ----> 类来调用
- 类来调用对象的绑定方法 ----》这个方法就变成了普通函数,有几个值就要传几个值
- 正常需要传这个类的对象 ----》因为可能方法内部使用了对象
- 但是如果内部没有使用对象 ----》可以随意传个对象
class Person:

    # 对象绑定方法 ---》写在类中,没有任何装饰器
    def run(self):
        # print(self.name)
        print('人走路')


### 对象绑定方法 ###
# p = Person()
# p.run()
Person.run(1)
Person.run(Person())- 绑定给类的方法 ---》类来调用 ----> 对象来调用
### 绑定给类的方法 ###
# Person.xx()  # 正统 类来调用
# Person().xx()
p = Person()
p.xx() # 对象来调用,类的绑定方法,会自动把当前对象的类拿到,传入进去- 静态方法
class Person:

    # 对象绑定方法---》写在类中,没有任何装饰器
    def run(self):
        # print(self.name)
        print('人走路')

    @classmethod
    def xx(cls):
        # 把类传入了,类可以实例化得到对象
        p = cls()  # 直接类实例化得到对象,要不要传参数,取决于Person类有没有写__init__
        print(p)
        print('类的绑定方法,xxx')

    # 静态方法 --->本质就是个函数
    @staticmethod
    def yy():
        print('staticmethod')
Person.yy() # 类来调用
Person().yy() # 对象来调用总结: 函数和方法
- 方法有特殊性,绑定给谁,就需要谁来调用,调用时会自动传值
- 只能能自动传值,它就是个方法
- 函数,有几个值就要传几个值,不能多也不能少
查看一个 '函数' 到底是函数还是方法
from types import FunctionType, MethodType
def add():
    pass

print(isinstance(add,FunctionType)) # True
print(isinstance(add,MethodType)) # Fals


print(isinstance(Person.xx,FunctionType)) # False  # 类来调用是个方法
print(isinstance(Person.xx,MethodType)) # True

print(isinstance(Person().xx,FunctionType)) # False  # 类来调用是个方法
print(isinstance(Person().xx,MethodType)) # True


print(isinstance(Person.yy,FunctionType)) # True  静态方法,自动传值了吗? 没有,就是函数
print(isinstance(Person.yy,MethodType)) # False


print(isinstance(Person().run,FunctionType)) # false
print(isinstance(Person().run,MethodType)) # True

print(isinstance(Person.run,FunctionType)) # True 不能自动传值---》就是函数
print(isinstance(Person.run,MethodType)) # False
四、上传图片和开启media访问
- views.py
from django.shortcuts import render, redirect, HttpResponse
from django.conf import settings

def index(request):
    obj = render(request, 'index.html')
    obj['xxx'] = 'xxx'
    return obj

def login(request):
    return HttpResponse('login')


# from django_demo04 import settings
# django 有两套配置文件--》一套是项目自己的,一套内置的
def upload_img(request):
    myfile = request.FILES.get('myfile')
    print(settings.MEDIA_ROOT)
    # with open(settings.MEDIA_ROOT + '/%s' % myfile.name, 'wb') as f:
    with open('media/%s' % myfile.name, 'wb') as f:
        for line in myfile:
            f.write(line)
return HttpResponse('图片上传成功')- urls.py
from django.contrib import admin
from django.urls import path

from app01.views import upload_img

urlpatterns = [
    path('admin/', admin.site.urls),
    path('', index),  # 访问根路径
    path('login/', login, name='login'),
    path('uplowd_img', upload_img),
]- settings.py
MEDIA_ROOT = os.path.join(BASE_DIR, 'media')启动之后发现没有开启这个路径

1 static文件夹,配置文件写好了,会自动开启
- static文件夹,只要配置如下,就会自动开启
- 浏览器中可以直接访问到它
所以在static文件夹下不要放重要内容,因为客户端可以直接下载访问!
STATIC_URL = '/static/'
STATICFILES_DIRS = [os.path.join(BASE_DIR, 'static')]
MEDIA_ROOT = os.path.join(BASE_DIR, 'media')
2 我们想让media这个文件夹像static文件夹一样,能被用户浏览器访问
- 自己开启路由
- url中写路由
访问的路径是:http://127.0.0.1:8000/ media/default.png
- media/img/default.png
- 访问meida这种路径,django会去 document_root指定的文件夹下找对应的文件
正则方法 re_path
re_path('^media/(?P<path>.*)', serve, kwargs={'document_root': settings.MEDIA_ROOT}),转换器 path
path('media/<path:path>', serve, kwargs={'document_root': settings.MEDIA_ROOT})即
from django.contrib import admin
from django.urls import path, re_path

from app01.views import upload_img, index, login

from django.views.static import serve
from django.conf import settings
urlpatterns = [
    path('admin/', admin.site.urls),
    path('', index),  # 访问根路径
    path('login/', login, name='login'),
    path('uplowd_img', upload_img),
    path('media/<path:path>', serve, kwargs={'document_root': settings.MEDIA_ROOT})
]
html
<!DOCTYPE html>
<html lang="en">
<head>
    <meta charset="UTF-8">
    <title>Title</title>
</head>
<body>
<h1>看帅哥</h1>
<img src="http://127.0.0.1:8000/media/img/default.png" alt="">
</body>
</html>
总结:
以后想开启media的访问
1 在项目根路径创建media文件
2 在配置文件中配置
MEDIA_ROOT = os.path.join(BASE_DIR, 'media')3 路由中配置:
path('media/<path:path>', serve, kwargs={'document_root': settings.MEDIA_ROOT}) 结果如下

五、页面静态化(解决访问率高的问题)
models.py
from django.db import models

# Create your models here.
class Book(models.Model):
    name = models.CharField(max_length=32)
    price = models.IntegerField()
    publish = models.CharField(max_length=64)
views.py
from .models import Book


from django.conf import settings

from django.template import Template, Context

import os
def books_view(request):
    # 做静态化
    if os.path.exists(os.path.join(settings.BASE_DIR, 'cache', 'books.html')):
        print('不走数据库')
        with open('cache/books.html', 'rt', encoding='utf-8') as f:
            res_str = f.read()
        return HttpResponse(res_str)
    else:
        books = Book.objects.all()
        with open('templates/books.html', 'rt', encoding='utf-8') as f:
            res = f.read()
        t = Template(res)
        c = Context({'books': books})
        html = t.render(c)
        # 保存起来
        with open('cache/books.html', 'wt', encoding='utf-8') as f:
            f.write(html)
        return HttpResponse(html)
urls.py
from app01.views import upload_img, index, login,books_view
from django.views.static import serve
from django.conf import settings

urlpatterns = [
    path('admin/', admin.site.urls),
    path('', index),
    path('books/', books_view),
books.html
<!DOCTYPE html>
<html lang="en">
<head>
    <meta charset="UTF-8">
    <title>Title</title>
    <script src="https://cdn.bootcdn.net/ajax/libs/jquery/3.7.1/jquery.min.js"></script>
    <link href="https://cdn.bootcdn.net/ajax/libs/twitter-bootstrap/3.3.7/css/bootstrap.min.css" rel="stylesheet">
    <script src="https://cdn.bootcdn.net/ajax/libs/twitter-bootstrap/3.3.7/js/bootstrap.min.js"></script>
</head>
<body>

<div class="container">
    <div class="row">

        <div class="col-md-8 col-md-offset-2">


            <table class="table table-striped">
                <thead>
                <tr>
                    <th>id号</th>
                    <th>图书名</th>
                    <th>图书价格</th>
                    <th>出版社</th>
                </tr>
                </thead>
                <tbody>

                {% for book in books %}
                    <tr>
                        <th scope="row">{{ book.id }}</th>
                        <td>{{ book.name }}</td>
                        <td>{{ book.price }}</td>
                        <td>{{ book.publish }}</td>
                    </tr>
                {% endfor %}


                </tbody>
            </table>
        </div>
    </div>
</div>
</body>
</html>
插入一些数据
import os
os.environ.setdefault('DJANGO_SETTINGS_MODULE', 'django01.settings')
import django
django.setup()
import random
from app01.models import Book
for i in range(100):
    Book.objects.create(name='图书_%s'%i,price=random.randint(1,100),publish='%s出版社'%i)
