Ingress-controller高可用
- Ingress-controller高可用
- 特别注意:
- 通过keepalived+nginx实现ingress-nginx-controller高可用
- 安装nginx主备:
- 修改nginx配置文件。主备一样
- keepalive配置
- 主keepalived
- 备keepalive
- k8snode1和k8snode2启动服务
- 测试vip是否绑定成功
- 测试keepalived:
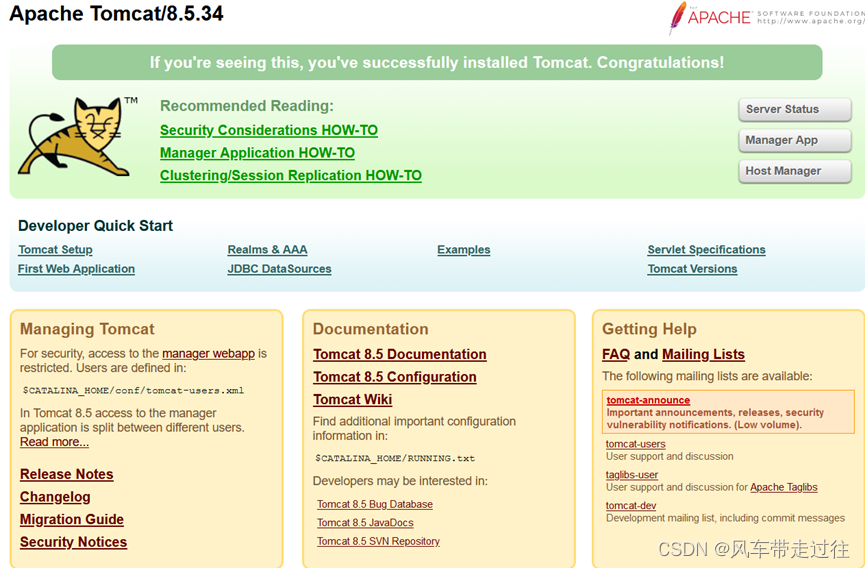
- 测试Ingress HTTP代理k8s内部pod
- 部署后端tomcat服务
- 编写ingress规则
- 如果有报错
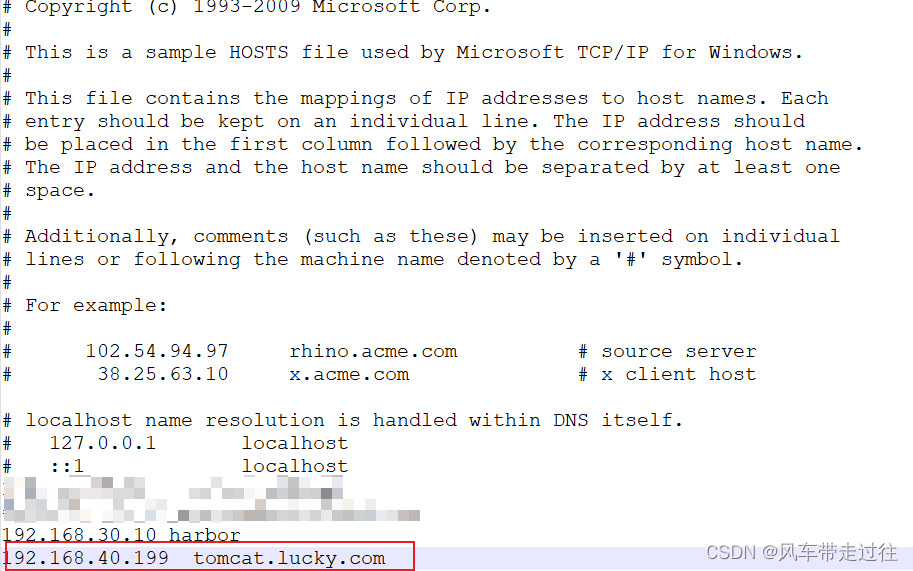
- 修改电脑本地的host文件,增加如下一行,IP为VIP
- 代理流程:
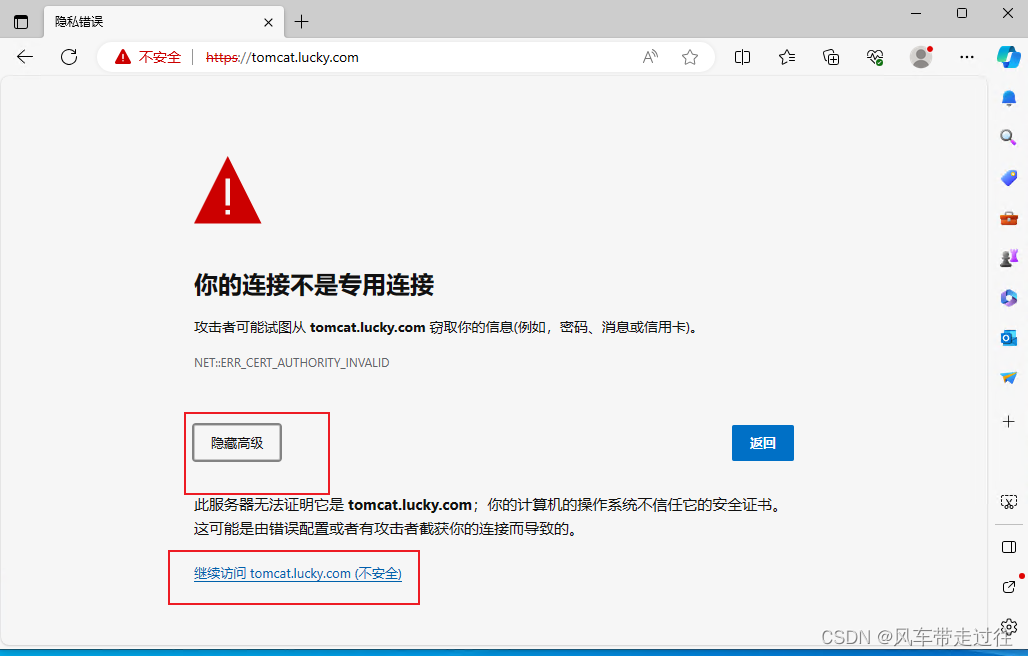
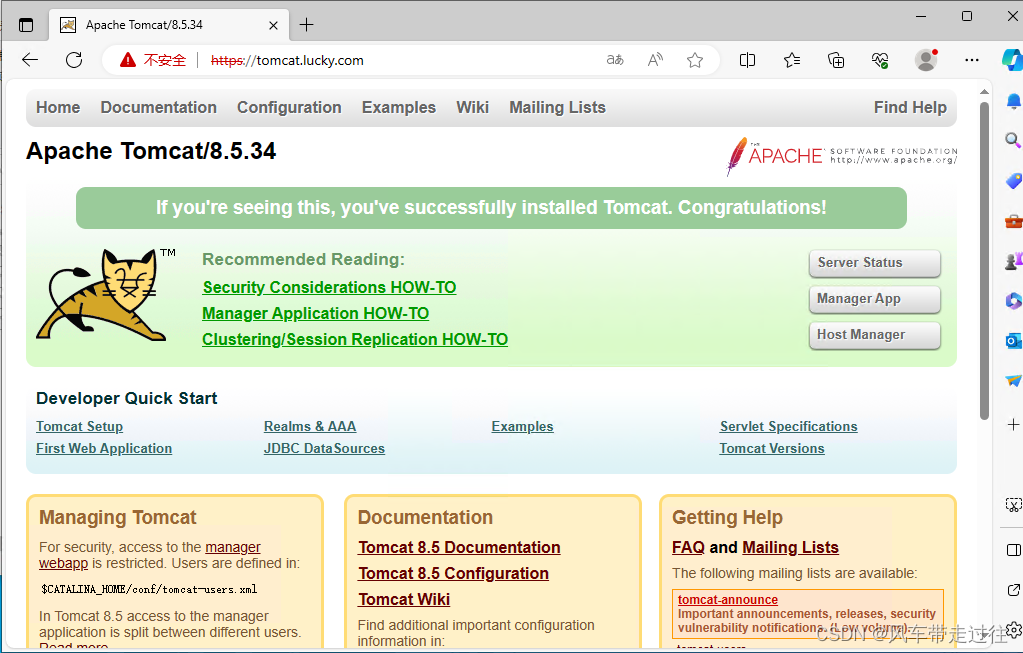
- 测试Ingress HTTPS代理k8s内部pod
- 构建TLS站点
- 创建Ingress
- 同一个k8s搭建多套Ingress-controller
- 原理以及注意事项
- 创建Ingress规则:
Ingress-controller高可用
Ingress Controller是集群流量的接入层,对它做高可用非常重要,可以基于keepalive实现nginx-ingress-controller高可用,具体实现如下:
- Ingress-controller根据Deployment+ nodeSeletor+pod反亲和性方式部署在k8s指定的两个work节点,nginx-ingress-controller这个pod共享宿主机ip,然后通过keepalive+nginx实现nginx-ingress-controller高可用
参考:https://github.com/kubernetes/ingress-nginx
https://github.com/kubernetes/ingress-nginx/tree/main/deploy/static/provider/baremetal
特别注意:
- 因为我们现在安装的k8s版本是1.25,那就需要按照文档步骤ctr -n=k8s.io images import导出镜像,如果k8s版本是1.24之前的,可以用docker load -i解压,现在安装更新到了k8s1.25,所以导出镜像需要用ctr -n=k8s.io images import
将ingress-nginx-controllerv1.1.0.tar.gz 上传至节点
链接:https://pan.baidu.com/s/1BP1Vr0IUxkMYqrP-MDs8vQ?pwd=0n68
提取码:0n68
ctr -n=k8s.io images import ingress-nginx-controllerv1.1.0.tar.gz
docker load -i ingress-nginx-controllerv1.1.0.tar.gz
ctr -n=k8s.io images import kube-webhook-certgen-v1.1.0.tar.gz
docker load -i kube-webhook-certgen-v1.1.0.tar.gz
##如果k8s版本是1.24之前的用docker load -i解压
#docker load -i ingress-nginx-controllerv1.1.0.tar.gz
ingress-deploy.yaml
链接:https://pan.baidu.com/s/1nNx9ZDHCu1stqtV7qo6bJA?pwd=x9pg
提取码:x9pg
kubectl apply -f ingress-deploy.yaml
通过keepalived+nginx实现ingress-nginx-controller高可用

安装nginx主备:
在k8snode1和k8snode2上做nginx主备安装
yum install epel-release nginx keepalived nginx-mod-stream -y
修改nginx配置文件。主备一样
cat /etc/nginx/nginx.conf
user nginx;
worker_processes auto;
error_log /var/log/nginx/error.log;
pid /run/nginx.pid;

include /usr/share/nginx/modules/*.conf;

events {
    worker_connections 1024;
}
# 四层负载均衡,为两台Master apiserver组件提供负载均衡
stream {

    log_format  main  '$remote_addr $upstream_addr - [$time_local] $status $upstream_bytes_sent';

    access_log  /var/log/nginx/k8s-access.log  main;

    upstream k8s-ingress-controller {
       server 192.168.40.12:80 weight=5 max_fails=3 fail_timeout=30s;   # k8snode1 IP:PORT
       server 192.168.40.13:80 weight=5 max_fails=3 fail_timeout=30s;  # k8snode2 IP:PORT
    }

    server {
       listen 30080;
       proxy_pass k8s-ingress-controller;
    }
}

http {
    log_format  main  '$remote_addr - $remote_user [$time_local] "$request" '
                      '$status $body_bytes_sent "$http_referer" '
                      '"$http_user_agent" "$http_x_forwarded_for"';

    access_log  /var/log/nginx/access.log  main;

    sendfile            on;
    tcp_nopush          on;
    tcp_nodelay         on;
    keepalive_timeout   65;
    types_hash_max_size 2048;

    include             /etc/nginx/mime.types;
    default_type        application/octet-stream;

}

#备注:
#server 反向服务地址和端口
#weight 权重
#max_fails 失败多少次,认为主机已挂掉,则踢出
#fail_timeout 踢出后重新探测时间
注意:nginx监听端口变成大于30000的端口,比方说30080,这样访问域名:30080就可以了,必须是满足大于30000以上,才能代理ingress-controller
keepalive配置
主keepalived
cat /etc/keepalived/keepalived.conf
global_defs {
   notification_email {
     acassen@firewall.loc
     failover@firewall.loc
     sysadmin@firewall.loc
   }
   notification_email_from Alexandre.Cassen@firewall.loc
   smtp_server 127.0.0.1
   smtp_connect_timeout 30
   router_id NGINX_MASTER
}

vrrp_script check_nginx {
    script "/etc/keepalived/check_nginx.sh"
}

vrrp_instance VI_1 {
    state MASTER
    interface ens33  # 修改为实际网卡名
    virtual_router_id 51 # VRRP 路由 ID实例,每个实例是唯一的
    priority 100    # 优先级,备服务器设置 90
    advert_int 1    # 指定VRRP 心跳包通告间隔时间,默认1秒
    authentication {
        auth_type PASS
        auth_pass 1111
    }
    # 虚拟IP
    virtual_ipaddress {
        192.168.40.199/24
    }
    track_script {
        check_nginx
    }
}

#vrrp_script:指定检查nginx工作状态脚本(根据nginx状态判断是否故障转移)
#virtual_ipaddress:虚拟IP(VIP)
cat /etc/keepalived/check_nginx.sh
#!/bin/bash
#1、判断Nginx是否存活
counter=$(ps -ef |grep nginx | grep sbin | egrep -cv "grep|$$" )
if [ $counter -eq 0 ]; then
    #2、如果不存活则尝试启动Nginx
    service nginx start
    sleep 2
    #3、等待2秒后再次获取一次Nginx状态
    counter=$(ps -ef |grep nginx | grep sbin | egrep -cv "grep|$$" )
    #4、再次进行判断,如Nginx还不存活则停止Keepalived,让地址进行漂移
    if [ $counter -eq 0 ]; then
        service  keepalived stop
    fi
fi
chmod +x /etc/keepalived/check_nginx.sh
备keepalive
cat /etc/keepalived/keepalived.conf
global_defs {
   notification_email {
     acassen@firewall.loc
     failover@firewall.loc
     sysadmin@firewall.loc
   }
   notification_email_from Alexandre.Cassen@firewall.loc
   smtp_server 127.0.0.1
   smtp_connect_timeout 30
   router_id NGINX_BACKUP
}

vrrp_script check_nginx {
    script "/etc/keepalived/check_nginx.sh"
}

vrrp_instance VI_1 {
    state BACKUP
    interface ens33
    virtual_router_id 51 # VRRP 路由 ID实例,每个实例是唯一的
    priority 90
    advert_int 1
    authentication {
        auth_type PASS
        auth_pass 1111
    }
    virtual_ipaddress {
        192.168.1.199/24
    }
    track_script {
        check_nginx
    }
}
cat /etc/keepalived/check_nginx.sh
#!/bin/bash
#1、判断Nginx是否存活
counter=$(ps -ef |grep nginx | grep sbin | egrep -cv "grep|$$" )
if [ $counter -eq 0 ]; then
    #2、如果不存活则尝试启动Nginx
    service nginx start
    sleep 2
    #3、等待2秒后再次获取一次Nginx状态
    counter=$(ps -ef |grep nginx | grep sbin | egrep -cv "grep|$$" )
    #4、再次进行判断,如Nginx还不存活则停止Keepalived,让地址进行漂移
    if [ $counter -eq 0 ]; then
        service  keepalived stop
    fi
fi
chmod +x /etc/keepalived/check_nginx.sh
注:keepalived根据脚本返回状态码(0为工作正常,非0不正常)判断是否故障转移。
k8snode1和k8snode2启动服务
systemctl daemon-reload
systemctl enable nginx keepalived
systemctl start nginx
systemctl start keepalived
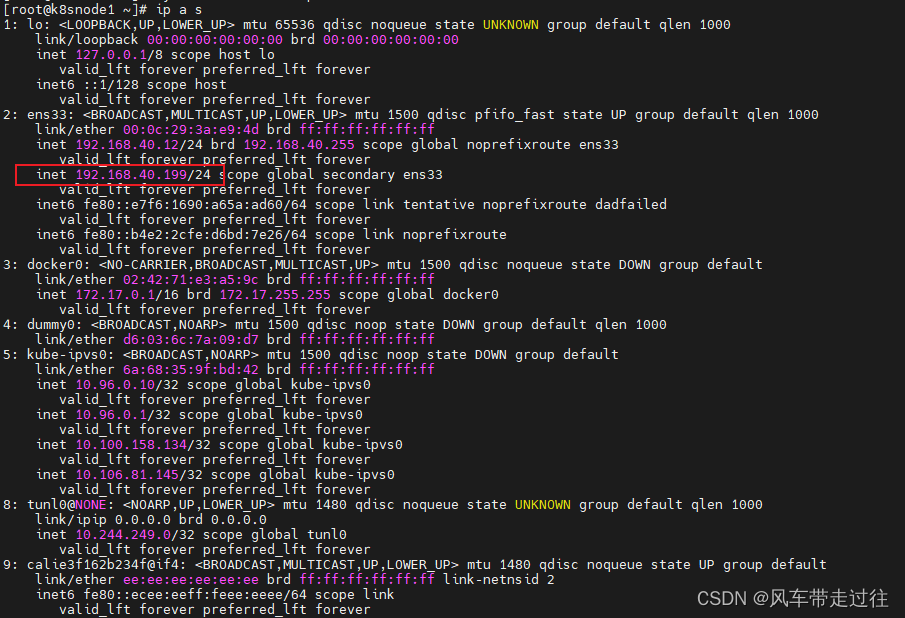
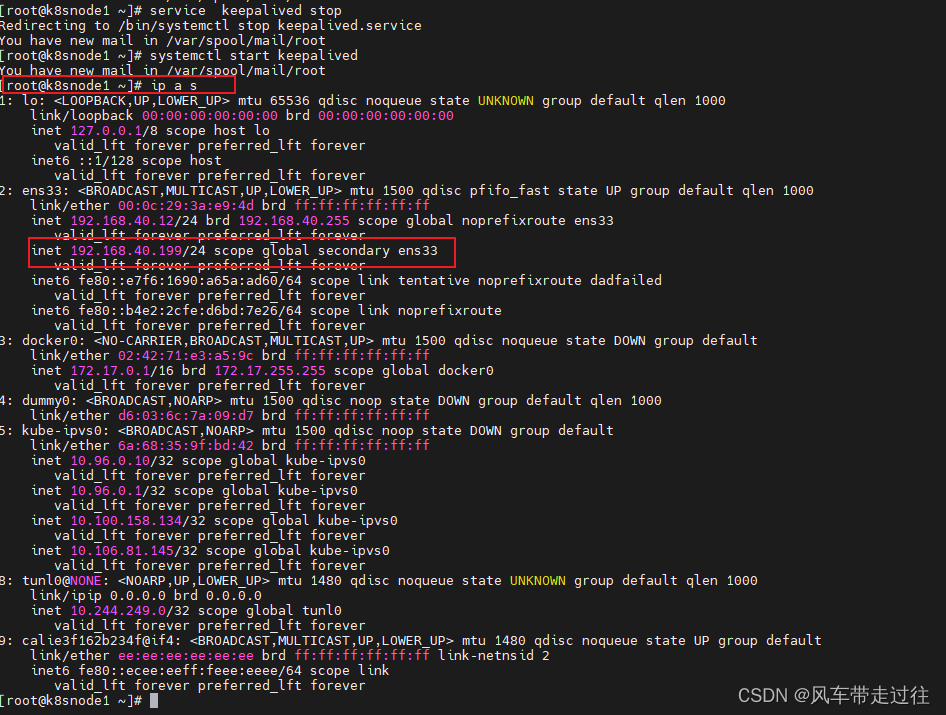
测试vip是否绑定成功
在k8snode1执行
ip addr
测试keepalived:
停掉k8snode1上的keepalived。Vip会漂移到k8snode2
service keepalived stop

在k8snode1启动keepalived ,Vip又会漂移到k8snode1
systemctl start keepalived
测试Ingress HTTP代理k8s内部pod
部署后端tomcat服务
tomcat:8.5.34-jre8-alpine
链接:https://pan.baidu.com/s/18AU47-mvEMeqFS9IGUQURw?pwd=abyo
提取码:abyo
cat ingress-demo.yaml
apiVersion: v1
kind: Service
metadata:
  name: tomcat
  namespace: default
spec:
  selector:
    app: tomcat
    release: canary
  ports:
  - name: http
    targetPort: 8080
    port: 8080
  - name: ajp
    targetPort: 8009
    port: 8009
---
apiVersion: apps/v1
kind: Deployment
metadata:
  name: tomcat-deploy
  namespace: default
spec:
  replicas: 2
  selector:
    matchLabels:
      app: tomcat
      release: canary
  template:
    metadata:
      labels:
        app: tomcat
        release: canary
    spec:
      containers:
      - name: tomcat
        image: tomcat:8.5.34-jre8-alpine
        imagePullPolicy: IfNotPresent
        ports:
        - name: http
          containerPort: 8080
          name: ajp
          containerPort: 8009
kubectl apply -f ingress-demo.yaml
kubectl get pods -l app=tomcat
编写ingress规则
ingress-myapp.yaml
链接:https://pan.baidu.com/s/1UE81sqHEELqPQhB6lx5xEQ?pwd=hxmc
提取码:hxmc
kubectl apply -f ingress-myapp.yaml
编写ingress的配置清单
vim ingress-myapp.yaml
apiVersion: networking.k8s.io/v1
kind: Ingress
metadata:
  name: ingress-myapp
  namespace: default
spec:
  ingressClassName: nginx
  rules:
  - host: tomcat.lucky.com
    http:
      paths:
      - backend:
          service:
            name: tomcat
            port:
              number: 8080
        path: /
        pathType: Prefix
kubectl apply -f ingress-myapp.yaml
如果有报错
报错如下:

解决办法:
kubectl delete -A ValidatingWebhookConfiguration ingress-nginx-admission
kubectl apply -f ingress-myapp.yaml
kubectl get pods -n ingress-nginx -o wide
修改电脑本地的host文件,增加如下一行,IP为VIP
本地hosts文件位置
C:\Windows\System32\drivers\etc
宿主机浏览器访问:tomcat.lucky.com
代理流程:
tomcat.lucky.com:30080->192.168.40.199:30080->192.168.40.181:80,192.168.40.182:80->svc: tomcat:8080->tomcat-deploy-
测试Ingress HTTPS代理k8s内部pod
构建TLS站点
准备证书,在k8smaster1节点操作
cd /root/
openssl genrsa -out tls.key 2048
openssl req -new -x509 -key tls.key -out tls.crt -subj /C=CN/ST=Beijing/L=Beijing/O=DevOps/CN=tomcat.lucky.com
生成secret,在k8smaster1节点操作
kubectl create secret tls tomcat-ingress-secret --cert=tls.crt --key=tls.key
查看secret
kubectl get secret

查看tomcat-ingress-secret详细信息
kubectl describe secret tomcat-ingress-secret

创建Ingress
Ingress规则可以参考官方:
https://kubernetes.io/zh/docs/concepts/services-networking/ingress/
cat ingress-tomcat-tls.yaml
apiVersion: networking.k8s.io/v1
kind: Ingress
metadata:
  name: ingress-tomcat-tls
  namespace: default
spec:
  ingressClassName: nginx
  tls:
  - hosts:
    -  tomcat.lucky.com
    secretName: tomcat-ingress-secret
  rules:
  - host: tomcat.lucky.com
    http:
      paths:
      - path: /
        pathType:  Prefix
        backend:
         service:
           name: tomcat
           port:
            number: 8080
更新yaml文件
kubectl delete -f ingress-myapp.yaml
kubectl apply -f ingress-tomcat-tls.yaml
再次访问 tomcat.lucky.com
同一个k8s搭建多套Ingress-controller
原理以及注意事项
- ingress可以简单理解为service的service,他通过独立的ingress对象来制定请求转发的规则,把请求路由到一个或多个service中。这样就把服务与请求规则解耦了,可以从业务维度统一考虑业务的暴露,而不用为每个service单独考虑。
- 在同一个k8s集群里,部署两个ingress nginx。一个deploy部署给A的API网关项目用。另一个daemonset部署给其它项目作域名访问用。这两个项目的更新频率和用法不一致,暂时不用合成一个。
- 为了满足多租户场景,需要在k8s集群部署多个ingress-controller,给不同用户不同环境使用。
主要参数设置:
containers:
        - name: nginx-ingress-controller
          image: registry.cn-hangzhou.aliyuncs.com/google_containers/nginx-ingress-controller:v1.1.0
          args:
            - /nginx-ingress-controller
            - --ingress-class=ngx-ds
注意:–ingress-class设置该Ingress Controller可监听的目标Ingress Class标识;
注意:同一个集群中不同套Ingress Controller监听的Ingress Class标识必须唯一,且不能设置为nginx关键字(其是集群默认Ingress Controller的监听标识);
创建Ingress规则:
apiVersion: networking.k8s.io/v1
kind: Ingress
metadata:
  name: ingress-myapp
  namespace: default
spec:
  ingressClassName: nginx
  rules:
  - host: tomcat.lucky.com
    http:
      paths:
      - path: /
        pathType:  Prefix
        backend:
         service:
           name: tomcat
           port:
            number: 8080
注意:这里要设置为你前面配置的
controller.ingressClass唯一标识
ingressClassName: nginx-ds
