YOLOV8解读及推理代码
- YOLOV8
- 前言
- 性能对比
- 新的骨干网络
- 新的 Ancher-Free 检测头
- 新的损失函数
- 环境配置
- 训练
- 基于python脚本
- 基于命令行
- 推理
- pt模型推理
- onnx模型推理
YOLOV8
前言
YOLOv8并非一个全新的目标检测网络,而是在YOLOv5的基础上进行了升级。其主要升级包括:
- 新的骨干网络
- 创新的Ancher-Free检测头
- 新的损失函数
性能对比
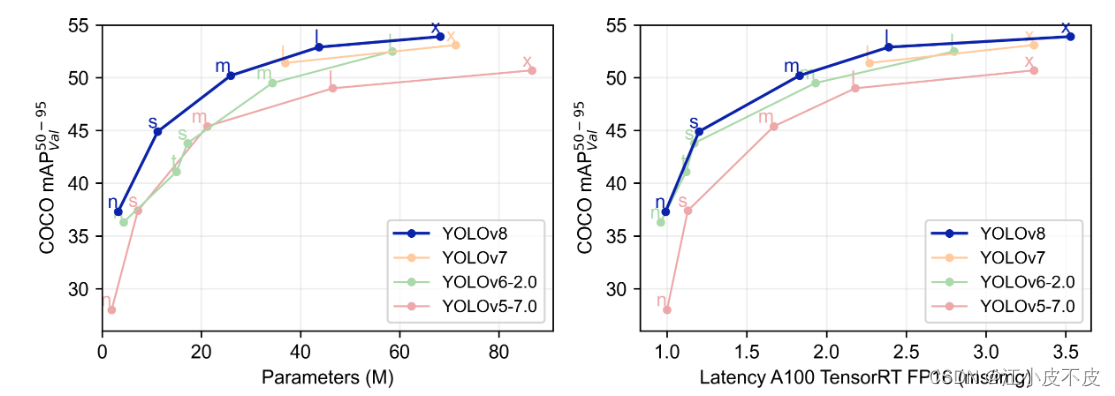
下表展示了在COCO Val 2017数据集上官方进行测试的mAP、参数量和FLOPs的结果。
| 模型 | YOLOv5 | params(M) | FLOPs@640 (B) | YOLOv8 | params(M) | FLOPs@640 (B) |
|---|---|---|---|---|---|---|
| n | 28.0(300e) | 1.9 | 4.5 | 37.3 (500e) | 3.2 | 8.7 |
| s | 37.4 (300e) | 7.2 | 16.5 | 44.9 (500e) | 11.2 | 28.6 |
| m | 45.4 (300e) | 21.2 | 49.0 | 50.2 (500e) | 25.9 | 78.9 |
| l | 49.0 (300e) | 46.5 | 109.1 | 52.9 (500e) | 43.7 | 165.2 |
| x | 50.7 (300e) | 86.7 | 205.7 | 53.9 (500e) | 68.2 | 257.8 |
可以看出,相较于YOLOv5,YOLOv8在精度上取得了显著提升。然而,N/S/M模型的参数量和FLOPs相应地也有相当的增加。此外,大多数模型相较于YOLOv5,在推理速度上都略有下降。
新的骨干网络
YOLOv8引入了一系列关键的改进,特别是在骨干网络方面:
- 第一个卷积层的kernel由6x6缩减为3x3,以提高特征提取的精度和效率。
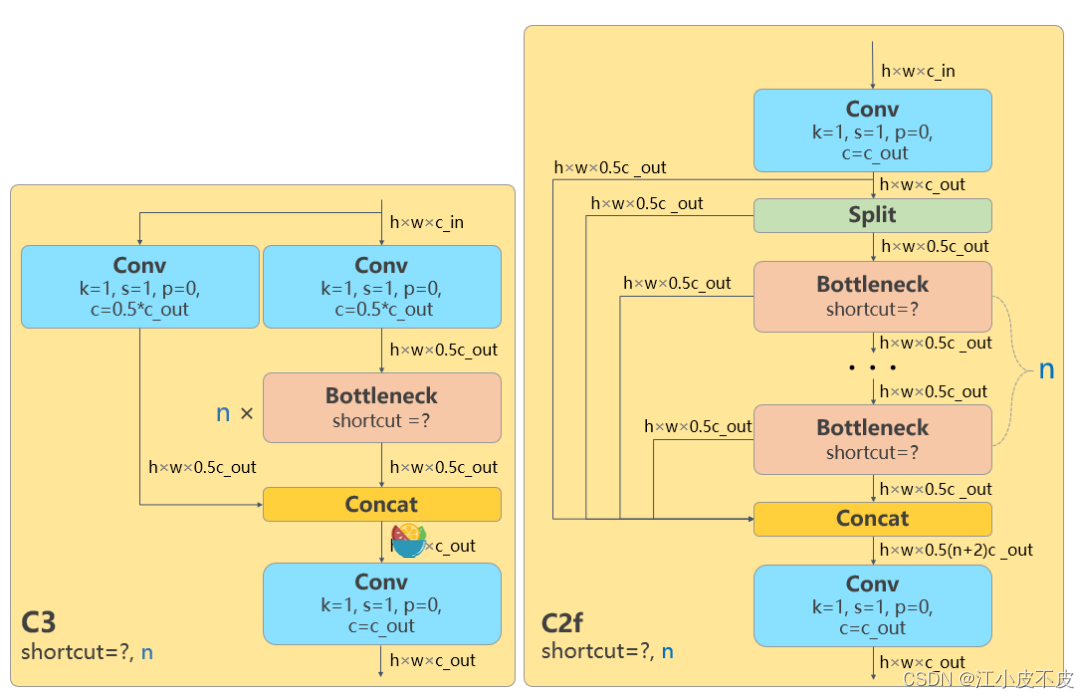
- 所有的C3模块都被替换为C2f模块,结构更为复杂,引入了更多的跳层连接和额外的Split操作,以促进信息的更好传递。
- 删除了Neck模块中的两个卷积连接层,以简化网络结构。
- 在Backbone中,C2f的block数由3-6-9-3调整为3-6-6-3,以优化网络的深度和复杂度。
新的 Ancher-Free 检测头
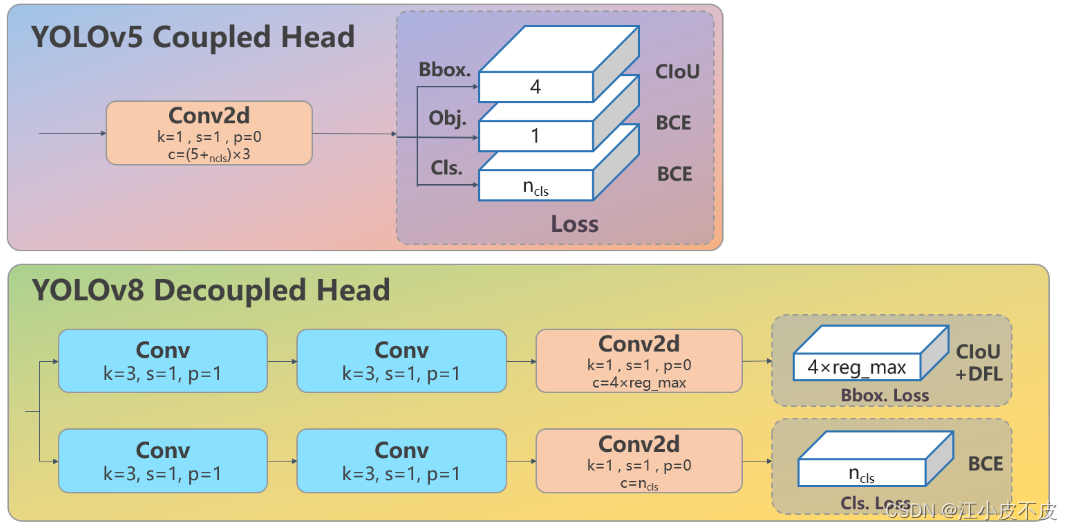
在YOLOv8中,Head部分经历了一系列重大变化,从原先的耦合头演变为解耦头,并且从YOLOv5的Anchor-Based设计转变为Anchor-Free设计。这一变化带来了以下关键特点:
- 解耦设计: Head部分不再采用之前的紧密耦合结构,而是进行了解耦,使分类和回归分支更为独立。
- Anchor-Free设计: 与YOLOv5的Anchor-Based设计不同,YOLOv8的Head部分摒弃了之前的objectness分支,转而实现了Anchor-Free设计,从而简化了模型结构。
- 回归分支创新: Head部分的回归分支采用了Distribution Focal Loss中提出的积分形式表示法,这一创新提高了模型对目标定位和边界框回归的效果。
这些变化共同构成了YOLOv8 Head部分的新特征,使其在目标检测任务中更具灵活性和性能。
新的损失函数
YOLOv8的损失函数计算涉及两个主要分支:分类分支和回归分支,不再包含之前的objectness分支。这两个分支的损失通过一定的权重比例进行加权。
- 分类分支: 仍然使用二元交叉熵(BCE Loss)来处理目标分类问题。
- 回归分支: 引入Distribution Focal Loss的积分形式表示法,同时还采用了CIoU Loss。这种设计使得回归分支更加精细化,有助于提高目标的定位和边界框回归的准确性。
通过这样的损失函数设计,YOLOv8在训练过程中能够更好地优化模型参数,使其在目标检测任务中取得更好的性能。
环境配置
conda create -n yolov8_env python==3.9
pip install ultralytics
conda activate yolov8_env
git clone https://github.com/ultralytics/ultralytics
训练
基于python脚本
from ultralytics import YOLO

# 加载模型
# model = YOLO("yolov8n.yaml")  # 从头开始构建新模型
model = YOLO("yolov8n.pt")  # 加载预训练模型(建议用于训练)

# 使用模型
model.train(data="ultralytics/ultralytics/datasets/VOC_lw.yaml", epochs=100,batch=16,patience=0)  # 训练模型
metrics = model.val()  # 在验证集上评估模型性能
基于命令行
yolo task=detect mode=train model=yolov8n.yaml data=ultralytics/ultralytics/datasets/VOC.yaml
推理
pt模型推理
results = model("https://ultralytics.com/images/bus.jpg") # 对图像进行预测
onnx模型推理
- pt模型转onnx
yolo export model=best.pt format=onnx opset=12
- 基于ultralytics进行onnx推理
from ultralytics import YOLO
import os
# Load a model
model = YOLO('best.onnx')  # load an official model

# Predict with the model
# results = model('62.png')  # predict on an image
path = "climb/images"
img_list = [os.path.join(path,dir) for dir in os.listdir(path)]
for im in img_list:
    model.predict(im, save=True, imgsz=640, conf=0.40)
- onnx推理
import numpy as np
import cv2

import logging


CLASSES = ['dog']
colors = np.random.uniform(0, 255, size=(len(CLASSES), 3))

def draw_bounding_box(img, class_id, confidence, x, y, x_plus_w, y_plus_h):
    label = f'{CLASSES[class_id]} ({confidence:.2f})'
    color = colors[class_id]
    cv2.rectangle(img, (x, y), (x_plus_w, y_plus_h), color, 2)
    cv2.putText(img, label, (x - 10, y - 10), cv2.FONT_HERSHEY_SIMPLEX, 0.5, color, 2)

class DogDetector:
    def __init__(self, model_path = None):
        # logging.info(f"start init model")
        self.model: cv2.dnn.Net = cv2.dnn.readNetFromONNX(model_path)
        self.img_det_size = 640


    def __call__(self , image, score_threshold = 0.9):
        blob = self.img_process(image)
        self.model.setInput(blob)
        outputs = self.model.forward()

        outputs = np.array([cv2.transpose(outputs[0])])
        rows = outputs.shape[1]

        boxes = []
        scores = []
        class_ids = []

        for i in range(rows):
            classes_scores = outputs[0][i][4:]
            (minScore, maxScore, minClassLoc, (x, maxClassIndex)) = cv2.minMaxLoc(classes_scores)
            if maxScore >= 0.25:
                box = [
                    outputs[0][i][0] - (0.5 * outputs[0][i][2]), outputs[0][i][1] - (0.5 * outputs[0][i][3]),
                    outputs[0][i][2], outputs[0][i][3]]
                boxes.append(box)
                scores.append(maxScore)
                class_ids.append(maxClassIndex)

        result_boxes = cv2.dnn.NMSBoxes(boxes, scores, score_threshold, 0.45, 0.5)
        detections = []
        # logging.info(f"result_boxes is : {result_boxes}")
        for i in range(len(result_boxes)):
            index = result_boxes[i]
            box = boxes[index]
            x1,y1,x2,y2 = round(box[0] * self.scale), round(box[1] * self.scale),round((box[0] + box[2]) * self.scale), round((box[1] + box[3]) * self.scale)
            box = [x1,y1,x2,y2]
            detection = {
                'class_id': class_ids[index],
                'class_name': CLASSES[class_ids[index]],
                'confidence': scores[index],
                'box': box,
                'scale': self.scale}
            detections.append(detection)
            draw_bounding_box(image, class_ids[index], scores[index], round(box[0] * self.scale), round(box[1] * self.scale),
                            round((box[0] + box[2]) * self.scale), round((box[1] + box[3]) * self.scale))

        return detections


    def img_process(self, img):
        img = cv2.cvtColor(img,cv2.COLOR_BGR2RGB)
        original_image: np.ndarray = img
        [height, width, _] = original_image.shape
        length = max((height, width))
        logging.info(f"img shape:{height,width}")
        image = np.zeros((length, length, 3), np.uint8)
        image[0:height, 0:width] = original_image
        self.scale = length / self.img_det_size

        blob = cv2.dnn.blobFromImage(image, scalefactor=1 / 255, size=(640, 640), swapRB=True)
        return blob
if __name__ == '__main__':
	image = cv2.imread("dog.png")
	model = DogDetector(model_path="best.onnx")
	detections = model(image, score_threshold=0.5)
