*
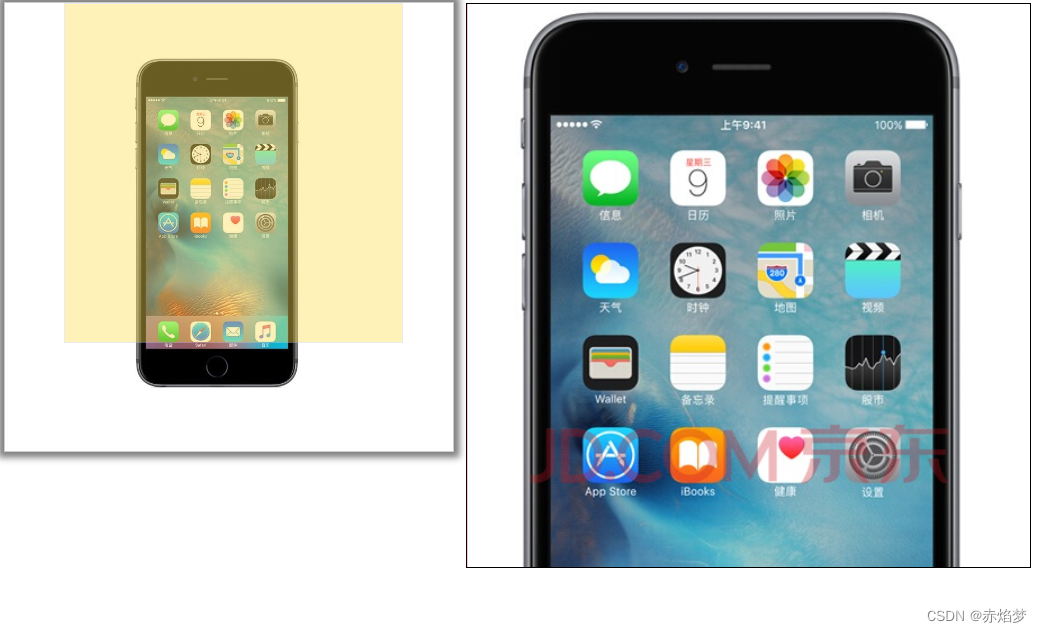
这个仿京东的商品放大镜效果真不好做!
鼠标拖拽:
*
代码:
<!DOCTYPE html>
<html lang="en">
<head>
<meta charset="UTF-8">
<meta http-equiv="X-UA-Compatible" content="IE=edge">
<meta name="viewport" content="width=device-width, initial-scale=1.0">
<title>Document</title>
</head>
<style>
.preview_img{
position: relative;
height: 398px;
width: 398px;
border:1px solid #ccc;
box-shadow: 0 0 6px 5px rgba(0, 0, 0, 0.5);
}
.preview_img .small{
width: 398px;
height: 398px;
}
.mask{
display: none;
position: absolute;
top:0; left:0;
width: 300px; height: 300px;
background-color: #FEDE4F;
opacity: .4;
border:1px solid #ccc;
cursor: move;
}
.big{
display: none;
position: absolute;
left:410px;
top:0;
width: 500px;
height: 500px;
background-color: pink;
z-index:999 ;
border:1px solid black;
overflow: hidden;
}
.big .bigimg{
position: absolute;
top:0; left:0;
}
</style>
<body>
<div class="preview_img">
<img src="img/b3.png" alt="" class="small">
<div class="mask"></div>
<div class="big">
<img src="img/big.jpg" alt="" class="bigimg">
</div>
</div>
</body>
<script>
var img=document.querySelector('.preview_img');
var big=document.querySelector('.big');
var mask=document.querySelector('.mask');
img.addEventListener('mouseover',function(e) {
big.style.display = "block";
mask.style.display = "block";
})
img.addEventListener('mouseout',function(e) {
big.style.display = "none";
mask.style.display = "none";
})
img.addEventListener('mousemove',function(e) {
var x=e.pageX-this.offsetLeft;
var y = e.pageY - this.offsetTop;
var maskX=x-mask.offsetWidth/2;
var maskY=y-mask.offsetHeight / 2;
var maskMax= img.offsetWidth-mask.offsetWidth;
if (maskX<0){
maskX = 0;
}
if (maskY < 0) {
maskY = 0;
}
if(maskX>maskMax){
maskX=maskMax;
}
// 正方形宽高一样,所以maskMax可以替换
if(maskY>maskMax){
maskY=maskMax;
}
mask.style.left=maskX+'px';
mask.style.top=maskY+'px';
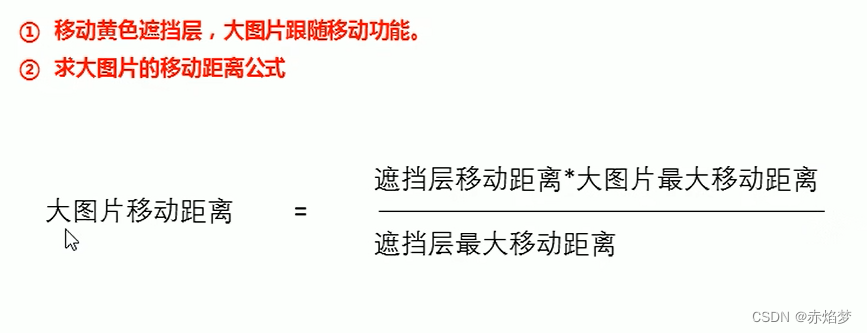
//大图的移动距离:遮挡层移动距离*大图片最大移动距离 /遮挡层的最大移动距离
var bigImg=document.querySelector('.bigimg')
// 大图片最大移动距离
var bigMax=bigImg.offsetWidth-big.offsetWidth ;
var bigX=(maskX)*bigMax/(maskMax);
var bigY=(maskY)*bigMax/(maskMax);
bigImg.style.left =-bigX + "px";
bigImg.style.top = -bigY + "px";
})
</script>
</html>
拖动模态框:
<!DOCTYPE html>
<html lang="en">
<head>
    <meta charset="UTF-8">
    <meta http-equiv="X-UA-Compatible" content="IE=edge">
    <meta name="viewport" content="width=device-width, initial-scale=1.0">
    <title>Document</title>
</head>
<style>

 .login-header {
            width: 100%;
            text-align: center;
            height: 30px;
            font-size: 24px;
            line-height: 30px;
        }

        ul,
        li,
        ol,
        dl,
        dt,
        dd,
        div,
        p,
        span,
        h1,
        h2,
        h3,
        h4,
        h5,
        h6,
        a {
            padding: 0px;
            margin: 0px;
        }

        .login {
            display: none;
            width: 512px;
            height: 280px;
            position: fixed;
            border: #ebebeb solid 1px;
            left: 50%;
            top: 50%;
            background: #ffffff;
            box-shadow: 0px 0px 20px #ddd;
            z-index: 9999;
            transform: translate(-50%, -50%);
        }

        .login-title {
            width: 100%;
            margin: 10px 0px 0px 0px;
            text-align: center;
            line-height: 40px;
            height: 40px;
            font-size: 18px;
            position: relative;
            cursor: move;
        }

        .login-input-content {
            margin-top: 20px;
        }

        .login-button {
            width: 50%;
            margin: 30px auto 0px auto;
            line-height: 40px;
            font-size: 14px;
            border: #ebebeb 1px solid;
            text-align: center;
        }

        .login-bg {
            display: none;
            width: 100%;
            height: 100%;
            position: fixed;
            top: 0px;
            left: 0px;
            background: rgba(0, 0, 0, .3);
        }

        a {
            text-decoration: none;
            color: #000000;
        }

        .login-button a {
            display: block;
        }

        .login-input input.list-input {
            float: left;
            line-height: 35px;
            height: 35px;
            width: 350px;
            border: #ebebeb 1px solid;
            text-indent: 5px;
        }

        .login-input {
            overflow: hidden;
            margin: 0px 0px 20px 0px;
        }

        .login-input label {
            float: left;
            width: 90px;
            padding-right: 10px;
            text-align: right;
            line-height: 35px;
            height: 35px;
            font-size: 14px;
        }

        .login-title span {
            position: absolute;
            font-size: 12px;
            right: -20px;
            top: -30px;
            background: #ffffff;
            border: #ebebeb solid 1px;
            width: 40px;
            height: 40px;
            border-radius: 20px;
        }
    </style>
</head>

<body>
    <div class="login-header"><a id="link" href="javascript:;">点击,弹出登录框</a></div>
    <div id="login" class="login">
        <div id="title" class="login-title">登录会员
            <span><a id="closeBtn" href="javascript:void(0);" class="close-login">关闭</a></span>
        </div>
        <div class="login-input-content">
            <div class="login-input">
                <label>用户名:</label>
                <input type="text" placeholder="请输入用户名" name="info[username]" id="username" class="list-input">
            </div>
            <div class="login-input">
                <label>登录密码:</label>
                <input type="password" placeholder="请输入登录密码" name="info[password]" id="password" class="list-input">
            </div>
        </div>
        <div id="loginBtn" class="login-button"><a href="javascript:void(0);" id="login-button-submit">登录会员</a></div>
    </div>
    <!-- 遮盖层 -->
    <div id="bg" class="login-bg"></div>
</body>
<script>
    var login=document.querySelector('.login');
    var mask = document.querySelector('.login-bg');
    var link=document.querySelector('#link');
    var closeBtn=document.querySelector('#closeBtn');
    //点击link,让mask和login显示出来
    link.addEventListener('click',function(e) {
        mask.style.display = "block";
        login.style.display = "block";
    })
    //点击closeBtn,就隐藏 mask和login
    closeBtn.addEventListener('click',function(e) {
        mask.style.display = "none";
        login.style.display = "none";
    })
//实现拖拽效果,在title位置才能进行拖拽
var title=document.querySelector("#title");
title.addEventListener("mousedown", function(e) {
    //获取鼠标的位置:e.pageX
  var y=e.pageY-login.offsetTop;
    var x=e.pageX-login.offsetLeft;
    //鼠标按下之后进行拖动
    //让鼠标在页面中的坐标减去鼠标在盒子里的坐标就是盒子的left和top值
    document.addEventListener('mousemove',move)
    function move(e) {
        login.style.left = e.pageX-x+'px';
        login.style.top = e.pageY - y + "px";
    }
    // 鼠标弹起,停止拖拽,移除事件
    document.addEventListener('mouseup',function(e) {
        document.removeEventListener('mousemove',move)
    })

})
</script>
</html>
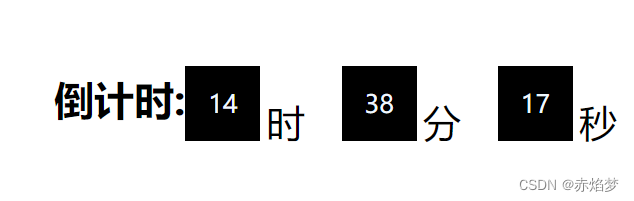
倒计时效果:
<!DOCTYPE html>
<html lang="en">
<head>
    <meta charset="UTF-8">
    <meta http-equiv="X-UA-Compatible" content="IE=edge">
    <meta name="viewport" content="width=device-width, initial-scale=1.0">
    <title>Document</title>
</head>
<style>
    div{
        margin: 200px 400px;
    }

    h1{
        display: block;
        height: 60px;
        line-height: 10px;
        float: left;
    }
span{
    float: left;
    margin-right: 5px;
    display: block;
    width: 60px; height: 60px;
    background-color: black;
    color:aliceblue;
    font-size :20px;
    text-align: center;
    line-height: 60px;

}
p{
    float: left;

        height: 60px;
        line-height: 30px;

    width: 60px; height: 60px;
    color:black;
    font-size :30px;


}
</style>
<body>
    <div>
        <h1>倒计时:</h1>
        <span class="hour"></span><p>时</p>
        <span class="minute"></span><p>分</p>
        <span class="second"></span><p>秒</p>
    </div>
</body>
<script>
    var hour=document.querySelector('.hour');
    var minute=document.querySelector('.minute');
    var second=document.querySelector('.second');

    var inputTime= +new Date("2022-12-30 10:50:00");  //返回的是用户输入时间总的毫秒数
   //先调用一次,防止刷新出现空白
   countDown();
    //开启定时器
    setInterval(countDown,1000)
    function countDown(time) {


        // 使用时间戳去计算不会出现负值
       var nowTime= +new Date(); //返回的是当前时间总的毫秒数

        var times=(inputTime - nowTime)/1000;  //times是剩余时间总的秒数

        var h=parseInt(times / 60 / 60 % 24);//小时
        h=h<10?'0'+h:h;
        hour.innerHTML=h;
       var m=parseInt(times / 60 % 60); //分钟
       m=m<10?'0'+m:m;
       minute.innerHTML = m;
       var s=parseInt(times % 60);//秒
       s=s<10?'0'+s:s;
        second.innerHTML = s;

   }


</script>
</html>
快递单号查询:
<!DOCTYPE html>
<html lang="en">
<head>
<meta charset="UTF-8">
<meta http-equiv="X-UA-Compatible" content="IE=edge">
<meta name="viewport" content="width=device-width, initial-scale=1.0">
<title>Document</title>
</head>
<style>
* {
margin: 0;
padding: 0;
}
.search {
position: relative;
width: 178px;
margin: 100px;
}
.con {
display: none;
position: absolute;
top: -40px;
width: 171px;
border: 1px solid rgba(0, 0, 0, .2);
box-shadow: 0 2px 4px rgba(0, 0, 0, .2);
padding: 5px 0;
font-size: 18px;
line-height: 20px;
color: #333;
}
.con::before{
content:"";
width: 0; height: 0;
position: absolute;
top: 28px;
left: 18px;
border:8px solid #000;
border-style:solid dashed dashed;
border-color: aliceblue transparent transparent;
}
</style>
<body>
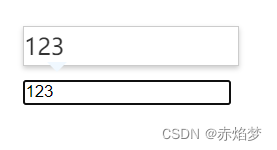
<div class="search">
<div class="con">123</div>
<input type="text" placeholder="请输入快递单号" class="jd">
</div>
</body>
<script>
var con=document.querySelector(".con");
var jd=document.querySelector(".jd");
jd.addEventListener('keyup',function(e){
if(jd.value===''){
con.style.display = "none";
}else {con.style.display = "block";
con.innerHTML=jd.value;}
});
//失去焦点,隐藏盒子
jd.addEventListener('blur',function(e) {
con.style.display = "none";
});
//获得焦点,显示盒子
jd.addEventListener('focus',function(e) {
if(jd.value !== "")
con.style.display = "block";
})
</script>
</html>
鼠标跟随:
黑马pink:
<!DOCTYPE html>
<html lang="en">
<head>
    <meta charset="UTF-8">
    <meta http-equiv="X-UA-Compatible" content="IE=edge">
    <meta name="viewport" content="width=device-width, initial-scale=1.0">
    <title>Document</title>
</head>
<style>
    img{
        position: absolute;
    }
</style>
<body>
    <!-- 按照绝对定位,获取鼠标位置,让"小天使”的位置随着鼠标变化,达成跟随效果 -->
<img src="angel.gif" alt="">
</body>
<script>
    var img=document.querySelector("img");
    document.addEventListener('mousemove',function(e){
       var x=e.pageX;
       var y=e.pageY;
        img.style.left=x-42+'px'
        img.style.top=y-34+'px'

    });
</script>
</html>
千峰:
<!DOCTYPE html>
<html lang="en">
<head>
    <meta charset="UTF-8">
    <meta http-equiv="X-UA-Compatible" content="IE=edge">
    <meta name="viewport" content="width=device-width, initial-scale=1.0">
    <title>Document</title>
    <style>
        *{padding:0;  margin:0;}

        #box{
            width: 200px;
w            height: 50px;
            background-color: red;
            position: relative;
            margin: 100px;
        }
        #box p{
            width: 300px;
            height: 200px;
            background-color: aqua;
            position: absolute;
            left: 100px; top: 100px;
            display: none;
            pointer-events: none;
            /* 穿透 */
            z-index: 100;
        }
        </style>
</head>
<!-- 做一个点击头像然后显示内容 -->
<body>
    <div id="box">
        你的头像
        <p>
            头像介绍
        </p>
    </div>
</body>
<script>

box.onmouseover = function(){
    this.firstElementChild.style.display="block";
}
box.onmouseout = function(){
    this.firstElementChild.style.display="none";
}
box.onmousemove=function(evt){
    // console.log(evt.offsetX,evt.offsetY)
    this.firstElementChild.style.left=evt.offsetX+50+"px";
    this.firstElementChild.style.top=evt.offsetY+50+"px";
}

</script>
</html>