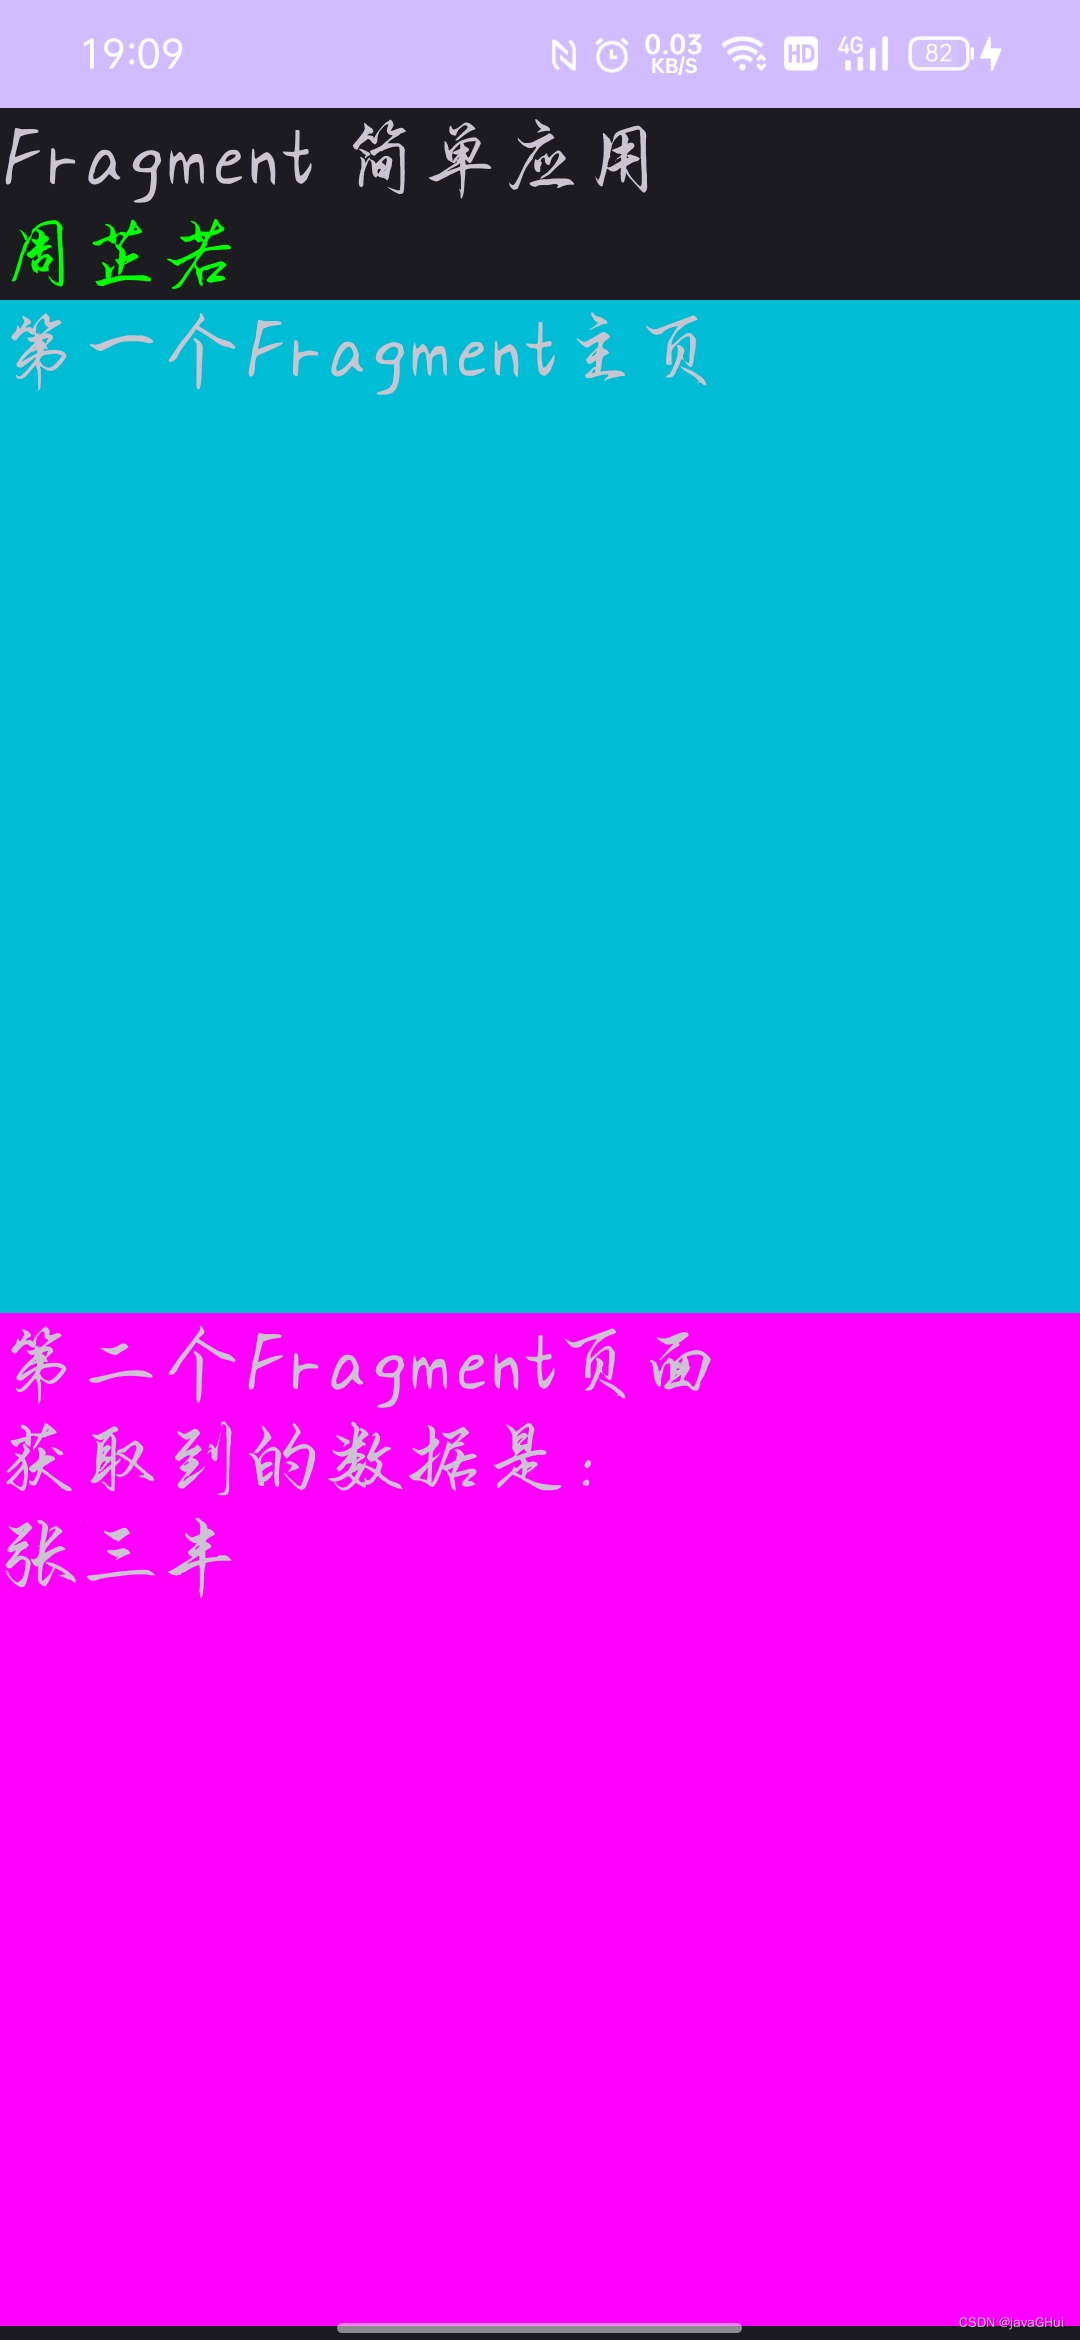
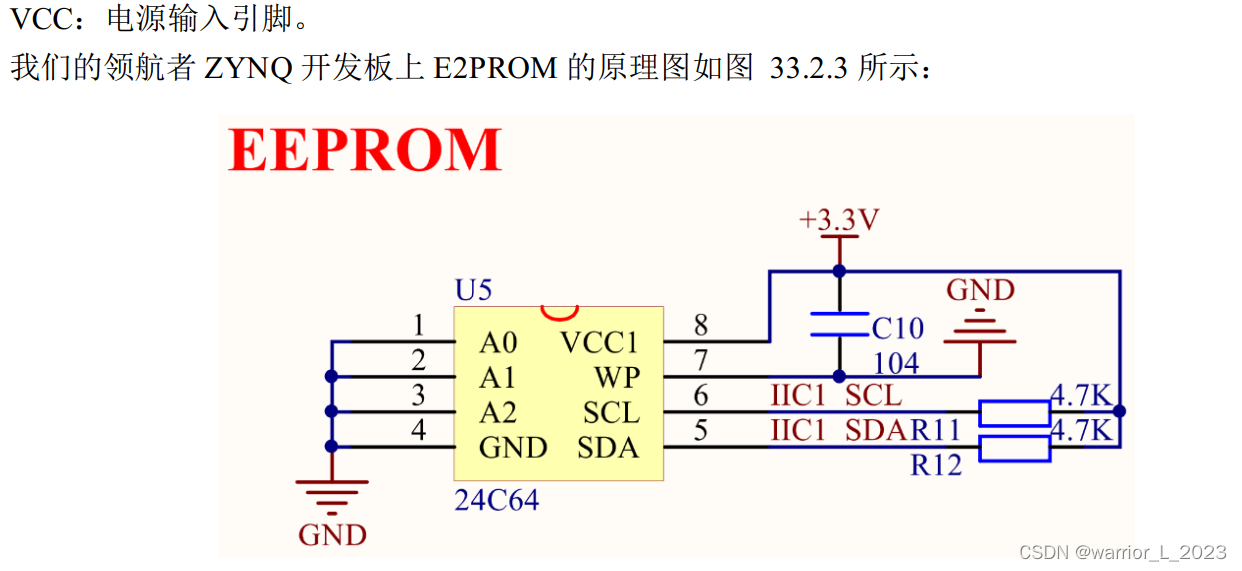
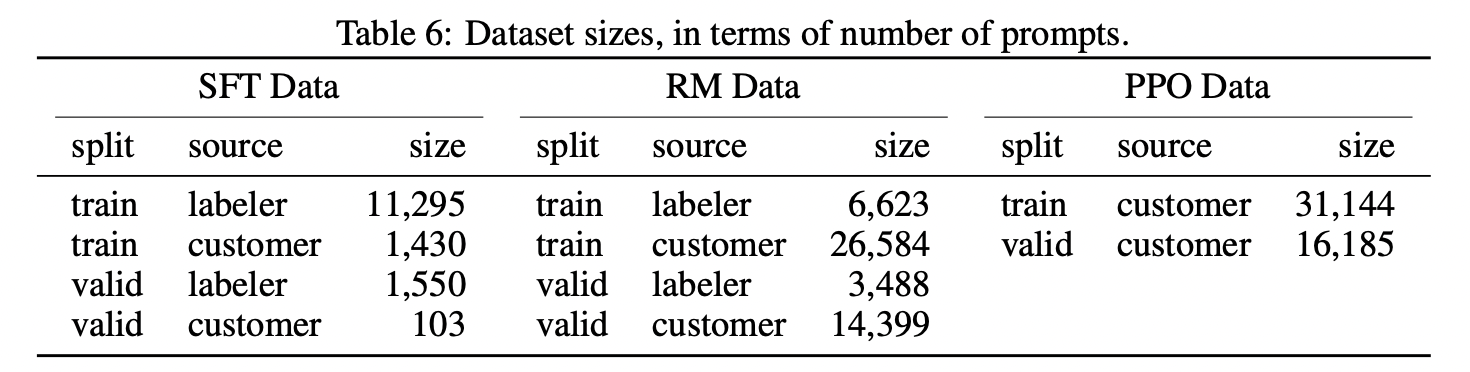
示例图:
创建 Fragment new -> Fragment -> Fragment(Blank)
MainActivity.java
package com.example.fragmentdemo;

import androidx.appcompat.app.AppCompatActivity;
import androidx.fragment.app.FragmentManager;
import androidx.fragment.app.FragmentTransaction;

import android.os.Bundle;
import android.widget.LinearLayout;
import android.widget.TextView;

public class MainActivity extends AppCompatActivity {

    private TextView textView;
    @Override
    protected void onCreate(Bundle savedInstanceState) {
        super.onCreate(savedInstanceState);
        setContentView(R.layout.activity_main);
        textView = findViewById(R.id.tv_get_result);

        TwoFragment twoFragment = new TwoFragment();
        //数据传递
        Bundle bundle = new Bundle();
        bundle.putString("name","张三丰");
        twoFragment.setArguments(bundle);

        //接收TwoFragment 传递过来的参数
        twoFragment.setPassingData(new TwoFragment.Myinterface() {
            @Override
            public void getResult(String data) {
                textView.setText(data);
            }
        });

        //动态添加Fragment
        FragmentManager fragmentManager = getSupportFragmentManager();
        FragmentTransaction fragmentTransaction = fragmentManager.beginTransaction();
          // 通过id , 把 twoFragment 添加到LinearLayout布局中
        fragmentTransaction.add(R.id.linear_layout,twoFragment);
        // 替换
//        fragmentTransaction.replace(R.id.linear_layout,twoFragment);

        //删除
//        fragmentTransaction.remove(twoFragment);
        // 添加到回退栈  点击返时重新创建fragment
       fragmentTransaction.addToBackStack(null);

        //提交
        fragmentTransaction.commit();
    }
}
HomeFragment.java
package com.example.fragmentdemo;

import android.os.Bundle;

import androidx.fragment.app.Fragment;

import android.view.LayoutInflater;
import android.view.View;
import android.view.ViewGroup;


public class HomeFragment extends Fragment {


    @Override
    public View onCreateView(LayoutInflater inflater, ViewGroup container,
                             Bundle savedInstanceState) {
        // Inflate the layout for this fragment
        return inflater.inflate(R.layout.fragment_home, container, false);
    }
}
TwoFragment.java
package com.example.fragmentdemo;

import android.os.Bundle;

import androidx.fragment.app.Fragment;

import android.view.LayoutInflater;
import android.view.View;
import android.view.ViewGroup;
import android.widget.TextView;


public class TwoFragment extends Fragment {
    private TextView textView;
    @Override
    public View onCreateView(LayoutInflater inflater, ViewGroup container,
                             Bundle savedInstanceState) {
        // Inflate the layout for this fragment
        View view = inflater.inflate(R.layout.fragment_two, container, false);
        //获取数据
        String name = getArguments().getString("name");
        textView = view.findViewById(R.id.tv_get_data);
        textView.setText(name);

        return view;
    }

    // 给主页面传递参数
    public void setPassingData(Myinterface myinterface){
        String name = "周芷若";
        myinterface.getResult(name);
    }
    //定义一个接口
    public interface Myinterface{
        void getResult(String data);
    }
}
主布局 activity_main.xml
<?xml version="1.0" encoding="utf-8"?>
<LinearLayout xmlns:android="http://schemas.android.com/apk/res/android"
    xmlns:app="http://schemas.android.com/apk/res-auto"
    xmlns:tools="http://schemas.android.com/tools"
    android:layout_width="match_parent"
    android:layout_height="match_parent"
    android:orientation="vertical"
    tools:context=".MainActivity">


    <TextView
        android:textSize="24sp"
        android:layout_width="wrap_content"
        android:layout_height="wrap_content"
        android:text="Fragment 简单应用"
        />
    <TextView
        android:id="@+id/tv_get_result"
        android:textSize="24sp"
        android:textColor="#ff00ff00"
        android:layout_width="match_parent"
        android:layout_height="wrap_content"
 />
    <!-- 注意:要加id
      android:name 引入java类-->
    <fragment
        android:id="@+id/fragment_test"
        android:name="com.example.fragmentdemo.HomeFragment"
        android:layout_width="match_parent"
        android:layout_height="300dp"
        />

    <LinearLayout
        android:id="@+id/linear_layout"
        android:layout_width="match_parent"
        android:layout_height="300dp"
        android:orientation="horizontal" />
</LinearLayout>
fragment_home.xml
<?xml version="1.0" encoding="utf-8"?>
<FrameLayout xmlns:android="http://schemas.android.com/apk/res/android"
    xmlns:tools="http://schemas.android.com/tools"
    android:background="#00BCD4"
    android:layout_width="match_parent"
    android:layout_height="match_parent"
    tools:context=".HomeFragment">

    <!-- TODO: Update blank fragment layout -->
    <TextView
        android:textSize="24sp"
        android:layout_width="match_parent"
        android:layout_height="match_parent"
        android:text="@string/hello_blank_fragment" />


</FrameLayout>
fragment_two.xml
<?xml version="1.0" encoding="utf-8"?>
<LinearLayout xmlns:android="http://schemas.android.com/apk/res/android"
    xmlns:tools="http://schemas.android.com/tools"
    android:layout_width="match_parent"
    android:layout_height="match_parent"
    android:orientation="vertical"
    android:background="#ff00ff"
    tools:context=".TwoFragment">

    <!-- TODO: Update blank fragment layout -->
    <TextView
        android:textSize="24sp"
        android:layout_width="match_parent"
        android:layout_height="wrap_content"
        android:text="@string/hello_blank_fragment_two" />
    <TextView
        android:text="获取到的数据是:"
        android:textSize="24sp"
        android:layout_width="match_parent"
        android:layout_height="wrap_content"
        />
    <TextView
        android:id="@+id/tv_get_data"
        android:textSize="24sp"
        android:layout_width="match_parent"
        android:layout_height="wrap_content"
        />

</LinearLayout>


![[含泪解决]OSError: [Errno 99] Cannot assign requested address__踩坑记录——app.py绑定IP失败](https://img-blog.csdnimg.cn/direct/7b417093edc14884857c1d31b4e66d80.png)