一,GT911 触摸屏简介
- 它的接口类型为 I2C ,供电电压和通讯电压均为 3.3V 。这款电容触摸屏内置了上拉电阻,这意味着我们的开发板上与该触摸屏的接口处不需要设置上拉电阻。
- 关于线序,同样是 GT911 ,不同批次的器件都有不同的线序。具体的要自行与厂家确认。
二,DTS配置
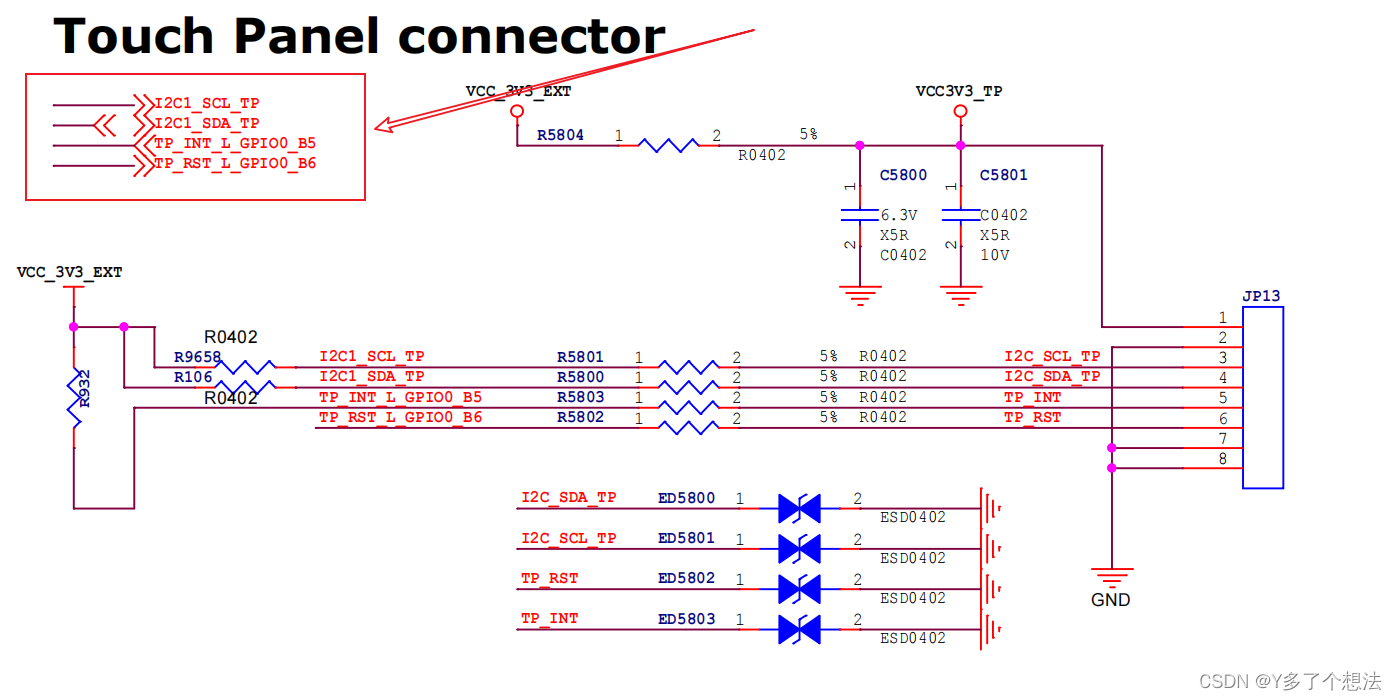
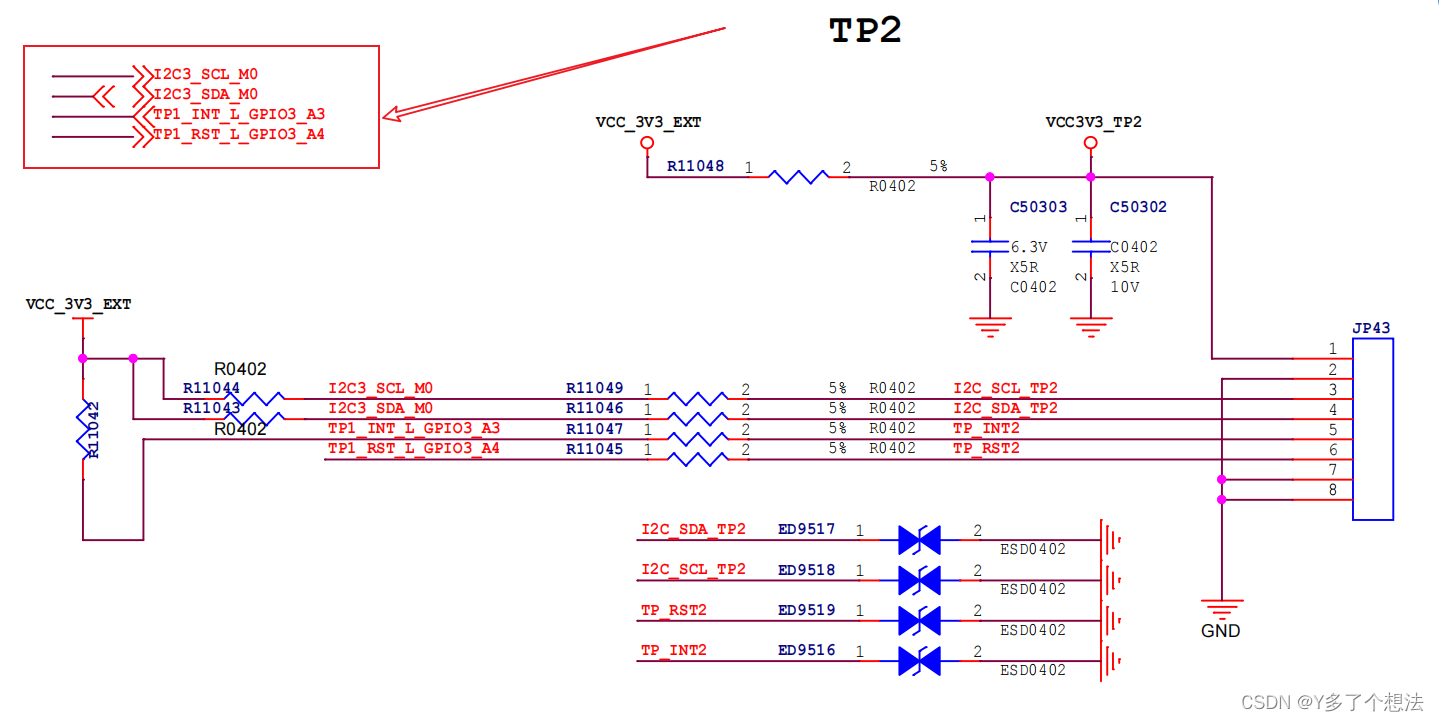
调试双I2C触摸,两个tp是同一型号(gt911),dts 文件配置的主要是 CPU 与触摸屏之间 I2C 通信的信息,查看硬件原理图两路tp是挂载在不同的I2C下。
TP1(i2c1):
TP2(i2c3):
&i2c1 {
        status = "okay";

        gt1x: gt1x@14 {
                status = "okay";
                compatible = "goodix,gt9xx";
                reg = <0x14>;
                pinctrl-names = "default";
                pinctrl-0 = <&touch_gpio>;
                reset-gpio = <&gpio0 RK_PB6 GPIO_ACTIVE_HIGH>;//复位脚
                touch-gpio = <&gpio0 RK_PB5 IRQ_TYPE_LEVEL_LOW>;//中断脚
                max-x = <1920>;
                max-y = <1080>;
                tp-size = <0>;
        };
};

&i2c3 {
        status = "okay";

        gt1x@14 {
            status = "okay";
            compatible = "goodix,gt9xx_extend";
            reg = <0x14>;
            pinctrl-names = "default";
            pinctrl-0 = <&extend_touch_gpio>;
            extend_reset-gpio = <&gpio3 RK_PA4 GPIO_ACTIVE_HIGH>;
            extend_touch-gpio = <&gpio3 RK_PA3 IRQ_TYPE_LEVEL_LOW>;
            max-x = <1920>;
            max-y = <1080>;
            tp-size = <0>;
        };
};

&pinctrl {

        touch {
                touch_gpio: touch-gpio {
                        rockchip,pins =
                                <0 RK_PB5 RK_FUNC_GPIO &pcfg_pull_up>,
                                <0 RK_PB6 RK_FUNC_GPIO &pcfg_pull_none>;
                };
                extend_touch_gpio:extend-touch-gpio{
                        rockchip,pins =
                                <3 RK_PA4 RK_FUNC_GPIO &pcfg_pull_up>,
                                <3 RK_PA3 RK_FUNC_GPIO &pcfg_pull_none>;
                };
        };
};
三,驱动文件配置
驱动相关的文件主要的就 3 个文件(这里以TP1的驱动为例):
1,gt9xx.c
static int goodix_ts_probe(struct i2c_client *client, const struct i2c_device_id *id) //入口函数
{
    ...

    ts->irq_pin = of_get_named_gpio_flags(np, "touch-gpio", 0, (enum of_gpio_flags *)(&ts->irq_flags));
    ts->rst_pin = of_get_named_gpio_flags(np, "reset-gpio", 0, &rst_flags);
    ts->pwr_pin = of_get_named_gpio_flags(np, "power-gpio", 0, &pwr_flags);
    //ts->tp_select_pin = of_get_named_gpio_flags(np, "tp-select-gpio", 0, &tp_select_flags);
    if (of_property_read_u32(np, "max-x", &val)) {
        dev_err(&client->dev, "no max-x defined\n");
        return -EINVAL;
    }
    //ts->abs_x_max = val;
    if (of_property_read_u32(np, "max-y", &val)) {
        dev_err(&client->dev, "no max-y defined\n");
        return -EINVAL;
    }
    //ts->abs_y_max = val;
    if (of_property_read_u32(np, "configfile-num", &val)) {
        ts->cfg_file_num = 0;
    } else {
        ts->cfg_file_num = val;
    }
    ts->pendown =PEN_RELEASE;
    ts->client = client;

    INIT_WORK(&ts->work, goodix_ts_work_func);
    ts->client = client;
    spin_lock_init(&ts->irq_lock);          // 2.6.39 later
    // ts->irq_lock = SPIN_LOCK_UNLOCKED;   // 2.6.39 & before

    ...

}
在这个函数中,可以看到读取前面dts中配置的信息,dts中的配置名,必须要与这份代码里的一致;
2,gt9xx.h
头文件里有几个宏,是关乎调试打印的,在我们适配过程中打开这些打印可以帮助我们定位一些问题。
#define DEBUG_SWITCH 0
#define GTP_DEBUG_ON          0
#define GTP_DEBUG_FUNC_ON     0
//这几个打印默认是关闭的,可以置1打开
3,cfg 文件
cfg 文件是触摸屏的初始化指令,它在上电后由 CPU 将这些指令通过 I2C 写到触摸屏的芯片中。
cfg文件是在gt9xx_cfg.h中配置,驱动程序具体引用了哪一份数组,可以自行查看确定。
#ifndef _GOODIX_GT9XX_CFG_H_
#define _GOODIX_GT9XX_CFG_H_

/* CFG for GT911 */
u8 gtp_dat_gt11[] = {
    /* <1200, 1920>*/
    #include "WGJ89006B_GT911_Config_20140625_085816_0X43.cfg"
};

u8 gtp_dat_8_9[] = {
    /* TODO:Puts your update firmware data here! */
    /* <1920, 1200> 8.9 */
    /* #include "WGJ89006B_GT9271_Config_20140625_085816_0X41.cfg" */
    /* #include "WGJ10162_GT9271_Config_20140820_182456.cfg" */
    #include "WGJ10162B_GT9271_1060_Config_20140821_1341110X42.cfg"
};

u8 gtp_dat_8_9_1[] = {
    #include "GT9271_Config_20170526.cfg"
};

u8 gtp_dat_9_7[] = {
    /* <1536, 2048> 9.7 */
    #include "GT9110P_Config_20160217_1526_2048_97.cfg"
};

u8 gtp_dat_10_1[] = {
    /* TODO:Puts your update firmware data here! */
    /* <1200, 1920> 10.1 */
    #include "WGJ10187_GT9271_Config_20140623_104014_0X41.cfg"
};

u8 gtp_dat_7[] = {
    /* TODO:Puts your update firmware data here! */
    /* <1024, 600> 7.0 */
    #include "WGJ10187_GT910_Config_20140623_104014_0X41.cfg"
};

#endif /* _GOODIX_GT9XX_CFG_H_ */
4,驱动移植
a.将原厂提供的的驱动(gt9xx)拷贝到下面的文件夹:
./kernel/drivers/input/touchscreen
b. 然后修改 touchscreen 目录下的 Makefile以及Kconfig。这个Makefile中定义的就是要编译哪个平台的触摸屏驱动的。
kernel/drivers/input/touchscreen/Makefile中添加:
obj-$(CONFIG_TOUCHSCREEN_GT9XX)                += gt9xx/
obj-$(CONFIG_TOUCHSCREEN_GT9XX_EXTEND)         += gt9xx_extend/


------------------------------------------------------------------------
kernel/drivers/input/touchscreen/Kconfig中添加:
source "drivers/input/touchscreen/gt9xx/Kconfig"
source "drivers/input/touchscreen/gt9xx_extend/Kconfig"
c. 内核中加载驱动:
kernel/arch/arm64/configs/rockchip_defconfig中添加:
CONFIG_TOUCHSCREEN_GT9XX=y
CONFIG_TOUCHSCREEN_GT9XX_EXTEND=y
注: 实现双I2C触摸,两份驱动可以使用一样的。即 将TP1的驱动复制一份出来给TP2使用,复制之后改匹配的字段,这时编译会出现冲突,然后把两份驱动中冲突的部分重命名,之后编译通过即可(判断驱动生效可以看文件夹下是否有对应的.o文件生成)。
三,调试
1>. 看上电时的内核打印日志,和触摸屏相关的打印都是以下列关键字开头的:
<<-GTP-INFO->>
<<-GTP-DEBUG->>
<<-GTP-ERROR->>
adb shell dmesg | grep GTP 可过滤触摸屏相关的打印。
2>. 查看工作状态的方式是看中断统计信息:
cat /proc/interrupts
驱动顺利加载的话,可以看到列出来的信息里有gt9xx,gt9xx_extend的统计信息。这些信息记录的就是这些中断发生的次数,通常我们与触摸屏交互,都能产生好多次中断。
