实验拓扑图如下所示
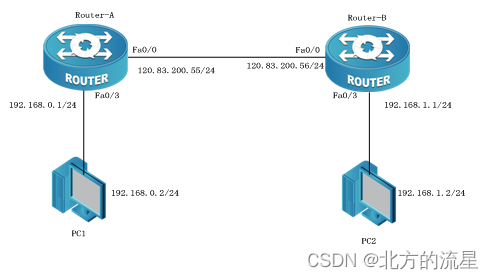
| 设备 | 端口 | IP | 子网掩码 | 网关 |
| Router-A | G0/0 | 120.83.200.55 | 255.255.255.0 | 无 |
| G0/3 | 192.168.0.1 | 255.255.255.0 | 无 | |
| Router-B | G0/0 | 120.83.200.56 | 255.255.255.0 | 无 |
| G0/3 | 192.168.1.1 | 255.255.255.0 | 无 | |
| PC1 | 192.168.0.2 | 255.255.255.0 | 192.168.0.1 | |
| PC2 | 192.168.1.2 | 255.255.255.0 | 192.168.1.1 |
操作步骤:
步骤1:连接网络拓扑图。
步骤2:设置计算机的IP地址、子网掩码和网关。
步骤3:配置路由器A的主机名和接口IP地址。
Router_config#hostname Router-A
Router-A_config#interface GigaEthernet 0/0
Router-A_config_f0/0#ip address 120.83.200.55 255.255.255.0
Router-A_config_f0/0#no shutdown
Router-A_config#interface GigaEthernet 0/3
Router-A_config_f0/3#ip address 192.168.0.1 255.255.255.0
Router-A_config_f0/3#no shutdown
步骤4:配置路由器B的主机名和接口IP地址。
Router-B_config#interface GigaEthernet 0/0
Router-B_config_f0/0#ip address 120.83.200.56 255.255.255.0
Router-B_config_f0/0#no shutdown
Router-B_config#interface GigaEthernet 0/3
Router-B_config_f0/3#ip address 192.168.1.1 255.255.255.0
Router-B_config_f0/3#no shutdown
步骤5:查看Router-A的路由表。
Router-A#showip route
VRF ID: 0
C 120.0.0.0/8 is directly connected, FastEthernet0/0 !直连的路由
C 192.168.0.0/24 is directly connected, GigaEthernet0/3 !直连的路由
步骤6:查看 Router-B的路由表
Router-B#show ip route
VRF ID: 0
C 120.0.0.0/8 is directly connected, FastEthernet0/0 !直连的路由
C 192.168.1.0/24 is directly connected, GigaEthernet0/3 !直连的路由
步骤7:ping命令测试网络的连通性。
(1)在PC1上ping 192.168.1.2,网络未通
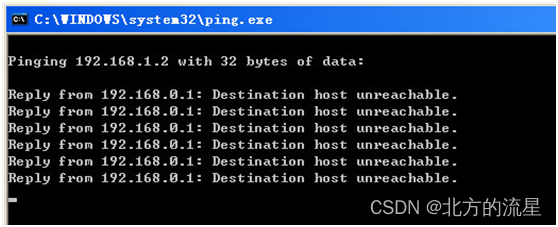
(2)在PC2上ping 192.168.0.2,网络未通

步骤8:在Router_A上配置静态路由。
Router_A#config
Router_A_config#ip route 192.168.1.0 255.255.255.0 120.83.200.56
还可以改为默认路由:
Router_A_config#ip route 0.0.0.0 0.0.0.0 120.83.200.56
步骤9:在Router_B上配置静态路由。
Router_B#config
Router_B_config#ip route 192.168.0.0 255.255.255.0 120.83.200.55
还可以改为默认路由:
Router_B_config#ip route 0.0.0.0 0.0.0.0 120.83.200.55
步骤10:查看Router_A的路由表。
Router-A#show ip route
VRF ID: 0
C 192.168.0.0/24 is directly connected, FastEthernet0/3
C 120.0.0.0/8 is directly connected, FastEthernet0/0
S 192.168.1.0/24 [1,0] via 120.83.200.56 !注意静态路由的管理距离是1
步骤11:查看Router_B的路由表。
Router-B#showip route
VRF ID: 0
C 192.168.1.0/24 is directly connected, FastEthernet0/3
C 120.0.0.0/8 is directly connected, FastEthernet0/0
S 192.168.0.0/24 [1,0] via 120.83.200.55 !注意静态路由的管理距离是1
步骤12:再次验证网络的连通性。
(1)在PC1上ping 192.168.1.2,网络已通

(2)在PC2上ping 192.168.0.2,网络已通


