前言
Mosaic数据增强,这种数据增强方式简单来说就是把4张图片,通过随机缩放、随机裁减、随机排布的方式进行拼接。Mosaic有如下优点:
(1)丰富数据集:随机使用4张图片,随机缩放,再随机分布进行拼接,大大丰富了检测数据集,特别是随机缩放增加了很多小目标,让网络的鲁棒性更好;
(2)减少GPU显存:直接计算4张图片的数据,使得Mini-batch大小并不需要很大就可以达到比较好的效果。
原理
思路:随机选择四张图,取其部分拼入该图,如下图所示,四种颜色代表四张样本图,超出的部分将被舍弃。

具体做法如下:
step1:新建mosaic画布,并在mosaic画布上随机生成一个点
im_size = 640
mosaic_border = [-im_size // 2, -im_size // 2]
s_mosaic = im_size * 2

mosaic = np.full((s_mosaic, s_mosaic, 3), 114, dtype=np.uint8)
yc, xc = (int(random.uniform(-x, s_mosaic + x)) for x in mosaic_border)

step2:围绕随机点 (x_c, y_c) 放置4块拼图
(1)左上位置
画布放置区域: (x1a, y1a, x2a, y2a)
case1:图片不超出画布,画布放置区域为 (x_c - w , y_c - h , x_c, y_c)
case2:图片超出画布,画布放置区域为 (0 , 0 , x_c, y_c)
综合case1和case2,画布区域为:
x1a, y1a, x2a, y2a = max(x_c - w, 0), max(y_c - h, 0), x_c, y_c

图片区域 : (x1b, y1b, x2b, y2b)
case1:图片不超出画布,图片不用裁剪,图片区域为 (0 , 0 , w , h)
case2:图片超出画布,超出部分的图片需要裁剪,区域为 (w - x_c , h - y_c , w , h)
综合case1和case2,图片区域为:
x1b, y1b, x2b, y2b = w - (x2a - x1a), h - (y2a - y1a), w, h
(2)右上位置
画布放置区域: (x1a, y1a, x2a, y2a)
case1:图片不超出画布,画布区域为 (x_c , y_c - h , x_c + w , y_c)
case2:图片超出画布,画布区域为 (x_c , 0 , s_mosaic , y_c)
综合case1和case2,画布区域为:
x1a, y1a, x2a, y2a = x_c, max(y_c - h, 0), min(x_c + w, s_mosaic), y_c

图片区域 : (x1b, y1b, x2b, y2b)
case1:图片不超出画布,图片不用裁剪,图片区域为 (0 , 0 , w , h)
case2:图片超出画布,图片需要裁剪,图片区域为 (0 , h - (y2a - y1a) , x2a - x1a , h)
综合case1和case2,图片区域为:
x1b, y1b, x2b, y2b = 0, h - (y2a - y1a), min(w, x2a - x1a), h
同理可实现左下和右下的拼图。
step3:更新bbox坐标
4张图片的bbox (n,4),其中n为4张图片中bbox数量,4代表四个坐标值(xmin,ymin,xmax,ymax) ,加上偏移量得到mosaic bbox坐标:
def xywhn2xyxy(x, padw=0, padh=0):
    # x: bbox坐标 (xmin,ymin,xmax,ymax)
    x = np.stack(x)
    y = x.clone() if isinstance(x, torch.Tensor) else np.copy(x)
    y[:, 0] = x[:, 0] + padw  # top left x
    y[:, 1] = x[:, 1] + padh  # top left y
    y[:, 2] = x[:, 2] + padw  # bottom right x
    y[:, 3] = x[:, 3] + padh  # bottom right y
    return y
完整实现代码
import cv2
import torch
import random
import os.path
import numpy as np
import matplotlib.pyplot as plt
from camvid import get_bbox, draw_box

# 定义一个名为load_mosaic的函数,它接受两个参数:im_files(图像文件列表)和name_color_dict(名称和颜色的字典)
def load_mosaic(im_files, name_color_dict):
    # 定义图像的默认大小为640x640
    im_size = 640
    # 定义mosaic(拼接的图像)的默认大小为1280x1280(两倍的im_size)
    s_mosaic = im_size * 2
    # 定义mosaic的边框为[-im_size//2, -im_size//2],即在中心位置周围绘制一个宽度的边框
    mosaic_border = [-im_size // 2, -im_size // 2]
    # 初始化三个空的列表,用于存储标签、分割和颜色信息
    labels4, segments4, colors = [], [], []
    # 在mosaic中随机选择一个中心点的x, y坐标,这里使用uniform函数随机生成,这样可以使拼接的图像有随机性,避免总是拼接在同一个位置
    # mosaic center x, y
    y_c, x_c = (int(random.uniform(-x, s_mosaic + x)) for x in mosaic_border)
    # 创建一个大小为(s_mosaic, s_mosaic, 3)的numpy数组,并用114(一种灰度值)填充,创建一个全为灰度的空白图像
    img4 = np.full((s_mosaic, s_mosaic, 3), 114, dtype=np.uint8)
    # 创建一个大小为(s_mosaic, s_mosaic)的numpy数组,并用0填充,作为分割图像用,表示所有像素都不属于任何物体
    seg4 = np.full((s_mosaic, s_mosaic), 0, dtype=np.uint8)
    # 对im_files中的每个图像文件进行遍历
    for i, im_file in enumerate(im_files):
        # 使用cv2库的imread函数读取图像文件,返回一个多维的numpy数组
        # Load image
        img = cv2.imread(im_file)
        # 根据图像文件路径生成对应的分割文件路径,替换'images'为'labels',并添加'_L.png'后缀,用于获取物体的边界框信息
        seg_file = im_file.replace('images', 'labels')
        # 从分割文件路径中获取文件名(不包含路径和后缀),作为物体名称
        name = os.path.basename(seg_file).split('.')[0]
        # 根据物体名称构造新的分割文件路径(与原来的图像文件路径在同一目录下,具有相同的文件名,但后缀不同)
        seg_file = os.path.join(os.path.dirname(seg_file), name + '_L.png')
        # 调用get_bbox函数获取物体的边界框信息(返回分割后的图像、边界框列表和颜色列表)
        seg, boxes, color = get_bbox(seg_file, names, name_color_dict)
        # 把从get_bbox函数获取的颜色列表添加到全局的颜色列表中
        colors += color
        # 获取当前图像的高度、宽度和通道数(这里假设是彩色图像,所以通道数为3)
        h, w, _ = np.shape(img)

        # 定义一个变量img4,它是一个大小为(s_mosaic, s_mosaic, 3)的空数组,用于存放拼接后的图像
        # place img in img4
        if i == 0:  # top left
            # 左上角的子图像
            # 计算源图像的坐标和目标图像的坐标
            x1a, y1a, x2a, y2a = max(x_c - w, 0), max(y_c - h, 0), x_c, y_c
            x1b, y1b, x2b, y2b = w - (x2a - x1a), h - (y2a - y1a), w, h
        elif i == 1:  # top right
            # 右上角的子图像
            # 计算源图像的坐标和目标图像的坐标
            x1a, y1a, x2a, y2a = x_c, max(y_c - h, 0), min(x_c + w, s_mosaic), y_c
            x1b, y1b, x2b, y2b = 0, h - (y2a - y1a), min(w, x2a - x1a), h
        elif i == 2:  # bottom left
            # 左下角的子图像
            # 计算源图像的坐标和目标图像的坐标
            x1a, y1a, x2a, y2a = max(x_c - w, 0), y_c, x_c, min(s_mosaic, y_c + h)
            x1b, y1b, x2b, y2b = w - (x2a - x1a), 0, w, min(y2a - y1a, h)
        elif i == 3:  # bottom right
            # 右下角的子图像
            # 计算源图像的坐标和目标图像的坐标
            x1a, y1a, x2a, y2a = x_c, y_c, min(x_c + w, s_mosaic), min(s_mosaic, y_c + h)
            x1b, y1b, x2b, y2b = 0, 0, min(w, x2a - x1a), min(y2a - y1a, h)
        # 将图像img切割并拼接到img4中,同时保持每个子图像的大小和位置不变
        # img4[y1a:y2a, x1a:x2a] = img[y1b:y2b, x1b:x2b]

        # 将分割后的图像(seg)切割并拼接到seg4中,保持分割信息的位置不变
        # place seg in seg4
        seg4[y1a:y2a, x1a:x2a] = seg[y1b:y2b, x1b:x2b]

        # 更新边界框(bbox)的坐标,根据拼接的偏移量进行修正
        # padw为x1a-x1b,代表拼接的横向偏移量
        # padh为y1a-y1b,代表拼接的纵向偏移量
        # update bbox
        padw = x1a - x1b
        padh = y1a - y1b
        boxes = xywhn2xyxy(boxes, padw=padw, padh=padh)
        labels4.append(boxes)

    # 将所有拼接后的边界框(bbox)和标签合并为一个数组
    labels4 = np.concatenate(labels4, 0)

    # 对边界框(bbox)的坐标进行修正,防止坐标超出拼接后的图像范围
    # clip coord
    for x in labels4[:, 1:]:
        np.clip(x, 0, s_mosaic, out=x)  # clip coord

    # 绘制拼接后的图像以及边界框(bbox)信息
    # draw result
    draw_box(seg4, labels4, colors)

    # 返回拼接后的图像img4,边界框(bbox)标签labels4以及分割后的图像seg4
    return img4, labels4,seg4

if __name__ == '__main__':
    names = ['Pedestrian', 'Car', 'Truck_Bus']

    im_files = ['camvid/images/0016E5_01440.png',
                'camvid/images/0016E5_06600.png',
                'camvid/images/0006R0_f00930.png',
                'camvid/images/0006R0_f03390.png']

    load_mosaic(im_files, name_color_dict)


第二种实现
1. 方法介绍
Mosaic 数据增强算法将多张图片按照一定比例组合成一张图片,使模型在更小的范围内识别目标。Mosaic 数据增强算法参考 CutMix数据增强算法。CutMix数据增强算法使用两张图片进行拼接,而 Mosaic 数据增强算法一般使用四张进行拼接,但两者的算法原理是非常相似的。
方法步骤:
(1)随机选取图片拼接基准点坐标(xc,yc),另随机选取四张图片。
(2)四张图片根据基准点,分别经过 尺寸调整 和 比例缩放 后,放置在指定尺寸的大图的左上,右上,左下,右下位置。
(3)根据每张图片的尺寸变换方式,将映射关系对应到图片标签上。
(4)依据指定的横纵坐标,对大图进行拼接。处理超过边界的检测框坐标。
方法优点:
(1)增加数据多样性,随机选取四张图像进行组合,组合得到图像个数比原图个数要多。
(2)增强模型鲁棒性,混合四张具有不同语义信息的图片,可以让模型检测超出常规语境的目标。
(3)加强批归一化层(Batch Normalization)的效果。当模型设置 BN 操作后,训练时会尽可能增大批样本总量(BatchSize),因为 BN 原理为计算每一个特征层的均值和方差,如果批样本总量越大,那么 BN 计算的均值和方差就越接近于整个数据集的均值和方差,效果越好。
(4)Mosaic 数据增强算法有利于提升小目标检测性能。Mosaic 数据增强图像由四张原始图像拼接而成,这样每张图像会有更大概率包含小目标。
2. 代码展示
2.1 加载图片及标签
我以四张图片及其标签文件为例,导入 xml.etree 库解析XML标签文件,这里我只读取检测框的左上和右下角坐标信息,我习惯使用opencv方法处理图片,当然也可以使用Image库处理。将读取的图片及其对应的坐标信息保存在同一个列表中。

代码如下:
# 主函数,获取图片路径和检测框路径
if __name__ == '__main__':

    # 给出图片文件夹和检测框文件夹所在的位置
    image_dir = 'D:/deeplearning/database/VOC2007/picture/'
    annotation_dir = 'D:/deeplearning/database/VOC2007/annotation/'

    image_list = []  # 存放每张图像和该图像对应的检测框坐标信息

    # 读取4张图像及其检测框信息
    for i in range(4):

        image_box = []  # 存放每张图片的检测框信息

        # 某张图片位置及其对应的检测框信息
        image_path = image_dir + str(i+1) + '.jpg'
        annotation_path = annotation_dir + str(i+1) + '.xml'
        image = cv2.imread(image_path)  # 读取图像

        # 读取检测框信息
        with open(annotation_path, 'r') as new_f:
            #  getroot()获取根节点
            root = ET.parse(annotation_path).getroot()

        # findall查询根节点下的所有直系子节点,find查询根节点下的第一个直系子节点
        for obj in root.findall('object'):
            obj_name = obj.find('name').text   # 目标名称
            bndbox = obj.find('bndbox')
            left = eval(bndbox.find('xmin').text)    # 左上坐标x
            top = eval(bndbox.find('ymin').text)     # 左上坐标y
            right = eval(bndbox.find('xmax').text)   # 右下坐标x
            bottom = eval(bndbox.find('ymax').text)  # 右下坐标y

            # 保存每张图片的检测框信息
            image_box.append([left, top, right, bottom])  # [[x1,y1,x2,y2],[..],[..]]

        # 保存图像及其对应的检测框信息
        image_list.append([image, image_box])

    # 分割、缩放、拼接图片
    get_random_data(image_list, input_shape=[416,416])
2.2 图像分割
输入图片的尺寸是 (iw, ih) ;指定图片的尺寸是 (w, h) ,其中w=h=416;缩放后的图片的尺寸是 (nw, nh)
(1)先通过cv2.resize()将图片尺寸从(iw, ih) 变成 (w, h);再乘以缩放比例 scale,是0.6至0.8之间的一个随机数;得到压缩后的图像尺寸 (nw, nh)
(2)生成一个尺寸为 (w, h) 的画板 np.zeros((h,w,3), np.uint8),将第一张压缩后的图片放在画板的左上方,第二张放在右上方,第三张放在左下方,第四张放在右下方。
(3)h-nh代表y轴方向上画板边界距离缩放后图片边界的距离,w-nw代表x轴方向上画板边界距离缩放后图片边界的距离
**(4)**检测框中心点坐标为 (cx, cy),坐标调整比例是 nw/iw,但需要分开调整位于不同位置的四张图的检测框。
代码如下:
def get_random_data(image_list, input_shape):

    h, w = input_shape  # 获取图像的宽高

    '''设置拼接的分隔线位置'''
    min_offset_x = 0.4
    min_offset_y = 0.4
    scale_low = 1 - min(min_offset_x, min_offset_y)  # 0.6
    scale_high = scale_low + 0.2  # 0.8

    image_datas = []  # 存放图像信息
    box_datas = []  # 存放检测框信息
    index = 0  # 当前是第几张图

    #(1)图像分割
    for frame_list in image_list:

        frame = frame_list[0]  # 取出的某一张图像
        box = np.array(frame_list[1:])  # 该图像对应的检测框坐标

        ih, iw = frame.shape[0:2]  # 图片的宽高

        cx = (box[0,:,0] + box[0,:,2]) // 2  # 检测框中心点的x坐标
        cy = (box[0,:,1] + box[0,:,3]) // 2  # 检测框中心点的y坐标

        # 对输入图像缩放
        new_ar = w/h  # 图像的宽高比
        scale = np.random.uniform(scale_low, scale_high)   # 缩放0.6--0.8倍
        # 调整后的宽高
        nh = int(scale * h)  # 缩放比例乘以要求的宽高
        nw = int(nh * new_ar)  # 保持原始宽高比例

        # 缩放图像
        frame = cv2.resize(frame, (nw,nh))

        # 调整中心点坐标
        cx = cx * nw/iw
        cy = cy * nh/ih

        # 调整检测框的宽高
        bw = (box[0,:,2] - box[0,:,0]) * nw/iw  # 修改后的检测框的宽高
        bh = (box[0,:,3] - box[0,:,1]) * nh/ih

        # 创建一块[416,416]的底版
        new_frame = np.zeros((h,w,3), np.uint8)

        # 确定每张图的位置
        if index==0: new_frame[0:nh, 0:nw] = frame   # 第一张位于左上方
        elif index==1: new_frame[0:nh, w-nw:w] = frame  # 第二张位于右上方
        elif index==2: new_frame[h-nh:h, 0:nw] = frame  # 第三张位于左下方
        elif index==3: new_frame[h-nh:h, w-nw:w] = frame  # 第四张位于右下方

        # 修正每个检测框的位置
        if index==0:  # 左上图像
            box[0,:,0] = cx - bw // 2  # x1
            box[0,:,1] = cy - bh // 2  # y1
            box[0,:,2] = cx + bw // 2  # x2
            box[0,:,3] = cy + bh // 2  # y2

        if index==1:  # 右上图像
            box[0,:,0] = cx - bw // 2 + w - nw  # x1
            box[0,:,1] = cy - bh // 2  # y1
            box[0,:,2] = cx + bw // 2 + w - nw # x2
            box[0,:,3] = cy + bh // 2  # y2

        if index==2:  # 左下图像
            box[0,:,0] = cx - bw // 2  # x1
            box[0,:,1] = cy - bh // 2 + h - nh  # y1
            box[0,:,2] = cx + bw // 2  # x2
            box[0,:,3] = cy + bh // 2 + h - nh  # y2

        if index==3:  # 右下图像
            box[0,:,2] = cx - bw // 2 + w - nw # x1
            box[0,:,3] = cy - bh // 2 + h - nh # y1
            box[0,:,0] = cx + bw // 2 + w - nw # x2
            box[0,:,1] = cy + bh // 2 + h - nh  # y2

        index = index + 1  # 处理下一张

        # 保存处理后的图像及对应的检测框坐标
        image_datas.append(new_frame)
        box_datas.append(box)

    # 取出某张图片以及它对应的检测框信息, i代表图片索引
    for image, boxes in zip(image_datas, box_datas):

        # 复制一份原图
        image_copy = image.copy()

        # 遍历该张图像中的所有检测框
        for box in boxes[0]:
            # 获取某一个框的坐标
            x1, y1, x2, y2 = box
            cv2.rectangle(image_copy, (x1,y1), (x2,y2), (0,255,0), 2)

        cv2.imshow('img', image_copy)
        cv2.waitKey(0)
        cv2.destroyAllWindows()
分割后的图像如下:

2.3 图像合并
首先设置拼接线,cutx代表x轴方向把图像分割成两块区域,cuty代表y轴方向把图片分割成两块。设置 (cutx, cuty) 代表四张图在何坐标下切割,如右上方的图只取 cutx左侧 且 cuty上侧 的区域。
创建一块新的画板new_image,大小为(416, 416),将切割后的四张图片组合在一起
#(2)将四张图像拼接在一起
    # 在指定范围中选择横纵向分割线
    cutx = np.random.randint(int(w*min_offset_x), int(w*(1-min_offset_x)))
    cuty = np.random.randint(int(h*min_offset_y), int(h*(1-min_offset_y)))

    # 创建一块[416,416]的底版用来组合四张图
    new_image = np.zeros((h,w,3), np.uint8)
    new_image[:cuty, :cutx, :] = image_datas[0][:cuty, :cutx, :]
    new_image[:cuty, cutx:, :] = image_datas[1][:cuty, cutx:, :]
    new_image[cuty:, :cutx, :] = image_datas[2][cuty:, :cutx, :]
    new_image[cuty:, cutx:, :] = image_datas[3][cuty:, cutx:, :]

    # 显示合并后的图像
    cv2.imshow('new_img', new_image)
    cv2.waitKey(0)
    cv2.destroyAllWindows()

    # 复制一份合并后的原图
    final_image_copy = new_image.copy()

    # 显示有检测框并合并后的图像
    for boxes in box_datas:

        # 遍历该张图像中的所有检测框
        for box in boxes[0]:
            # 获取某一个框的坐标
            x1, y1, x2, y2 = box
            cv2.rectangle(final_image_copy, (x1,y1), (x2,y2), (0,255,0), 2)

    cv2.imshow('new_img_bbox', final_image_copy)
    cv2.waitKey(0)
    cv2.destroyAllWindows()
拼接后的图像如下:

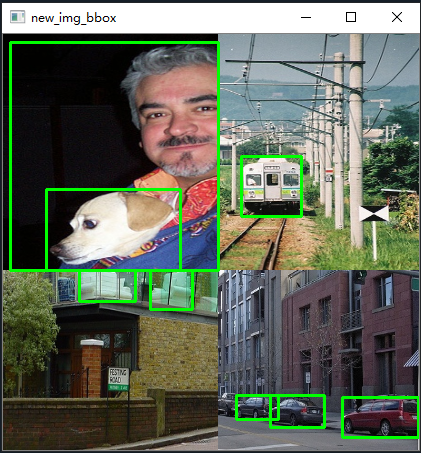
2.4 处理检测框边界
如上图,我们发现左上图的检测框伸展到了其他区域,右下图的部分检测车辆的框中没有目标。因为我们只对图片进行了拼接,而图片对应的检测框仍然是原来分割前的检测框坐标。
(1)将不在其对应图像所在区域内的检测框都剔除;如右下侧图中的检测车的框跑到左下侧图中去了。
(2)将检测框一部分在图像区域内,一部分不在图像区域内的,以该图的区域分界线(cutx, cuty)代替越界的检测框线条。如左上图人的检测框需要用边界线代替区域外的边缘线
(3)如果修正后的检测框的高度或者宽度过于小,那么就没有意义,剔除这个修正后的框
代码如下:
#(4)处理超出边缘的检测框
def merge_bboxes(bboxes, cutx, cuty):

    # 保存修改后的检测框
    merge_box = []

    # 遍历每张图像,共4个
    for i, box in enumerate(bboxes):

        # 每张图片中需要删掉的检测框
        index_list = []

        # 遍历每张图的所有检测框,index代表第几个框
        for index, box in enumerate(box[0]):

            # axis=1纵向删除index索引指定的列,axis=0横向删除index指定的行
            # box[0] = np.delete(box[0], index, axis=0)

            # 获取每个检测框的宽高
            x1, y1, x2, y2 = box

            # 如果是左上图,修正右侧和下侧框线
            if i== 0:
                # 如果检测框左上坐标点不在第一部分中,就忽略它
                if x1 > cutx or y1 > cuty:
                    index_list.append(index)

                # 如果检测框右下坐标点不在第一部分中,右下坐标变成边缘点
                if y2 >= cuty and y1 <= cuty:
                    y2 = cuty
                    if y2-y1 < 5:
                        index_list.append(index)

                if x2 >= cutx and x1 <= cutx:
                    x2 = cutx
                    # 如果修正后的左上坐标和右下坐标之间的距离过小,就忽略这个框
                    if x2-x1 < 5:
                        index_list.append(index)

            # 如果是右上图,修正左侧和下册框线
            if i == 1:
                if x2 < cutx or y1 > cuty:
                    index_list.append(index)

                if y2 >= cuty and y1 <= cuty:
                    y2 = cuty
                    if y2-y1 < 5:
                        index_list.append(index)

                if x1 <= cutx and x2 >= cutx:
                    x1 = cutx
                    if x2-x1 < 5:
                        index_list.append(index)

            # 如果是左下图
            if i == 2:
                if x1 > cutx or y2 < cuty:
                    index_list.append(index)

                if y1 <= cuty and y2 >= cuty:
                    y1 = cuty
                    if y2-y1 < 5:
                        index_list.append(index)

                if x1 <= cutx and x2 >= cutx:
                    x2 = cutx
                    if x2-x1 < 5:
                        index_list.append(index)

            # 如果是右下图
            if i == 3:
                if x2 < cutx or y2 < cuty:
                    index_list.append(index)

                if x1 <= cutx and x2 >= cutx:
                    x1 = cutx
                    if x2-x1 < 5:
                        index_list.append(index)

                if y1 <= cuty and y2 >= cuty:
                    y1 = cuty
                    if y2-y1 < 5:
                        index_list.append(index)

            # 更新坐标信息
            bboxes[i][0][index] = [x1, y1, x2, y2]  # 更新第i张图的第index个检测框的坐标

        # 删除不满足要求的框,并保存
        merge_box.append(np.delete(bboxes[i][0], index_list, axis=0))

    # 返回坐标信息
    return merge_box

#(3)处理超出图像边缘的检测框
new_boxes = merge_bboxes(box_datas, cutx, cuty)

# 复制一份合并后的图像
modify_image_copy = new_image.copy()

# 绘制修正后的检测框
for boxes in new_boxes:
    # 遍历每张图像中的所有检测框
    for box in boxes:
        # 获取某一个框的坐标
        x1, y1, x2, y2 = box
        cv2.rectangle(modify_image_copy, (x1,y1), (x2,y2), (0,255,0), 2)
cv2.imshow('new_img_bbox', modify_image_copy)
cv2.waitKey(0)
cv2.destroyAllWindows()
效果图如下:
3. 完整代码
from xml.etree import ElementTree as ET  # xml文件解析方法
import numpy as np
import cv2

#(3)处理超出边缘的检测框
def merge_bboxes(bboxes, cutx, cuty):

    # 保存修改后的检测框
    merge_box = []

    # 遍历每张图像,共4个
    for i, box in enumerate(bboxes):

        # 每张图片中需要删掉的检测框
        index_list = []

        # 遍历每张图的所有检测框,index代表第几个框
        for index, box in enumerate(box[0]):

            # axis=1纵向删除index索引指定的列,axis=0横向删除index指定的行
            # box[0] = np.delete(box[0], index, axis=0)

            # 获取每个检测框的宽高
            x1, y1, x2, y2 = box

            # 如果是左上图,修正右侧和下侧框线
            if i== 0:
                # 如果检测框左上坐标点不在第一部分中,就忽略它
                if x1 > cutx or y1 > cuty:
                    index_list.append(index)

                # 如果检测框右下坐标点不在第一部分中,右下坐标变成边缘点
                if y2 >= cuty and y1 <= cuty:
                    y2 = cuty
                    if y2-y1 < 5:
                        index_list.append(index)

                if x2 >= cutx and x1 <= cutx:
                    x2 = cutx
                    # 如果修正后的左上坐标和右下坐标之间的距离过小,就忽略这个框
                    if x2-x1 < 5:
                        index_list.append(index)

            # 如果是右上图,修正左侧和下册框线
            if i == 1:
                if x2 < cutx or y1 > cuty:
                    index_list.append(index)

                if y2 >= cuty and y1 <= cuty:
                    y2 = cuty
                    if y2-y1 < 5:
                        index_list.append(index)

                if x1 <= cutx and x2 >= cutx:
                    x1 = cutx
                    if x2-x1 < 5:
                        index_list.append(index)

            # 如果是左下图
            if i == 2:
                if x1 > cutx or y2 < cuty:
                    index_list.append(index)

                if y1 <= cuty and y2 >= cuty:
                    y1 = cuty
                    if y2-y1 < 5:
                        index_list.append(index)

                if x1 <= cutx and x2 >= cutx:
                    x2 = cutx
                    if x2-x1 < 5:
                        index_list.append(index)

            # 如果是右下图
            if i == 3:
                if x2 < cutx or y2 < cuty:
                    index_list.append(index)

                if x1 <= cutx and x2 >= cutx:
                    x1 = cutx
                    if x2-x1 < 5:
                        index_list.append(index)

                if y1 <= cuty and y2 >= cuty:
                    y1 = cuty
                    if y2-y1 < 5:
                        index_list.append(index)

            # 更新坐标信息
            bboxes[i][0][index] = [x1, y1, x2, y2]  # 更新第i张图的第index个检测框的坐标

        # 删除不满足要求的框,并保存
        merge_box.append(np.delete(bboxes[i][0], index_list, axis=0))

    # 返回坐标信息
    return merge_box


#(1)对传入的四张图片数据增强
def get_random_data(image_list, input_shape):

    h, w = input_shape  # 获取图像的宽高

    '''设置拼接的分隔线位置'''
    min_offset_x = 0.4
    min_offset_y = 0.4
    scale_low = 1 - min(min_offset_x, min_offset_y)  # 0.6
    scale_high = scale_low + 0.2  # 0.8

    image_datas = []  # 存放图像信息
    box_datas = []  # 存放检测框信息
    index = 0  # 当前是第几张图


    #(1)图像分割
    for frame_list in image_list:

        frame = frame_list[0]  # 取出的某一张图像
        box = np.array(frame_list[1:])  # 该图像对应的检测框坐标

        ih, iw = frame.shape[0:2]  # 图片的宽高

        cx = (box[0,:,0] + box[0,:,2]) // 2  # 检测框中心点的x坐标
        cy = (box[0,:,1] + box[0,:,3]) // 2  # 检测框中心点的y坐标


        # 对输入图像缩放
        new_ar = w/h  # 图像的宽高比
        scale = np.random.uniform(scale_low, scale_high)   # 缩放0.6--0.8倍
        # 调整后的宽高
        nh = int(scale * h)  # 缩放比例乘以要求的宽高
        nw = int(nh * new_ar)  # 保持原始宽高比例

        # 缩放图像
        frame = cv2.resize(frame, (nw,nh))

        # 调整中心点坐标
        cx = cx * nw/iw
        cy = cy * nh/ih

        # 调整检测框的宽高
        bw = (box[0,:,2] - box[0,:,0]) * nw/iw  # 修改后的检测框的宽高
        bh = (box[0,:,3] - box[0,:,1]) * nh/ih


        # 创建一块[416,416]的底版
        new_frame = np.zeros((h,w,3), np.uint8)

        # 确定每张图的位置
        if index==0: new_frame[0:nh, 0:nw] = frame   # 第一张位于左上方
        elif index==1: new_frame[0:nh, w-nw:w] = frame  # 第二张位于右上方
        elif index==2: new_frame[h-nh:h, 0:nw] = frame  # 第三张位于左下方
        elif index==3: new_frame[h-nh:h, w-nw:w] = frame  # 第四张位于右下方


        # 修正每个检测框的位置
        if index==0:  # 左上图像
            box[0,:,0] = cx - bw // 2  # x1
            box[0,:,1] = cy - bh // 2  # y1
            box[0,:,2] = cx + bw // 2  # x2
            box[0,:,3] = cy + bh // 2  # y2

        if index==1:  # 右上图像
            box[0,:,0] = cx - bw // 2 + w - nw  # x1
            box[0,:,1] = cy - bh // 2  # y1
            box[0,:,2] = cx + bw // 2 + w - nw # x2
            box[0,:,3] = cy + bh // 2  # y2

        if index==2:  # 左下图像
            box[0,:,0] = cx - bw // 2  # x1
            box[0,:,1] = cy - bh // 2 + h - nh  # y1
            box[0,:,2] = cx + bw // 2  # x2
            box[0,:,3] = cy + bh // 2 + h - nh  # y2

        if index==3:  # 右下图像
            box[0,:,2] = cx - bw // 2 + w - nw # x1
            box[0,:,3] = cy - bh // 2 + h - nh # y1
            box[0,:,0] = cx + bw // 2 + w - nw # x2
            box[0,:,1] = cy + bh // 2 + h - nh  # y2


        index = index + 1  # 处理下一张

        # 保存处理后的图像及对应的检测框坐标
        image_datas.append(new_frame)
        box_datas.append(box)


    # 取出某张图片以及它对应的检测框信息, i代表图片索引
    for image, boxes in zip(image_datas, box_datas):

        # 复制一份原图
        image_copy = image.copy()

        # 遍历该张图像中的所有检测框
        for box in boxes[0]:
            # 获取某一个框的坐标
            x1, y1, x2, y2 = box
            cv2.rectangle(image_copy, (x1,y1), (x2,y2), (0,255,0), 2)

        cv2.imshow('img', image_copy)
        cv2.waitKey(0)
        cv2.destroyAllWindows()


    #(2)将四张图像拼接在一起
    # 在指定范围中选择横纵向分割线
    cutx = np.random.randint(int(w*min_offset_x), int(w*(1-min_offset_x)))
    cuty = np.random.randint(int(h*min_offset_y), int(h*(1-min_offset_y)))

    # 创建一块[416,416]的底版用来组合四张图
    new_image = np.zeros((h,w,3), np.uint8)
    new_image[:cuty, :cutx, :] = image_datas[0][:cuty, :cutx, :]
    new_image[:cuty, cutx:, :] = image_datas[1][:cuty, cutx:, :]
    new_image[cuty:, :cutx, :] = image_datas[2][cuty:, :cutx, :]
    new_image[cuty:, cutx:, :] = image_datas[3][cuty:, cutx:, :]


    # 显示合并后的图像
    cv2.imshow('new_img', new_image)
    cv2.waitKey(0)
    cv2.destroyAllWindows()


    # 复制一份合并后的原图
    final_image_copy = new_image.copy()

    # 显示有检测框并合并后的图像
    for boxes in box_datas:

        # 遍历该张图像中的所有检测框
        for box in boxes[0]:
            # 获取某一个框的坐标
            x1, y1, x2, y2 = box
            cv2.rectangle(final_image_copy, (x1,y1), (x2,y2), (0,255,0), 2)

    cv2.imshow('new_img_bbox', final_image_copy)
    cv2.waitKey(0)
    cv2.destroyAllWindows()


    # 处理超出图像边缘的检测框
    new_boxes = merge_bboxes(box_datas, cutx, cuty)

    # 复制一份合并后的图像
    modify_image_copy = new_image.copy()

    # 绘制修正后的检测框
    for boxes in new_boxes:
        # 遍历每张图像中的所有检测框
        for box in boxes:
            # 获取某一个框的坐标
            x1, y1, x2, y2 = box
            cv2.rectangle(modify_image_copy, (x1,y1), (x2,y2), (0,255,0), 2)
    cv2.imshow('new_img_bbox', modify_image_copy)
    cv2.waitKey(0)
    cv2.destroyAllWindows()


# 主函数,获取图片路径和检测框路径
if __name__ == '__main__':

    # 给出图片文件夹和检测框文件夹所在的位置
    image_dir = 'D:/deeplearning/database/VOC2007/picture/'
    annotation_dir = 'D:/deeplearning/database/VOC2007/annotation/'

    image_list = []  # 存放每张图像和该图像对应的检测框坐标信息

    # 读取4张图像及其检测框信息
    for i in range(4):

        image_box = []  # 存放每张图片的检测框信息

        # 某张图片位置及其对应的检测框信息
        image_path = image_dir + str(i+1) + '.jpg'
        annotation_path = annotation_dir + str(i+1) + '.xml'

        image = cv2.imread(image_path)  # 读取图像

        # 读取检测框信息
        with open(annotation_path, 'r') as new_f:
            #  getroot()获取根节点
            root = ET.parse(annotation_path).getroot()

        # findall查询根节点下的所有直系子节点,find查询根节点下的第一个直系子节点
        for obj in root.findall('object'):
            obj_name = obj.find('name').text   # 目标名称
            bndbox = obj.find('bndbox')
            left = eval(bndbox.find('xmin').text)    # 左上坐标x
            top = eval(bndbox.find('ymin').text)     # 左上坐标y
            right = eval(bndbox.find('xmax').text)   # 右下坐标x
            bottom = eval(bndbox.find('ymax').text)  # 右下坐标y

            # 保存每张图片的检测框信息
            image_box.append([left, top, right, bottom])  # [[x1,y1,x2,y2],[..],[..]]

        # 保存图像及其对应的检测框信息
        image_list.append([image, image_box])

    # 缩放、拼接图片
    get_random_data(image_list, input_shape=[416,416])
最后一种通用代码
def load_mosaic(self, index):
    """
    将四张图片拼接在一张马赛克图像中
    :param self:
    :param index: 需要获取的图像索引
    :return:
    """
    # loads images in a mosaic

    labels4 = []  # 拼接图像的label信息
    s = self.img_size
    # 随机初始化拼接图像的中心点坐标
    xc, yc = [int(random.uniform(s * 0.5, s * 1.5)) for _ in range(2)]  # mosaic center x, y
    # 从dataset中随机寻找三张图像进行拼接
    indices = [index] + [random.randint(0, len(self.labels) - 1) for _ in range(3)]  # 3 additional image indices
    # 遍历四张图像进行拼接
    for i, index in enumerate(indices):
        # load image
        img, _, (h, w) = load_image(self, index)

        # place img in img4
        if i == 0:  # top left
            # 创建马赛克图像
            img4 = np.full((s * 2, s * 2, img.shape[2]), 114, dtype=np.uint8)  # base image with 4 tiles
            # 计算马赛克图像中的坐标信息(将图像填充到马赛克图像中)
            x1a, y1a, x2a, y2a = max(xc - w, 0), max(yc - h, 0), xc, yc  # xmin, ymin, xmax, ymax (large image)
            # 计算截取的图像区域信息(以xc,yc为第一张图像的右下角坐标填充到马赛克图像中,丢弃越界的区域)
            x1b, y1b, x2b, y2b = w - (x2a - x1a), h - (y2a - y1a), w, h  # xmin, ymin, xmax, ymax (small image)
        elif i == 1:  # top right
            # 计算马赛克图像中的坐标信息(将图像填充到马赛克图像中)
            x1a, y1a, x2a, y2a = xc, max(yc - h, 0), min(xc + w, s * 2), yc
            # 计算截取的图像区域信息(以xc,yc为第二张图像的左下角坐标填充到马赛克图像中,丢弃越界的区域)
            x1b, y1b, x2b, y2b = 0, h - (y2a - y1a), min(w, x2a - x1a), h
        elif i == 2:  # bottom left
            # 计算马赛克图像中的坐标信息(将图像填充到马赛克图像中)
            x1a, y1a, x2a, y2a = max(xc - w, 0), yc, xc, min(s * 2, yc + h)
            # 计算截取的图像区域信息(以xc,yc为第三张图像的右上角坐标填充到马赛克图像中,丢弃越界的区域)
            x1b, y1b, x2b, y2b = w - (x2a - x1a), 0, max(xc, w), min(y2a - y1a, h)
        elif i == 3:  # bottom right
            # 计算马赛克图像中的坐标信息(将图像填充到马赛克图像中)
            x1a, y1a, x2a, y2a = xc, yc, min(xc + w, s * 2), min(s * 2, yc + h)
            # 计算截取的图像区域信息(以xc,yc为第四张图像的左上角坐标填充到马赛克图像中,丢弃越界的区域)
            x1b, y1b, x2b, y2b = 0, 0, min(w, x2a - x1a), min(y2a - y1a, h)

        # 将截取的图像区域填充到马赛克图像的相应位置
        img4[y1a:y2a, x1a:x2a] = img[y1b:y2b, x1b:x2b]  # img4[ymin:ymax, xmin:xmax]
        # 计算pad(图像边界与马赛克边界的距离,越界的情况为负值)
        padw = x1a - x1b
        padh = y1a - y1b

        # Labels 获取对应拼接图像的labels信息
        # [class_index, x_center, y_center, w, h]
        x = self.labels[index]
        labels = x.copy()  # 深拷贝,防止修改原数据
        if x.size > 0:  # Normalized xywh to pixel xyxy format
            # 计算标注数据在马赛克图像中的坐标(绝对坐标)
            labels[:, 1] = w * (x[:, 1] - x[:, 3] / 2) + padw   # xmin
            labels[:, 2] = h * (x[:, 2] - x[:, 4] / 2) + padh   # ymin
            labels[:, 3] = w * (x[:, 1] + x[:, 3] / 2) + padw   # xmax
            labels[:, 4] = h * (x[:, 2] + x[:, 4] / 2) + padh   # ymax
        labels4.append(labels)

    # Concat/clip labels
    if len(labels4):
        labels4 = np.concatenate(labels4, 0)
        # 设置上下限防止越界
        np.clip(labels4[:, 1:], 0, 2 * s, out=labels4[:, 1:])  # use with random_affine

    # Augment
    # 随机旋转,缩放,平移以及错切
    img4, labels4 = random_affine(img4, labels4,
                                  degrees=self.hyp['degrees'],
                                  translate=self.hyp['translate'],
                                  scale=self.hyp['scale'],
                                  shear=self.hyp['shear'],
                                  border=-s // 2)  # border to remove

    return img4, labels4
def load_image(self, index):
    # loads 1 image from dataset, returns img, original hw, resized hw
    img = self.imgs[index]
    if img is None:  # not cached
        path = self.img_files[index]
        img = cv2.imread(path)  # BGR
        assert img is not None, "Image Not Found " + path
        h0, w0 = img.shape[:2]  # orig hw
        # img_size 设置的是预处理后输出的图片尺寸
        r = self.img_size / max(h0, w0)  # resize image to img_size
        if r != 1:  # if sizes are not equal
            interp = cv2.INTER_AREA if r < 1 and not self.augment else cv2.INTER_LINEAR
            img = cv2.resize(img, (int(w0 * r), int(h0 * r)), interpolation=interp)
        return img, (h0, w0), img.shape[:2]  # img, hw_original, hw_resized
    else:
        return self.imgs[index], self.img_hw0[index], self.img_hw[index]  # img, hw_original, hw_resized
def random_affine(img, targets=(), degrees=10, translate=.1, scale=.1, shear=10, border=0):
    """随机旋转,缩放,平移以及错切"""
    # torchvision.transforms.RandomAffine(degrees=(-10, 10), translate=(.1, .1), scale=(.9, 1.1), shear=(-10, 10))
    # https://medium.com/uruvideo/dataset-augmentation-with-random-homographies-a8f4b44830d4
    # 这里可以参考我写的博文: https://blog.csdn.net/qq_37541097/article/details/119420860
    # targets = [cls, xyxy]

    # 最终输出的图像尺寸,等于img4.shape / 2
    height = img.shape[0] + border * 2
    width = img.shape[1] + border * 2

    # Rotation and Scale
    # 生成旋转以及缩放矩阵
    R = np.eye(3)  # 生成对角阵
    a = random.uniform(-degrees, degrees)  # 随机旋转角度
    s = random.uniform(1 - scale, 1 + scale)  # 随机缩放因子
    R[:2] = cv2.getRotationMatrix2D(angle=a, center=(img.shape[1] / 2, img.shape[0] / 2), scale=s)

    # Translation
    # 生成平移矩阵
    T = np.eye(3)
    T[0, 2] = random.uniform(-translate, translate) * img.shape[0] + border  # x translation (pixels)
    T[1, 2] = random.uniform(-translate, translate) * img.shape[1] + border  # y translation (pixels)

    # Shear
    # 生成错切矩阵
    S = np.eye(3)
    S[0, 1] = math.tan(random.uniform(-shear, shear) * math.pi / 180)  # x shear (deg)
    S[1, 0] = math.tan(random.uniform(-shear, shear) * math.pi / 180)  # y shear (deg)

    # Combined rotation matrix
    M = S @ T @ R  # ORDER IS IMPORTANT HERE!!
    if (border != 0) or (M != np.eye(3)).any():  # image changed
        # 进行仿射变化
        img = cv2.warpAffine(img, M[:2], dsize=(width, height), flags=cv2.INTER_LINEAR, borderValue=(114, 114, 114))

    # Transform label coordinates
    n = len(targets)
    if n:
        # warp points
        xy = np.ones((n * 4, 3))
        xy[:, :2] = targets[:, [1, 2, 3, 4, 1, 4, 3, 2]].reshape(n * 4, 2)  # x1y1, x2y2, x1y2, x2y1
        # [4*n, 3] -> [n, 8]
        xy = (xy @ M.T)[:, :2].reshape(n, 8)

        # create new boxes
        # 对transform后的bbox进行修正(假设变换后的bbox变成了菱形,此时要修正成矩形)
        x = xy[:, [0, 2, 4, 6]]  # [n, 4]
        y = xy[:, [1, 3, 5, 7]]  # [n, 4]
        xy = np.concatenate((x.min(1), y.min(1), x.max(1), y.max(1))).reshape(4, n).T  # [n, 4]

        # reject warped points outside of image
        # 对坐标进行裁剪,防止越界
        xy[:, [0, 2]] = xy[:, [0, 2]].clip(0, width)
        xy[:, [1, 3]] = xy[:, [1, 3]].clip(0, height)
        w = xy[:, 2] - xy[:, 0]
        h = xy[:, 3] - xy[:, 1]

        # 计算调整后的每个box的面积
        area = w * h
        # 计算调整前的每个box的面积
        area0 = (targets[:, 3] - targets[:, 1]) * (targets[:, 4] - targets[:, 2])
        # 计算每个box的比例
        ar = np.maximum(w / (h + 1e-16), h / (w + 1e-16))  # aspect ratio
        # 选取长宽大于4个像素,且调整前后面积比例大于0.2,且比例小于10的box
        i = (w > 4) & (h > 4) & (area / (area0 * s + 1e-16) > 0.2) & (ar < 10)

        targets = targets[i]
        targets[:, 1:5] = xy[i]

    return img, targets
x2y1
# [4*n, 3] -> [n, 8]
xy = (xy @ M.T)[:, :2].reshape(n, 8)
    # create new boxes
    # 对transform后的bbox进行修正(假设变换后的bbox变成了菱形,此时要修正成矩形)
    x = xy[:, [0, 2, 4, 6]]  # [n, 4]
    y = xy[:, [1, 3, 5, 7]]  # [n, 4]
    xy = np.concatenate((x.min(1), y.min(1), x.max(1), y.max(1))).reshape(4, n).T  # [n, 4]

    # reject warped points outside of image
    # 对坐标进行裁剪,防止越界
    xy[:, [0, 2]] = xy[:, [0, 2]].clip(0, width)
    xy[:, [1, 3]] = xy[:, [1, 3]].clip(0, height)
    w = xy[:, 2] - xy[:, 0]
    h = xy[:, 3] - xy[:, 1]

    # 计算调整后的每个box的面积
    area = w * h
    # 计算调整前的每个box的面积
    area0 = (targets[:, 3] - targets[:, 1]) * (targets[:, 4] - targets[:, 2])
    # 计算每个box的比例
    ar = np.maximum(w / (h + 1e-16), h / (w + 1e-16))  # aspect ratio
    # 选取长宽大于4个像素,且调整前后面积比例大于0.2,且比例小于10的box
    i = (w > 4) & (h > 4) & (area / (area0 * s + 1e-16) > 0.2) & (ar < 10)

    targets = targets[i]
    targets[:, 1:5] = xy[i]

return img, targets
![[ CSS ] 内容超出容器后 以...省略](https://img-blog.csdnimg.cn/img_convert/bc83ef4b5bda4b80c35ef58352dacb6e.jpeg)
