TensorFlow2的核心概念
- Tensorflow中的张量
- 常量张量
- 变量张量
- Tensorflow中的计算图
- 计算图介绍
- 静态计算图
- 动态计算图
- Autograph
- 张量Tensor、图Graph、操作Operation、会话Session
- 模型Model与层Layer
- Tensorflow中的自动微分机制
- 利用梯度磁带求导数
- 利用梯度磁带和优化器求最小值
- 参考资料
TensorFlow是一个采用
数据流图(data flow graphs),用于数值计算的开源软件库。
节点(Nodes)在图中表示数学操作,图中的
线(edges)则表示在节点间相互联系的多维数据数组,即
张量(tensor)。它灵活的架构让你可以
在多种平台上展开计算,例如台式计算机中的一个或多个CPU(或GPU),服务器,移动设备等等。
TensorFlow 最初由Google大脑小组(隶属于Google机器智能研究机构)的研究员和工程师们开发出来,用于机器学习和深度神经网络 方面的研究,但这个系统的通用性使其也可广泛用于其他计算领域。
TensorFlow的主要优点:
- 灵活性:支持底层数值计算,C++自定义操作符
- 可移植性:从服务器到PC到手机,从CPU到GPU到TPU
- 分布式计算:分布式并行计算,可指定操作符对应计算设备
Tensorflow底层最核心的概念是张量,计算图以及自动微分。
Tensorflow中的张量
常量张量
TensorFlow程序 = 张量数据结构 + 计算图算法语言。张量和计算图是 TensorFlow的核心概念。Tensorflow的基本数据结构是张量Tensor。张量即多维数组。Tensorflow的张量和numpy中的array很类似。
从行为特性来看,有两种类型的张量,常量constant和变量Variable。常量的值在计算图中不可以被重新赋值,变量可以在计算图中用assign等算子重新赋值。
import numpy as np
import tensorflow as tf

a = tf.constant(1) # tf.int32 常量类型
b = tf.constant(1, dtype=tf.int64)
c = tf.constant(1.23) # tf.float32 类型常量
d = tf.constant(3.14, dtype=tf.double)
e = tf.constant('hello world') # tf.string类型常量
f = tf.constant(True) # tf.bool类型常量

print(tf.int64==np.int64) # True
print(tf.bool==np.bool)   # True
print(tf.double == np.float64) # True
print(tf.string==np.unicode)   # False
不同类型的数据可以用不同维度(rank)的张量来表示。标量为0维张量,向量为1维张量,矩阵为2维张量。彩色图像有RGB三个通道,可以表示为3维张量。视频还有时间维,可以表示为4维张量。简单地总结为:有几层中括号,就是多少维的张量。
示例代码如下:
1维张量:
vector = tf.constant([1.0,2.0,3.0,4.0]) #向量,1维张量

print(tf.rank(vector))
print(np.ndim(vector.numpy()))
2维张量:
matrix = tf.constant([[1.0,2.0],[3.0,4.0]]) #矩阵, 2维张量

print(tf.rank(matrix).numpy())
print(np.ndim(matrix))
3维张量:
tensor3 = tf.constant([[[1.0,2.0],[3.0,4.0]],[[5.0,6.0],[7.0,8.0]]])  # 3维张量
print(tensor3)
print(tf.rank(tensor3))
4维张量:
tensor4 = tf.constant([[[[1.0,1.0],[2.0,2.0]],[[3.0,3.0],[4.0,4.0]]],
                        [[[5.0,5.0],[6.0,6.0]],[[7.0,7.0],[8.0,8.0]]]])  # 4维张量
print(tensor4)
print(tf.rank(tensor4))
- 可以用
tf.cast改变张量的数据类型。 - 可以用numpy方法将tensorflow中的张量转化成numpy中的张量。
- 可以用shape方法查看张量的尺寸。
示例代码如下:
g = tf.constant([123, 456], dtype=tf.int32)
h = tf.cast(g, tf.float32)
print(g.dtype, h.dtype) # <dtype: 'int32'> <dtype: 'float32'>
转换为numpy
y = tf.constant([[1.0,2.0],[3.0,4.0]])
print(y.numpy()) #转换成np.array
print(y.shape)
字符串类型转换为numpy
u = tf.constant(u"你好 世界")
print(u.numpy())
print(u.numpy().decode("utf-8"))
变量张量
模型中需要被训练的参数一般被设置成变量。因为常量值不可以改变,常量的重新赋值相当于创造新的内存空间。
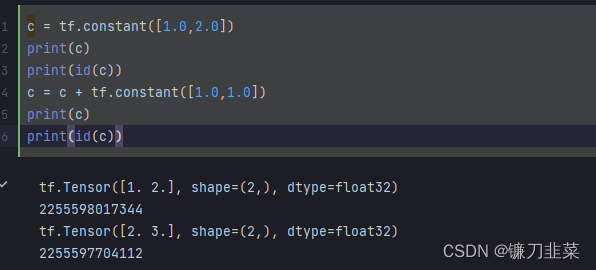
而变量的值可以改变,可以通过assign, assign_add等方法给变量重新赋值:

Tensorflow中的计算图
有三种计算图的构建方式:静态计算图,动态计算图,以及Autograph。
- 在
TensorFlow1.0时代,采用的是静态计算图,需要先使用TensorFlow的各种算子创建计算图,然后再开启一个会话Session,显式执行计算图。 - 在
TensorFlow2.0时代,采用的是动态计算图,即每使用一个算子后,该算子会被动态加入到隐含的默认计算图中立即执行得到结果,而无需开启Session。
使用动态计算图即Eager Excution的好处是方便调试程序,它会让TensorFlow代码的表现和Python原生代码的表现一样,写起来就像写numpy一样,各种日志打印,控制流全部都是可以使用的。
使用动态计算图的缺点是运行效率相对会低一些。因为使用动态图会有许多次Python进程和TensorFlow的C++进程之间的通信。而静态计算图构建完成之后几乎全部在TensorFlow内核上使用C++代码执行,效率更高。此外静态图会对计算步骤进行一定的优化,剪去和结果无关的计算步骤。
如果需要在TensorFlow2.0中使用静态图,可以使用@tf.function装饰器将普通Python函数转换成对应的TensorFlow计算图构建代码。运行该函数就相当于在TensorFlow1.0中用Session执行代码。使用tf.function构建静态图的方式叫做Autograph。
计算图介绍
计算图由节点(nodes)和线(edges)组成。节点表示操作符Operator,或者称之为算子,线表示计算间的依赖。实线表示有数据传递依赖,传递的数据即张量。虚线通常可以表示控制依赖,即执行先后顺序。
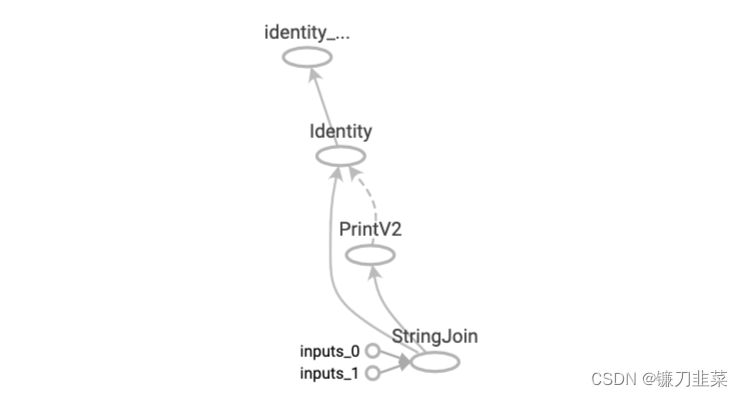
静态计算图
在TensorFlow1.0中,使用静态计算图分两步,第一步定义计算图,第二步在会话中执行计算图。
TensorFlow 1.0静态计算图范例
import tensorflow as tf

# 定义计算图
g = tf.Graph()
# 作为默认图
with g.as_default():
    #placeholder为占位符,执行会话时候指定填充对象
    x = tf.placeholder(name='x', shape=[], dtype=tf.string)
    y = tf.placeholder(name='y', shape=[], dtype=tf.string)
    z = tf.string_join([x, y],name = 'join', separator=' ')

# 新建会话,执行计算图
with tf.Session(graph = g) as sess:
    print(sess.run(fetches = z, feed_dict = {x:"hello", y:"world"})) # ⇒ hello world
TensorFlow2.0 怀旧版静态计算图
TensorFlow2.0为了确保对老版本tensorflow项目的兼容性,在tf.compat.v1子模块中保留了对TensorFlow1.0那种静态计算图构建风格的支持。可称之为怀旧版静态计算图,已经不推荐使用了。
import tensorflow as tf

g = tf.compat.v1.Graph()
with g.as_default():
    x = tf.compat.v1.placeholder(name='x', shape=[], dtype=tf.string)
    y = tf.compat.v1.placeholder(name='y', shape=[], dtype=tf.string)
    z = tf.strings.join([x,y],name = "join",separator = " ")

with tf.compat.v1.Session(graph = g) as sess:
    # fetches的结果非常像一个函数的返回值,而feed_dict中的占位符相当于函数的参数序列。
    result = sess.run(fetches = z,feed_dict = {x:"hello",y:"world"})
    print(result)
动态计算图
在TensorFlow2.0中,使用的是动态计算图和Autograph。动态计算图已经不区分计算图的定义和执行了,而是定义后立即执行。因此称之为 Eager Excution。Eager这个英文单词的原意是”迫不及待的”,也就是立即执行的意思。
# 动态计算图在每个算子处都进行构建,构建后立即执行
x = tf.constant("hello")
y = tf.constant("world")
z = tf.strings.join([x, y], separator=" ")
tf.print(z) # ⇒ hello world
也可以将动态计算图代码的输入和输出关系封装成函数,如:
def strjoin(x, y):
    z =  tf.strings.join([x, y], separator = " ")
    tf.print(z)
    return z # ⇒ hello world

result = strjoin(tf.constant("hello"),tf.constant("world"))
print(result) # ⇒ tf.Tensor(b'hello world', shape=(), dtype=string)
如果硬是想在2.0版本中使用1.0版本的计算图也是可以的。2.0版本提供了tf.compat.v1模块来兼容低版本代码,如:
import tensorflow as tf

g = tf.compat.v1.Graph()
with g.as_default():
    x = tf.compat.v1.placeholder(name='x', shape=[], dtype=tf.string)
    y = tf.compat.v1.placeholder(name='y', shape=[], dtype=tf.string)
    z = tf.strings.join([x, y], name = "join", separator = " ")

with tf.compat.v1.Session(graph = g) as sess:
    # fetches的结果非常像一个函数的返回值,而feed_dict中的占位符相当于函数的参数序列。
    result = sess.run(fetches = z, feed_dict = {x:"hello", y:"world"})
    print(result) # ⇒ b'hello world'
Autograph
动态计算图运行效率相对较低。但是可以用@tf.function装饰器将普通Python函数转换成和TensorFlow1.0对应的静态计算图构建代码。
- 在TensorFlow1.0中,使用计算图分两步,第一步定义计算图,第二步在会话中执行计算图。
- 在TensorFlow2.0中,如果采用Autograph的方式使用计算图,第一步定义计算图变成了定义函数,第二步执行计算图变成了调用函数。不需要使用会话了,一些都像原始的Python语法一样自然。
实践中,一般会先用动态计算图调试代码,然后在需要提高性能的的地方利用@tf.function切换成Autograph获得更高的效率。当然,@tf.function的使用需要遵循一定的规范。
import tensorflow as tf

# 使用autograph构建静态图
@tf.function
def strjoin(x, y):
    z =  tf.strings.join([x,y], separator = " ")
    tf.print(z)
    return z # ⇒ hello world

result = strjoin(tf.constant("hello"), tf.constant("world"))
print(result) # ⇒ tf.Tensor(b'hello world', shape=(), dtype=string)
张量Tensor、图Graph、操作Operation、会话Session
张量Tensor是TensorFlow的基本数据结构。张量在概念上等同于多维数组,Tensorflow的张量和numpy中的array很类似。从行为特性来看,有两种类型的张量,常量constant张量和变量Variable张量。.
首先看这张图:

如图所示,张量[5, 3]进入节点a,分别流向了节点b、c进行prod和sum两个操作,结果15和8又同时流入节点d进行add操作,最后输出结果23。由此发现,图Graph实际上是一个由数据流图表示的计算过程,即张量Tensor在图Graph中的流动过程。而每一个节点便对应一个操作Operation。
包括生成张量Tensor在内,上图包括abcd四个操作,代码表示为:
import tensorflow as tf

a = tf.constant([5, 3], name='input_a')
b = tf.reduce_prod(a, name='prod_b')
c = tf.reduce_sum(a, name='sum_c')
d = tf.add(b, c, name='add_d')
再提一下会话Session,其作用是分配CPU或GPU资源来运行一张图Graph。一个会话Session的目的简单来说就是操作Operation的执行和张量Tensor的计算。
需要注意的是,TensorFlow2.0版本后已经取消了Session模块,并且不需要新建图Graph再新建会话Session来运行,便可以像普通Python代码一样运行 。这种模式便是“动态图模式”,即所谓的Eager Excution。
模型Model与层Layer
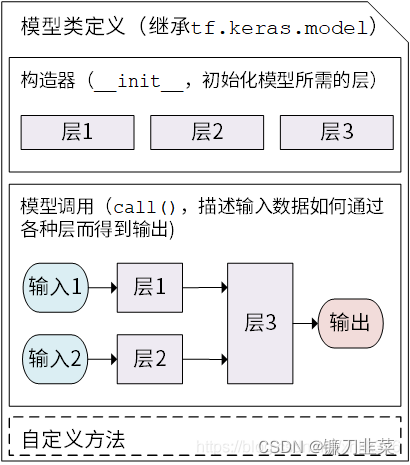
层Layer将各种计算流程和变量进行了封装(例如基本的全连接层,CNN 的卷积层、池化层等),而模型Model则将各种层进行组织和连接,并封装成一个整体,描述了如何将输入数据通过各种层以及运算而得到输出。
在 TensorFlow 中,通常使用Keras( tf.keras )构建模型。Keras 是一个广为流行的高级神经网络 API,简单、快速而不失灵活性,现已得到 TensorFlow 的官方内置和全面支持。
Keras 在tf.keras.layers 下内置了深度学习中大量常用的的预定义层,同时也允许我们自定义层。
Keras 模型以类的形式呈现,可以通过继承 tf.keras.Model这个 Python 类来定义自己的模型。在继承类中,需要重写init()(构造函数,初始化)和call(input)(模型调用)两个方法,同时也可以根据需要增加自定义的方法。
模型类定义示意图:
代码示意:
class MyModel(tf.keras.Model):
    def __init__(self):
        super().__init__()     # Python 2 下使用 super(MyModel, self).__init__()
        # 此处添加初始化代码(包含 call 方法中会用到的层),例如
        # layer1 = tf.keras.layers.BuiltInLayer(...)
        # layer2 = MyCustomLayer(...)

    def call(self, input):
        # 此处添加模型调用的代码(处理输入并返回输出),例如
        # x = layer1(input)
        # output = layer2(x)
        return output

    # 还可以添加自定义的方法
Tensorflow中的自动微分机制
神经网络通常依赖反向传播求梯度来更新网络参数,求梯度过程通常是一件非常复杂而容易出错的事情。而深度学习框架可以帮助我们自动地完成这种求梯度运算。
Tensorflow一般使用梯度磁带tf.GradientTape来记录正向运算过程,然后反播磁带自动得到梯度值。这种利用tf.GradientTape求微分的方法叫做Tensorflow的自动微分机制。
利用梯度磁带求导数
import tensorflow as tf
import numpy as np

# 求f(x) = a*x**2 + b*x + c的导数

x = tf.Variable(0.0,name = "x",dtype = tf.float32)
a = tf.constant(1.0)
b = tf.constant(-2.0)
c = tf.constant(1.0)


with tf.GradientTape() as tape:
    y = a*tf.pow(x, 2)+b*x+c

dy_dx = tape.gradient(y, x)
print(dy_dx)

'''
tf.Tensor(-2.0, shape=(), dtype=float32)
'''
对常量张量也可以求导,需要增加watch:
with tf.GradientTape() as tape:
    tape.watch([a, b, c])
    y = a * tf.pow(x, 2) + b * x + c

dy_dx, dy_da, dy_db, dy_dc = tape.gradient(y, [x, a, b, c])
print(dy_da) # tf.Tensor(0.0, shape=(), dtype=float32)
print(dy_dc) # tf.Tensor(1.0, shape=(), dtype=float32)
可以求二阶导数:
with tf.GradientTape() as tape2:
    with tf.GradientTape() as tape1:
        y = a*tf.pow(x,2) + b*x + c
    dy_dx = tape1.gradient(y,x)
dy2_dx2 = tape2.gradient(dy_dx,x)

print(dy2_dx2) # tf.Tensor(2.0, shape=(), dtype=float32)
可以在autograph中使用:
@tf.function
def f(x):
    a = tf.constant(1.0)
    b = tf.constant(-2.0)
    c = tf.constant(1.0)

    # 自变量转换成tf.float32
    x = tf.cast(x,tf.float32)
    with tf.GradientTape() as tape:
        tape.watch(x)
        y = a*tf.pow(x,2)+b*x+c
    dy_dx = tape.gradient(y,x)

    return((dy_dx,y))

tf.print(f(tf.constant(0.0))) # (-2, 1)
tf.print(f(tf.constant(1.0))) # (0, 0)
利用梯度磁带和优化器求最小值
- 求
f
(
x
)
=
a
×
x
2
+
b
×
x
+
c
f(x) = a\times x^2 + b\times x + c
f(x)=a×x2+b×x+c的最小值
(1)使用optimizer.apply_gradients:
x = tf.Variable(0.0,name = "x",dtype = tf.float32)
a = tf.constant(1.0)
b = tf.constant(-2.0)
c = tf.constant(1.0)

optimizer = tf.keras.optimizers.SGD(learning_rate=0.01)
for _ in range(1000):
    with tf.GradientTape() as tape:
        y = a*tf.pow(x, 2)+b*x+c
    dy_dx = tape.gradient(y, x)
    optimizer.apply_gradients(grads_and_vars=[(dy_dx,x)])

tf.print("y =",y,"; x =",x) # y = 0 ; x = 0.999998569
(2)使用optimizer.minimize:
optimizer.minimize相当于先用tape求gradient,再apply_gradient:
x = tf.Variable(0.0, name="x", dtype=tf.float32)


#注意f()无参数
def f():
    a = tf.constant(1.0)
    b = tf.constant(-2.0)
    c = tf.constant(1.0)
    y = a * tf.pow(x, 2) + b * x + c
    return (y)


optimizer = tf.keras.optimizers.SGD(learning_rate=0.01)
for _ in range(1000):
    optimizer.minimize(f, [x])

tf.print("y =", f(), "; x =", x) # y = 0 ; x = 0.999998569
- 在
autograph中完成最小值求解
(1)使用optimizer.apply_gradients:
x = tf.Variable(0.0, name="x", dtype=tf.float32)
optimizer = tf.keras.optimizers.SGD(learning_rate=0.01)


@tf.function
def minimizef():
    a = tf.constant(1.0)
    b = tf.constant(-2.0)
    c = tf.constant(1.0)

    for _ in tf.range(1000):  #注意autograph时使用tf.range(1000)而不是range(1000)
        with tf.GradientTape() as tape:
            y = a * tf.pow(x, 2) + b * x + c
        dy_dx = tape.gradient(y, x)
        optimizer.apply_gradients(grads_and_vars=[(dy_dx, x)])

    y = a * tf.pow(x, 2) + b * x + c
    return y


tf.print(minimizef()) # 0
tf.print(x)           # 0.99999851
(2)使用optimizer.minimize:
x = tf.Variable(0.0, name="x", dtype=tf.float32)
optimizer = tf.keras.optimizers.SGD(learning_rate=0.01)


@tf.function
def f():
    a = tf.constant(1.0)
    b = tf.constant(-2.0)
    c = tf.constant(1.0)
    y = a * tf.pow(x, 2) + b * x + c
    return (y)


@tf.function
def train(epoch):
    for _ in tf.range(epoch):
        optimizer.minimize(f, [x])
    return (f())


tf.print(train(1000)) # 0
tf.print(x)           # 0.99999851
参考资料
[1] 30天吃掉那只Tensorflow
[2] 《TensorFlow:实战Google深度学习框架》
[3] 从张量Tensor、图Graph、操作Operation到模型Model与层Layer
