做自己第一次使用Yolov8的记录。
1、下载代码
官网的我没找到对应的视频教程,操作起来麻烦,一下这个链接的代码可以有对应bilibili教程:完整且详细的Yolov8复现+训练自己的数据集
选择这个下载:

2、安装需要的包:
按照对应bilibili教程完成 :
【包会!YOLOv8训练自己的数据集】 https://www.bilibili.com/video/BV1o44y1w77C/?share_source=copy_web&vd_source=c87a195bcc1df47a24018e5bbe3057d5
pip install ultraytics
报错1:no matching distribution found for ultraytics
或者WARNING: Retrying (Retry(total=1, connect=None, read=None, redirect=None, status=None)) after connection broken by 'NewConnectionError('<pip._vendor.urllib3.connection.H TTPSConnection object at 0x000002032A838340>: Failed to establish a new connecti
并且按照网上换了好多源都不行!
解决:直接去下载whl文件,然后放到工程文件中直接安装,
下载地址:ultralytics · PyPI 安装方法见我的:whl文件下载安装笔记。
报错2:Error: No such command ‘predict‘.
解决: 执行命令:python setup.py install
3、准备自己的数据集、设置等
数据集的coco转txt可以参考以下文章,很好用:COCO(.json)格式 转换为 YOLO(.txt)格式训练(详细介绍,避坑贴)_annotation.coco.json_Study->CV的博客-CSDN博客
为防止作者删除,这里搬过来。修改12,14, 62行,改为自己数据集的位置,运行即可
# 转自 https://blog.csdn.net/liuyafengliu/article/details/121267785
#COCO 格式的数据集转化为 YOLO 格式的数据集
#--json_path 输入的json文件路径
#--save_path 保存的文件夹名字,默认为当前目录下的labels。

import os
import json
from tqdm import tqdm
import argparse

parser = argparse.ArgumentParser()
#这里根据自己的json文件位置,换成自己的就行
parser.add_argument('--json_path', default='E:/data/COCO2017/annotations_trainval2017/annotations/instances_train2017.json',type=str, help="input: coco format(json)")
#这里设置.txt文件保存位置
parser.add_argument('--save_path', default='E:/data/COCO', type=str, help="specify where to save the output dir of labels")
arg = parser.parse_args()

def convert(size, box):
    dw = 1. / (size[0])
    dh = 1. / (size[1])
    x = box[0] + box[2] / 2.0
    y = box[1] + box[3] / 2.0
    w = box[2]
    h = box[3]
#round函数确定(xmin, ymin, xmax, ymax)的小数位数
    x = round(x * dw, 6)
    w = round(w * dw, 6)
    y = round(y * dh, 6)
    h = round(h * dh, 6)
    return (x, y, w, h)

if __name__ == '__main__':
    json_file =   arg.json_path # COCO Object Instance 类型的标注
    ana_txt_save_path = arg.save_path  # 保存的路径

    data = json.load(open(json_file, 'r'))
    if not os.path.exists(ana_txt_save_path):
        os.makedirs(ana_txt_save_path)

    id_map = {} # coco数据集的id不连续!重新映射一下再输出!
    with open(os.path.join(ana_txt_save_path, 'classes.txt'), 'w') as f:
        # 写入classes.txt
        for i, category in enumerate(data['categories']):
            f.write(f"{category['name']}\n")
            id_map[category['id']] = i
    # print(id_map)
    #这里需要根据自己的需要,更改写入图像相对路径的文件位置。
    list_file = open(os.path.join(ana_txt_save_path, 'train2017.txt'), 'w')
    for img in tqdm(data['images']):
        filename = img["file_name"]
        img_width = img["width"]
        img_height = img["height"]
        img_id = img["id"]
        head, tail = os.path.splitext(filename)
        ana_txt_name = head + ".txt"  # 对应的txt名字,与jpg一致
        f_txt = open(os.path.join(ana_txt_save_path, ana_txt_name), 'w')
        for ann in data['annotations']:
            if ann['image_id'] == img_id:
                box = convert((img_width, img_height), ann["bbox"])
                f_txt.write("%s %s %s %s %s\n" % (id_map[ann["category_id"]], box[0], box[1], box[2], box[3]))
        f_txt.close()
        #将图片的相对路径写入train2017或val2017的路径
        list_file.write('E:/data/COCO2017/train2017/%s.jpg\n' %(head))
    list_file.close()
都按照对应bilibili教程完成 :
【包会!YOLOv8训练自己的数据集】 https://www.bilibili.com/video/BV1o44y1w77C/?share_source=copy_web&vd_source=c87a195bcc1df47a24018e5bbe3057d5
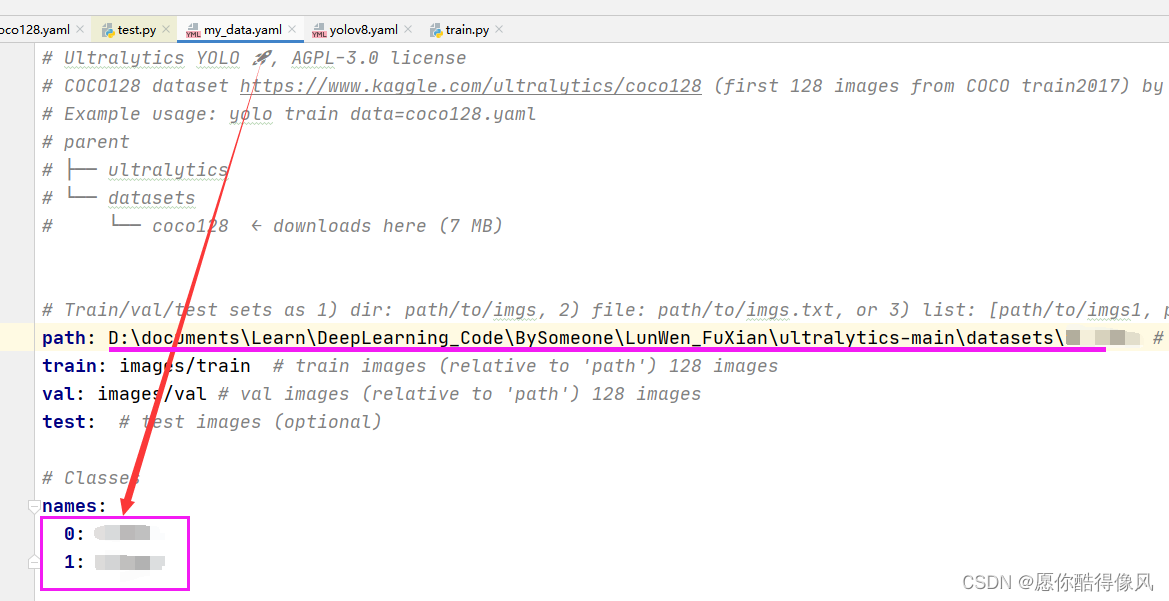
设置训练类别:

4、训练
用以下指令:
yolo train data=D:\documents\Learn\DeepLearning_Code\BySomeone\LunWen_FuXian\ultralytics-main\datasets\my_data.yaml model=yolov8m.yaml pretrained=D:\documents\Learn\DeepLearning_Code\BySomeone\LunWen_FuXian\ultralytics-main\yolov8m.pt epochs=200 imgsz=640 batch=4 resume=True
data、model 、pretrained等参数根据自己的电脑改,batch=4 我看别人是3050设置的4就设置了
报错3:OMP: Error #15: Initializing libiomp5md.dll, but found libiomp5md.dll already initialized.
解决:用以下软件搜索所有的libiomp5md.dll,是不是当前环境存在两个libiomp5md.dll,是则删除一个,我删除的是Libary/bin/libiomp5md.dll这个

5、完成,开始训练


