YOLOv5 分类模型 预处理 OpenCV实现
flyfish
YOLOv5 分类模型 预处理 PIL 实现
YOLOv5 分类模型 OpenCV和PIL两者实现预处理的差异
YOLOv5 分类模型 数据集加载 1 样本处理
YOLOv5 分类模型 数据集加载 2 切片处理
YOLOv5 分类模型 数据集加载 3 自定义类别
YOLOv5 分类模型的预处理(1) Resize 和 CenterCrop
YOLOv5 分类模型的预处理(2)ToTensor 和 Normalize
YOLOv5 分类模型 Top 1和Top 5 指标说明
YOLOv5 分类模型 Top 1和Top 5 指标实现
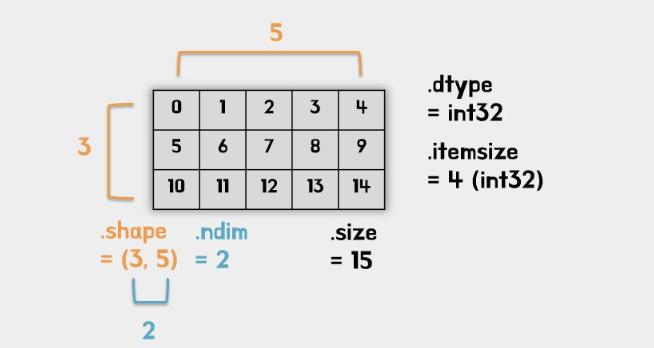
判断图像是否是np.ndarray类型和维度
OpenCV读取一张图像时,类型类型就是<class 'numpy.ndarray'>,这里判断图像是否是np.ndarray类型
dim是dimension维度的缩写,shape属性的长度也是它的ndim
灰度图的shape为HW,二个维度
RGB图的shape为HWC,三个维度
def _is_numpy_image(img):
    return isinstance(img, np.ndarray) and (img.ndim in {2, 3})
实现ToTensor和Normalize
def totensor_normalize(img):
    print("preprocess:",img.shape)
    images = (img/255-mean)/std
    images = images.transpose((2, 0, 1))# HWC to CHW
    images = np.ascontiguousarray(images)
    return images
实现Resize
插值可以是以下参数
# 'nearest': cv2.INTER_NEAREST,
# 'bilinear': cv2.INTER_LINEAR,
# 'area': cv2.INTER_AREA,
# 'bicubic': cv2.INTER_CUBIC,
# 'lanczos': cv2.INTER_LANCZOS4
def resize(img, size, interpolation=cv2.INTER_LINEAR):
    r"""Resize the input numpy ndarray to the given size.
    Args:
        img (numpy ndarray): Image to be resized.
        size: like pytroch about size interpretation flyfish.
        interpolation (int, optional): Desired interpolation. Default is``cv2.INTER_LINEAR``
    Returns:
        numpy Image: Resized image.like opencv
    """
    if not _is_numpy_image(img):
        raise TypeError('img should be numpy image. Got {}'.format(type(img)))
    if not (isinstance(size, int) or (isinstance(size, collections.abc.Iterable) and len(size) == 2)):
        raise TypeError('Got inappropriate size arg: {}'.format(size))
    h, w = img.shape[0], img.shape[1]

    if isinstance(size, int):
        if (w <= h and w == size) or (h <= w and h == size):
            return img
        if w < h:
            ow = size
            oh = int(size * h / w)
        else:
            oh = size
            ow = int(size * w / h)
    else:
        ow, oh = size[1], size[0]
    output = cv2.resize(img, dsize=(ow, oh), interpolation=interpolation)
    if img.shape[2] == 1:
        return output[:, :, np.newaxis]
    else:
        return output
实现CenterCrop
def crop(img, i, j, h, w):
    """Crop the given Image flyfish.
    Args:
        img (numpy ndarray): Image to be cropped.
        i: Upper pixel coordinate.
        j: Left pixel coordinate.
        h: Height of the cropped image.
        w: Width of the cropped image.
    Returns:
        numpy ndarray: Cropped image.
    """
    if not _is_numpy_image(img):
        raise TypeError('img should be numpy image. Got {}'.format(type(img)))

    return img[i:i + h, j:j + w, :]


def center_crop(img, output_size):
    if isinstance(output_size, numbers.Number):
        output_size = (int(output_size), int(output_size))
    h, w = img.shape[0:2]
    th, tw = output_size
    i = int(round((h - th) / 2.))
    j = int(round((w - tw) / 2.))
    return crop(img, i, j, th, tw)
完整
import time
from models.common import DetectMultiBackend
import os
import os.path
from typing import Any, Callable, cast, Dict, List, Optional, Tuple, Union
import cv2
import numpy as np
import collections
import torch
import numbers


classes_name=['n02086240', 'n02087394', 'n02088364', 'n02089973', 'n02093754', 'n02096294', 'n02099601', 'n02105641', 'n02111889', 'n02115641']

mean=[0.485, 0.456, 0.406]
std=[0.229, 0.224, 0.225]

def _is_numpy_image(img):
    return isinstance(img, np.ndarray) and (img.ndim in {2, 3})


def totensor_normalize(img):
    print("preprocess:",img.shape)
    images = (img/255-mean)/std
    images = images.transpose((2, 0, 1))# HWC to CHW
    images = np.ascontiguousarray(images)
    return images

def resize(img, size, interpolation=cv2.INTER_LINEAR):
    r"""Resize the input numpy ndarray to the given size.
    Args:
        img (numpy ndarray): Image to be resized.
        size: like pytroch about size interpretation flyfish.
        interpolation (int, optional): Desired interpolation. Default is``cv2.INTER_LINEAR``
    Returns:
        numpy Image: Resized image.like opencv
    """
    if not _is_numpy_image(img):
        raise TypeError('img should be numpy image. Got {}'.format(type(img)))
    if not (isinstance(size, int) or (isinstance(size, collections.abc.Iterable) and len(size) == 2)):
        raise TypeError('Got inappropriate size arg: {}'.format(size))
    h, w = img.shape[0], img.shape[1]

    if isinstance(size, int):
        if (w <= h and w == size) or (h <= w and h == size):
            return img
        if w < h:
            ow = size
            oh = int(size * h / w)
        else:
            oh = size
            ow = int(size * w / h)
    else:
        ow, oh = size[1], size[0]
    output = cv2.resize(img, dsize=(ow, oh), interpolation=interpolation)
    if img.shape[2] == 1:
        return output[:, :, np.newaxis]
    else:
        return output

def crop(img, i, j, h, w):
    """Crop the given Image flyfish.
    Args:
        img (numpy ndarray): Image to be cropped.
        i: Upper pixel coordinate.
        j: Left pixel coordinate.
        h: Height of the cropped image.
        w: Width of the cropped image.
    Returns:
        numpy ndarray: Cropped image.
    """
    if not _is_numpy_image(img):
        raise TypeError('img should be numpy image. Got {}'.format(type(img)))

    return img[i:i + h, j:j + w, :]


def center_crop(img, output_size):
    if isinstance(output_size, numbers.Number):
        output_size = (int(output_size), int(output_size))
    h, w = img.shape[0:2]
    th, tw = output_size
    i = int(round((h - th) / 2.))
    j = int(round((w - tw) / 2.))
    return crop(img, i, j, th, tw)

class DatasetFolder:

    def __init__(
        self,
        root: str,

    ) -> None:
        self.root = root

        if classes_name is None or not classes_name:
            classes, class_to_idx = self.find_classes(self.root)
            print("not classes_name")

        else:
            classes = classes_name
            class_to_idx ={cls_name: i for i, cls_name in enumerate(classes)}
            print("is classes_name")

        print("classes:",classes)

        print("class_to_idx:",class_to_idx)
        samples = self.make_dataset(self.root, class_to_idx)

        self.classes = classes
        self.class_to_idx = class_to_idx
        self.samples = samples
        self.targets = [s[1] for s in samples]

    @staticmethod
    def make_dataset(
        directory: str,
        class_to_idx: Optional[Dict[str, int]] = None,

    ) -> List[Tuple[str, int]]:

        directory = os.path.expanduser(directory)

        if class_to_idx is None:
            _, class_to_idx = self.find_classes(directory)
        elif not class_to_idx:
            raise ValueError("'class_to_index' must have at least one entry to collect any samples.")

        instances = []
        available_classes = set()
        for target_class in sorted(class_to_idx.keys()):
            class_index = class_to_idx[target_class]
            target_dir = os.path.join(directory, target_class)
            if not os.path.isdir(target_dir):
                continue
            for root, _, fnames in sorted(os.walk(target_dir, followlinks=True)):
                for fname in sorted(fnames):
                    path = os.path.join(root, fname)
                    if 1:  # 验证:
                        item = path, class_index
                        instances.append(item)

                        if target_class not in available_classes:
                            available_classes.add(target_class)

        empty_classes = set(class_to_idx.keys()) - available_classes
        if empty_classes:
            msg = f"Found no valid file for the classes {', '.join(sorted(empty_classes))}. "

        return instances

    def find_classes(self, directory: str) -> Tuple[List[str], Dict[str, int]]:

        classes = sorted(entry.name for entry in os.scandir(directory) if entry.is_dir())
        if not classes:
            raise FileNotFoundError(f"Couldn't find any class folder in {directory}.")

        class_to_idx = {cls_name: i for i, cls_name in enumerate(classes)}
        return classes, class_to_idx

    def __getitem__(self, index: int) -> Tuple[Any, Any]:

        path, target = self.samples[index]
        sample = self.loader(path)

        return sample, target

    def __len__(self) -> int:
        return len(self.samples)

    def loader(self, path):
        print("path:", path)
        img = cv2.imread(path)  # BGR HWC
        img=cv2.cvtColor(img,cv2.COLOR_BGR2RGB)#RGB
        print("type:",type(img))
        return img


def time_sync():
    return time.time()


dataset = DatasetFolder(root="/media/flyfish/datasets/imagewoof/val")
weights = "/home/classes.pt"
device = "cpu"
model = DetectMultiBackend(weights, device=device, dnn=False, fp16=False)
model.eval()


def classify_transforms(img):
    img=resize(img,224)
    img=center_crop(img,224)
    img=totensor_normalize(img)
    return img;

pred, targets, loss, dt = [], [], 0, [0.0, 0.0, 0.0]
# current batch size =1
for i, (images, labels) in enumerate(dataset):
    print("i:", i)
    print(images.shape, labels)
    im = classify_transforms(images)


    images=torch.from_numpy(im).to(torch.float32) # numpy to tensor
    images = images.unsqueeze(0).to("cpu")

    print(images.shape)


    t1 = time_sync()
    images = images.to(device, non_blocking=True)
    t2 = time_sync()
    # dt[0] += t2 - t1

    y = model(images)
    y=y.numpy()

    print("y:", y)
    t3 = time_sync()
    # dt[1] += t3 - t2

    tmp1=y.argsort()[:,::-1][:, :5]

    print("tmp1:", tmp1)
    pred.append(tmp1)

    print("labels:", labels)


    targets.append(labels)

    print("for pred:", pred)  # list
    print("for targets:", targets)  # list

    # dt[2] += time_sync() - t3


pred, targets = np.concatenate(pred), np.array(targets)
print("pred:", pred)
print("pred:", pred.shape)
print("targets:", targets)
print("targets:", targets.shape)
correct = ((targets[:, None] == pred)).astype(np.float32)
print("correct:", correct.shape)
print("correct:", correct)
acc = np.stack((correct[:, 0], correct.max(1)), axis=1)  # (top1, top5) accuracy
print("acc:", acc.shape)
print("acc:", acc)
top = acc.mean(0)
print("top1:", top[0])
print("top5:", top[1])
结果
pred: [[0 3 6 2 1]
 [0 7 2 9 3]
 [0 5 6 2 9]
 ...
 [9 8 7 6 1]
 [9 3 6 7 0]
 [9 5 0 2 7]]
pred: (3929, 5)
targets: [0 0 0 ... 9 9 9]
targets: (3929,)
correct: (3929, 5)
correct: [[          1           0           0           0           0]
 [          1           0           0           0           0]
 [          1           0           0           0           0]
 ...
 [          1           0           0           0           0]
 [          1           0           0           0           0]
 [          1           0           0           0           0]]
acc: (3929, 2)
acc: [[          1           1]
 [          1           1]
 [          1           1]
 ...
 [          1           1]
 [          1           1]
 [          1           1]]
top1: 0.86230594
top5: 0.98167473






![【Sorted Set】Redis常用数据类型: ZSet [使用手册]](https://img-blog.csdnimg.cn/20a7f1b58dfb4660b75d7f021c157d57.png#pic_center)

