Threejs 同一个几何体如何实现多材质呢?
多材质的实现
1.使用索引绘制一个几何体
//创建几何体(三角形)
const geometry = new THREE.BufferGeometry();

//使用索引绘制  (两个共用的)
const vertices = new Float32Array([
  -1.0, -1.0, 0.0, 1.0, -1.0, 0.0, 1.0, 1.0, 0.0, -1.0, 1.0, 0,
]);
//创建顶点属性
geometry.setAttribute("position", new THREE.BufferAttribute(vertices, 3));
//创建索引
const indices = new Uint16Array([0, 1, 2, 2, 3, 0]);
//创建索引属性
geometry.setIndex(new THREE.BufferAttribute(indices, 1));
2. 设置顶点组(为了方便应用材质)
// 设置2个顶点组 形成两个材质 顶点0开始 添加3个顶点 用的是第一个材质(第三个参数)
geometry.addGroup(0, 3, 0);
geometry.addGroup(3, 3, 1); //顶点3开始 添加三个顶点 第二个材质
3.创建两个材质
//创建材质
const material = new THREE.MeshBasicMaterial({
  color: 0x00ff00,
  // wireframe: true,
  // side: THREE.DoubleSide,
});
const material1 = new THREE.MeshBasicMaterial({
  color: 0xff0000,
  // wireframe: true,
});
4. 构建几何体
const plane = new THREE.Mesh(geometry, [material, material1]);
//现在就有两个材质了
scene.add(plane); 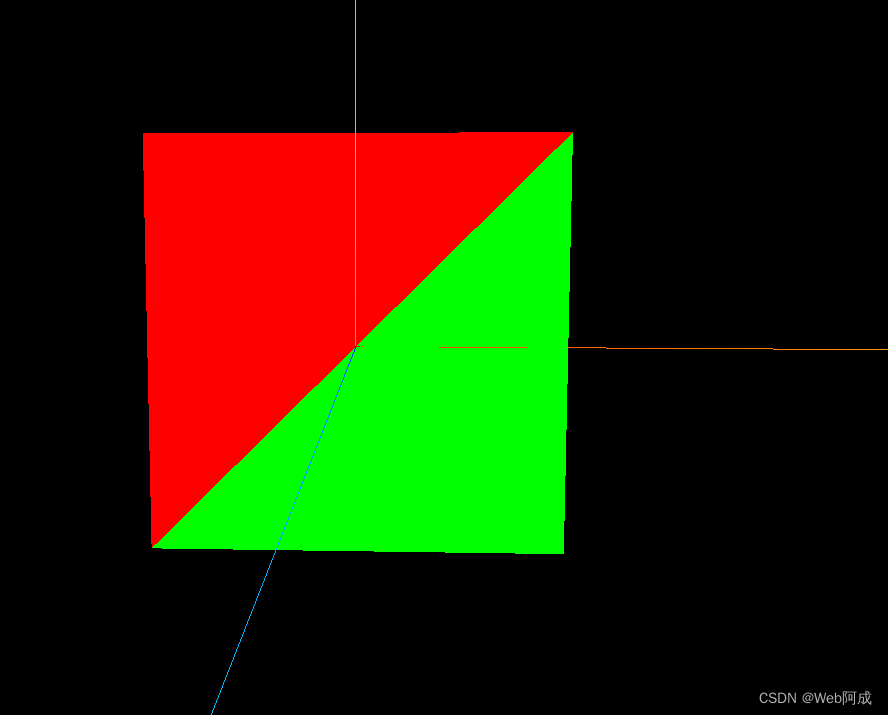
多材质绘制立方体
1. 做一个立方体的物料
// 创建一个集合体  (立方体)
const cubegeometry = new THREE.BoxGeometry(1, 1, 1);
2. 做立方体六个面的六个材质
// 创建材质 (16进制颜色)
const cubematerial0 = new THREE.MeshBasicMaterial({
  color: 0x00ff00,
  //线框
  // wireframe: true,
});
const cubematerial1 = new THREE.MeshBasicMaterial({
  color: 0xff0000,
});
const cubematerial2 = new THREE.MeshBasicMaterial({
  color: 0x0000ff,
});
const cubematerial3 = new THREE.MeshBasicMaterial({
  color: 0xffff00,
});
const cubematerial4 = new THREE.MeshBasicMaterial({
  color: 0x00ffff,
});
const cubematerial5 = new THREE.MeshBasicMaterial({
  color: 0xff00ff,
});
3. 创建立方体
// 创建网格体
const cube = new THREE.Mesh(cubegeometry, [
  cubematerial0,
  cubematerial1,
  cubematerial2,
  cubematerial3,
  cubematerial4,
  cubematerial5,
]);
//移动一下
cube.position.set(2, 0, 0);
// 添加到场景中
scene.add(cube);
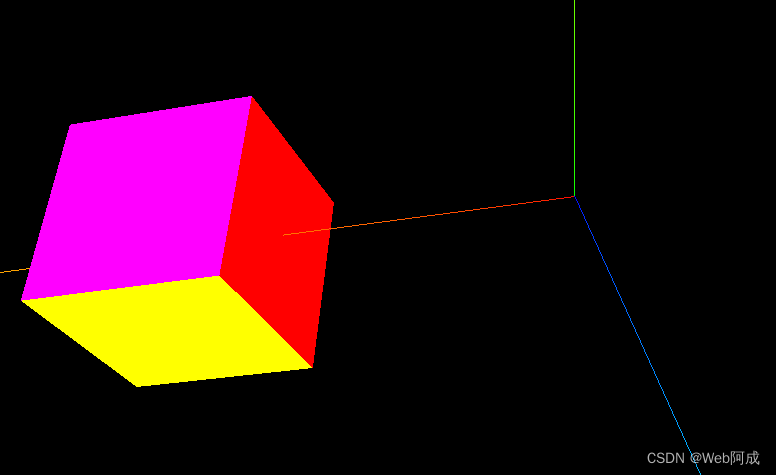
一个六面六个不同材质的立方体就做好了。
所有代码
//1.一个物体可以设置多个材质嘛

//1.设置定点组
//2 多个

//导入 threejs
import * as THREE from "three";
//导入轨道控制器
import { OrbitControls } from "three/examples/jsm/controls/OrbitControls.js";
//导入lil.gui
// import * as dat from "dat.gui";  // 旧
import { GUI } from "three/examples/jsm/libs/lil-gui.module.min.js";

// 创建场景
const scene = new THREE.Scene();
// 创建相机
const camera = new THREE.PerspectiveCamera(
  45, // 视角
  window.innerWidth / window.innerHeight, // 宽高比 窗口的宽高进行设置的
  0.1, // 近平面   相机最近最近能看到的物体
  1000 // 远平面   相机最远能看到的物体
);
// 创建渲染器
const renderer = new THREE.WebGLRenderer();
// 设置渲染器的大小  (窗口大小)
renderer.setSize(window.innerWidth, window.innerHeight);
// 将渲染器的dom元素添加到body中
document.body.appendChild(renderer.domElement);

// 创建一个集合体  (立方体)
const cubegeometry = new THREE.BoxGeometry(1, 1, 1);
console.log(cubegeometry);
// 创建材质 (16进制颜色)
const cubematerial0 = new THREE.MeshBasicMaterial({
  color: 0x00ff00,
  //线框
  // wireframe: true,
});
const cubematerial1 = new THREE.MeshBasicMaterial({
  color: 0xff0000,
});
const cubematerial2 = new THREE.MeshBasicMaterial({
  color: 0x0000ff,
});
const cubematerial3 = new THREE.MeshBasicMaterial({
  color: 0xffff00,
});
const cubematerial4 = new THREE.MeshBasicMaterial({
  color: 0x00ffff,
});
const cubematerial5 = new THREE.MeshBasicMaterial({
  color: 0xff00ff,
});
// 创建网格体
const cube = new THREE.Mesh(cubegeometry, [
  cubematerial0,
  cubematerial1,
  cubematerial2,
  cubematerial3,
  cubematerial4,
  cubematerial5,
]);
//移动一下
cube.position.set(2, 0, 0);
// 添加到场景中
scene.add(cube);

// //创建几何体(三角形)
// const geometry = new THREE.BufferGeometry();

// //使用索引绘制  (两个共用的)
// const vertices = new Float32Array([
//   -1.0, -1.0, 0.0, 1.0, -1.0, 0.0, 1.0, 1.0, 0.0, -1.0, 1.0, 0,
// ]);
// //创建顶点属性
// geometry.setAttribute("position", new THREE.BufferAttribute(vertices, 3));
// //创建索引
// const indices = new Uint16Array([0, 1, 2, 2, 3, 0]);
// //创建索引属性
// geometry.setIndex(new THREE.BufferAttribute(indices, 1));

// // 设置2个顶点组 形成两个材质 顶点0开始 添加3个顶点 用的是第一个材质(第三个参数)
// geometry.addGroup(0, 3, 0);
// geometry.addGroup(3, 3, 1); //顶点3开始 添加三个顶点 第二个材质

// //创建材质
// const material = new THREE.MeshBasicMaterial({
//   color: 0x00ff00,
//   // wireframe: true,
//   // side: THREE.DoubleSide,
// });
// const material1 = new THREE.MeshBasicMaterial({
//   color: 0xff0000,
//   // wireframe: true,
// });

// const plane = new THREE.Mesh(geometry, [material, material1]);
// //现在就有两个材质了
// scene.add(plane);

// 设置相机的位置
camera.position.z = 5;
// 为了看到z轴
camera.position.y = 2;
// 设置x轴
camera.position.x = 2;
//设置相机的焦点 (相机看向哪个点)
camera.lookAt(0, 0, 0);

//添加世界坐标辅助器  (红色x轴,绿色y轴,蓝色z轴)一个线段 参数为 线段长度
const axesHelper = new THREE.AxesHelper(5);
//添加到场景之中
scene.add(axesHelper);

// 添加轨道控制器 (修改侦听位置)  一般监听画布的事件  不监听document.body
const controls = new OrbitControls(camera, renderer.domElement);
// 这里传递阻塞掉了 会导致无法点击
// const controls = new OrbitControls(camera, document.body);

// // 设置带阻尼的旋转
// controls.enableDamping = true;
// // 设置阻尼系数
// controls.dampingFactor = 0.01;
// // 自动旋转
// controls.autoRotate = false;

//渲染函数
function animate() {
  controls.update();
  //请求动画帧
  requestAnimationFrame(animate);
  //旋转网格体
  // cube.rotation.x += 0.01;
  // cube.rotation.y += 0.01;
  //渲染
  renderer.render(scene, camera);
}
animate();
//渲染

// 监听窗口的变化 重新设置渲染器的大小 画布自适应窗口
window.addEventListener("resize", () => {
  // 重新设置渲染器的大小
  renderer.setSize(window.innerWidth, window.innerHeight);
  // 重新设置相机的宽高比
  camera.aspect = window.innerWidth / window.innerHeight;
  // 重新计算相机的投影矩阵
  camera.updateProjectionMatrix();
});


//1.gui控制按钮
let eventObj = {
  Fullscreen: function () {
    // 全屏 (画布)
    // renderer.domElement.requestFullscreen();
    // 全屏 (document.body)  可以看到写入的按钮
    document.body.requestFullscreen();
  },
  exitFullscreen: function () {
    // 退出全屏
    document.exitFullscreen();
  },
};

//创建gui实例
const gui = new GUI();
//添加按钮  第一个参数为对象实例  第二个参数为对象中属性名称
gui.add(eventObj, "Fullscreen").name("全屏");
//退出按钮
gui.add(eventObj, "exitFullscreen").name("退出全屏");

//2.gui控制立方体的位置
// gui.add(cube.position, "x", -5, 5).name("立方体x轴位置");
