✅作者简介:大家好,我是Leo,热爱Java后端开发者,一个想要与大家共同进步的男人😉😉
🍎个人主页:Leo的博客
💞当前专栏:每天一个知识点
✨特色专栏: MySQL学习
🥭本文内容: SpringBoot常见注解
🖥️个人小站 :个人博客,欢迎大家访问
📚个人知识库: 知识库,欢迎大家访问
✨✨ 粉丝福利订阅✨✨
Leo哥收集了一些关于面试以及其他学习资源,这里分享给大家,各位卷王快收下吧!!!
1. @SpringBootApplication
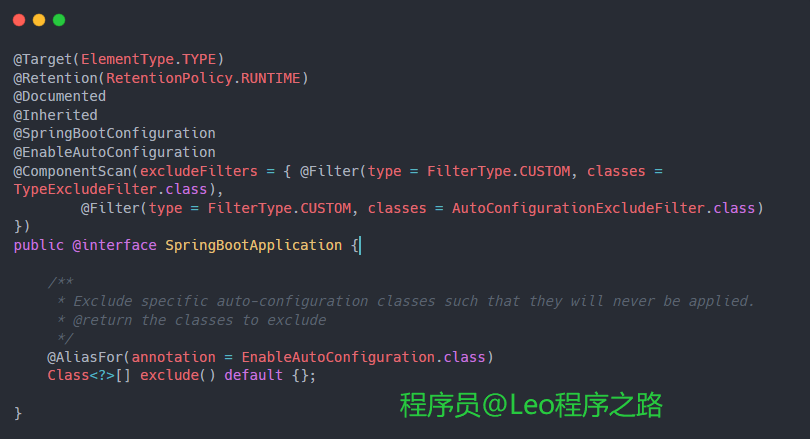
定义在main方法入口类处,用于启动sping boot应用项目
2. @SpringBootConfiguration
@SpringBootConfiguration注解是@Configuration注解的派生注解,用于标识一个类是Spring Boot应用的配置类。它通常用于定义配置信息、Bean的定义以及其他与应用配置相关的内容。
- 派生自
@Configuration:@SpringBootConfiguration注解是@Configuration注解的派生注解。这意味着使用@SpringBootConfiguration标注的类将被Spring容器识别为配置类,可以用来定义bean、配置属性等。 - 用于组织配置类: 在一个典型的Spring Boot应用中,你可能有多个配置类来组织不同部分的配置。使用
@SpringBootConfiguration可以更清晰地表示这是一个SpringBoot的配置类。 - 自动扫描: Spring Boot应用通常使用
@SpringBootApplication注解来启动应用程序,并该注解本身包含@SpringBootConfiguration。因此,@SpringBootConfiguration标注的配置类会被自动扫描并加载到Spring容器中。 - 与
@Configuration的区别: 尽管@SpringBootConfiguration与@Configuration功能相似,但@SpringBootConfiguration通常更适用于Spring Boot应用,而@Configuration则是通用的Spring注解。使用@SpringBootConfiguration可以更好地表达应用是一个Spring Boot应用。
下面是一个简单的例子,演示了@SpringBootConfiguration的使用:
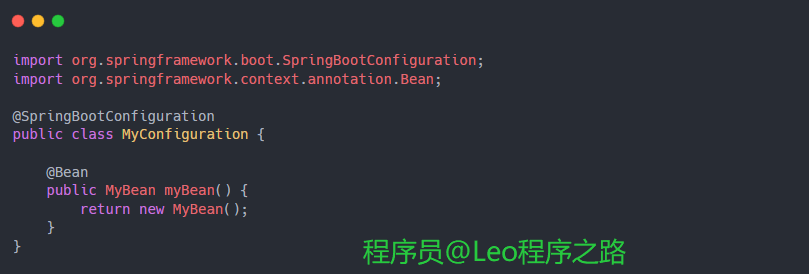
在这个例子中,MyConfiguration被标记为@SpringBootConfiguration,并定义了一个名为myBean的bean。这个配置类将被Spring Boot自动扫描,并将MyBean注入到应用上下文中。
3. @EnableAutoConfiguration
@EnableAutoConfiguration用于启用自动配置机制。在SpringBoot应用中,许多常见的配置任务都可以通过自动配置来完成,而不需要显式地进行手动配置。@EnableAutoConfiguration注解就是用来启用这种自动配置的。
让SpringBoot根据类路径中的jar包依赖当前项目进行自动配置
- 自动配置: Spring Boot的自动配置通过在类路径上查找特定的条件类来实现。
@EnableAutoConfiguration注解告诉Spring Boot去自动配置项目的类路径上所需的beans。 - 条件化配置: 自动配置是条件化的,它只会在满足特定条件时才会应用。条件类(
@Conditional注解的类)定义了这些条件。这使得自动配置可以根据项目的实际情况进行动态调整。 - 元注解:
@EnableAutoConfiguration是一个元注解,它本身包含了@AutoConfigurationPackage、@Import(AutoConfigurationImportSelector.class)等注解,用于导入自动配置的相关信息。 - 自动配置导入选择器:
AutoConfigurationImportSelector是一个重要的类,它根据项目的依赖关系和条件类的情况,确定应该导入哪些自动配置类。这个类实现了ImportSelector接口。 - 禁用默认自动配置: 如果你想禁用某个特定的自动配置类,你可以使用
exclude属性,例如:@EnableAutoConfiguration(exclude = {DataSourceAutoConfiguration.class}),这里禁用了数据源的自动配置。
在src/main/resources的META-INF/spring.factories

简单例子:
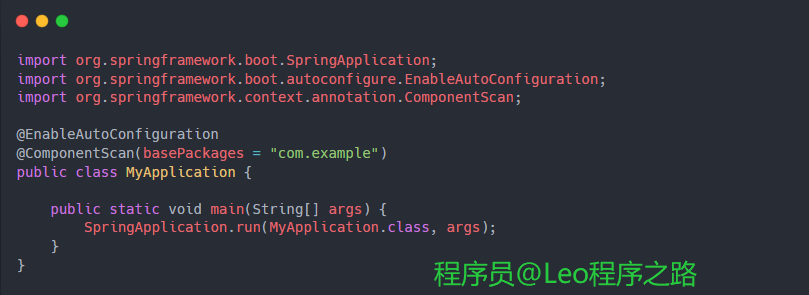
上面这个例子中,@EnableAutoConfiguration启用了SpringBoot的自动配置机制,而@ComponentScan用于扫描com.example包下的组件。SpringBoot将根据自动配置规则,自动配置项目所需的beans。
3.4 @ComponentScan
@ComponentScan告诉Spring在指定的包或类路径下查找并注册标有@Component及其派生注解(如@Service、@Repository、@Controller等)的类作为Spring容器的bean。
基本用法: @ComponentScan通常与@Configuration注解一起使用,以便在配置类中指定要扫描的基础包。例如:

在上面的例子中,@ComponentScan指定了要扫描的基础包为com.example。
指定多个包: 你可以通过basePackages属性指定多个包,也可以使用basePackageClasses属性指定一组类,Spring将扫描这些包或类路径下的组件。

包含和排除过滤: 通过includeFilters和excludeFilters属性,你可以进一步定义包含或排除特定条件的组件。例如,只包含带有@MyAnnotation注解的类:

扫描默认规则: 如果不指定basePackages,@ComponentScan将默认扫描被注解类所在的包及其子包。这通常足以满足大多数应用的需求。

总结@ComponentScan的常用方式如下:
- 自定扫描路径下边带有@Controller,@Service,@Repository,@Component注解加入spring容器
- 通过includeFilters加入扫描路径下没有以上注解的类加入spring容器
- 通过excludeFilters过滤出不用加入spring容器的类
- 自定义增加了@Component注解的注解方式
4. @RequestMapping简化注解
- @GetMapping 等同于 @RequestMapping(method = RequestMethod.GET)
- @PostMapping 等同于 @RequestMapping(method = RequestMethod.POST)
- @PutMapping 等同于 @RequestMapping(method = RequestMethod.PUT)
- @DeleteMapping 等同于 @RequestMapping(method = RequestMethod.DELETE)
- @PatchMapping 等同于 @RequestMapping(method = RequestMethod.PATCH)
5. @Profiles
@Profiles是Spring框架中用于定义和激活配置文件**(profiles)**的注解。Profiles允许在不同的环境中使用不同的配置,这在开发、测试和生产等不同阶段非常有用。
以下是关于@Profiles注解的详细解释:
1.定义Profiles: 使用@Profiles注解可以将一个bean或者一个配置类限制在特定的环境中。你可以为@Profiles注解指定一个或多个环境(profile)的名称。
@Component
@Profile("development")
public class DevelopmentDataSource implements DataSource {
    // Development environment specific configuration
}
在上面的例子中,DevelopmentDataSource bean 只会在激活了名为"development"的profile时被注册到Spring容器中。
2.激活Profiles: 有几种方式可以激活特定的profiles:
在application.properties或application.yml文件中使用spring.profiles.active属性:
spring.profiles.active=development
在启动应用程序时通过命令行参数:
java -jar your-application.jar --spring.profiles.active=development
在代码中通过ConfigurableEnvironment接口:
ConfigurableEnvironment environment = applicationContext.getEnvironment();
environment.setActiveProfiles("development");
3.默认Profiles: 你可以使用default关键字定义默认的profile。如果没有激活任何profile,那么默认profile中的bean将被注册到容器中。
@Component
@Profile("default")
public class DefaultDataSource implements DataSource {
    // Default configuration
}
4.组合Profiles: 通过使用逻辑运算符,你可以组合多个profiles。例如,要在同时激活"development"和"test"时注册一个bean:
@Component
@Profile({"development", "test"})
public class CombinedDataSource implements DataSource {
    // Combined configuration
}
@Profiles注解允许你在不同的环境中使用不同的配置,提高了应用程序的灵活性和可移植性。
6.总结
以上便是本文的全部内容,本人才疏学浅,文章有什么错误的地方,欢迎大佬们批评指正!我是Leo,一个在互联网行业的小白,立志成为更好的自己。
如果你想了解更多关于Leo,可以关注公众号-程序员Leo,后面文章会首先同步至公众号。


