经典综合实验(二)
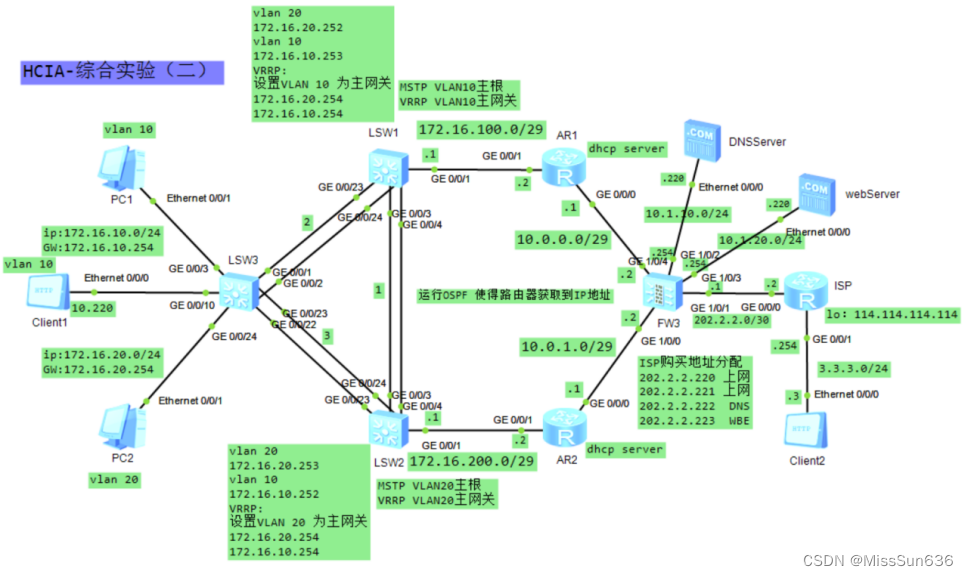
实验拓扑
配置步骤
配置Eth-Trunk聚合链路
SW1
sysname SW1
#
undo info-center enable  //关闭交换机日志信息
#
lldp enable  //做邻居发现的,可以看到自己的端口和对端设备的端口
#
interface Eth-Trunk1
 mode lacp-static
#
interface Eth-Trunk2
 mode lacp-static
#
interface GigabitEthernet0/0/3
 eth-trunk 1
#
interface GigabitEthernet0/0/4
 eth-trunk 1
#
interface GigabitEthernet0/0/23
 eth-trunk 2
#
interface GigabitEthernet0/0/24
 eth-trunk 2
- 查看相应的邻居列表
- [SW1]dis lldp neighbor brief
SW2
sysname SW2
#
undo info-center enable
#
lldp enable
#
interface Eth-Trunk1
 mode lacp-static
#
interface Eth-Trunk3
 mode lacp-static
#
interface GigabitEthernet0/0/3
 eth-trunk 1
#
interface GigabitEthernet0/0/4
 eth-trunk 1
#
interface GigabitEthernet0/0/23
 eth-trunk 3
#
interface GigabitEthernet0/0/24
 eth-trunk 3
SW3
sysname SW3
#
undo info-center enable
#
lldp enable
#
interface Eth-Trunk2
 mode lacp-static
#
interface Eth-Trunk3
 mode lacp-static
#
interface GigabitEthernet0/0/1
 eth-trunk 2
#
interface GigabitEthernet0/0/2
 eth-trunk 2
#
interface GigabitEthernet0/0/22
 eth-trunk 3
#
interface GigabitEthernet0/0/23
 eth-trunk 3
第一步 配置二层VLAN
SW1
vlan batch 10 20 100
#
interface Eth-Trunk1
 port link-type trunk
 port trunk allow-pass vlan 10 20
#
interface Eth-Trunk2
 port link-type trunk
 port trunk allow-pass vlan 10 20
#
interface GigabitEthernet0/0/1
 port link-type access
 port default vlan 100
SW2
vlan batch 10 20 200
#
interface Eth-Trunk1
 port link-type trunk
 port trunk allow-pass vlan 10 20
#
interface Eth-Trunk3
 port link-type trunk
 port trunk allow-pass vlan 10 20
#
interface GigabitEthernet0/0/1
 port link-type access
 port default vlan 200
SW3
vlan batch 10 20
#
interface Eth-Trunk2
 port link-type trunk
 port trunk allow-pass vlan 10 20
#
interface Eth-Trunk3
 port link-type trunk
 port trunk allow-pass vlan 10 20
#
interface GigabitEthernet0/0/3
 port link-type access
 port default vlan 10
#
interface GigabitEthernet0/0/10
 port link-type access
 port default vlan 10
#
interface GigabitEthernet0/0/24
 port link-type access
 port default vlan 20
第二步 配置MSTP生成树
SW1
stp mode mstp  // 华为交换机默认是 MSTP,所以这条命令可写可不写
#
stp region-configuration
 region-name wml
 instance 1 vlan 10
 instance 2 vlan 20
 active region-configuration
#
stp instance 1 root primary
stp instance 2 root secondary
SW2
stp region-configuration
 region-name wml
 instance 1 vlan 10
 instance 2 vlan 20
 active region-configuration
#
stp instance 1 root secondary
stp instance 2 root primary
SW3
stp region-configuration
 region-name wml
 instance 1 vlan 10
 instance 2 vlan 20
 active region-configuration
#
stp edged-port default   //设置此交换机所有接口为边缘端口
stp bpdu-protection  //配置BPDU保护
#
interface Eth-Trunk2
 stp edged-port disable   //关闭此接口的边缘端口
#
interface Eth-Trunk3
 stp edged-port disable   //关闭此接口的边缘端口
[SW1]dis stp brief 查看STP的选举情况


第三步 配置相关IP地址
SW1
interface Vlanif10
 ip address 172.16.10.253 255.255.255.0
 #
interface Vlanif20
 ip address 172.16.20.252 255.255.255.0
 #
interface Vlanif100
 ip address 172.16.100.1 255.255.255.248
SW2
interface Vlanif10
 ip address 172.16.10.252 255.255.255.0
 #
interface Vlanif20
 ip address 172.16.20.253 255.255.255.0
 #
interface Vlanif200
 ip address 172.16.200.1 255.255.255.248
R1
sysname R1
#
interface GigabitEthernet0/0/0
 ip address 10.0.0.1 255.255.255.248
#
interface GigabitEthernet0/0/1
 ip address 172.16.100.2 255.255.255.248
R2
sysname R2
#
interface GigabitEthernet0/0/0
 ip address 10.0.1.1 255.255.255.248
#
interface GigabitEthernet0/0/1
 ip address 172.16.200.2 255.255.255.248
FW3
sysname USG6000V1
#
interface GigabitEthernet0/0/0
 undo shutdown
 ip address 192.168.0.1 255.255.255.0
 #
interface GigabitEthernet1/0/0
 undo shutdown
 ip address 10.0.1.2 255.255.255.248
#
interface GigabitEthernet1/0/1
 undo shutdown
 ip address 202.2.2.1 255.255.255.252
#
interface GigabitEthernet1/0/2
 undo shutdown
 ip address 10.1.10.254 255.255.255.0
#
interface GigabitEthernet1/0/3
 undo shutdown
 ip address 10.1.20.254 255.255.255.0
#
interface GigabitEthernet1/0/4
 undo shutdown
 ip address 10.0.0.2 255.255.255.248
 service-manage ping permit    //允许ping
ISP
sysname ISP
#
interface GigabitEthernet0/0/0
 ip address 202.2.2.2 255.255.255.252
#
interface GigabitEthernet0/0/1
 ip address 3.3.3.254 255.255.255.0
#
interface LoopBack0
 ip address 114.114.114.114 255.255.255.255
第四步 配置DHCP及DHCP中继
SW1
dhcp enable
#
interface Vlanif10
 dhcp select relay
 dhcp relay server-ip 172.16.100.2
#
interface Vlanif20
 dhcp select relay
 dhcp relay server-ip 172.16.100.2
SW2
dhcp enable
#
interface Vlanif10
 dhcp select relay
 dhcp relay server-ip 172.16.200.2
#
interface Vlanif20
 dhcp select relay
 dhcp relay server-ip 172.16.200.2
R1
dhcp enable
#
ip pool vlan10
 gateway-list 172.16.10.254
 network 172.16.10.0 mask 255.255.255.0
 excluded-ip-address 172.16.10.240 172.16.10.253
 dns-list 202.2.2.222
#
ip pool vlan20
 gateway-list 172.16.20.254
 network 172.16.20.0 mask 255.255.255.0
 excluded-ip-address 172.16.20.240 172.16.20.253
 dns-list 202.2.2.222
#
interface GigabitEthernet0/0/1
 dhcp select global
R2
dhcp enable
#
ip pool vlan10
 gateway-list 172.16.10.254
 network 172.16.10.0 mask 255.255.255.0
 excluded-ip-address 172.16.10.240 172.16.10.253
 dns-list 202.2.2.222
#
ip pool vlan20
 gateway-list 172.16.20.254
 network 172.16.20.0 mask 255.255.255.0
 excluded-ip-address 172.16.20.240 172.16.20.253
 dns-list 202.2.2.222
#
interface GigabitEthernet0/0/1
 dhcp select global
第五步 配置三层的网关冗余协议 VRRP及OSPF
SW1
interface Vlanif10
 vrrp vrid 2 virtual-ip 172.16.10.254
 vrrp vrid 2 priority 150
 vrrp vrid 2 track interface Eth-Trunk2 reduced 100
 vrrp vrid 2 track interface GigabitEthernet0/0/1 reduced 100
#
interface Vlanif20
 vrrp vrid 1 virtual-ip 172.16.20.254
#
ospf 1 router-id 11.11.11.11
 silent-interface all
 undo silent-interface Vlanif100
 area 0.0.0.0
  network 172.16.10.0 0.0.0.255
  network 172.16.20.0 0.0.0.255
  network 172.16.100.1 0.0.0.0
SW2
interface Vlanif10
 vrrp vrid 2 virtual-ip 172.16.10.254
#
interface Vlanif20
 vrrp vrid 1 virtual-ip 172.16.20.254
 vrrp vrid 1 priority 150
 vrrp vrid 1 track interface Eth-Trunk3 reduced 100
 vrrp vrid 1 track interface GigabitEthernet0/0/1 reduced 100
#
ospf 1 router-id 22.22.22.22
 silent-interface all
 undo silent-interface Vlanif200
 area 0.0.0.0
  network 172.16.10.0 0.0.0.255
  network 172.16.20.0 0.0.0.255
  network 172.16.200.1 0.0.0.0
[SW1]display vrrp brief 查看VRRP主备情况
确保SW1的接口断开后VRRP可以自动切换到SW2上


R1
ospf 1 router-id 1.1.1.1
 default-route-advertise
 area 0.0.0.0
  network 10.0.0.1 0.0.0.0
  network 172.16.100.2 0.0.0.0
R2
ospf 1 router-id 2.2.2.2
 default-route-advertise
 area 0.0.0.0
  network 10.0.1.1 0.0.0.0
  network 172.16.200.2 0.0.0.0
FW3
ospf 1 router-id 3.3.3.3
 default-route-advertise
 area 0.0.0.0
  network 10.0.0.2 0.0.0.0
  network 10.0.1.2 0.0.0.0
  network 10.1.10.0 0.0.0.0
  network 10.1.10.0 0.0.0.255
  network 10.1.20.0 0.0.0.0
  network 10.1.20.0 0.0.0.255
第六步 配置静态路由,NAT地址转换及其他配置完善
FW3
firewall zone trust   //把接口划入到trust区域,安全区域,一般用于内部网络
 set priority 85
 add interface GigabitEthernet0/0/0
 add interface GigabitEthernet1/0/0
 add interface GigabitEthernet1/0/4
#
firewall zone untrust  //把接口划入到untrust区域,非安全区域,一般用于网络出口
 set priority 5
 add interface GigabitEthernet1/0/1
#
firewall zone dmz  //把接口划入到DMZ区域,服务器区域,一般用于服务器接口下
 set priority 50
 add interface GigabitEthernet1/0/2
 add interface GigabitEthernet1/0/3
#
ip route-static 0.0.0.0 0.0.0.0 202.2.2.2  //配置上网的默认路由
ip route-static 202.2.2.220 255.255.255.255 NULL0     //防止路由环路,配置NULL0路由
ip route-static 202.2.2.221 255.255.255.255 NULL0
ip route-static 202.2.2.222 255.255.255.255 NULL0
ip route-static 202.2.2.223 255.255.255.255 NULL0
#
//配置内外网映射
 nat server 0 protocol udp global 202.2.2.222 dns inside 10.1.10.220 dns
 nat server 1 protocol tcp global 202.2.2.223 www inside 10.1.20.220 www
#
//规划NAT地址池
nat address-group trust 0
 mode pat
 section 0 202.2.2.220 202.2.2.221
#
//配置各种安全策略
security-policy
 rule name P1   //规则名称
  source-zone local    //源区域
  action permit   //动作允许
 rule name P2   //规则名称
  source-zone trust    //源区域
  destination-zone dmz   //目的区域
  destination-zone untrust
  action permit   //动作允许
 rule name P3
  source-zone untrust
  destination-zone dmz
  action permit
#
//配置NAT策略
nat-policy
 rule name NAT1
  source-zone trust
  destination-zone untrust
  action source-nat address-group trust
ISP
//用户向运营商购买IP地址后,ISP需要配置静态路由指向用户的网关
ip route-static 202.2.2.220 255.255.255.255 202.2.2.1
ip route-static 202.2.2.221 255.255.255.255 202.2.2.1
ip route-static 202.2.2.222 255.255.255.255 202.2.2.1
ip route-static 202.2.2.223 255.255.255.255 202.2.2.1
配置验证
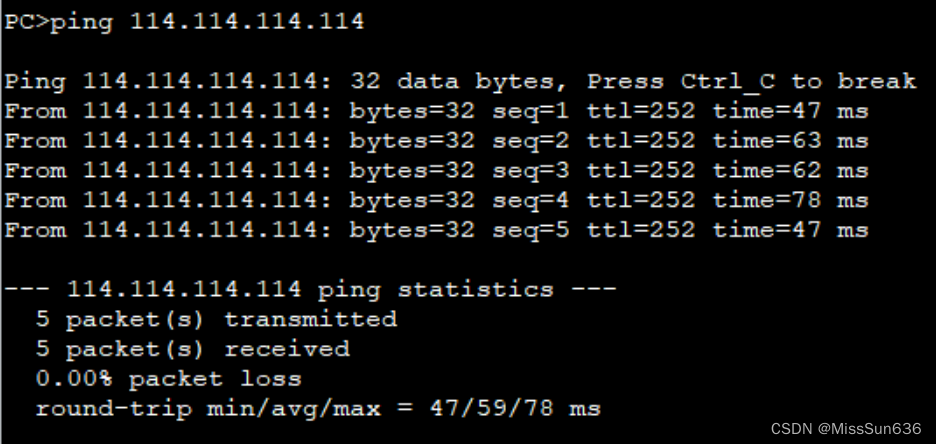
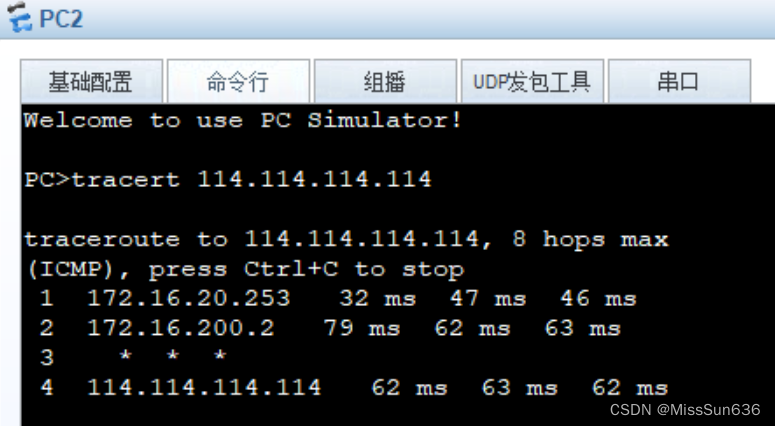
确保内网设备都可以访问到外网
其余自行测试
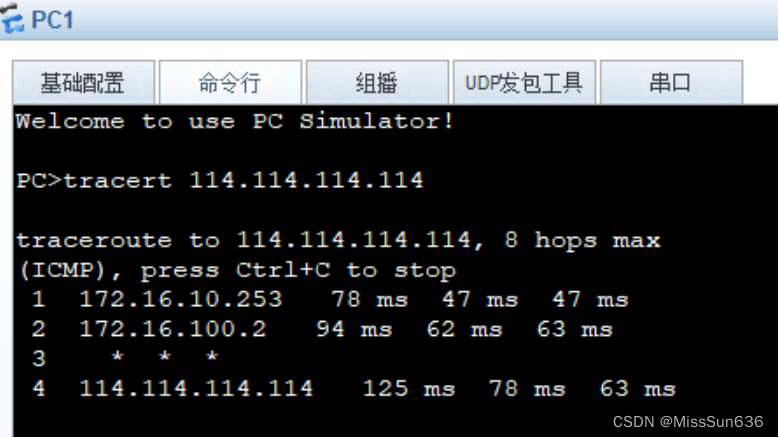
确保VLAN10的数据走SW1 VLAN20的数据走SW2
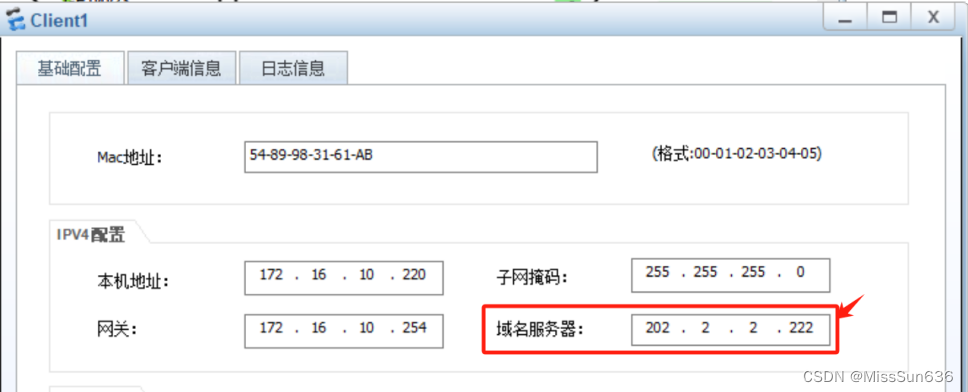
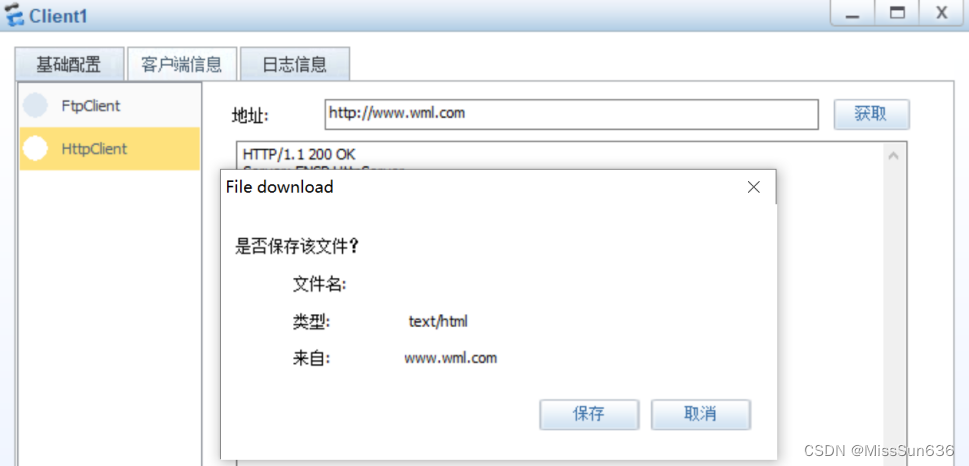
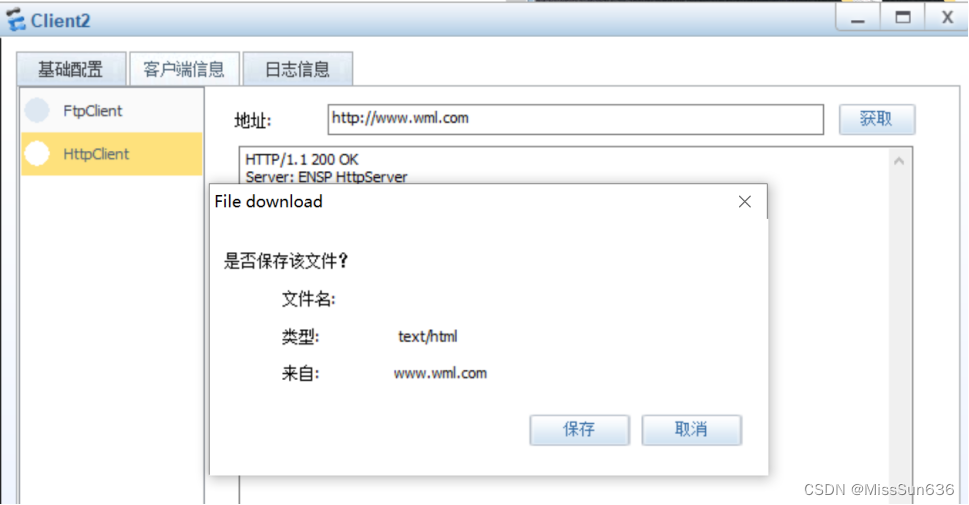
Client1和Client2都可以通过域名访问WEB服务器
抓包查看外网是否是通过地址池中配置的地址进行上网的

