1. 通用定时器的知识
1.STM32共有14个定时器,其中12个16位定时器,2个32 位定时器
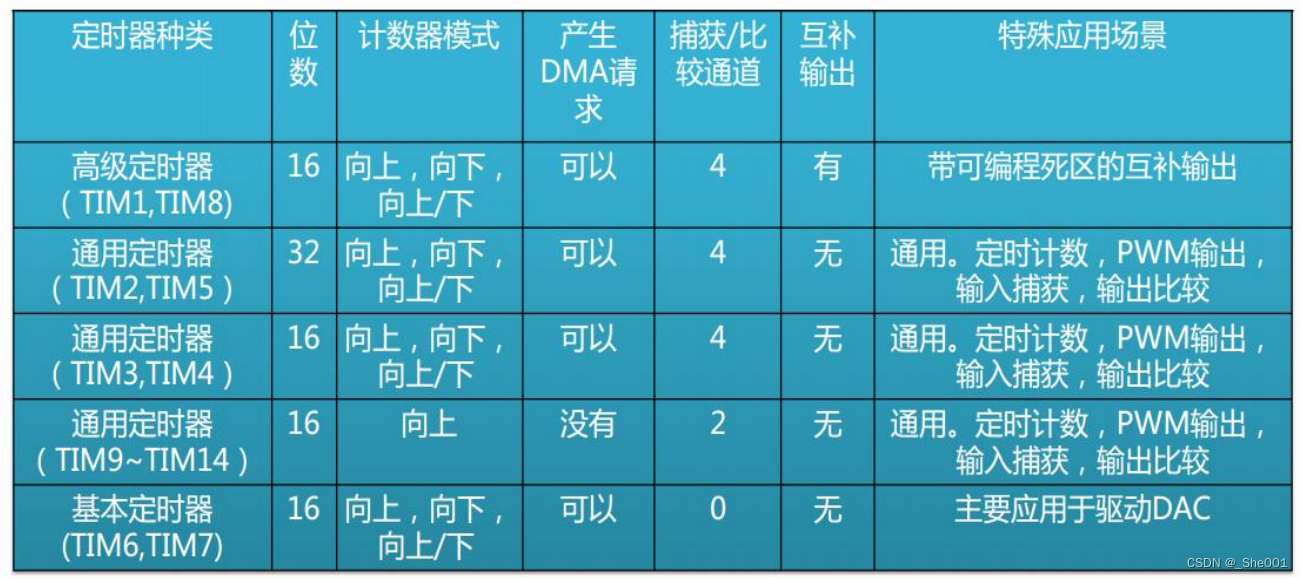
2. 通用定时器特点
1. 16/32位向上、向下、向上/向下(中心对齐)计数模式,自动装载计数器(TIMXCNT) 。
2. 16位可编程预分频器(TIMx_PSC),计数器时钟频率的分频系数为1~65535之间的任意数值。
3. 4个独立通道(TIMx_CH1~4),这些通道可以用来作为:输入捕获,输出比较。
4. PWM生成(边缘或中间对齐模式)单脉冲模式输出。
5. 可使用外部信号(TIMx_ETR)控制定时器和定时器互连(可以用1个定时器控制另外一个定时
器)的同步电路。
3.定时器工作原理
通用定时器可以向上计数、向下计数、向上向下双向计数模式。
①向上计数模式:计数器从0计数到自动加载值(TIMx_ARR),然后重新从0开始计数并且产生一个计数器溢出事件。
②向下计数模式:计数器从自动装入的值(TIMx_ARR)开始向下计数到0,然后从自动装入的值重新开始,并产生一个计数器向下溢出事件。
③中央对齐模式(向上/向下计数)︰计数器从0开始计数到自动装入的值-1,产生一个计数器溢出事件,然后向下计数到1并且产生一个计数器溢出事件;然后再从0开始重新计数。
4.CK_INT定时器时钟源
获得PCLK1或PCLK2 (APB1或APB2总线时钟)后,就可以根据前面的APB1/APB2的分频系数,获得倍频系数,从而生成不同的定时器输入时钟源TIMxCLK(也就是定时器的CK_INT)。3.1)由于APB1预分频器的分频系数是4,不等于1,那么倍频系数为2,此时,TIMxCLK=PCLK1X 2 = 84MHZ。
3.2)由于APB2预分频器的分频系数是2,不等于1,那么倍频系数为2,此时,TIMxCLK=PCLK2x 2 =168MHZ。
由上推知:
1)APB1总线上的定时器有:TIM2、3、4、5、12、13、14,这些定时器的输入时钟源CK_INT就是84MHZ。
2)APB2总线上的定时器有:TIM1、8、9、10、11,这些定时器的输入时钟源CK_INT就是168MHZ。
5.定时器初值的计算
6.定时器编程步骤(TIM3)
7.代码:
头文件
#ifndef __MY_TIM_H__
#define __MY_TIM_H__

#include "stm32f4xx.h"

extern void tim3Config(int tim3_arr,int tim3_psc);
extern void tim3NvicConfig(void);
extern void tim3IntConfig(void);

#endif
.cpp 文件
#include "mytim.h"
#include "led.h"
/**函数功能:定时器2初始化配置,产生1s中断一次的计时
**计	算:计数器的时钟频率CK_CNT = f(CK_PSC)/(PCS[15:0]+1)
**			计数器的计时频率CK_CNT = 72MHz/(7199+1) = 10KHz
**			单次计数时间 	T(CNT) = 1/CK_CNT = 100us
**			定时器溢出时间	Tout = ((CNT[15:0] + 1)*[PSC[15:0]+1])/Tclk
**			定时器溢出时间	Tout = ((9999 + 1)*(7199 + 1))/72MHz = 1s
//1、定时器的初始化*/
void tim3Config(int tim3_arr,int tim3_psc)
{
	TIM_TimeBaseInitTypeDef TIM3_InitStructure;  //定时器初始化数据结构

	//1.1、使能 TIM3 的时钟。TIM3在RCC对应的时钟树上。
	RCC_APB1PeriphClockCmd(RCC_APB1Periph_TIM3,ENABLE);


	//1.2、配置TIM3的工作模式
	TIM3_InitStructure.TIM_ClockDivision = TIM_CKD_DIV1;
	TIM3_InitStructure.TIM_CounterMode = TIM_CounterMode_Up;
	TIM3_InitStructure.TIM_Period = tim3_arr;
	TIM3_InitStructure.TIM_Prescaler = tim3_psc;

	//1.3、软件通过设置 UG 产生一个更新事件
	TIM_TimeBaseInit(TIM3,&TIM3_InitStructure);

}

//2、定时器的 NVIC 初始化
void tim3NvicConfig(void)
{
	NVIC_InitTypeDef NVIC_InitStructure;  //NVIC数据结构

	//2.2、配置优先级。必须先配置位占比
	NVIC_PriorityGroupConfig(NVIC_PriorityGroup_1);

	//2.1、明确 TIM3 的 IRQ 中断号: 29 。
	NVIC_InitStructure.NVIC_IRQChannel = TIM3_IRQn;
	NVIC_InitStructure.NVIC_IRQChannelPreemptionPriority = 0X1;
	NVIC_InitStructure.NVIC_IRQChannelSubPriority = 0X6;
	NVIC_InitStructure.NVIC_IRQChannelCmd = ENABLE;
	NVIC_Init(&NVIC_InitStructure);

}


//3、使能定时器 TIM3
void tim3IntConfig(void)
{
	//3.1、先使能 TIM3 定时器中断。
	TIM_ITConfig(TIM3,TIM_IT_Update,ENABLE);


	//3.2、再使能TIM3定时器
	TIM_Cmd(TIM3,ENABLE);

}


int tim3IntStatus = 0;

void TIM3_IRQHandler(void)
{
//1.检查TIM3是否有更新事件的中断(条件:中断使能 且 有中断记录)
	if(TIM_GetITStatus(TIM3,TIM_IT_Update)==SET)
	{
		if(tim3IntStatus==0)
		{
			LED_R_ON();  //灭灯
			tim3IntStatus=1;  //进入下一个状态
		}
		else
		{
			LED_R_OFF();  //点灯
			tim3IntStatus=0;  //进入下一个状态
		}

		//2.清除中断记录
		TIM_ClearITPendingBit(TIM3,TIM_IT_Update);
	}
}
mian .cpp
#include "stm32f4xx.h"                  // Device header
#include "mysistick.h"
#include "oled.h"
#include "led.h"
#include "mytim.h"

int main(void)
{
      systickConfig(168); //传参:168MHZ===>168

/*CK_INT = 84MHZ.
	延时时间 = (9999+1)*(8399+1)/84 MHZ
        = (9999+1)*(8399+1)/84 us = 1000000 us =1s.*/
		tim3Config(9999,8399);  //设置TIM3的工作模式(周期、分频系数、IRQ中断号)
		tim3NvicConfig();  //配置NVIC属性(位占比,优先级值,使能 对应的IRQ号的中断)
		tim3IntConfig();  //TIM3中断使能,TIM3计数开始
        led_init();
        while(1);


return 0;
}
2. OLED 屏幕使用
1.两个函数 :
OLed_ShowChina(16,0,HZ1); //显示自己取模文字 的显示函数
OLed_ShowASCII(48,0,"111"); //显示字符串。(自带的128X64I液晶底层驱动[8X16]字体库 )
代码:
头文件:
#ifndef __OLED_H__
#define __OLED_H__
//#include "sys.h"
#include "mysistick.h"
/*
 OLED 屏 --I2C接口
  slave addr: 0x3C ,低7位
*/
#define OLED_SLAVE_ADDR_WR   (0x3C<<1)   //从机地址 011 11000

//打开oled函数:初始化函数
void InitOLed(void);
//填充像素函数
void OLed_Fill(uint8_t bmp_data);
//显示字母函数
void OLed_ShowASCII(uint8_t x, uint8_t y,char *str);
//显示汉字函数
void OLed_ShowChina(uint8_t x,uint8_t y,uint8_t *buf);
//测试函数
void OLed_ShowTest(uint8_t x,uint8_t y);
//关闭oled函数
void offInitOLed(void);

//显示温度湿度
void OLed_ShowTemp(void);

#endif
.cpp
#include "stm32f4xx.h" //系统库文件

#include "oled.h"   //oled操作函数文件
#include "mysistick.h"  //延时函数文件
#include "myiic.h"   //iic接口文件;

//======================================================
// 128X64I液晶底层驱动[8X16]字体库
// 设计者: powerint
// 描  述: [8X16]西文字符的字模数据 (纵向取模,字节倒序)
// !"#$%&'()*+,-./0123456789:;<=>?@ABCDEFGHIJKLMNOPQRSTUVWXYZ[\]^_`abcdefghijklmnopqrstuvwxyz{|}~
//======================================================

const unsigned char F8X16[]=
{

  0x00,0x00,0x00,0x00,0x00,0x00,0x00,0x00,0x00,0x00,0x00,0x00,0x00,0x00,0x00,0x00,// 0
  0x00,0x00,0x00,0xF8,0x00,0x00,0x00,0x00,0x00,0x00,0x00,0x33,0x30,0x00,0x00,0x00,//!1
  0x00,0x10,0x0C,0x06,0x10,0x0C,0x06,0x00,0x00,0x00,0x00,0x00,0x00,0x00,0x00,0x00,//"2
  0x40,0xC0,0x78,0x40,0xC0,0x78,0x40,0x00,0x04,0x3F,0x04,0x04,0x3F,0x04,0x04,0x00,//#3
  0x00,0x70,0x88,0xFC,0x08,0x30,0x00,0x00,0x00,0x18,0x20,0xFF,0x21,0x1E,0x00,0x00,//$4
  0xF0,0x08,0xF0,0x00,0xE0,0x18,0x00,0x00,0x00,0x21,0x1C,0x03,0x1E,0x21,0x1E,0x00,//%5
  0x00,0xF0,0x08,0x88,0x70,0x00,0x00,0x00,0x1E,0x21,0x23,0x24,0x19,0x27,0x21,0x10,//&6
  0x10,0x16,0x0E,0x00,0x00,0x00,0x00,0x00,0x00,0x00,0x00,0x00,0x00,0x00,0x00,0x00,//'7
  0x00,0x00,0x00,0xE0,0x18,0x04,0x02,0x00,0x00,0x00,0x00,0x07,0x18,0x20,0x40,0x00,//(8
  0x00,0x02,0x04,0x18,0xE0,0x00,0x00,0x00,0x00,0x40,0x20,0x18,0x07,0x00,0x00,0x00,//)9
  0x40,0x40,0x80,0xF0,0x80,0x40,0x40,0x00,0x02,0x02,0x01,0x0F,0x01,0x02,0x02,0x00,//*10
  0x00,0x00,0x00,0xF0,0x00,0x00,0x00,0x00,0x01,0x01,0x01,0x1F,0x01,0x01,0x01,0x00,//+11
  0x00,0x00,0x00,0x00,0x00,0x00,0x00,0x00,0x80,0xB0,0x70,0x00,0x00,0x00,0x00,0x00,//,12
  0x00,0x00,0x00,0x00,0x00,0x00,0x00,0x00,0x00,0x01,0x01,0x01,0x01,0x01,0x01,0x01,//-13
  0x00,0x00,0x00,0x00,0x00,0x00,0x00,0x00,0x00,0x30,0x30,0x00,0x00,0x00,0x00,0x00,//.14
  0x00,0x00,0x00,0x00,0x80,0x60,0x18,0x04,0x00,0x60,0x18,0x06,0x01,0x00,0x00,0x00,///15
  0x00,0xE0,0x10,0x08,0x08,0x10,0xE0,0x00,0x00,0x0F,0x10,0x20,0x20,0x10,0x0F,0x00,//016
  0x00,0x10,0x10,0xF8,0x00,0x00,0x00,0x00,0x00,0x20,0x20,0x3F,0x20,0x20,0x00,0x00,//117
  0x00,0x70,0x08,0x08,0x08,0x88,0x70,0x00,0x00,0x30,0x28,0x24,0x22,0x21,0x30,0x00,//218
  0x00,0x30,0x08,0x88,0x88,0x48,0x30,0x00,0x00,0x18,0x20,0x20,0x20,0x11,0x0E,0x00,//319
  0x00,0x00,0xC0,0x20,0x10,0xF8,0x00,0x00,0x00,0x07,0x04,0x24,0x24,0x3F,0x24,0x00,//420
  0x00,0xF8,0x08,0x88,0x88,0x08,0x08,0x00,0x00,0x19,0x21,0x20,0x20,0x11,0x0E,0x00,//521
  0x00,0xE0,0x10,0x88,0x88,0x18,0x00,0x00,0x00,0x0F,0x11,0x20,0x20,0x11,0x0E,0x00,//622
  0x00,0x38,0x08,0x08,0xC8,0x38,0x08,0x00,0x00,0x00,0x00,0x3F,0x00,0x00,0x00,0x00,//723
  0x00,0x70,0x88,0x08,0x08,0x88,0x70,0x00,0x00,0x1C,0x22,0x21,0x21,0x22,0x1C,0x00,//824
  0x00,0xE0,0x10,0x08,0x08,0x10,0xE0,0x00,0x00,0x00,0x31,0x22,0x22,0x11,0x0F,0x00,//925
  0x00,0x00,0x00,0xC0,0xC0,0x00,0x00,0x00,0x00,0x00,0x00,0x30,0x30,0x00,0x00,0x00,//:26
  0x00,0x00,0x00,0x80,0x00,0x00,0x00,0x00,0x00,0x00,0x80,0x60,0x00,0x00,0x00,0x00,//;27
  0x00,0x00,0x80,0x40,0x20,0x10,0x08,0x00,0x00,0x01,0x02,0x04,0x08,0x10,0x20,0x00,//<28
  0x40,0x40,0x40,0x40,0x40,0x40,0x40,0x00,0x04,0x04,0x04,0x04,0x04,0x04,0x04,0x00,//=29
  0x00,0x08,0x10,0x20,0x40,0x80,0x00,0x00,0x00,0x20,0x10,0x08,0x04,0x02,0x01,0x00,//>30
  0x00,0x70,0x48,0x08,0x08,0x08,0xF0,0x00,0x00,0x00,0x00,0x30,0x36,0x01,0x00,0x00,//?31
  0xC0,0x30,0xC8,0x28,0xE8,0x10,0xE0,0x00,0x07,0x18,0x27,0x24,0x23,0x14,0x0B,0x00,//@32
  0x00,0x00,0xC0,0x38,0xE0,0x00,0x00,0x00,0x20,0x3C,0x23,0x02,0x02,0x27,0x38,0x20,//A33
  0x08,0xF8,0x88,0x88,0x88,0x70,0x00,0x00,0x20,0x3F,0x20,0x20,0x20,0x11,0x0E,0x00,//B34
  0xC0,0x30,0x08,0x08,0x08,0x08,0x38,0x00,0x07,0x18,0x20,0x20,0x20,0x10,0x08,0x00,//C35
  0x08,0xF8,0x08,0x08,0x08,0x10,0xE0,0x00,0x20,0x3F,0x20,0x20,0x20,0x10,0x0F,0x00,//D36
  0x08,0xF8,0x88,0x88,0xE8,0x08,0x10,0x00,0x20,0x3F,0x20,0x20,0x23,0x20,0x18,0x00,//E37
  0x08,0xF8,0x88,0x88,0xE8,0x08,0x10,0x00,0x20,0x3F,0x20,0x00,0x03,0x00,0x00,0x00,//F38
  0xC0,0x30,0x08,0x08,0x08,0x38,0x00,0x00,0x07,0x18,0x20,0x20,0x22,0x1E,0x02,0x00,//G39
  0x08,0xF8,0x08,0x00,0x00,0x08,0xF8,0x08,0x20,0x3F,0x21,0x01,0x01,0x21,0x3F,0x20,//H40
  0x00,0x08,0x08,0xF8,0x08,0x08,0x00,0x00,0x00,0x20,0x20,0x3F,0x20,0x20,0x00,0x00,//I41
  0x00,0x00,0x08,0x08,0xF8,0x08,0x08,0x00,0xC0,0x80,0x80,0x80,0x7F,0x00,0x00,0x00,//J42
  0x08,0xF8,0x88,0xC0,0x28,0x18,0x08,0x00,0x20,0x3F,0x20,0x01,0x26,0x38,0x20,0x00,//K43
  0x08,0xF8,0x08,0x00,0x00,0x00,0x00,0x00,0x20,0x3F,0x20,0x20,0x20,0x20,0x30,0x00,//L44
  0x08,0xF8,0xF8,0x00,0xF8,0xF8,0x08,0x00,0x20,0x3F,0x00,0x3F,0x00,0x3F,0x20,0x00,//M45
  0x08,0xF8,0x30,0xC0,0x00,0x08,0xF8,0x08,0x20,0x3F,0x20,0x00,0x07,0x18,0x3F,0x00,//N46
  0xE0,0x10,0x08,0x08,0x08,0x10,0xE0,0x00,0x0F,0x10,0x20,0x20,0x20,0x10,0x0F,0x00,//O47
  0x08,0xF8,0x08,0x08,0x08,0x08,0xF0,0x00,0x20,0x3F,0x21,0x01,0x01,0x01,0x00,0x00,//P48
  0xE0,0x10,0x08,0x08,0x08,0x10,0xE0,0x00,0x0F,0x18,0x24,0x24,0x38,0x50,0x4F,0x00,//Q49
  0x08,0xF8,0x88,0x88,0x88,0x88,0x70,0x00,0x20,0x3F,0x20,0x00,0x03,0x0C,0x30,0x20,//R50
  0x00,0x70,0x88,0x08,0x08,0x08,0x38,0x00,0x00,0x38,0x20,0x21,0x21,0x22,0x1C,0x00,//S51
  0x18,0x08,0x08,0xF8,0x08,0x08,0x18,0x00,0x00,0x00,0x20,0x3F,0x20,0x00,0x00,0x00,//T52
  0x08,0xF8,0x08,0x00,0x00,0x08,0xF8,0x08,0x00,0x1F,0x20,0x20,0x20,0x20,0x1F,0x00,//U53
  0x08,0x78,0x88,0x00,0x00,0xC8,0x38,0x08,0x00,0x00,0x07,0x38,0x0E,0x01,0x00,0x00,//V54
  0xF8,0x08,0x00,0xF8,0x00,0x08,0xF8,0x00,0x03,0x3C,0x07,0x00,0x07,0x3C,0x03,0x00,//W55
  0x08,0x18,0x68,0x80,0x80,0x68,0x18,0x08,0x20,0x30,0x2C,0x03,0x03,0x2C,0x30,0x20,//X56
  0x08,0x38,0xC8,0x00,0xC8,0x38,0x08,0x00,0x00,0x00,0x20,0x3F,0x20,0x00,0x00,0x00,//Y57
  0x10,0x08,0x08,0x08,0xC8,0x38,0x08,0x00,0x20,0x38,0x26,0x21,0x20,0x20,0x18,0x00,//Z58
  0x00,0x00,0x00,0xFE,0x02,0x02,0x02,0x00,0x00,0x00,0x00,0x7F,0x40,0x40,0x40,0x00,//[59
  0x00,0x0C,0x30,0xC0,0x00,0x00,0x00,0x00,0x00,0x00,0x00,0x01,0x06,0x38,0xC0,0x00,//\60
  0x00,0x02,0x02,0x02,0xFE,0x00,0x00,0x00,0x00,0x40,0x40,0x40,0x7F,0x00,0x00,0x00,//]61
  0x00,0x00,0x04,0x02,0x02,0x02,0x04,0x00,0x00,0x00,0x00,0x00,0x00,0x00,0x00,0x00,//^62
  0x00,0x00,0x00,0x00,0x00,0x00,0x00,0x00,0x80,0x80,0x80,0x80,0x80,0x80,0x80,0x80,//_63
  0x00,0x02,0x02,0x04,0x00,0x00,0x00,0x00,0x00,0x00,0x00,0x00,0x00,0x00,0x00,0x00,//`64
  0x00,0x00,0x80,0x80,0x80,0x80,0x00,0x00,0x00,0x19,0x24,0x22,0x22,0x22,0x3F,0x20,//a65
  0x08,0xF8,0x00,0x80,0x80,0x00,0x00,0x00,0x00,0x3F,0x11,0x20,0x20,0x11,0x0E,0x00,//b66
  0x00,0x00,0x00,0x80,0x80,0x80,0x00,0x00,0x00,0x0E,0x11,0x20,0x20,0x20,0x11,0x00,//c67
  0x00,0x00,0x00,0x80,0x80,0x88,0xF8,0x00,0x00,0x0E,0x11,0x20,0x20,0x10,0x3F,0x20,//d68
  0x00,0x00,0x80,0x80,0x80,0x80,0x00,0x00,0x00,0x1F,0x22,0x22,0x22,0x22,0x13,0x00,//e69
  0x00,0x80,0x80,0xF0,0x88,0x88,0x88,0x18,0x00,0x20,0x20,0x3F,0x20,0x20,0x00,0x00,//f70
  0x00,0x00,0x80,0x80,0x80,0x80,0x80,0x00,0x00,0x6B,0x94,0x94,0x94,0x93,0x60,0x00,//g71
  0x08,0xF8,0x00,0x80,0x80,0x80,0x00,0x00,0x20,0x3F,0x21,0x00,0x00,0x20,0x3F,0x20,//h72
  0x00,0x80,0x98,0x98,0x00,0x00,0x00,0x00,0x00,0x20,0x20,0x3F,0x20,0x20,0x00,0x00,//i73
  0x00,0x00,0x00,0x80,0x98,0x98,0x00,0x00,0x00,0xC0,0x80,0x80,0x80,0x7F,0x00,0x00,//j74
  0x08,0xF8,0x00,0x00,0x80,0x80,0x80,0x00,0x20,0x3F,0x24,0x02,0x2D,0x30,0x20,0x00,//k75
  0x00,0x08,0x08,0xF8,0x00,0x00,0x00,0x00,0x00,0x20,0x20,0x3F,0x20,0x20,0x00,0x00,//l76
  0x80,0x80,0x80,0x80,0x80,0x80,0x80,0x00,0x20,0x3F,0x20,0x00,0x3F,0x20,0x00,0x3F,//m77
  0x80,0x80,0x00,0x80,0x80,0x80,0x00,0x00,0x20,0x3F,0x21,0x00,0x00,0x20,0x3F,0x20,//n78
  0x00,0x00,0x80,0x80,0x80,0x80,0x00,0x00,0x00,0x1F,0x20,0x20,0x20,0x20,0x1F,0x00,//o79
  0x80,0x80,0x00,0x80,0x80,0x00,0x00,0x00,0x80,0xFF,0xA1,0x20,0x20,0x11,0x0E,0x00,//p80
  0x00,0x00,0x00,0x80,0x80,0x80,0x80,0x00,0x00,0x0E,0x11,0x20,0x20,0xA0,0xFF,0x80,//q81
  0x80,0x80,0x80,0x00,0x80,0x80,0x80,0x00,0x20,0x20,0x3F,0x21,0x20,0x00,0x01,0x00,//r82
  0x00,0x00,0x80,0x80,0x80,0x80,0x80,0x00,0x00,0x33,0x24,0x24,0x24,0x24,0x19,0x00,//s83
  0x00,0x80,0x80,0xE0,0x80,0x80,0x00,0x00,0x00,0x00,0x00,0x1F,0x20,0x20,0x00,0x00,//t84
  0x80,0x80,0x00,0x00,0x00,0x80,0x80,0x00,0x00,0x1F,0x20,0x20,0x20,0x10,0x3F,0x20,//u85
  0x80,0x80,0x80,0x00,0x00,0x80,0x80,0x80,0x00,0x01,0x0E,0x30,0x08,0x06,0x01,0x00,//v86
  0x80,0x80,0x00,0x80,0x00,0x80,0x80,0x80,0x0F,0x30,0x0C,0x03,0x0C,0x30,0x0F,0x00,//w87
  0x00,0x80,0x80,0x00,0x80,0x80,0x80,0x00,0x00,0x20,0x31,0x2E,0x0E,0x31,0x20,0x00,//x88
  0x80,0x80,0x80,0x00,0x00,0x80,0x80,0x80,0x80,0x81,0x8E,0x70,0x18,0x06,0x01,0x00,//y89
  0x00,0x80,0x80,0x80,0x80,0x80,0x80,0x00,0x00,0x21,0x30,0x2C,0x22,0x21,0x30,0x00,//z90
  0x00,0x00,0x00,0x00,0x80,0x7C,0x02,0x02,0x00,0x00,0x00,0x00,0x00,0x3F,0x40,0x40,//{91
  0x00,0x00,0x00,0x00,0xFF,0x00,0x00,0x00,0x00,0x00,0x00,0x00,0xFF,0x00,0x00,0x00,//|92
  0x00,0x02,0x02,0x7C,0x80,0x00,0x00,0x00,0x00,0x40,0x40,0x3F,0x00,0x00,0x00,0x00,//}93
  0x00,0x06,0x01,0x01,0x02,0x02,0x04,0x04,0x00,0x00,0x00,0x00,0x00,0x00,0x00,0x00,//~94
};

//汉字字模数据  字库字符数组

//温
uint8_t HZ1[]={
0x10,0x60,0x02,0x8C,0x00,0x00,0xFE,0x92,0x92,0x92,0x92,0x92,0xFE,0x00,0x00,0x00,
0x04,0x04,0x7E,0x01,0x40,0x7E,0x42,0x42,0x7E,0x42,0x7E,0x42,0x42,0x7E,0x40,0x00,
};

//度
uint8_t HZ2[]={
0x00,0x00,0xFC,0x24,0x24,0x24,0xFC,0x25,0x26,0x24,0xFC,0x24,0x24,0x24,0x04,0x00,
0x40,0x30,0x8F,0x80,0x84,0x4C,0x55,0x25,0x25,0x25,0x55,0x4C,0x80,0x80,0x80,0x00,
};

//湿
uint8_t HZ3[]={
0x10,0x60,0x02,0x8C,0x00,0xFE,0x92,0x92,0x92,0x92,0x92,0x92,0xFE,0x00,0x00,0x00,
0x04,0x04,0x7E,0x01,0x44,0x48,0x50,0x7F,0x40,0x40,0x7F,0x50,0x48,0x44,0x40,0x00,
};

uint8_t jj[] ={
0x00,0x10,0x10,0xF8,0x00,0x00,0x00,0x00,0x00,0x20,0x20,0x3F,0x20,0x20,0x00,0x00,
0x00,0x10,0x10,0xF8,0x00,0x00,0x00,0x00,0x00,0x20,0x20,0x3F,0x20,0x20,0x00,0x00,

};

//显示温度 和湿度函数
void OLed_ShowTemp(void)
{
	//第1行显示温度
	OLed_ShowChina(16,0,HZ1);
	OLed_ShowChina(32,0,HZ2);
	OLed_ShowASCII(48,0,"111");  //显示英文。

	  //第2行显示湿度
	OLed_ShowChina(16,2,HZ3);
	OLed_ShowChina(32,2,HZ2);
}


/*
 写OLED命令寄存器的函数
*/
void WriteOLedCmd(uint8_t cmd)
{
	uint8_t CtrWord = 0x00;

	IIC_Start();

	IIC_Send_Byte(OLED_SLAVE_ADDR_WR); 	//发送从设备地址
	IIC_Wait_Ack();

	IIC_Send_Byte(CtrWord); //发送命令控制字
	IIC_Wait_Ack();

	IIC_Send_Byte(cmd);
	IIC_Wait_Ack();

	IIC_Stop();
}

/*
  写OLED数据的函数
*/

void WriteOLedData(uint8_t data)
{

	uint8_t CtrWord = 0x00;

	CtrWord |= (0x1<<6);  //表示发送的是数据

	IIC_Start();

	IIC_Send_Byte(OLED_SLAVE_ADDR_WR); 	//发送从设备地址
	IIC_Wait_Ack();

	IIC_Send_Byte(CtrWord); //发送命令控制字
	IIC_Wait_Ack();

	IIC_Send_Byte(data);
	IIC_Wait_Ack();

	IIC_Stop();
}


/*
 设置显示位置
 y--> page address页地址  ,相当于 行 (0 ~ 7)       1 100
 x --> 列地址 (0 ~ 127)
*/
void OLed_SetPos(unsigned char x, unsigned char y)
{
	WriteOLedCmd((0xb0+y));  //设置行地址,设置页号
	WriteOLedCmd(((x&0xf0)>>4)|0x10);  //设置列地址高位
	WriteOLedCmd((x&0x0f)|0x00);   //设置列地址的低位
}


#define X_WIDTH   128

/*
 填充显示数据缓冲区
*/
void OLed_Fill(unsigned char bmp_data)
{
	unsigned char y,x;

	for(y=0;y<8;y++)
	{
		  //设置PAGE地址
			WriteOLedCmd(0xb0+y);
		  //设置列地址
			WriteOLedCmd(0x00);
			WriteOLedCmd(0x10);

			for(x=0;x<X_WIDTH;x++)
			{
				WriteOLedData(bmp_data);
			}
	}

}


//-----------------------------------------------------//
//1 打开oled函数
void InitOLed(void)
{
	  //给OLED发送命令 初始化OLED
		WriteOLedCmd(0xAE);//--turn off oled panel
		WriteOLedCmd(0x00);//---set low column address
		WriteOLedCmd(0x10);//---set high column address
		WriteOLedCmd(0x40);//--set start line address  Set Mapping RAM Display Start Line (0x00~0x3F)
		WriteOLedCmd(0x81);//--set contrast control register
		WriteOLedCmd(0xCF); // Set SEG Output Current Brightness
		WriteOLedCmd(0xA1);//--Set SEG/Column Mapping     0xa0???? 0xa1??
		WriteOLedCmd(0xC8);//Set COM/Row Scan Direction   0xc0???? 0xc8??
		WriteOLedCmd(0xA6);//--set normal display
		WriteOLedCmd(0xA8);//--set multiplex ratio(1 to 64)
		WriteOLedCmd(0x3f);//--1/64 duty
		WriteOLedCmd(0xD3);//-set display offset	Shift Mapping RAM Counter (0x00~0x3F)
		WriteOLedCmd(0x00);//-not offset
		WriteOLedCmd(0xd5);//--set display clock divide ratio/oscillator frequency
		WriteOLedCmd(0x80);//--set divide ratio, Set Clock as 100 Frames/Sec
		WriteOLedCmd(0xD9);//--set pre-charge period
		WriteOLedCmd(0xF1);//Set Pre-Charge as 15 Clocks & Discharge as 1 Clock
		WriteOLedCmd(0xDA);//--set com pins hardware configuration
		WriteOLedCmd(0x12);
		WriteOLedCmd(0xDB);//--set vcomh
		WriteOLedCmd(0x40);//Set VCOM Deselect Level
		WriteOLedCmd(0x20);//-Set Page Addressing Mode (0x00/0x01/0x02)
		WriteOLedCmd(0x02);//
		WriteOLedCmd(0x8D);//--set Charge Pump enable/disable
		WriteOLedCmd(0x14);//--set(0x10) disable
		WriteOLedCmd(0xA4);// Disable Entire Display On (0xa4/0xa5)
		WriteOLedCmd(0xA6);// Disable Inverse Display On (0xa6/a7)
		WriteOLedCmd(0xAF);//--turn on oled panel

		WriteOLedCmd(0xAF); /*display ON*/

		OLed_Fill(0x00);

}

//2oled关闭函数
void offInitOLed(void)
{
	  //给OLED发送命令 初始化OLED
		WriteOLedCmd(0xAE);//--turn off oled panel
		WriteOLedCmd(0x00);//---set low column address
		WriteOLedCmd(0x10);//---set high column address
		WriteOLedCmd(0x40);//--set start line address  Set Mapping RAM Display Start Line (0x00~0x3F)
		WriteOLedCmd(0x81);//--set contrast control register
		WriteOLedCmd(0xCF); // Set SEG Output Current Brightness
		WriteOLedCmd(0xA1);//--Set SEG/Column Mapping     0xa0???? 0xa1??
		WriteOLedCmd(0xC8);//Set COM/Row Scan Direction   0xc0???? 0xc8??
		WriteOLedCmd(0xA6);//--set normal display
		WriteOLedCmd(0xA8);//--set multiplex ratio(1 to 64)
		WriteOLedCmd(0x3f);//--1/64 duty
		WriteOLedCmd(0xD3);//-set display offset	Shift Mapping RAM Counter (0x00~0x3F)
		WriteOLedCmd(0x00);//-not offset
		WriteOLedCmd(0xd5);//--set display clock divide ratio/oscillator frequency
		WriteOLedCmd(0x80);//--set divide ratio, Set Clock as 100 Frames/Sec
		WriteOLedCmd(0xD9);//--set pre-charge period
		WriteOLedCmd(0xF1);//Set Pre-Charge as 15 Clocks & Discharge as 1 Clock
		WriteOLedCmd(0xDA);//--set com pins hardware configuration
		WriteOLedCmd(0x12);
		WriteOLedCmd(0xDB);//--set vcomh
		WriteOLedCmd(0x40);//Set VCOM Deselect Level
		WriteOLedCmd(0x20);//-Set Page Addressing Mode (0x00/0x01/0x02)
		WriteOLedCmd(0x02);//
		WriteOLedCmd(0x8D);//--set Charge Pump enable/disable
		WriteOLedCmd(0x14);//--set(0x10) disable
		WriteOLedCmd(0xA4);// Disable Entire Display On (0xa4/0xa5)
		WriteOLedCmd(0xA6);// Disable Inverse Display On (0xa6/a7)
		WriteOLedCmd(0xAF);//--turn on oled panel


}

/***********************************显示3个函数*************************************************/
uint8_t fbuf1[]={0x00,0x00,0xF0,0x10,0x10,0x10,0x10,0xFF,0x10,0x10,0x10,0x10,0xF0,0x00,0x00,0x00};
uint8_t fbuf2[]={0x00,0x00,0x0F,0x04,0x04,0x04,0x04,0xFF,0x04,0x04,0x04,0x04,0x0F,0x00,0x00,0x00};/*中*/

uint8_t fbuf3[]={0x00,0xFE,0x02,0x12,0x92,0x92,0x92,0xF2,0x92,0x92,0x92,0x12,0x02,0xFE,0x00,0x00};
uint8_t fbuf4[]={0x00,0xFF,0x40,0x48,0x48,0x48,0x48,0x4F,0x48,0x4A,0x4C,0x48,0x40,0xFF,0x00,0x00};/*国*/

/*
功能:在指定位置显示指定ASCII码对应字符串
@x: 显示的行号(页号0~7)
@y:显示的列号(列号0~127)
@str: 要显示的ascii的字符串
*/

//3.显示字母函数
void OLed_ShowASCII(uint8_t x, uint8_t y,char *str)
{
		uint8_t i = 0;

		char *pstr = str;

		while(*pstr)
		{
				OLed_SetPos(x,y);
				for(i=0;i<8;i++)
				{
					WriteOLedData(F8X16[((*pstr)-32)*16+i]);
				}

				OLed_SetPos(x,y+1);
				for(i=0;i<8;i++)
				{
					WriteOLedData(F8X16[((*pstr)-32)*16+8+i]);
				}

				pstr++;

				x +=8;
		}

}

/*
 功能: 在指定位置显示一个汉字, 显示下一个汉字时,X每次递增16
 Y递增 2  字模数据 buf
*/
//4.显示汉字函数
void OLed_ShowChina(uint8_t x,uint8_t y,uint8_t *buf)
{
		uint8_t i = 0;
		OLed_SetPos(x,y);
		for(i=0;i<16;i++)
		{
			WriteOLedData(buf[i]);
		}
		OLed_SetPos(x,(y+1));
		for(i=0;i<16;i++)
		{
			WriteOLedData(buf[i+16]);
		}
}

/*
 在 x,y 位置显示
*/
void OLed_ShowTest(unsigned char x,unsigned char y)
{
		uint8_t i = 0;

		OLed_SetPos(x,y);
		for(i=0;i<16;i++)
		{
			WriteOLedData(fbuf1[i]);
		}

		OLed_SetPos(x,(y+1));
		for(i=0;i<16;i++)
		{
			WriteOLedData(fbuf2[i]);
		}

		OLed_SetPos((x+16),y);
		for(i=0;i<16;i++)
		{
			WriteOLedData(fbuf3[i]);
		}

		OLed_SetPos((x+16),(y+1));
		for(i=0;i<16;i++)
		{
			WriteOLedData(fbuf4[i]);
		}


}
mian.cpp
#include "stm32f4xx.h"                  // Device header
#include "mysistick.h"
#include "at24c02.h"
#include "myiic.h"
#include "myusart.h"
#include "oled.h"
#include "led.h"
#include "wwdg.h"
#include "mytim.h"
#define OLED_TEST

int main()
{
    #ifdef OLED_TEST
   systickConfig(168);
	IIC_Init();
    myusart_init(115200);
	printf("USART1 print:HELLO WORLD!\r\n");
   InitOLed();
	while(1)
	{
		//显示一个学生的信息;
	//	OLed_ShowASCII(0, 0,"name: danny");
		OLed_ShowASCII(0, 4,"sex: man");
		OLed_ShowASCII(0, 6,"ad:changsha");  //显示英文。
       OLed_ShowTemp();
    }
    return 0;
#endif


}
3. PWM 的使用
1.PWM全称:Pulse Width Modulation脉冲宽度调制。
是靠改变脉冲宽度来控制输出电压,通过改变周期来控制其输出频率。PWM信号广泛应用在直流电机调速和灯具调光领域。
2.脉冲: 51单片机lO口输出一个脉冲,是指IO口发生一次高低电平的变化
3.占空比: 是指一个脉冲时间内,高电平的时间与整个脉冲持续时间的比值。
4.频率: :物质在1s内完成周期性变化的次数叫做频率常用f表示。公式:f=1/T
5.整个方波脉冲周期 = 高电平持续时间 + 低电平持续时间。
6.PWM信号 多用用于控制领域,尤其是
头文件:
#ifndef __MY_TIM_H__
#define __MY_TIM_H__

#include "stm32f4xx.h"

extern void tim3Config(int tim3_arr,int tim3_psc);
extern void tim3NvicConfig(void);
extern void tim3IntConfig(void);
void Timer2pwminit(void);

#endif
.cpp 文件
#include "mytim.h"
#include "led.h"
/**函数功能:定时器2初始化配置,产生1s中断一次的计时
**计	算:计数器的时钟频率CK_CNT = f(CK_PSC)/(PCS[15:0]+1)
**			计数器的计时频率CK_CNT = 72MHz/(7199+1) = 10KHz
**			单次计数时间 	T(CNT) = 1/CK_CNT = 100us
**			定时器溢出时间	Tout = ((CNT[15:0] + 1)*[PSC[15:0]+1])/Tclk
**			定时器溢出时间	Tout = ((9999 + 1)*(7199 + 1))/72MHz = 1s
//1、定时器的初始化*/
void tim3Config(int tim3_arr,int tim3_psc)
{
	TIM_TimeBaseInitTypeDef TIM3_InitStructure;  //定时器初始化数据结构

	//1.1、使能 TIM3 的时钟。TIM3在RCC对应的时钟树上。
	RCC_APB1PeriphClockCmd(RCC_APB1Periph_TIM3,ENABLE);


	//1.2、配置TIM3的工作模式
	TIM3_InitStructure.TIM_ClockDivision = TIM_CKD_DIV1;
	TIM3_InitStructure.TIM_CounterMode = TIM_CounterMode_Up;
	TIM3_InitStructure.TIM_Period = tim3_arr;
	TIM3_InitStructure.TIM_Prescaler = tim3_psc;

	//1.3、软件通过设置 UG 产生一个更新事件
	TIM_TimeBaseInit(TIM3,&TIM3_InitStructure);

}

//2、定时器的 NVIC 初始化
void tim3NvicConfig(void)
{
	NVIC_InitTypeDef NVIC_InitStructure;  //NVIC数据结构

	//2.2、配置优先级。必须先配置位占比
	NVIC_PriorityGroupConfig(NVIC_PriorityGroup_1);

	//2.1、明确 TIM3 的 IRQ 中断号: 29 。
	NVIC_InitStructure.NVIC_IRQChannel = TIM3_IRQn;
	NVIC_InitStructure.NVIC_IRQChannelPreemptionPriority = 0X1;
	NVIC_InitStructure.NVIC_IRQChannelSubPriority = 0X6;
	NVIC_InitStructure.NVIC_IRQChannelCmd = ENABLE;
	NVIC_Init(&NVIC_InitStructure);

}


//3、使能定时器 TIM3
void tim3IntConfig(void)
{
	//3.1、先使能 TIM3 定时器中断。
	TIM_ITConfig(TIM3,TIM_IT_Update,ENABLE);


	//3.2、再使能TIM3定时器
	TIM_Cmd(TIM3,ENABLE);

}


int tim3IntStatus = 0;

void TIM3_IRQHandler(void)
{
//1.检查TIM3是否有更新事件的中断(条件:中断使能 且 有中断记录)
	if(TIM_GetITStatus(TIM3,TIM_IT_Update)==SET)
	{
		if(tim3IntStatus==0)
		{
			LED_R_ON();  //灭灯
			tim3IntStatus=1;  //进入下一个状态
		}
		else
		{
			LED_R_OFF();  //点灯
			tim3IntStatus=0;  //进入下一个状态
		}

		//2.清除中断记录
		TIM_ClearITPendingBit(TIM3,TIM_IT_Update);
	}
}

//pwm2初始化
void Timer2pwminit()
{
			//1.配置时钟  定时器模块需要时钟 GPIO电路也需要时钟。
				RCC_APB1PeriphClockCmd(RCC_APB1Periph_TIM2,ENABLE);
				RCC_AHB1PeriphClockCmd(RCC_AHB1Periph_GPIOB,ENABLE);

			//2.PB10配置成复用功能。
				GPIO_PinAFConfig(GPIOB,GPIO_PinSource10,GPIO_AF_TIM2);

			//3.GPIO B组第10个脚配置成复用模式。
				GPIO_InitTypeDef PWMstruct;
				//填写引脚
				PWMstruct.GPIO_Pin = GPIO_Pin_10 ;
				//填写速度
				PWMstruct.GPIO_Speed = GPIO_Speed_2MHz;
				//填写电阻
				PWMstruct.GPIO_PuPd = GPIO_PuPd_UP ;
				//填写模式:输出?输入?模拟信号?复用?
				PWMstruct.GPIO_Mode = GPIO_Mode_AF;
				//即可以输出高电平也可以输出低电平
				GPIO_Init(GPIOB,&PWMstruct);

				//4.配置定时器
				TIM_TimeBaseInitTypeDef timer2struct;
				//自动装载值决定的是周期时间
				timer2struct.TIM_Period = 5000;
				timer2struct.TIM_CounterMode = TIM_CounterMode_Up;
				timer2struct.TIM_Prescaler =8400;
				timer2struct.TIM_ClockDivision = TIM_CKD_DIV1;
				TIM_TimeBaseInit(TIM2,&timer2struct);

				//5.配置通道3   //没有使用定时器的中断功能。
				TIM_OCInitTypeDef OC3struct;
				OC3struct.TIM_OCMode = TIM_OCMode_PWM1;
				OC3struct.TIM_OCPolarity = TIM_OCPolarity_High;
				OC3struct.TIM_OutputState = TIM_OutputState_Enable;
				TIM_OC3Init(TIM2,&OC3struct);

				//6.通道3比较捕获寄存器使能
				TIM_OC3PreloadConfig(TIM2,TIM_OCPreload_Enable);
				//7.自动装载值使能
				TIM_ARRPreloadConfig(TIM2,ENABLE);
				//8.定时器使能
				TIM_Cmd(TIM2,ENABLE);
}
#include "stm32f4xx.h"                  // Device header
#include "mysistick.h"
#include "at24c02.h"
#include "myiic.h"
#include "myusart.h"
#include "oled.h"
#include "led.h"
#include "wwdg.h"
#include "mytim.h"
#define PWM_TEST

int main(void)
{
     #ifdef PWM_TEST
        	//写一个循环 改变占空比的值 。
			unsigned int beepvalue = 0 ;
			unsigned char flg = 1 ;
			systickConfig(168);
			Timer2pwminit();
			while(1){

					if(flg)		        beepvalue++;
					else		        beepvalue--;
					if(beepvalue > 500)	flg = 0 ;
					if(beepvalue == 0)	flg = 1 ;

					//比较寄存器修改的是 占空比。
					TIM_SetCompare3(TIM2,beepvalue);
					//TIM2->ARR = beepvalue;
					//beep的变化范围是 0 - 61;

			}
        #endif


return 0;
}
程序功能: PWM 形成 呼吸灯
头文件
#ifndef _TIMER_H
#define _TIMER_H
void TIM14_PWM_Init(void);
#endif
.cpp 文件
#include "pwm.h"
#include "led.h"

//TIM14 PWM部分初始化
//PWM输出初始化
//arr:自动重装值
//psc:时钟预分频数
void TIM14_PWM_Init(void)
{
	//此部分需手动修改IO口设置
	GPIO_InitTypeDef GPIO_InitStructure;
	//定时器结构体初始化。
	TIM_TimeBaseInitTypeDef  TIM_TimeBaseStructure;

	TIM_OCInitTypeDef  TIM_OCInitStructure;
	//1TIM14时钟使能
	RCC_APB2PeriphClockCmd(RCC_APB2Periph_TIM1,ENABLE);
	2使能PORTF时钟
	TIM_DeInit(TIM1);
	RCC_AHB1PeriphClockCmd(RCC_AHB1Periph_GPIOE, ENABLE);
	//3GPIOF9复用为定时器14
	GPIO_PinAFConfig(GPIOE,GPIO_PinSource9,GPIO_AF_TIM1);

	//GPIOF9
	GPIO_InitStructure.GPIO_Pin = GPIO_Pin_9;
	//复用功能
	GPIO_InitStructure.GPIO_Mode = GPIO_Mode_AF;
	//速度100MHz
	GPIO_InitStructure.GPIO_Speed = GPIO_Speed_100MHz;
	//推挽复用输出
	GPIO_InitStructure.GPIO_OType = GPIO_OType_PP;
	//上拉
	GPIO_InitStructure.GPIO_PuPd = GPIO_PuPd_UP;
	//4初始化PF9
	GPIO_Init(GPIOE,&GPIO_InitStructure);

	TIM_TimeBaseStructure.TIM_Prescaler=400;  //定时器分频
	TIM_TimeBaseStructure.TIM_CounterMode=TIM_CounterMode_Up; //向上计数模式
	TIM_TimeBaseStructure.TIM_Period=100;   //自动重装载值
	TIM_TimeBaseStructure.TIM_ClockDivision=TIM_CKD_DIV1;
//	TIM_TimeBaseStructure.TIM_RepetitionCounter = 1;
	//5初始化定时器14
	TIM_TimeBaseInit(TIM1,&TIM_TimeBaseStructure);

	//初始化TIM14 Channel1 PWM模式
	//选择定时器模式:TIM脉冲宽度调制模式2
	TIM_OCInitStructure.TIM_OCMode = TIM_OCMode_PWM1;
	TIM_OCInitStructure.TIM_OCPolarity = TIM_OCPolarity_High;
	TIM_OCInitStructure.TIM_OutputState = TIM_OutputState_Enable;
	TIM_OCInitStructure.TIM_OCIdleState = TIM_OCIdleState_Reset;
	//6根据T指定的参数初始化外设TIM1 4OC1
//	TIM_OCInitStructure.TIM_Pulse = 100;
	TIM_OC1Init(TIM1, &TIM_OCInitStructure);

	//7使能TIM14在CCR1上的预装载寄存器
//	TIM_OC1PreloadConfig(TIM1, TIM_OCPreload_Enable);
//	//8ARPE使能
//	TIM_ARRPreloadConfig(TIM1,ENABLE);
	//9使能TIM14
	TIM_Cmd(TIM1, ENABLE);
	TIM_CtrlPWMOutputs(TIM1, ENABLE);
}
main.cpp
#include "sys.h"
#include "delay.h"
#include "usart.h"
#include "led.h"
#include "pwm.h"

int main(void)
{
	u16 led0pwmval=0;
	u8 dir=1;
	NVIC_PriorityGroupConfig(NVIC_PriorityGroup_2);//设置系统中断优先级分组2
	delay_init(168);  //初始化延时函数
	//uart_init(115200);//初始化串口波特率为115200
 	TIM14_PWM_Init();	//84M/84=1Mhz的计数频率,重装载值500,所以PWM频率为 1M/500=2Khz.
	while(1) //实现比较值从0-300递增,到300后从300-0递减,循环
	{
 		delay_ms(10);
		//dir==1 led0pwmval递增
		if(dir)
			led0pwmval++;
		else     //dir==0 led0pwmval递减
			led0pwmval--;
		//led0pwmval到达300后,方向为递减
 		if(led0pwmval>100)
			dir=0;
		//led0pwmval递减到0后,方向改为递增
		if(led0pwmval==0)
			dir=1;

		//修改比较值,修改占空比
		TIM_SetCompare1(TIM1,led0pwmval);
	}
}