- redis整合
- redis的注解式开发及应用场景
- redis的击穿穿透雪崩
1.redis整合
mysql整合
pom配置;
String-fmybatis.xml --> mybatis.cfg.xml:
包扫描;
注册了一个jdbc.properties(url/password/username/...);
配置数据源(数据库连接池);
配置sqlsession,配置会话;
配置事务...;
StringContext.xml中添加spring-mybatis.xml;
<?xml version="1.0" encoding="UTF-8"?>
<beans xmlns="http://www.springframework.org/schema/beans"
       xmlns:xsi="http://www.w3.org/2001/XMLSchema-instance"
       xmlns:context="http://www.springframework.org/schema/context" xmlns:tx="http://www.springframework.org/schema/tx"
       xmlns:aop="http://www.springframework.org/schema/aop"
       xsi:schemaLocation="http://www.springframework.org/schema/beans http://www.springframework.org/schema/beans/spring-beans.xsd http://www.springframework.org/schema/context http://www.springframework.org/schema/context/spring-context.xsd http://www.springframework.org/schema/tx http://www.springframework.org/schema/tx/spring-tx.xsd http://www.springframework.org/schema/aop http://www.springframework.org/schema/aop/spring-aop.xsd">
    <!--1. 注解式开发 -->
    <!-- 注解驱动 -->
    <context:annotation-config/>
    <!-- 用注解方式注入bean,并指定查找范围:com.javaxl.ssm及子子孙孙包-->
    <context:component-scan base-package="com.zlj.ssm"/>

    <context:property-placeholder location="classpath:jdbc.properties"/>

    <bean id="dataSource" class="org.apache.commons.dbcp2.BasicDataSource"
          destroy-method="close">
        <property name="driverClassName" value="${jdbc.driver}"/>
        <property name="url" value="${jdbc.url}"/>
        <property name="username" value="${jdbc.username}"/>
        <property name="password" value="${jdbc.password}"/>
        <!--初始连接数-->
        <property name="initialSize" value="10"/>
        <!--最大活动连接数-->
        <property name="maxTotal" value="100"/>
        <!--最大空闲连接数-->
        <property name="maxIdle" value="50"/>
        <!--最小空闲连接数-->
        <property name="minIdle" value="10"/>
        <!--设置为-1时,如果没有可用连接,连接池会一直无限期等待,直到获取到连接为止。-->
        <!--如果设置为N(毫秒),则连接池会等待N毫秒,等待不到,则抛出异常-->
        <property name="maxWaitMillis" value="-1"/>
    </bean>

    <!--4. spring和MyBatis整合 -->
    <!--1) 创建sqlSessionFactory-->
    <bean id="sqlSessionFactory" class="org.mybatis.spring.SqlSessionFactoryBean">
        <!-- 指定数据源 -->
        <property name="dataSource" ref="dataSource"/>
        <!-- 自动扫描XxxMapping.xml文件,**任意路径 -->
        <property name="mapperLocations" value="classpath*:com/zlj/ssm/**/mapper/*.xml"/>
        <!-- 指定别名 -->
        <property name="typeAliasesPackage" value="com/zlj/ssm/**/model"/>
        <!--配置pagehelper插件-->
        <property name="plugins">
            <array>
                <bean class="com.github.pagehelper.PageInterceptor">
                    <property name="properties">
                        <value>
                            helperDialect=mysql
                        </value>
                    </property>
                </bean>
            </array>
        </property>
    </bean>

    <!--2) 自动扫描com/javaxl/ssm/**/mapper下的所有XxxMapper接口(其实就是DAO接口),并实现这些接口,-->
    <!--   即可直接在程序中使用dao接口,不用再获取sqlsession对象-->
    <bean class="org.mybatis.spring.mapper.MapperScannerConfigurer">
        <!--basePackage 属性是映射器接口文件的包路径。-->
        <!--你可以使用分号或逗号 作为分隔符设置多于一个的包路径-->
        <property name="basePackage" value="com/zlj/ssm/**/mapper"/>
        <property name="sqlSessionFactoryBeanName" value="sqlSessionFactory"/>
    </bean>

    <bean id="transactionManager" class="org.springframework.jdbc.datasource.DataSourceTransactionManager">
        <property name="dataSource" ref="dataSource" />
    </bean>
    <tx:annotation-driven transaction-manager="transactionManager" />
    <aop:aspectj-autoproxy/>
</beans>
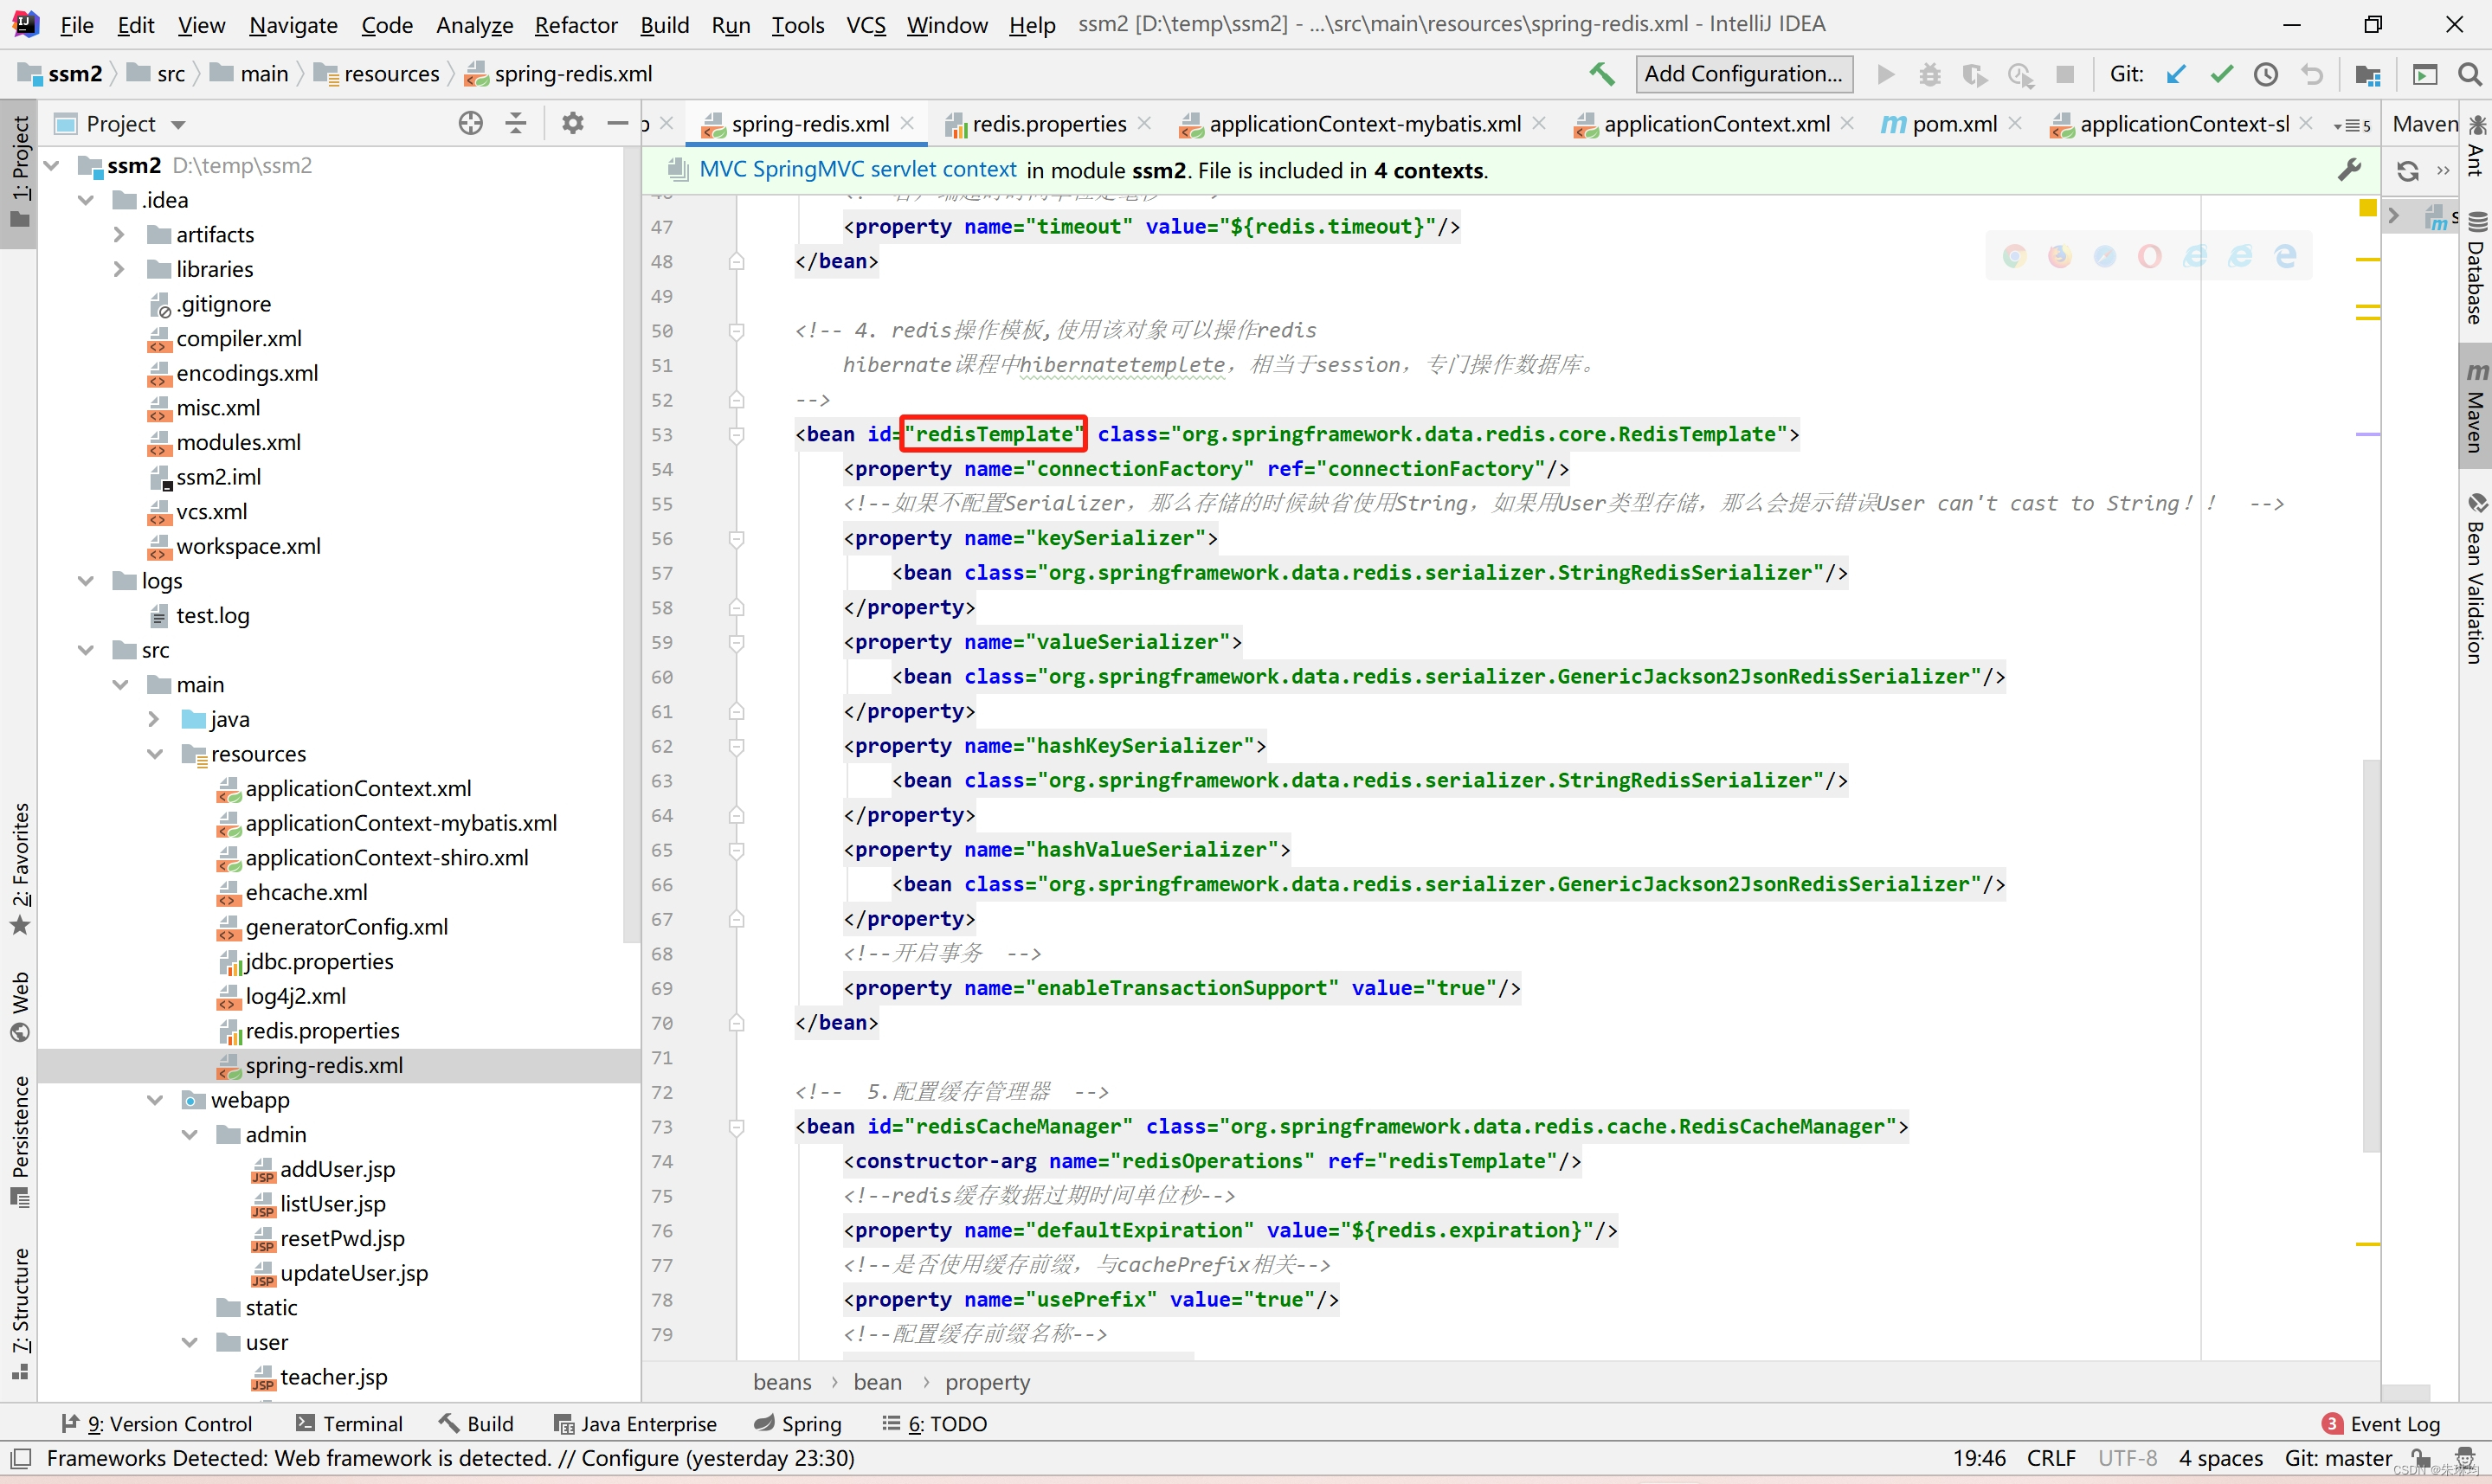
redis整合
pom配置;
Spring-redis.xml
注册了一个redis.properties.xml;
配置注册源;
连接工厂;
配置序列化器;
配置redis的key生成策略;
StringContext.xml中添加spring-redis.xml;
<?xml version="1.0" encoding="UTF-8"?>
<beans xmlns="http://www.springframework.org/schema/beans"
       xmlns:xsi="http://www.w3.org/2001/XMLSchema-instance"
       xmlns:context="http://www.springframework.org/schema/context"
       xmlns:cache="http://www.springframework.org/schema/cache"
       xsi:schemaLocation="http://www.springframework.org/schema/beans
       http://www.springframework.org/schema/beans/spring-beans.xsd
       http://www.springframework.org/schema/context
       http://www.springframework.org/schema/context/spring-context.xsd
       http://www.springframework.org/schema/cache
       http://www.springframework.org/schema/cache/spring-cache.xsd">

    <!-- 1. 引入properties配置文件 -->
    <!--<context:property-placeholder location="classpath:redis.properties" />-->

    <!-- 2. redis连接池配置-->
    <bean id="poolConfig" class="redis.clients.jedis.JedisPoolConfig">
        <!--最大空闲数-->
        <property name="maxIdle" value="${redis.maxIdle}"/>
        <!--连接池的最大数据库连接数  -->
        <property name="maxTotal" value="${redis.maxTotal}"/>
        <!--最大建立连接等待时间-->
        <property name="maxWaitMillis" value="${redis.maxWaitMillis}"/>
        <!--逐出连接的最小空闲时间 默认1800000毫秒(30分钟)-->
        <property name="minEvictableIdleTimeMillis" value="${redis.minEvictableIdleTimeMillis}"/>
        <!--每次逐出检查时 逐出的最大数目 如果为负数就是 : 1/abs(n), 默认3-->
        <property name="numTestsPerEvictionRun" value="${redis.numTestsPerEvictionRun}"/>
        <!--逐出扫描的时间间隔(毫秒) 如果为负数,则不运行逐出线程, 默认-1-->
        <property name="timeBetweenEvictionRunsMillis" value="${redis.timeBetweenEvictionRunsMillis}"/>
        <!--是否在从池中取出连接前进行检验,如果检验失败,则从池中去除连接并尝试取出另一个-->
        <property name="testOnBorrow" value="${redis.testOnBorrow}"/>
        <!--在空闲时检查有效性, 默认false  -->
        <property name="testWhileIdle" value="${redis.testWhileIdle}"/>
    </bean>

    <!-- 3. redis连接工厂 -->
    <bean id="connectionFactory" class="org.springframework.data.redis.connection.jedis.JedisConnectionFactory"
          destroy-method="destroy">
        <property name="poolConfig" ref="poolConfig"/>
        <!--IP地址 -->
        <property name="hostName" value="${redis.hostName}"/>
        <!--端口号  -->
        <property name="port" value="${redis.port}"/>
        <!--如果Redis设置有密码  -->
        <property name="password" value="${redis.password}"/>
        <!--客户端超时时间单位是毫秒  -->
        <property name="timeout" value="${redis.timeout}"/>
    </bean>

    <!-- 4. redis操作模板,使用该对象可以操作redis
        hibernate课程中hibernatetemplete,相当于session,专门操作数据库。
    -->
    <bean id="redisTemplate" class="org.springframework.data.redis.core.RedisTemplate">
        <property name="connectionFactory" ref="connectionFactory"/>
        <!--如果不配置Serializer,那么存储的时候缺省使用String,如果用User类型存储,那么会提示错误User can't cast to String!!  -->
        <property name="keySerializer">
            <bean class="org.springframework.data.redis.serializer.StringRedisSerializer"/>
        </property>
        <property name="valueSerializer">
            <bean class="org.springframework.data.redis.serializer.GenericJackson2JsonRedisSerializer"/>
        </property>
        <property name="hashKeySerializer">
            <bean class="org.springframework.data.redis.serializer.StringRedisSerializer"/>
        </property>
        <property name="hashValueSerializer">
            <bean class="org.springframework.data.redis.serializer.GenericJackson2JsonRedisSerializer"/>
        </property>
        <!--开启事务  -->
        <property name="enableTransactionSupport" value="true"/>
    </bean>

    <!--  5.配置缓存管理器  -->
    <bean id="redisCacheManager" class="org.springframework.data.redis.cache.RedisCacheManager">
        <constructor-arg name="redisOperations" ref="redisTemplate"/>
        <!--redis缓存数据过期时间单位秒-->
        <property name="defaultExpiration" value="${redis.expiration}"/>
        <!--是否使用缓存前缀,与cachePrefix相关-->
        <property name="usePrefix" value="true"/>
        <!--配置缓存前缀名称-->
        <property name="cachePrefix">
            <bean class="org.springframework.data.redis.cache.DefaultRedisCachePrefix">
                <constructor-arg index="0" value="-cache-"/>
            </bean>
        </property>
    </bean>

    <!--6.配置缓存生成键名的生成规则-->
    <bean id="cacheKeyGenerator" class="com.zlj.ssm.redis.CacheKeyGenerator"></bean>

    <!--7.启用缓存注解功能-->
    <cache:annotation-driven cache-manager="redisCacheManager" key-generator="cacheKeyGenerator"/>
</beans>
注解1:当spring-content.xml中需要注解多个.propertise结尾的配置文件,那么不能在spring-*.xml添加注册(在applicationContext-mybatis.xml里添加)
<?xml version="1.0" encoding="UTF-8"?>
<beans xmlns="http://www.springframework.org/schema/beans"
       xmlns:xsi="http://www.w3.org/2001/XMLSchema-instance"
       xmlns:context="http://www.springframework.org/schema/context" xmlns:tx="http://www.springframework.org/schema/tx"
       xmlns:aop="http://www.springframework.org/schema/aop"
       xsi:schemaLocation="http://www.springframework.org/schema/beans http://www.springframework.org/schema/beans/spring-beans.xsd http://www.springframework.org/schema/context http://www.springframework.org/schema/context/spring-context.xsd http://www.springframework.org/schema/tx http://www.springframework.org/schema/tx/spring-tx.xsd http://www.springframework.org/schema/aop http://www.springframework.org/schema/aop/spring-aop.xsd">
    <!--1. 引入外部多文件方式 -->
    <bean id="propertyConfigurer"
          class="org.springframework.beans.factory.config.PropertyPlaceholderConfigurer">
        <property name="systemPropertiesModeName" value="SYSTEM_PROPERTIES_MODE_OVERRIDE" />
        <property name="ignoreResourceNotFound" value="true" />
        <property name="locations">
            <list>
                <value>classpath:jdbc.properties</value>
                <value>classpath:redis.properties</value>
            </list>
        </property>
    </bean>

<!--  随着后续学习,框架会越学越多,不能将所有的框架配置,放到同一个配制间,否者不便于管理  -->
    <import resource="applicationContext-mybatis.xml"></import>
    <import resource="spring-redis.xml"></import>
    <import resource="applicationContext-shiro.xml"></import>
</beans>
注解2:resources的配置必须要涵盖读取.propertis结尾的文件
<?xml version="1.0" encoding="UTF-8"?>
<beans xmlns="http://www.springframework.org/schema/beans"
       xmlns:xsi="http://www.w3.org/2001/XMLSchema-instance"
       xmlns:context="http://www.springframework.org/schema/context" xmlns:tx="http://www.springframework.org/schema/tx"
       xmlns:aop="http://www.springframework.org/schema/aop"
       xsi:schemaLocation="http://www.springframework.org/schema/beans http://www.springframework.org/schema/beans/spring-beans.xsd http://www.springframework.org/schema/context http://www.springframework.org/schema/context/spring-context.xsd http://www.springframework.org/schema/tx http://www.springframework.org/schema/tx/spring-tx.xsd http://www.springframework.org/schema/aop http://www.springframework.org/schema/aop/spring-aop.xsd">
    <!--1. 引入外部多文件方式 -->
    <bean id="propertyConfigurer"
          class="org.springframework.beans.factory.config.PropertyPlaceholderConfigurer">
        <property name="systemPropertiesModeName" value="SYSTEM_PROPERTIES_MODE_OVERRIDE" />
        <property name="ignoreResourceNotFound" value="true" />
        <property name="locations">
            <list>
                <value>classpath:jdbc.properties</value>
                <value>classpath:redis.properties</value>
            </list>
        </property>
    </bean>

<!--  随着后续学习,框架会越学越多,不能将所有的框架配置,放到同一个配制间,否者不便于管理  -->
    <import resource="applicationContext-mybatis.xml"></import>
    <import resource="spring-redis.xml"></import>
    <import resource="applicationContext-shiro.xml"></import>
</beans>
注解3:redistemplate的使用,可以参照jdbcTemplate,amqptemplate,rabbitMQtemplate...
2.redis的注解式开发及应用场景
package com.zlj.ssm.biz;

import com.zlj.ssm.model.Clazz;
import com.zlj.ssm.util.PageBean;
import org.springframework.cache.annotation.CacheEvict;
import org.springframework.cache.annotation.CachePut;

import java.util.List;
import java.util.Map;

public interface ClazzBiz {
    @CacheEvict(value = "xx",key = "'cid:'+#cid",allEntries = true)
    int deleteByPrimaryKey(Integer cid);

    int insert(Clazz record);

    int insertSelective(Clazz record);

//    xx=cache-cid:1
//    key的作用改变原有的key生成规则
//    @Cacheable(value = "xx",key = "'cid:'+#cid",condition = "#cid > 6")
    @CachePut(value = "xx",key = "'cid:'+#cid",condition = "#cid > 6")
    Clazz selectByPrimaryKey(Integer cid);

    int updateByPrimaryKeySelective(Clazz record);

    int updateByPrimaryKey(Clazz record);

    List<Clazz> listPager(Clazz clazz, PageBean pageBean);
    List<Map> listMapPager(Clazz clazz, PageBean pageBean);
}
cacheable会在redis中存储数据,同时也会读取数据
cacheput只会在redis中写数据,不会读数据
cacgeEict强行清除缓存(问题:redis与mybatis的性能同步问题)
cacgeEict(value = "xx",key = "'cid:'+#cid",allEntries = true);
3.redis的击穿穿透雪崩
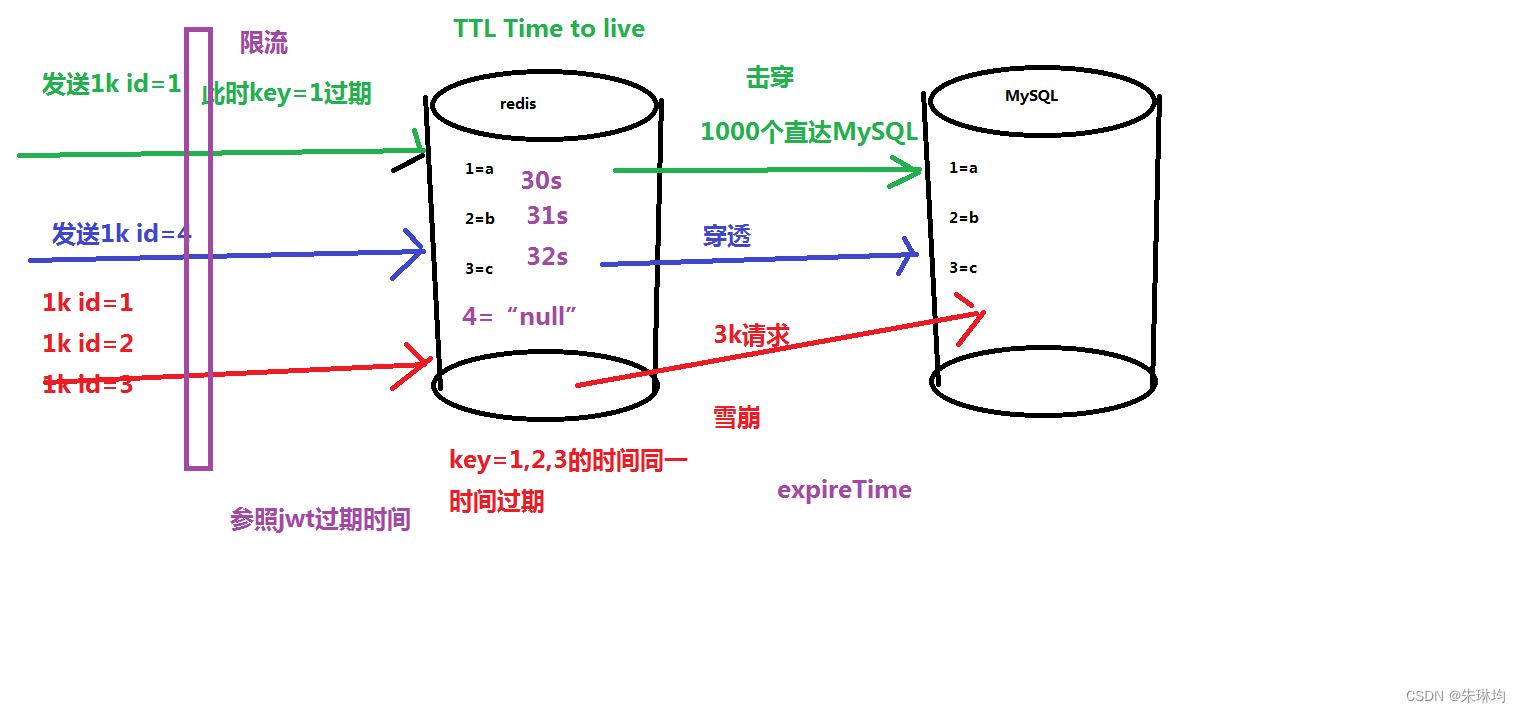
缓存击穿:
redis中一个热点key刚好过期(大量用户访问该热点key,但是热点key刚好过期)
缓存击穿解决方案:
进行预先的热门词汇的设置,进行key时长的调整;
实时调整,监控哪些数据是热门数据,实时的调整key的过期时长;
使用锁机制(只有一个线程可以进行热点数据的重构);
缓存穿透:
大量请求根本不存在的key
缓存穿透解决方案:
对空值进行缓存;
设置白名单;
使用布隆过滤器;
网警;
缓存雪崩:
redis中大量key集体同一时间过期
缓存雪崩解决方案:
进行预先的热门词汇的设置,进行key时长的调整;
实时调整,监控哪些数据是热门数据,实时的调整key的过期时长;
使用锁机制;
