1. 等待与通知
为了支持多线程之间的协作,JDK 中提供了两个非常重要的方法:wait() 和 notify() ,这两个方法定义在 Object 类中,这意味着任何 Java 对象都可以调用者两个方法。如果一个线程调用了 object.wait() 方法,那么它就会进入该对象的等待队列中,这个队列中可能包含了多个线程,此时代表多个线程都在等待同一个对象;当 object.notify() 方法被调用时,它就会从这个等待队列中随机唤醒一个线程。
需要特别注意的是在调用这两个方法时,它们都必须位于对应对象的 synchronzied 语句中,因为这两个方法在调用前都需要获得对应对象的监视器(内部锁),过程如下:
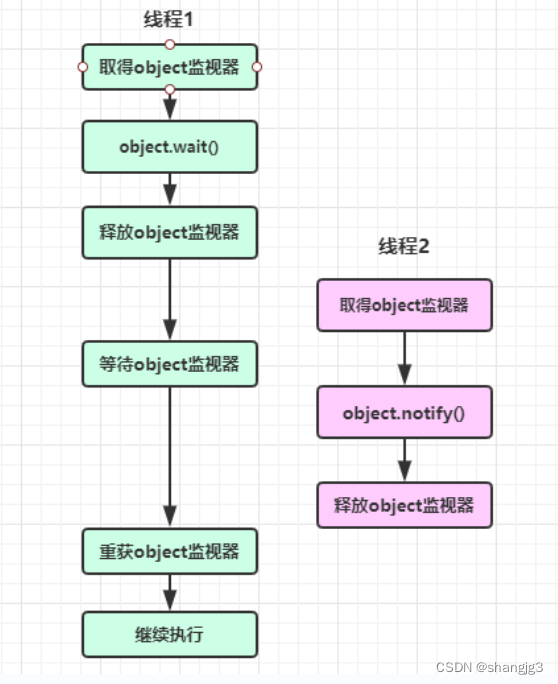
使用示例如下:
public class J3_WaitAndNotify {

    private static final Object object = new Object();

    public static void main(String[] args) {
        new Thread(() -> {
            synchronized (object) {
                try {
                    System.out.println("对象object等待");
                    object.wait();
                    System.out.println("线程1后续操作");
                } catch (InterruptedException e) {
                    e.printStackTrace();
                }
            }
        }).start();
        new Thread(() -> {
            synchronized (object) {
                System.out.println("线程2开始操作");
                System.out.println("对象object唤醒");
                object.notify();
            }
        }).start();
    }
}

// 输出
对象object等待
线程2开始操作
对象object唤醒
线程1后续操作
notify() 表示随机唤醒任意一个等待线程,如果想要唤醒所有等待线程,则可以使用 notifyAll() 方法:
public class J5_NotifyAll {

    private static final Object object = new Object();

    public static void main(String[] args) {
        new Thread(() -> {
            synchronized (object) {
                try {
                    System.out.println("对象object在线程1等待");
                    object.wait();
                    System.out.println("线程1后续操作");
                } catch (InterruptedException e) {
                    e.printStackTrace();
                }
            }
        }).start();
        new Thread(() -> {
            synchronized (object) {
                try {
                    System.out.println("对象object在线程2等待");
                    object.wait();
                    System.out.println("线程2后续操作");
                } catch (InterruptedException e) {
                    e.printStackTrace();
                }
            }
        }).start();
        new Thread(() -> {
            synchronized (object) {
                System.out.println("线程3开始操作");
                System.out.println("对象object唤醒");
                object.notifyAll();
            }
        }).start();
    }
}

// 输出
对象object在线程1等待
对象object在线程2等待
线程3开始操作
对象object唤醒
线程2后续操作
线程1后续操作
在上面的示例中,由于有两个线程处于等待状态,所以 notifyAll() 的效果等价于调用 notify() 两次:
object.notify();
object.notify();
2. 条件变量
综上所述可以使用 wait() 和 notify() 配合内部锁 synchronized 可以实现线程间的等待与唤醒,如果你使用的是显示锁而不是内部锁,此时可以使用 Condition 来实现同样的效果。Condition 接口中定义了如下方法:
await():使得当前线程进入等待状态,类似于 object.wait();
awaitUninterruptibly():与 await() 类似,但它不会在等待过程中响应中断;
awaitNanos(long nanosTimeout) & await(long time, TimeUnit unit) & awaitUntil(Date deadline):有时间限制的等待;
signal():用于随机唤醒一个等待;
signalAll():用于唤醒所有等待。
和 object 的 wait()\notify()\notifyAll() 一样,在使用 condition 的 await()\signal()\signalAll() 前,也要求线程必须持有相关的重入锁, 示例如下:
public class AwaitAndSignal {

    private static ReentrantLock lock = new ReentrantLock();
    private static Condition condition = lock.newCondition();

    static class IncreaseTask implements Runnable {
        @Override
        public void run() {
            try {
                lock.lock();
                String threadName = Thread.currentThread().getName();
                System.out.println(threadName + "线程等待通知...");
                condition.await();
                System.out.println(threadName + "线程后续操作");
            } catch (InterruptedException e) {
                e.printStackTrace();
            } finally {
                lock.unlock();
            }
        }
    }

    public static void main(String[] args) throws InterruptedException {
        Thread thread1 = new Thread(new IncreaseTask());
        thread1.start();
        Thread.sleep(1000);
        System.out.println("主线程开始操作");
        lock.lock();
        System.out.println("主线程唤醒");
        condition.signal();
        lock.unlock();
    }
}

// 输出:
Thread-0线程等待通知...
主线程开始操作
主线程唤醒
Thread-0线程后续操作
3. Join
Thread.join() 可以让当前线程等待目标线程结束后再开始运行,示例如下:
public class J1_Normal {
    private static int j = 0;
    public static void main(String[] args)  {
        Thread thread = new Thread(() -> {
            for (int i = 0; i < 100000; i++) {
                j++;
            }
        });
        thread.start();
        System.out.println(j);
    }
}
// 此时主线程不等待子线程运行完成,通常输出结果为:0

public class J2_Join {
    private static int j = 0;
    public static void main(String[] args) throws InterruptedException {
        Thread thread = new Thread(() -> {
            for (int i = 0; i < 100000; i++) {
                j++;
            }
        });
        thread.start();
        thread.join();
        System.out.println(j);
    }
}
// 此时主线程需要等待子线程运行完成,输出结果为:100000
4. CountDownLatch
Thread.join() 可以让当前线程等待目标线程结束后再开始运行,但大多数时候,你只需要等待目标线程完成特定的操作,而不必等待其完全终止。此时可以使用条件变量 Condition 来实现,也可以使用更为简单的工具类 CountDownLatch 。CountDownLatch 会在内部维护一个计数器,每次完成一个任务,则计数器减 1,当计数器为 0 时,则唤醒所有的等待线程,示例如下:
public class j1_Normal {
    private static AtomicInteger integer = new AtomicInteger(0);
    static class IncreaseTask implements Runnable {
        @Override
        public void run() {
            try {
                // 假设这是一个耗时的任务
                Thread.sleep(3000);
                integer.incrementAndGet();
            } catch (InterruptedException e) {
                e.printStackTrace();
            }
        }
    }

    public static void main(String[] args) {
        IncreaseTask task = new IncreaseTask();
        ExecutorService executorService = Executors.newFixedThreadPool(100);
        for (int i = 0; i < 100; i++) {
            executorService.submit(task);
        }
        System.out.println("integer:" + integer);
        executorService.shutdown();
    }
}

// 不使用CountDownLatch 时,主线程不会子线程等待计算完成,此时输出通常为: 0


public class J2_CountDown {
    private static int number = 100;
    // 指定计数器的初始值
    private static CountDownLatch latch = new CountDownLatch(number);
    private static AtomicInteger integer = new AtomicInteger(0);
    static class IncreaseTask implements Runnable {
        @Override
        public void run() {
            try {
                // 假设这是一个耗时的任务
                Thread.sleep(3000);
                integer.incrementAndGet();
                // 计数器减1
                latch.countDown();
            } catch (InterruptedException e) {
                e.printStackTrace();
            }
        }
    }

    public static void main(String[] args) throws InterruptedException {
        IncreaseTask task = new IncreaseTask();
        ExecutorService executorService = Executors.newFixedThreadPool(100);
        for (int i = 0; i < number; i++) {
            executorService.submit(task);
        }
        // 等待计数器为0时唤醒所有等待的线程
        latch.await();
        System.out.println("integer:" + integer);
        executorService.shutdown();
    }
}

// 使用CountDownLatch 时,主线程需要等待所有的子线程计算完成后再输出,计算结果为:100
5. CyclicBarrier
CyclicBarrier 和 CountDownLatch 类似,都是用于等待一个或者多个线程完成特定的任务后再执行某项操作,但不同的是它可以循环使用,示例如下:
/**
 * 每五个人完成任务后,则算一个小组已完成
 */
public class J1_CyclicBarrier {

    private static CyclicBarrier cyclicBarrier = new CyclicBarrier(5, () -> System.out.println("五人小组任务执行完成"));

    static class Task implements Runnable {
        @Override
        public void run() {
            try {
                long l = new Double(Math.random() * 5000).longValue();
                Thread.sleep(l);
                System.out.println("任务" + Thread.currentThread().getId() + "执行完成");
                cyclicBarrier.await();
            } catch (InterruptedException | BrokenBarrierException e) {
                e.printStackTrace();
            }
        }
    }

    public static void main(String[] args) {
        ExecutorService executorService = Executors.newFixedThreadPool(20);
        for (int j = 0; j < 10; j++) {
            executorService.submit(new Task());
        }
        executorService.shutdown();
    }
}

// 输出如下:
任务21执行完成
任务20执行完成
任务15执行完成
任务14执行完成
任务22执行完成
五人小组任务执行完成
任务17执行完成
任务13执行完成
任务19执行完成
任务18执行完成
任务16执行完成
五人小组任务执行完成
基于 CyclicBarrier 的特性,通常可以用于在测试环境来模仿高并发,如每次等待一万个线程启动后再让其并发执行某项压力测试。
6. Semaphore
信号量(Semaphore)可以看做是锁的扩展,由于锁的排它性,所以一次只允许一个线程来访问某个特定的资源, 而 Semaphore 则允许多个线程并发的访问某个特定的资源,并且可以通过配置许可证的数量来限制并发访问的线程数,因此其可以用于流量控制等场景中:
public class J1_Semaphore {

    // 限制并发访问的线程的数量为5
    private static Semaphore semaphore = new Semaphore(5);

    static class IncreaseTask implements Runnable {
        @Override
        public void run() {
            try {
                semaphore.acquire();
                System.out.println(Thread.currentThread().getId() + "获得锁!");
                Thread.sleep(5000);
                semaphore.release();
            } catch (InterruptedException e) {
                e.printStackTrace();
            }
        }
    }

    public static void main(String[] args) {
        IncreaseTask task = new IncreaseTask();
        for (int i = 0; i < 20; i++) {
            new Thread(task).start();
        }
    }
}

// 输出如下,至多只能有五个线程并发获得锁
13获得锁!
15获得锁!
16获得锁!
18获得锁!
17获得锁!
....
19获得锁!
20获得锁!
21获得锁!
22获得锁!
23获得锁!
....
7. LockSupport
LockSupport 可以在线程内的任意位置实现阻塞。它采用和 Semaphore 类似的信号量机制:它为每个线程准备一个许可,如果许可可用,则 park() 方法会立即返回,并且消费掉这个许可,让许可不可用;此时因为许可不可用,相应的线程就会被阻塞。而 unpark() 则会使得一个许可从不可用变为可用。但和 Semaphore 不同的是:它的许可不能累加,你不可能拥有超过一个许可,它永远只有一个:
public class J1_LockSupport {

    static class Task implements Runnable {
        @Override
        public void run() {
            long id = Thread.currentThread().getId();
            System.out.println("线程" + id + "开始阻塞");
            LockSupport.park();
            System.out.println("线程" + id + "解除阻塞");
        }
    }

    public static void main(String[] args) throws InterruptedException {
        Thread thread01 = new Thread(new Task());
        Thread thread02 = new Thread(new Task());
        thread01.start();
        thread02.start();
        Thread.sleep(3000);
        System.out.println("主线程干预");
        LockSupport.unpark(thread01);
        LockSupport.unpark(thread02);
    }
}

// 输出:
线程13开始阻塞
线程14开始阻塞
主线程干预
线程13解除阻塞
线程14解除阻塞
