题目描述
这是 LeetCode 上的 「117. 填充每个节点的下一个右侧节点指针 II」 ,难度为 「中等」。
Tag : 「BFS」、「链表」
给定一个二叉树:
struct Node {
  int val;
  Node *left;
  Node *right;
  Node *next;
}
填充它的每个 next 指针,让这个指针指向其下一个右侧节点。如果找不到下一个右侧节点,则将 next 指针设置为 NULL。
初始状态下,所有 next 指针都被设置为 NULL。
示例 1: 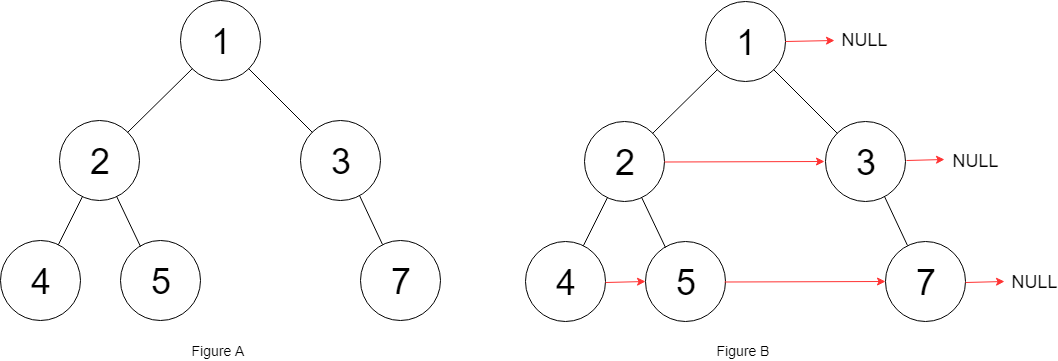
输入:root = [1,2,3,4,5,null,7]

输出:[1,#,2,3,#,4,5,7,#]

解释:给定二叉树如图 A 所示,你的函数应该填充它的每个 next 指针,以指向其下一个右侧节点,如图 B 所示。序列化输出按层序遍历顺序(由 next 指针连接),'#' 表示每层的末尾。
示例 2:
输入:root = []

输出:[]
提示:
-
树中的节点数在范围 内 -
进阶:
-
你只能使用常量级额外空间。 -
使用递归解题也符合要求,本题中递归程序的隐式栈空间不计入额外空间复杂度。
BFS - 层序遍历
一个最直观的做法,是利用 BFS 对树进行「层序遍历」。
每个 BFS 回合中,对整层节点进行处理。
首先通过 pop 拿到当前节点,同时通过 peek 拿到当前层的下一节点,并建立 next 关系,注意需要跳过每层的最后一个节点。
Java 代码:
class Solution {
    public Node connect(Node root) {
        Node ans = root;
        if (root == null) return ans;
        Deque<Node> d = new ArrayDeque<>();
        d.addLast(root);
        while (!d.isEmpty()) {
            int sz = d.size();
            while (sz-- > 0) {
                Node a = d.pollFirst();
                if (sz != 0) a.next = d.peekFirst();
                if (a.left != null) d.addLast(a.left);
                if (a.right != null) d.addLast(a.right);
            }
        }
        return ans;
    }
}
C++ 代码:
class Solution {
public:
    Node* connect(Node* root) {
        Node* ans = root;
        if (root == nullptr) return ans;
        deque<Node*> d;
        d.push_back(root);
        while (!d.empty()) {
            int sz = d.size();
            while (sz-- > 0) {
                Node* a = d.front();
                d.pop_front();
                if (sz != 0) a->next = d.front();
                if (a->left) d.push_back(a->left);
                if (a->right) d.push_back(a->right);
            }
        }
        return ans;
    }
};
Python 代码:
class Solution:
    def connect(self, root: 'Node') -> 'Node':
        ans = root
        if root is None:
            return ans
        d = [root]
        while d:
            sz = len(d)
            for i in range(sz):
                a = d.pop(0)
                if i != sz - 1:
                    a.next = d[0]
                if a.left:
                    d.append(a.left)
                if a.right:
                    d.append(a.right)
        return ans
TypeScript 代码:
function connect(root: Node | null): Node | null {
    let ans = root;
    if (root == null) return ans;
    const d = [root];
    while (d.length > 0) {
        let sz = d.length;
        while (sz-- > 0) {
            const a = d.shift() as Node;
            if (sz != 0) a.next = d[0];
            if (a.left) d.push(a.left);
            if (a.right) d.push(a.right);
        }
    }
    return ans;
};
-
时间复杂度: -
空间复杂度:
BFS - 逐层构建
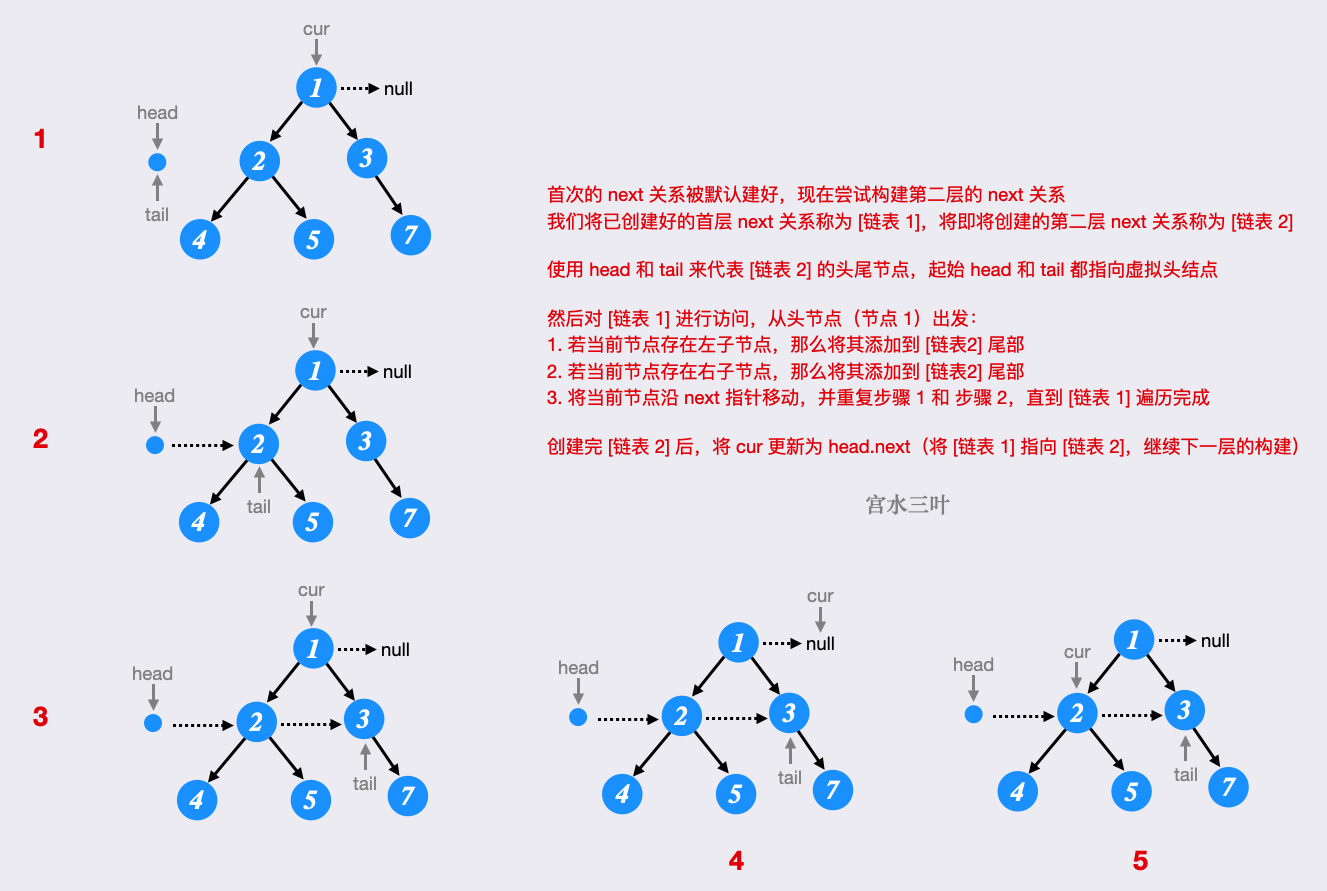
上述解法中,每一层节点的 next 关系的构建都是独立的。我们构建第
层的 next 关系时,并没有利用已建好的到第
层的 next 关系。
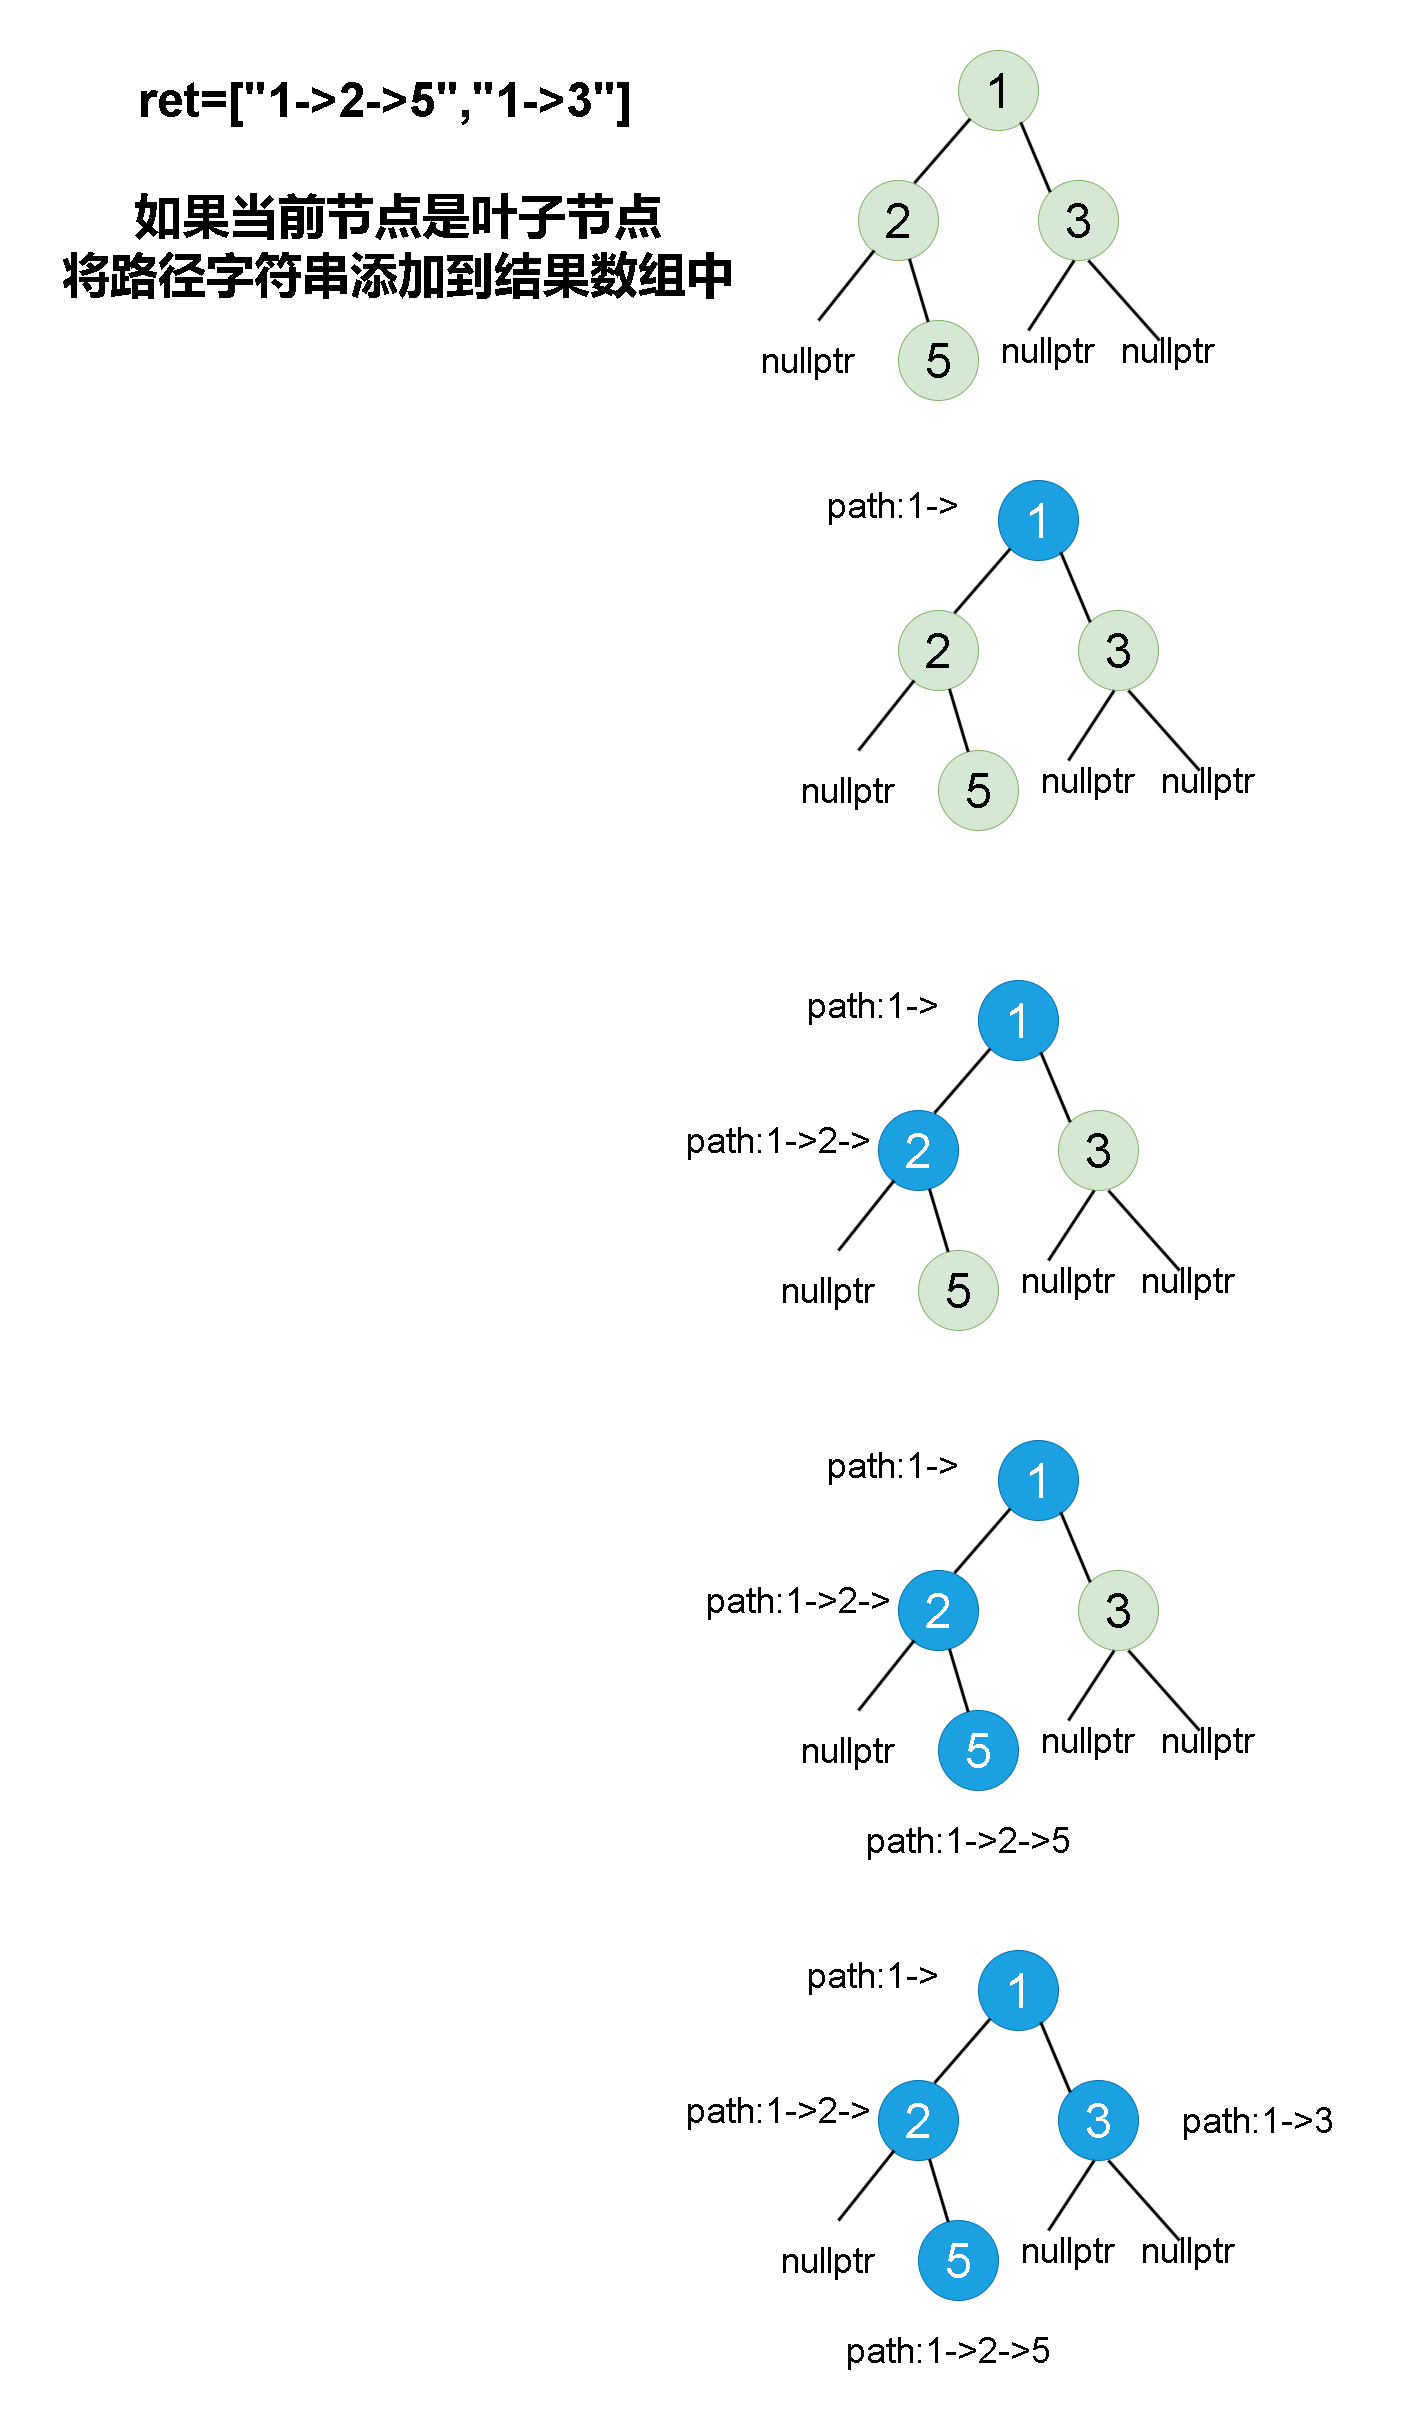
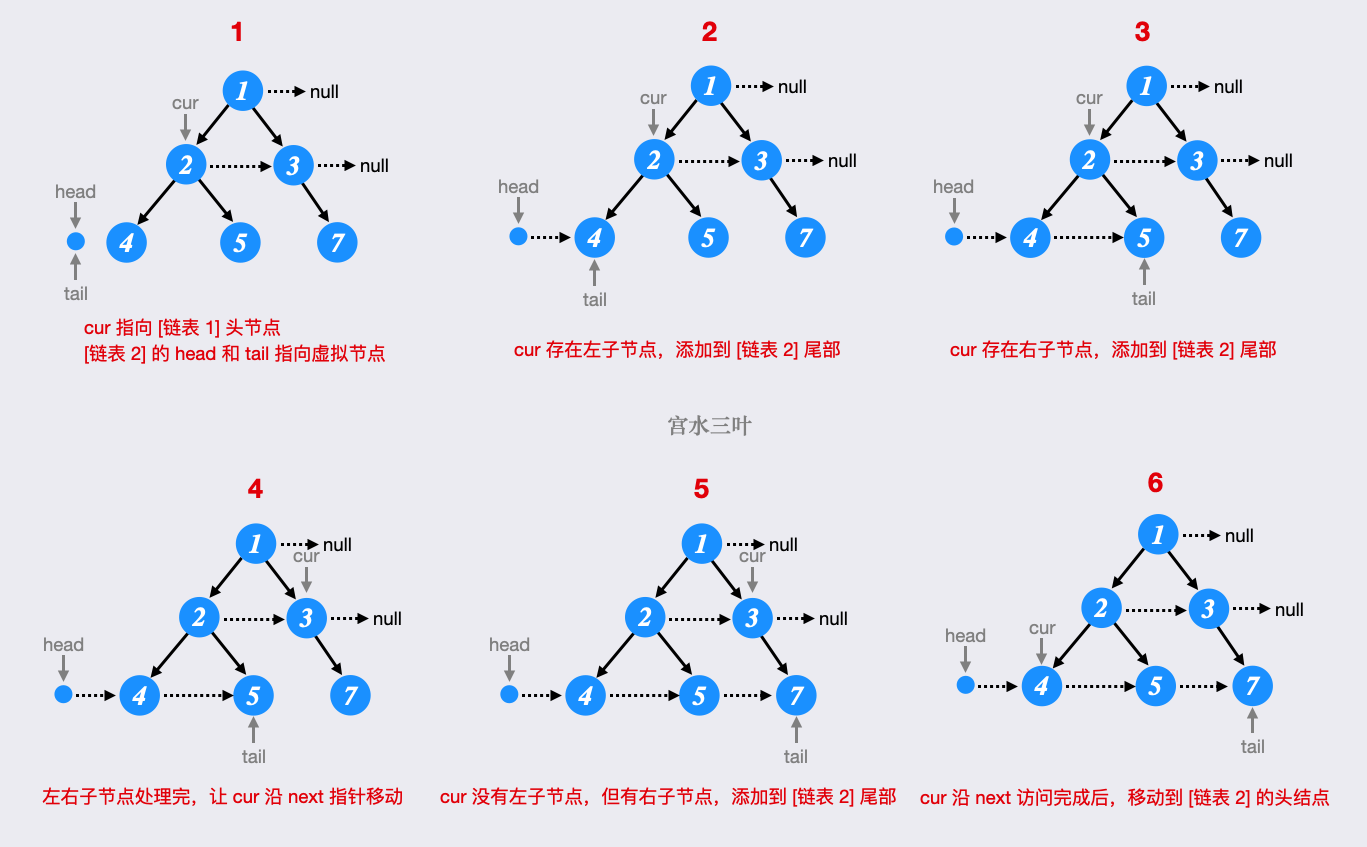
实际上,每一层构建好的 next 关系都可看做「链表」,可参与到下一层 next 关系的构建,同时由于所有节点的起始 next 指向都是 null,相当于首层的 next 关系已经默认建好了。
我们使用图解方式,来感受逐层构建过程:

Java 代码:
class Solution {
    public Node connect(Node root) {
        Node ans = root;
        if (root == null) return ans;
        Node cur = root;
        while (cur != null) {
            Node head = new Node(-1), tail = head;
            for (Node i = cur; i != null; i = i.next) {
                if (i.left != null) tail = tail.next = i.left;
                if (i.right != null) tail = tail.next = i.right;
            }
            cur = head.next;
        }
        return ans;
    }
}
C++ 代码:
class Solution {
public:
    Node* connect(Node* root) {
        auto ans = root;
        if (root == nullptr) return ans;
        auto cur = root;
        while (cur) {
            auto head = new Node(-1), tail = head;
            for (auto i = cur; i != nullptr; i = i->next) {
                if (i->left) tail = tail->next = i->left;
                if (i->right) tail = tail->next = i->right;
            }
            cur = head->next;
        }
        return ans;
    }
};
Python 代码:
class Solution:
    def connect(self, root: 'Node') -> 'Node':
        ans = root
        if not root:
            return ans
        cur = root
        while cur:
            head = Node(-1)
            tail = head
            i = cur
            while i:
                if i.left:
                    tail.next = i.left
                    tail = tail.next
                if i.right:
                    tail.next = i.right
                    tail = tail.next
                i = i.next
            cur = head.next
        return ans
TypeScript 代码:
function connect(root: Node | null): Node | null {
    let ans = root;
    if (root == null) return ans;
    let cur = root;
    while (cur != null) {
        let head = new Node(-1), tail = head;
        for (let i = cur; i != null; i = i.next) {
            if (i.left) tail = tail.next = i.left;
            if (i.right) tail = tail.next = i.right;
        }
        cur = head.next;
    }
    return ans;
};
-
时间复杂度: -
空间复杂度:
最后
这是我们「刷穿 LeetCode」系列文章的第 No.117 篇,系列开始于 2021/01/01,截止于起始日 LeetCode 上共有 1916 道题目,部分是有锁题,我们将先把所有不带锁的题目刷完。
在这个系列文章里面,除了讲解解题思路以外,还会尽可能给出最为简洁的代码。如果涉及通解还会相应的代码模板。
为了方便各位同学能够电脑上进行调试和提交代码,我建立了相关的仓库:https://github.com/SharingSource/LogicStack-LeetCode 。
在仓库地址里,你可以看到系列文章的题解链接、系列文章的相应代码、LeetCode 原题链接和其他优选题解。
更多更全更热门的「笔试/面试」相关资料可访问排版精美的 合集新基地 🎉🎉
本文由 mdnice 多平台发布
