模型实战(1)之YOLOv5 实现目标检测+训练自己的数据集
写一个小总结吧,关于yolov5使用可以参考我的两外两篇博文:
1.YOLOV5算法一之Windows10下yolov5安装测试并训练自己的数据集
2.YOLOV5算法二之数据集转换及自动划分训练集与测试集
3.YOLOV5算法三之各结构文件的功能作用及介绍
4.深度网络模型训练评价指标之yolov5训练结果分析
本文将实现从头训练yolov5并基于python进行封装,以便用于实际应用,可以直接复用的训练模型直接点此下载:https://gitcode.net/openmodel/yolov5,关于具体细节将在文章中做出说明 。
1.本地环境部署
- 克隆代码到本地
git clone https://gitcode.net/openmodel/yolov5.git  # clone
cd yolov5

#创建环境
conda create -n yolov5-seg python=3.8
#激活
conda activate yolov5-seg

# 安装 torch 1.8.2+cu11.1
pip install torch==1.8.2 torchvision==0.9.2 torchaudio===0.8.2 --extra-index-url https://download.pytorch.org/whl/lts/1.8/cu111

#其他版本:torch+cuda10.2
pip install torch==1.8.1+cu102 torchvision==0.9.1+cu102 torchaudio===0.8.1 -f https://download.pytorch.org/whl/torch_stable.html

# 修改requirements.txt,将其中的torch和torchvision注释掉
pip install -r requirements.txt
- 通过labelImg对数据集进行标注,标签格式
.xml,然后再mytrain路径下将label通过xml2txt.py转为yolo需要的.txt格式:

- 若要进行数据集划分:可通过下边demo设置测试集和验证集的占比实现
"""
time:20220729
writer:yohn
function:将数据集分为训练集、测试集和验证集,在此就将测试与验证归为一个了
"""

import os
import shutil

train_p=".\\train"
val_p=".\\val"
imgs_p="images"
labels_p="labels"

#创建训练集
if not os.path.exists(train_p):#指定要创建的目录
    os.mkdir(train_p)
tp1=os.path.join(train_p,imgs_p)
tp2=os.path.join(train_p,labels_p)
print(tp1,tp2)
if not os.path.exists(tp1):#指定要创建的目录
    os.mkdir(tp1)
if not os.path.exists(tp2):  # 指定要创建的目录
    os.mkdir(tp2)

#创建测试集文件夹
if not os.path.exists(val_p):#指定要创建的目录
    os.mkdir(val_p)
vp1=os.path.join(val_p,imgs_p)
vp2=os.path.join(val_p,labels_p)
print(vp1,vp2)
if not os.path.exists(vp1):#指定要创建的目录
    os.mkdir(vp1)
if not os.path.exists(vp2):  # 指定要创建的目录
    os.mkdir(vp2)

#数据集路径
path1=".\\images"
path2=".\\labels"
#划分数据集,设置数据集数量占比
proportion_ = 0.95 #训练集占比


for root,dirs,files in os.walk(path1,topdown=True):
    #print(files) #此处是将所有文件名字一次性取出
    nums=0
    nums_T=int(len(files)*proportion_)
    print("开始数据集划分...")
    for file in files:
        name = file.split('.')[0]
        if(nums <= nums_T):
            jpg_1 = os.path.join(path1,file)
            jpg_2 = os.path.join(train_p,imgs_p,file)
            txt_1 = os.path.join(path2, name + '.txt')
            txt_2 = os.path.join(train_p, labels_p, name + '.txt')
            shutil.copyfile(jpg_1,jpg_2)
            shutil.copyfile(txt_1,txt_2)
            nums+=1
        else:
            jpg_1 = os.path.join(path1, file)
            jpg_2 = os.path.join(val_p, imgs_p, file)
            txt_1 = os.path.join(path2, name + '.txt')
            txt_2 = os.path.join(val_p, labels_p, name + '.txt')
            shutil.copyfile(jpg_1, jpg_2)
            shutil.copyfile(txt_1, txt_2)
            nums+=1
        print(nums)
    print("数据集划分完成: 总数量:",len(files)," 训练集数量:",nums_T," 测试集数量:",len(files)-nums_T)
- 然后将处理好的数据集和标签统一在下方路径下进行替换:

./data下更改路径:

./model下修改想要选择的模型配置
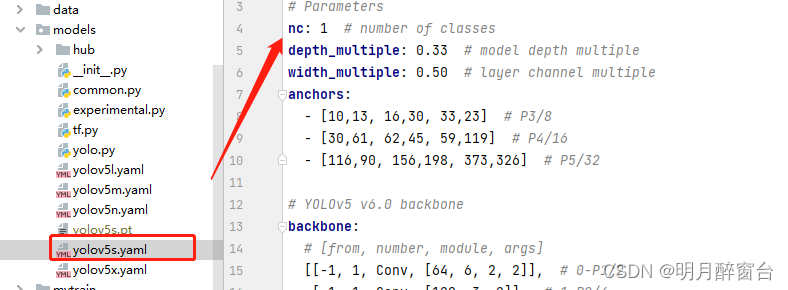
- 修改
train.py:

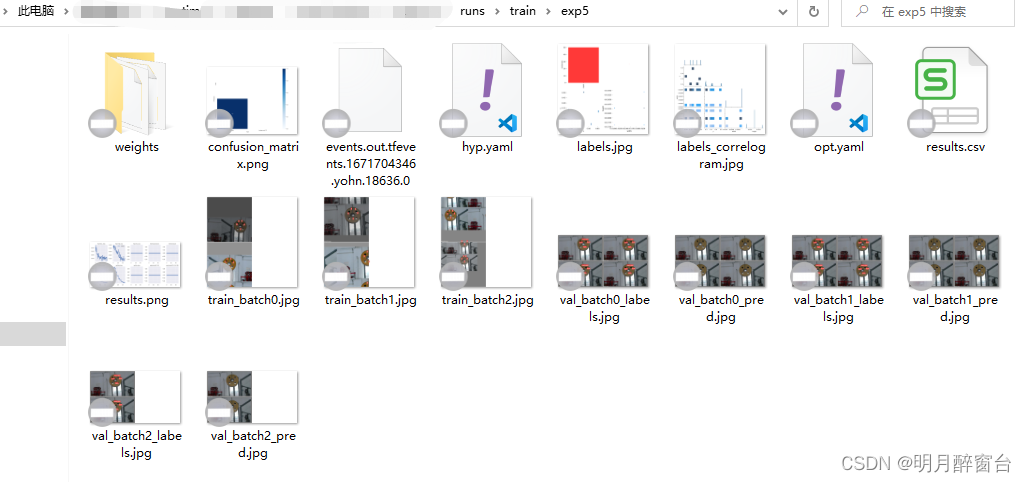
- 执行训练即可,训练后的结果将在
./runs中保存
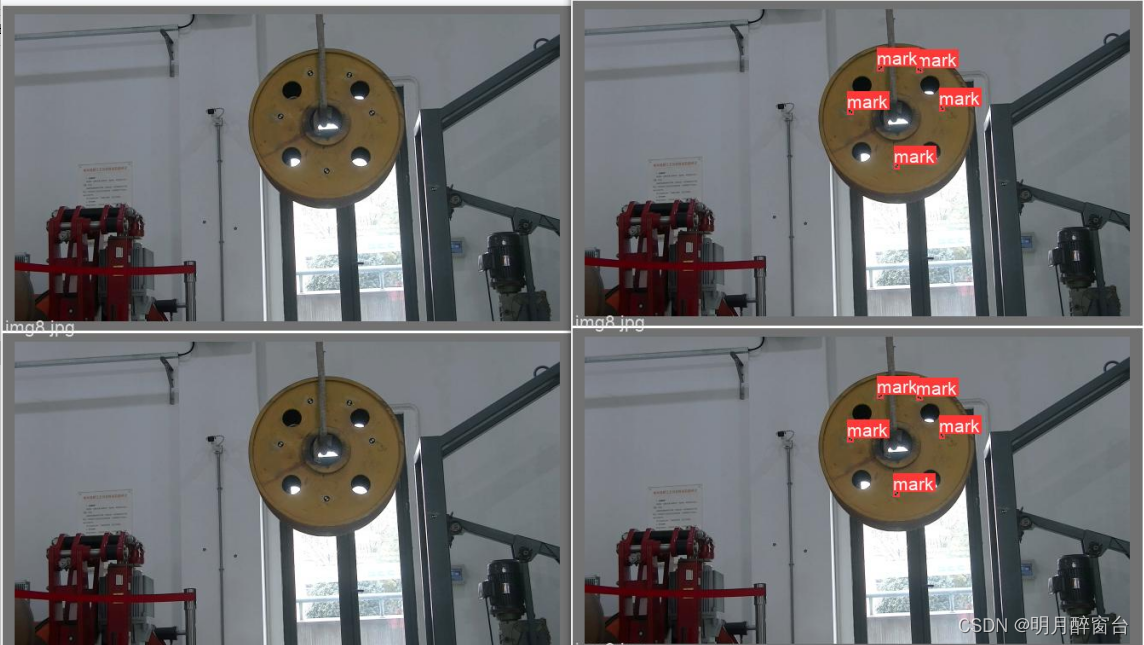
检测结果:
2.推理、部署
- 进行推理预测,即在
detect.py中修改训练好的权重路径即可,或者通过命令行导入参数

python detect.py --source 0  # webcam
                          img.jpg  # image
                          vid.mp4  # video
                          path/  # directory
                          path/*.jpg  # glob
                          'https://youtu.be/Zgi9g1ksQHc'  # YouTube
                          'rtsp://example.com/media.mp4'  # RTSP, RTMP, HTTP stream
pytorch.hub部署
import torch

# Model
model = torch.hub.load('ultralytics/yolov5', 'yolov5s')  # or yolov5n - yolov5x6, custom

# Images
img = 'https://ultralytics.com/images/zidane.jpg'  # or file, Path, PIL, OpenCV, numpy, list

# Inference
results = model(img)

# Results
results.print()  # or .show(), .save(), .crop(), .pandas(), etc.
- 导出onnx、tensorRT模型
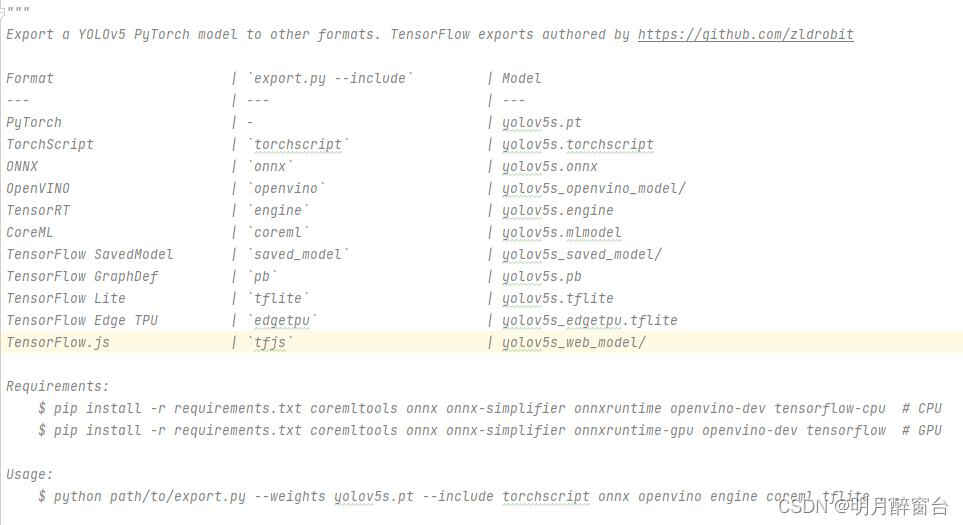
python export.py --weights yolov5s.pt --include torchscript onnx
💡 ProTip: Add --half to export models at FP16 half precision for smaller file sizes
output:
export: data=data/coco128.yaml, weights=['yolov5s.pt'], imgsz=[640, 640], batch_size=1, device=cpu, half=False, inplace=False, train=False, keras=False, optimize=False, int8=False, dynamic=False, simplify=False, opset=12, verbose=False, workspace=4, nms=False, agnostic_nms=False, topk_per_class=100, topk_all=100, iou_thres=0.45, conf_thres=0.25, include=['torchscript', 'onnx']
YOLOv5 🚀 v6.2-104-ge3e5122 Python-3.7.13 torch-1.12.1+cu113 CPU

Downloading https://github.com/ultralytics/yolov5/releases/download/v6.2/yolov5s.pt to yolov5s.pt...
100% 14.1M/14.1M [00:00<00:00, 274MB/s]

Fusing layers...
YOLOv5s summary: 213 layers, 7225885 parameters, 0 gradients

PyTorch: starting from yolov5s.pt with output shape (1, 25200, 85) (14.1 MB)

TorchScript: starting export with torch 1.12.1+cu113...
TorchScript: export success ✅ 1.7s, saved as yolov5s.torchscript (28.1 MB)

ONNX: starting export with onnx 1.12.0...
ONNX: export success ✅ 2.3s, saved as yolov5s.onnx (28.0 MB)

Export complete (5.5s)
Results saved to /content/yolov5
Detect:          python detect.py --weights yolov5s.onnx
Validate:        python val.py --weights yolov5s.onnx
PyTorch Hub:     model = torch.hub.load('ultralytics/yolov5', 'custom', 'yolov5s.onnx')
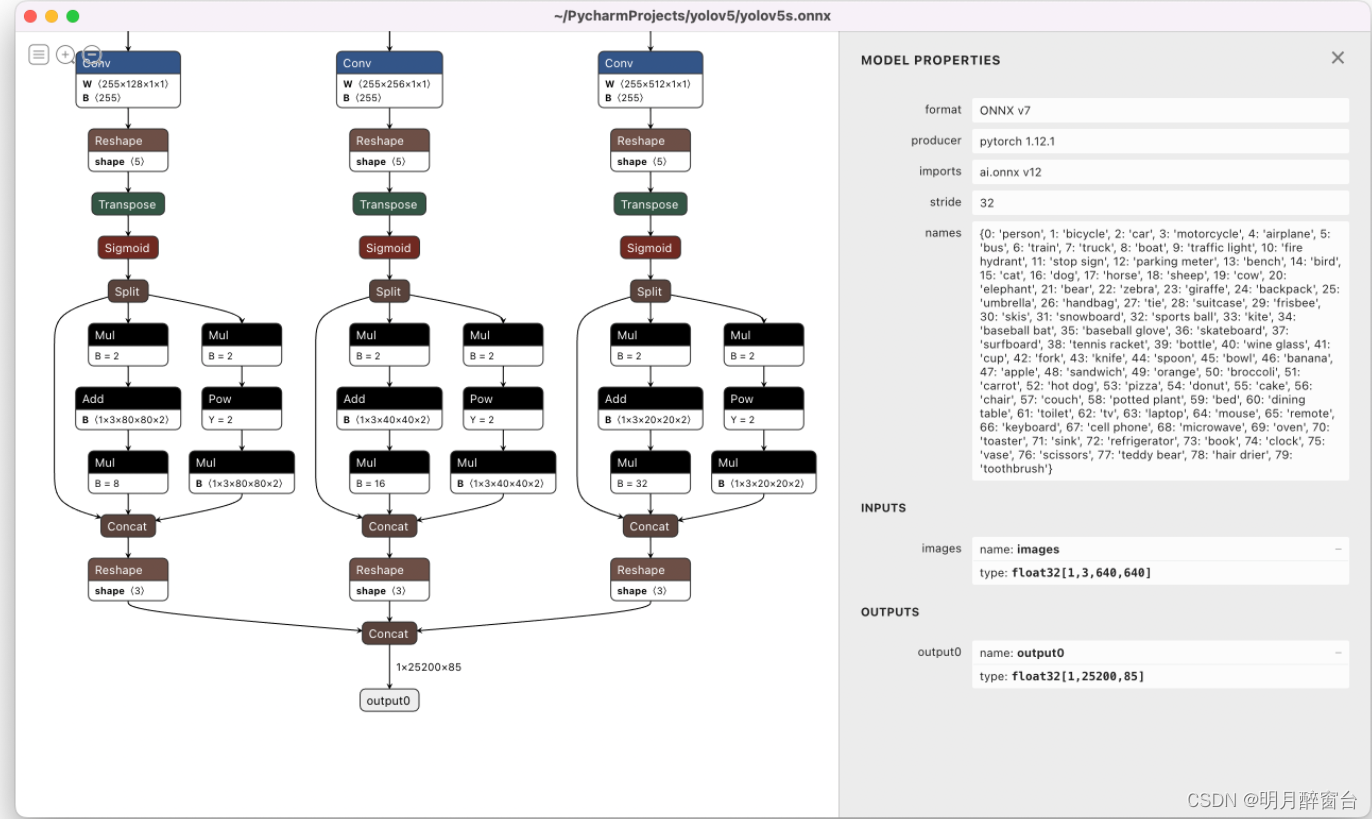
Visualize:       https://netron.app/
Netron Viewer is recommended for visualizing exported models:
3.检测接口封装
- 将检测接口进行封装,以便外侧过程调用
"""
time:20220618
writer:yohn
tel:15542286857
"""
import random

from utils.augmentations import letterbox

"""
该文件将yolov5封装成一个接口以便可以被测试过程调用
"""

# Copyright (c) 2022 guluC

# 导入需要的库
import os
import sys
from pathlib import Path
import numpy as np
import cv2
import torch

# 初始化目录
FILE = Path(__file__).resolve()
ROOT = FILE.parents[0]  # 定义YOLOv5的根目录
if str(ROOT) not in sys.path:
    sys.path.append(str(ROOT))  # 将YOLOv5的根目录添加到环境变量中(程序结束后删除)
ROOT = Path(os.path.relpath(ROOT, Path.cwd()))  # relative

from models.common import DetectMultiBackend
from utils.dataloaders import IMG_FORMATS, VID_FORMATS, LoadImages, LoadStreams
from utils.general import (LOGGER, check_file, check_img_size, check_imshow, check_requirements, colorstr, cv2,
                                  increment_path, non_max_suppression, print_args, scale_coords, strip_optimizer, xyxy2xywh)
from utils.plots import Annotator, colors, save_one_box
from utils.torch_utils import select_device, time_sync


#定义一个类存放意向检测区域,意向检测区域通过读取图像
# class detect_ROI:
#     def __int__(self):
#         self.ROI_fall=cv2.imread("SetROI\\mask.png")


#定义一个结构体存放检测结果
class GResult:
    def __int__(self):
        self.detections={}
        self.colors=[]
        #self.dst=np.zeros((640,640,3),np.unit8)

def plot_one_box(x, img, label=None,conf=0, color=None, line_thickness=None):
    # Plots one bounding box on image img
    tl = line_thickness or round(0.002 * (img.shape[0] + img.shape[1]) / 2) + 1  # line/font thickness
    color = color or [random.randint(0, 255) for _ in range(3)]
    c1, c2 = (int(x[0]), int(x[1])), (int(x[0]+x[2]), int(x[1]+x[3]))
    cv2.rectangle(img, c1, c2, color, thickness=tl, lineType=cv2.LINE_AA)
    if label:
        tf = max(tl - 1, 1)  # font thickness
        t_size = cv2.getTextSize(label+" "+str(conf), 0, fontScale=tl / 3, thickness=tf)[0]
        c2 = c1[0] + t_size[0], c1[1] - t_size[1] - 3
        cv2.rectangle(img, c1, c2, color, -1, cv2.LINE_AA)  # filled
        cv2.putText(img, label+" "+str(conf), (c1[0], c1[1]), 0, tl/3, [225, 255, 255], thickness=tf, lineType=cv2.LINE_AA)


weights = ROOT /'weights/best1101.pt'  # 权重文件地址   .pt文件
source = ROOT / 'data/images'  # 测试数据文件(图片或视频)的保存路径

gresult=GResult()#初始化一个检测结果类
imgsz = (640, 640)  # 输入图片的大小 默认640(pixels)
conf_thres = 0.25  # object置信度阈值 默认0.25  用在nms中
iou_thres = 0.45  # 做nms的iou阈值 默认0.45   用在nms中
max_det = 1000  # 每张图片最多的目标数量  用在nms中
device = '0'  # 设置代码执行的设备 cuda device, i.e. 0 or 0,1,2,3 or cpu
classes = None  # 在nms中是否是只保留某些特定的类 默认是None 就是所有类只要满足条件都可以保留 --class 0, or --class 0 2 3
agnostic_nms = False  # 进行nms是否也除去不同类别之间的框 默认False
augment = False  # 预测是否也要采用数据增强 TTA 默认False
visualize = False  # 特征图可视化 默认FALSE
half = False  # 是否使用半精度 Float16 推理 可以缩短推理时间 但是默认是False
dnn = False  # 使用OpenCV DNN进行ONNX推理

# 获取设备
device = select_device(device)

# 载入模型
model = DetectMultiBackend(weights, device=device, dnn=dnn)
stride, names, pt, jit, onnx, engine = model.stride, model.names, model.pt, model.jit, model.onnx, model.engine
imgsz = check_img_size(imgsz, s=stride)  # 检查图片尺寸

# Half
# 使用半精度 Float16 推理
half &= (pt or jit or onnx or engine) and device.type != 'cpu'  # FP16 supported on limited backends with CUDA
if pt or jit:
    model.model.half() if half else model.model.float()

classnames=model.names
print("label:")
# for i in classnames:
#     print(i)

#设置随机颜色绘制标签
colors= [[random.randint(0, 255) for _ in range(3)] for _ in range(len(classnames))]

def detect(img):
    # Dataloader
    # 载入数据保存路径
    #dataset = LoadImages(source, img_size=imgsz, stride=stride, auto=pt)
    # Run inference
    # 开始预测
    model.warmup(imgsz=(1 , 3, *imgsz))  # warmup
    dt, seen = [0.0, 0.0, 0.0], 0
    # 对图片进行处理
    im0 = img
    # Padded resize
    im = letterbox(im0, imgsz, stride, auto=pt)[0]
    # Convert
    im = im.transpose((2, 0, 1))[::-1]  # HWC to CHW, BGR to RGB
    im = np.ascontiguousarray(im)
    t1 = time_sync()
    im = torch.from_numpy(im).to(device)
    im = im.half() if half else im.float()  # uint8 to fp16/32
    im /= 255  # 0 - 255 to 0.0 - 1.0
    if len(im.shape) == 3:
        im = im[None]  # expand for batch dim
    t2 = time_sync()
    dt[0] += t2 - t1
    # Inference
    # 预测
    pred = model(im, augment=augment, visualize=visualize)
    t3 = time_sync()
    dt[1] += t3 - t2
    # NMS
    pred = non_max_suppression(pred, conf_thres, iou_thres, classes, agnostic_nms, max_det=max_det)
    dt[2] += time_sync() - t3
    # 用于存放结果
    detections = []
    # Process predictions
    #print("目标数 = ",pred[0].shape[0])
    for i, det in enumerate(pred):  # per image 每张图片
        seen += 1
        # im0 = im0s.copy()
        if len(det):
            # Rescale boxes from img_size to im0 size
            det[:, :4] = scale_coords(im.shape[2:], det[:, :4], im0.shape).round()
            # Write results
            # 写入结果
            for *xyxy, conf, cls in reversed(det):
                xywh = (xyxy2xywh(torch.tensor(xyxy).view(1, 4))).view(-1).tolist()
                xywh = [round(x) for x in xywh]
                xywh = [xywh[0] - xywh[2] // 2, xywh[1] - xywh[3] // 2, xywh[2],
                        xywh[3]]  # 检测到目标位置,格式:(left,top,w,h)
                cls = names[int(cls)]
                # conf = float(conf)
                conf = format(conf,'.2f')
                detections.append({'class': cls, 'conf': conf, 'position': xywh})
                col=colors[classnames.index(cls)]
                plot_one_box(xywh,im0,cls,conf,col)
    # # 输出结果
    # t=0
    # for i in detections:
    #     print(str(t),i)
    #     t=t+1
    # cv2.imshow("result",im0)
    # cv2.waitKey(0)
    # 推测的时间
    #LOGGER.info(f'({t3 - t2:.3f}s)')

    gresult.detections=detections
    gresult.colors=colors
    gresult.dst=im0

    return detections
    #return gresult


# #自测demo
# path = "F:\\Deeplearning\\yolov5-master\\data\\val\\images\\garb01_801.jpg"
# img = cv2.imread(path)
# # 传入一张图片
# detect(img)
