文章目录
- 前言
- 一、web点亮LED流程
- 二、静态网页设计(html界面)
- 三、 CGI和BOA在本项目中的使用
- 总结
前言
书接上期,和大家分享的是web点灯,哈哈哈,谈论起点灯这个词,这么久以来我已然已经成长为一名合格的点灯大师了;点灯是一个很好的测试办法,不仅要去测试开发板是否正常,也要去测试网页是否能够顺利下发数据,接下俩让我们仔细来看一下这个过程!!!
一、web点亮LED流程
先来理一下流程,之后呢我们按照这个流程来一步步实现相应的功能;
html的数据发送到A9期间经历了这么几个过程:
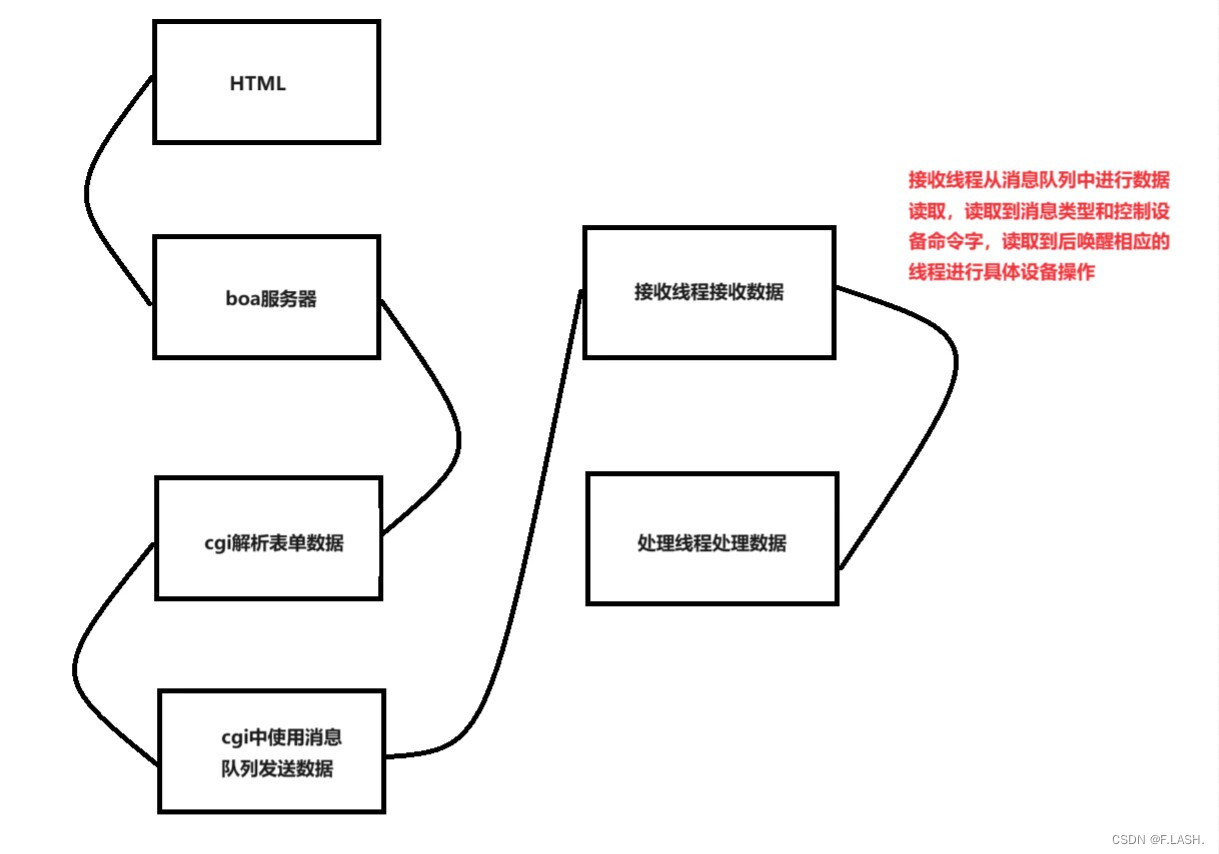
接下来咱们就根据上面流程图一步步来看一下每一步的具体实现!
二、静态网页设计(html界面)
以下呢就是默认index.html网页的具体设计;代码还是比较简单的,没啥技术含量,大家只要能读懂,在这个基础上可以根据自己的需求去修改就可以了;
<!DOCTYPE html PUBLIC "-//W3C//DTD XHTML 1.0 Transitional//EN" "http://www.w3.org/TR/xhtml1/DTD/xhtml1-transitional.dtd">
<html xmlns="http://www.w3.org/1999/xhtml">
<head>
<meta http-equiv="Content-Type" content="text/html; charset=utf-8" />
<title>登录界面</title>
</head>
<body>
<body background="./images/ckp00.png">
<div align="center">
<table width="900" border="0" background="./images/ckp3.png">
<tr>
<th width="385" height="320" scope="col"> </th>
<th width="385" scope="col"> </th>
<th width="70" scope="col"> </th>
</tr>
<tr>
<td height="50"> </td>
<td>
<div align="center"></div>
</td>
<td> </td>
</tr>
</table>
</div>
<div></div>
<div align="center">
<table width="900" border="0">
<tr>
<td>
<form onsubmit="return isValidate(myform)" action="cgi-bin/login.cgi" method="post">
用户名: <input type="text" name="username" id="username"> 密码: <input type="password" name="userpass" id="userpass">
<input type="submit" value="登录" id="button">
</form>
</td>
</tr>
</table>
</div>
<!--<p> </p>-->
<div align="center">
<table width="900" height="467" border="0" background="./images/ckp4.jpg">
<tr>
<td width="126" height="248"> </td>
<td width="351"></td>
<td width="101"> </td>
</tr>
<tr>
<td></td>
<td> </td>
</tr>
<tr>
<td>
<form name="myform" method="get" action="cgi-bin/login.cgi" onsubmit="return isValidate(myform)"></form>
</td>
</tr>
</div>
</body>
</html>
网页打开如下:

在这里呢需要用户名和密码来进行登录;那接下来肯定是看一下怎样进行登录了呀!
三、 CGI和BOA在本项目中的使用
用户名和密码由网页端发送BOA服务器,接收到数据后CGI进行数据的解析,那接下来看下CGI的程序到底是如何编写的!
#include <stdio.h>
#include <stdlib.h>
#include <string.h>

char name[64];
char pass[64];

char* getcgidata(FILE* fp, char* requestmethod)
{
	char* input;
	int len;
	int size = 1024;
	int i = 0;

	if (!strcmp(requestmethod, "GET"))   {
		 input = getenv("QUERY_STRING");
		 return input;
	}
	else if (!strcmp(requestmethod, "POST"))   {
		 len = atoi(getenv("CONTENT_LENGTH"));
		 input = (char*)malloc(sizeof(char)*(size + 1));

		 if (len == 0)   {
			input[0] = '\0';
			return input;
		 }

		 while(1)
		 {
			input[i] = (char)fgetc(fp);
			if (i == size)   {
				 input[i+1] = '\0';
				 return input;
			}
			--len;
			if (feof(fp) || (!(len)))   {
				 i++;
				 input[i] = '\0';
				 return input;
			}
			i++;

		 }
	}
	return NULL;
}

void unencode_for_name_pass(char *input)
{
	int i = 0;
	int j = 0;

		// 我们获取的input字符串可能像如下的形式
		// Username="admin"&Password="aaaaa"
		// 其中"Username="和"&Password="都是固定的
		// 而"admin"和"aaaaa"都是变化的,也是我们要获取的

		// 前面9个字符是UserName=
		// 在"UserName="和"&"之间的是我们要取出来的用户名
	for ( i = 9; i < (int)strlen(input); i++ )  {
		 if (input[i] == '&')   {
			name[j] = '\0';
			break;
		 }
		 name[j++] = input[i];
	}

	// 前面9个字符 + "&Password="10个字符 + Username的字符数
	// 是我们不要的,故省略掉,不拷贝
	for ( i = 19 + strlen(name), j = 0; i < (int)strlen(input); i++ ){
		 pass[j++] = input[i];
	}
	pass[j] = '\0';

	//printf("Your Username is %s<br> Your Password is %s<br> \n", name, pass);

	printf("Content-type: text/html\n\n");   //告诉编译器,用html语法来解析
	if((strcmp(name,"Romeo") == 0)&&(strcmp(pass,"123") == 0))		//html登陆的用户名和密码
	{
		printf("<script language='javascript'>document.location = 'http://192.168.1.100/choose.html'</script>"); //自动跳转到这个页面
	}
	else{
		printf("用户名或密码错误<br><br>");
		//exit(-1);
	}
}

int main()
{
	char *input;
	char *req_method;

	printf("Content-type: text/html\n\n");   //告诉编译器,用html语法来解析
	printf("The following is query reuslt:<br><br>");

	req_method = getenv("REQUEST_METHOD");
	input = getcgidata(stdin, req_method);   //获取URL 编码的数据

	unencode_for_name_pass(input);   //解码,并判断用户名,密码,如果正确,跳转至选择界面,否则提示错误
	return 0;
}
上述代码就能够实现自动解析用户名和密码并且实现在登陆成功后跳转至二级页面的操作;
二级页面如下:
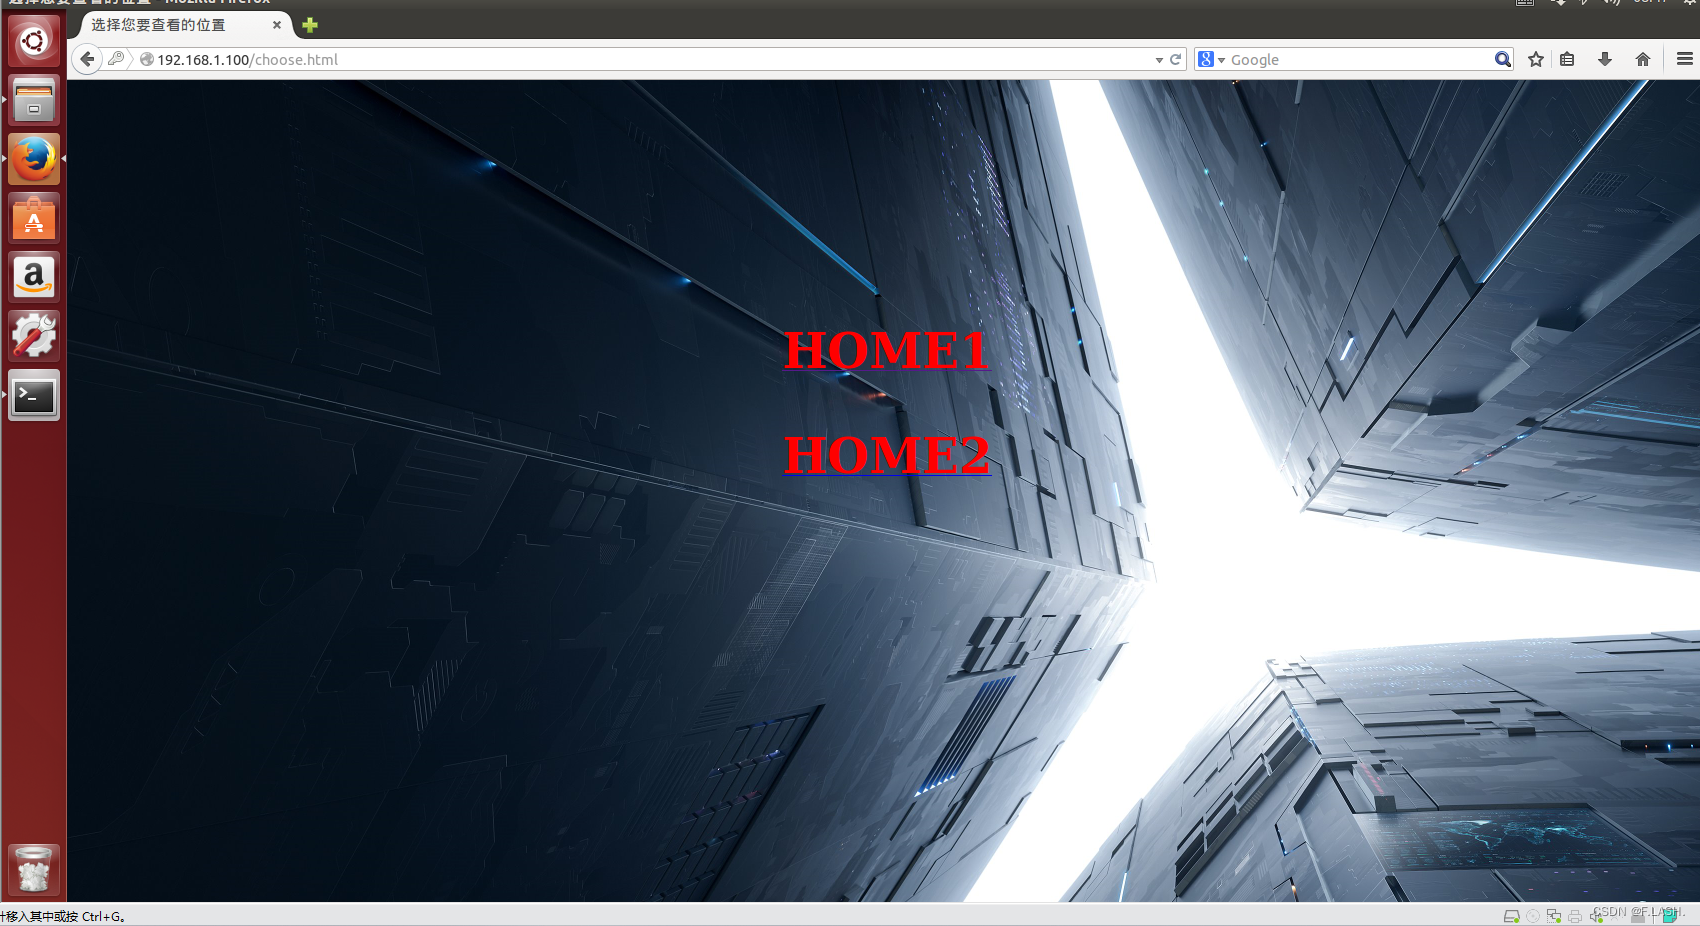
三级页面如下:

四级页面如下:
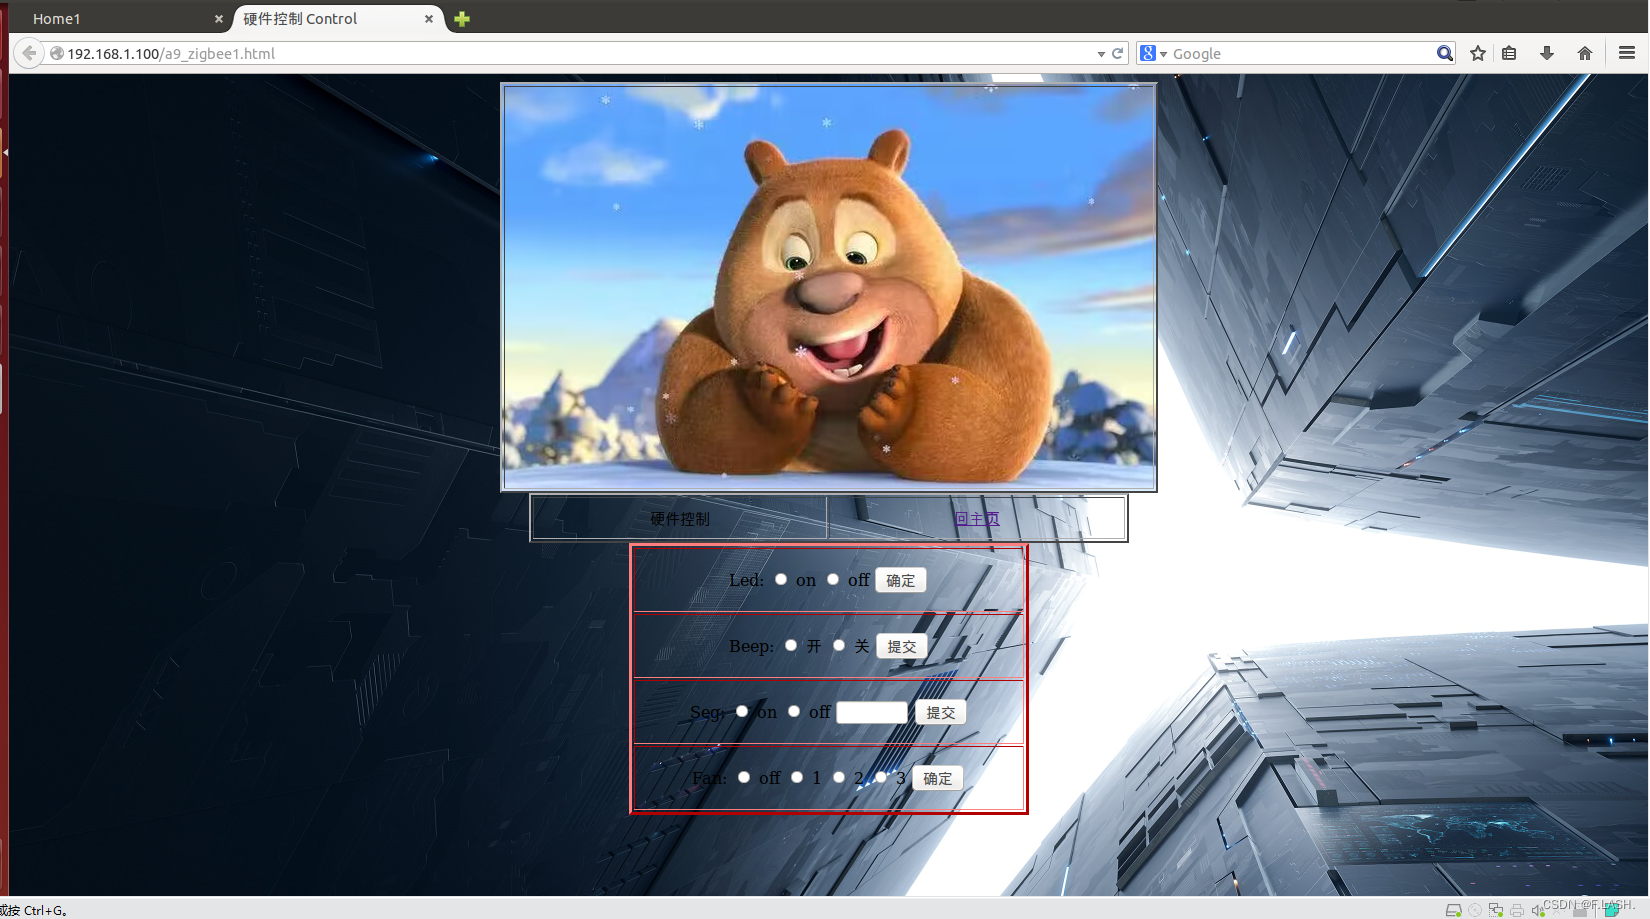
到这里呢我们就可以开始点灯了,但是我们必须清楚,网页下发指令后BOA服务器和CGI究竟是如何进行相应的;下来看一下cgi的工程框架:

下面看一下这个是a9_led.c的CGI代码:
#include <stdio.h>
#include "cgic.h"
#include <string.h>
#include <sys/types.h>
#include <sys/stat.h>
#include <fcntl.h>
#include <stdlib.h>
#include <unistd.h>
#include <stdio.h>
#include <errno.h>
#include <sys/ipc.h>
#include <sys/msg.h>

#define N 8

struct msg
{
	long type;
	long msgtype;
	unsigned char text[N];
};


int cgiMain()
{
	key_t key;
	char buf[N];
	char sto_no[2];
	int msgid;
	struct msg msg_buf;
	memset(&msg_buf,0,sizeof(msg_buf));

	cgiFormString("led",buf,N);				//bled网页键值进行接收,接收8个字节
	cgiFormString("store",sto_no,2);

	if((key = ftok("/tmp", 'g')) < 0)		//创建IPC对象键值(生成一个IPC对象),用于消息队列,参数1是指定的文件名,参数2是子序号
	{
		perror("ftok");
		exit(1);
	}

	if((msgid = msgget(key, 0666)) < 0)		//创建一个消息队列
	{
		perror("msgget");
		exit(1);
	}

	bzero (msg_buf.text, sizeof (msg_buf.text));

	//如果是打开的按钮
	if (buf[0] == '1')
	{
		//开灯
		msg_buf.text[0] = ((sto_no[0] - 48)) << 6 | (0x0 << 4) | (1 << 0);
	}
	else
	{
		msg_buf.text[0] = ((sto_no[0] - 48)) << 6 | (0x0 << 4) | (0 << 0);
	}

	msg_buf.type = 1L;		//1L表示home1,也表示消息队列的消息类型
	msg_buf.msgtype = 1L;	//表示led设备的消息类型

	//向消息队列中写入消息,将消息发出,在A9端进行接收
	//这里发送的字节数为sizeof(msg_buf)-sizeof(long)的原因是由于不需要传送消息类型,只需要传送具体的消息大小即可(也就是msg结构体的第一个变量不需要作为发送的有效字节传送)
	msgsnd(msgid, &msg_buf,sizeof(msg_buf)-sizeof(long),0);

	sto_no[0] -= 48;	//为了后面生成是哪一个操作引起网页反馈(生成二级网页名序号)

	cgiHeaderContentType("text/html\n\n");
	fprintf(cgiOut, "<HTML><HEAD>\n");
	fprintf(cgiOut, "<TITLE>My CGI</TITLE></HEAD>\n");
	fprintf(cgiOut, "<BODY>");

	fprintf(cgiOut, "<H2>send sucess</H2>");

	//fprintf(cgiOut, "<a href='.html'>返回</a>");
	fprintf(cgiOut, "<meta http-equiv=\"refresh\" content=\"1;url=../a9_zigbee%d.html\">", sto_no[0]);
	fprintf(cgiOut, "</BODY>\n");
	fprintf(cgiOut, "</HTML>\n");


	return 0;
}
代码中注释的消息类型如下,这个是在通信结构体设计的分享中对应用层进程间通信使用消息队列机制的具体实现;
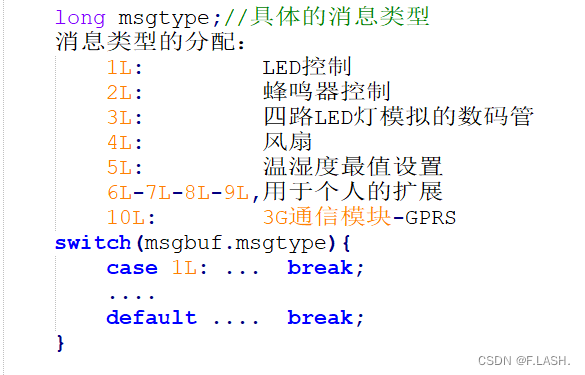
那么当cgi发把消息写入到消息队列后,那应用层究竟是如何进行接收的呢,继续来看吧:
下图是应用层的框架:

在pthread_client_request.c中,对消息队列进行了接收操作:
#include "data_global.h"
#include "linuxuart.h"

//消息队列id
extern int msgid;
//ipc对象键值
extern key_t key;
//锁资源
extern pthread_mutex_t mutex_client_request,
        		mutex_refresh,
        		mutex_sqlite,
	        	mutex_transfer,
	        	mutex_analysis,
	        	mutex_sms,
	        	mutex_buzzer,
	         	mutex_led,
	         	mutex_camera;
//条件变量
extern pthread_cond_t  cond_client_request,
        		cond_refresh,
        		cond_sqlite,
	        	cond_transfer,
	        	cond_analysis,
	        	cond_sms,
	        	cond_buzzer,
	         	cond_led,
	         	cond_camera;
//模块的控制命令字
extern unsigned char cmd_led;
extern unsigned char  cmd_buzzer;
extern unsigned char  cmd_fan;

//GPRS模块的电话号
extern char recive_phone[12] ;
extern char center_phone[12] ;

//消息队列通信结构体
struct msg msgbuf;


void *pthread_client_request(void *arg)
{
	if((key = ftok("/tmp",'g')) < 0){
		perror("ftok failed .\n");
		exit(-1);
	}

	msgid = msgget(key,IPC_CREAT|IPC_EXCL|0666); 		//检测消息队列中是否有这个键值,如果有则返回对应的-1,没有则创建并返回创建消息队列的id
	if(msgid == -1)	{
		if(errno == EEXIST){ 							//如果已经存在
			msgid = msgget(key,0777); 					//设置权限为0777
		}else{
			perror("fail to msgget");
			exit(1);
		}
	}
	printf("pthread_client_request\n");

	while(1){
		bzero(&msgbuf,sizeof(msgbuf)); 					//清理操作,但一般使用memset,功能更加强大一点
		printf("wait form client request...\n");
		msgrcv (msgid, &msgbuf, sizeof (msgbuf) - sizeof (long), 1L, 0); //从消息队列中读取消息
		printf ("Get %ldL msg\n", msgbuf.msgtype); 		//打印消息类型
		printf ("text[0] = %#x\n", msgbuf.text[0]); 	//打印消息内容

		//判断消息类型,从而确定是哪一个设备
		switch(msgbuf.msgtype){
			case 1L:
				//1L的类型是led的消息类型,此时上锁,等待消息内容也就是控制命令字复制完成后解锁,通过pthread_cond_signal唤醒pthread_led.c这个led线程,进行led的具体硬件操作
				pthread_mutex_lock(&mutex_led);
				printf("hello led\n");
				cmd_led = msgbuf.text[0];
				pthread_mutex_unlock(&mutex_led);
				pthread_cond_signal(&cond_led);
				break;
		}
	}

}
#endif
下面来看一下led线程里都干了什么事情呢,代码如下:
#include "data_global.h"
#include "chrdev.h"
#include <unistd.h>

//led的锁资源和条件变量,用来进行同步和互斥操作
extern pthread_mutex_t  	mutex_led;
extern pthread_cond_t      	cond_led;

extern unsigned char cmd_seg;

//流水灯
int fswaterled_control(int led_fd, int times);
//四位二进制表示十六进制
int fsled_control(int led_fd, unsigned char led_control_cmd);  //发送的数字
//关闭所有的灯
int fsled_close_all(int led_fd);


//:A9LED模块线程.
void *pthread_led(void *arg)
{
	printf("pthread_led\n");
	int i, j;
	int led_fd;
	led_desc_t led;

	led_fd = open(LED_DEV, O_RDWR);
	if(led_fd == -1){
		printf("open failed.\n");
	}
	printf("led_fd ;%d.\n",led_fd);

	while(1){
		pthread_mutex_lock(&mutex_led); 				//锁和条件变量的操作都是原子操作,不会被cpu的任务调度机制打断
		printf("led ioctl:***********\n");
		pthread_cond_wait(&cond_led,&mutex_led); 		//会主动释放上面的锁并且判断是否有唤醒信号,在被唤醒后主动又继续加上锁(wait前必须加锁)
		printf("led ioctl:***********\n");
		if(cmd_led == 0x41){
			fswaterled_control(led_fd, 2);
			cmd_led = 0;
		}

		int tmp = cmd_seg & 0xf0;

		if(!(tmp ^ 0x70)) {

			fsled_control(led_fd, cmd_seg);
		}
		pthread_mutex_unlock(&mutex_led);
	}

	close(led_fd);

}


int fsled_control(int led_fd, unsigned char led_control_cmd)
{
	int i = 0;
	led_desc_t led;
	led_control_cmd &= 0x0f;
	int shift_count = 1; //第0位,第1 - 3位

	printf("led_control_cmd = %d.\n",led_control_cmd);
	fsled_close_all(led_fd);
	sleep(3);
	while(led_control_cmd){
		if(shift_count >= 5)
			break;
		if((led_control_cmd & 0x1) == 1){ //第0位开始 = LED2
			shift_count ++;  // = 2  LED2
			printf("if shift_count :%d.\n",shift_count);
			led.which = shift_count; //led2 3 4 5 灯
			ioctl(led_fd,FSLEDON,&led);
			usleep(50000);  //让驱动响应的时间
		}else {
			shift_count ++;
			printf("else shift_count :%d.\n",shift_count);
			led.which = shift_count; //led2 3 4 5 灯
			ioctl(led_fd,FSLEDOFF,&led);
			usleep(50000);
		}
		led_control_cmd >>= 1;
	}

	return 0;
}


int fsled_close_all(int led_fd)
{
	int i = 0;
	led_desc_t led;

	for(i = 2;i < 6;i ++){
		led.which = i;
		ioctl(led_fd,FSLEDOFF,&led);
		usleep(50000);
	}

	return 0;
}


int fswaterled_control(int led_fd, int times)
{
	int i = 0,j = 0;
	led_desc_t led;

	for(j = 0;j < times;j ++){
		for(i = 2;i < 6;i ++){
			led.which = i;
			ioctl(led_fd,FSLEDON,&led);
			usleep(500000);

			led.which = i;
			ioctl(led_fd,FSLEDOFF,&led);
			usleep(500000);
		}
	}

	return 0;
}
当然这里不要忘记在跑主框架之前先要加载led的驱动模块哦,要不然我们前面写的再牛,这里的灯也是亮不起来的,哈哈哈哈!
总结
好啦,本期的分享大概就到这里结束了,是不是点个灯这个操作还是具有一定的难度的呢,虽然步骤过程很多,但是每一步都需要我们谨小慎微,把每一步做好,最后自然就能把灯点亮;不要着急,我饿能够按照步骤整理出来是因为我整个项目已经做完了,所以大家不要着急,还是需要一步步来,后面做完后大家肯定比我理解的更深刻!把灯点亮后,那后面蜂鸣器就不是什么问题了,都是一样的原理,是不是跃跃欲试了!加油哦!最后,各位小伙伴们如果有收获,可以点赞收藏哦,你们的认可是我创作的动力,一起加油!


![[C++]命名空间等——喵喵要吃C嘎嘎](https://img-blog.csdnimg.cn/f74c76d54537422ca5d9ba61d83b4bfb.png)


