您好, 如果喜欢我的文章或者想上岸大厂,可以关注公众号「量子前端」,将不定期关注推送前端好文、分享就业资料秘籍,也希望有机会一对一帮助你实现梦想
前言
什么是前端UI自动化测试平台?由于部门的业务域非常广,项目体量也很足,大约有100+项目,10条业务线,因此需要这样前端基建来保证业务的强交付、高质量。接下来看一张图来理解一下吧:
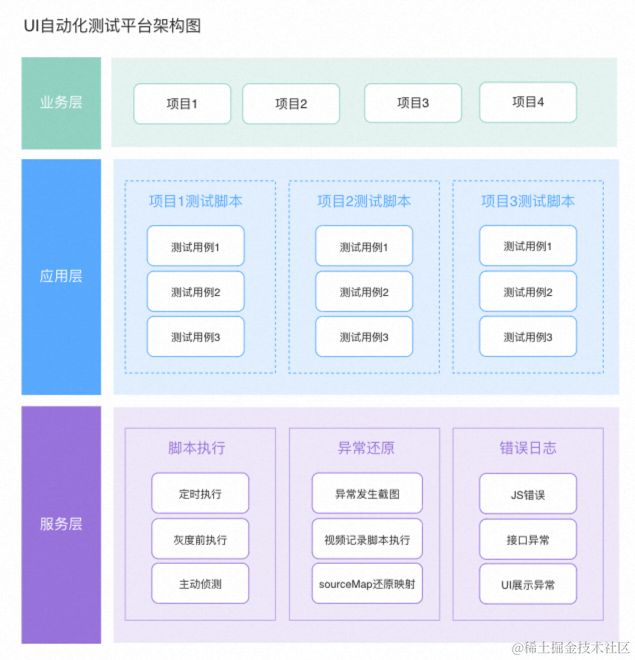
自动化测试平台整体架构主要分为三层:
- 业务层:在前端可以添加多个项目,提供预发、生产的域名、项目负责人,对已有项目具备主动执行项目所有测试用例的能力;
- 应用层:存储在自动化测试平台服务端项目中,保存各个项目的测试用例,通过
child_process来执行pkg中的jest测试命令,例如执行A项目的测试用例即npm run testA,对应jest ./autoTest/a; - 服务层:自动化测试服务端,所有后台跑脚本能力的聚集地,核心就是前端调接口,后端执行测试用例,最后产出测试数据落库;
整体技术架构如下:
- 前端:
React + Umi + Antd - 后端:
Node + Midway + Typeorm + Tddl + Jest-puppeteer
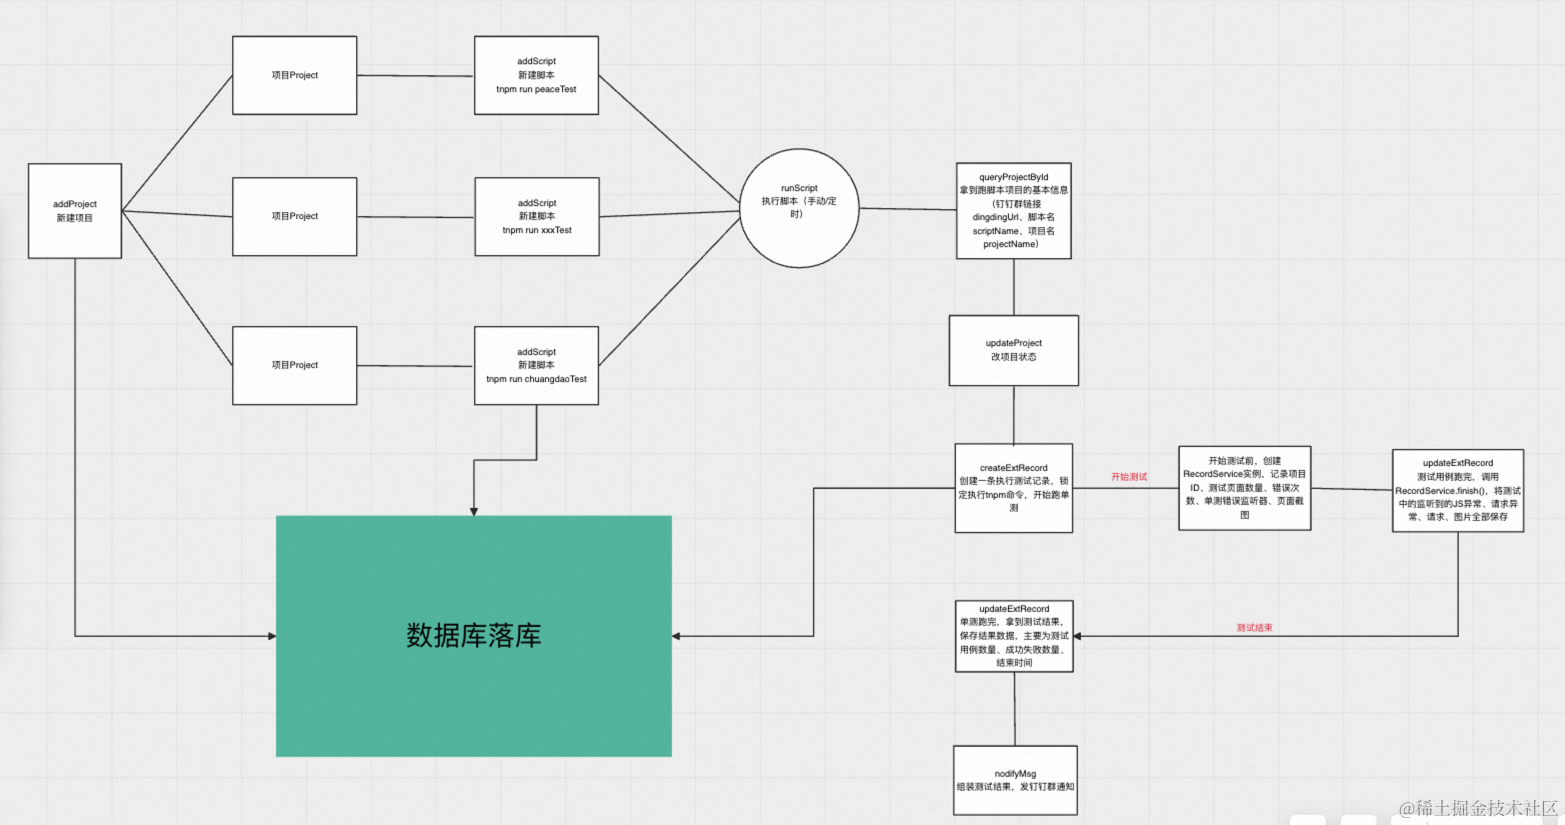
产品链路如下:
技术实现
新建后端项目
首先新建一个Midway项目:
tnpm init @ali/midway
接下来我们首先搭建测试环境,安装如下依赖包:
npm i jest-puppeteer @types/jest jest ts-jest --save -dev
下一步就是设计测试用例在项目中的结构,我们采用在项目根目录新建一个testCase文件夹,再往下划分出一个个项目,里面存放所有的测试用例文件,如下:
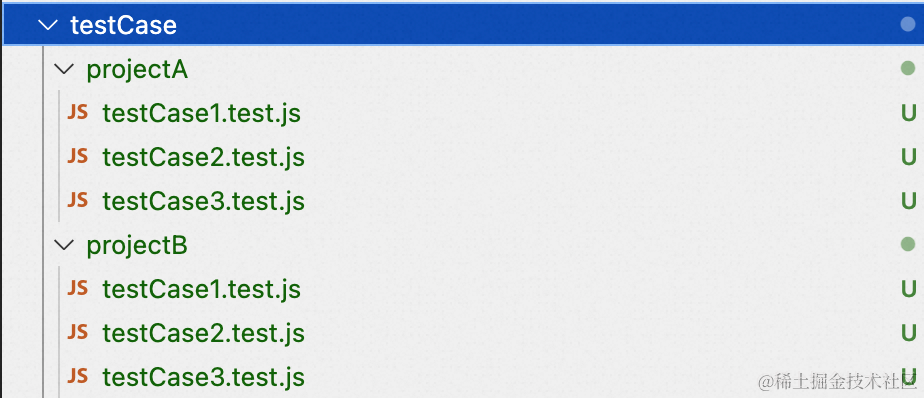
当需要执行指定项目的脚本时,只需要执行对应目录下所有用例即可,但是每个项目都需要一个执行主文件,这里定未index.test.js,基本代码块设计如下:
require('expect-puppeteer');
const testCase1 = require('./testCase1.test');
const testCase2 = require('./testCase2.test');
const testCase3 = require('./testCase3.test');
const TestConfig = require('./test.config.json');

const projectName = 'projectA';

describe('开始执行创建任务操作', () => {
  beforeAll(async () => {
    await page.goto('http://www.projectA.com');
  });

  it('执行用例1', async () => {
    await testCase1(page);
  });

  it('执行用例2', async () => {
    await testCase2(page);
  });

  it('执行用例3', async () => {
    await testCase3(page);
  });

  afterAll(async () => {
    console.log('用例都执行完啦');
  });
});
这样当执行jest ./testCase/projectA/index.test.js --coverage就会跑完项目A所有测试用例,并产出结果,初步的测试链路已经完成了。
测试异常感知与拦截
我们在上面完成了基本的项目测试用例,也具备了测试的能力,自动化测试平台的最终目标是记录测试中的所有数据,这里罗列出下面这些数据:
- JS错误、页面错误、接口请求异常、sourcemap源代码位置;
- 发生异常时的截图快照;
- 执行测试无头浏览器中的完整视频录制;
在记录这些数据时,由于测试是无状态的,因此我们需要设计一个监听器,来记录完成一次测试整个生命周期遇到的所有需要记录的数据,我们设计一个RecordService服务,在测试开始和结束的时候进行执行和结束,在执行时开启监听,在结束时上报测试记录。
class RecordService {
  constructor(objcet_id) {
    this.objcet_id = objcet_id; //项目id
    this.test_page_count = 0; //测试页面数量
    this.ErrorReducer = new ErrorReducer(); // 记录错误次数
    this.recorder = null;
  }

  async config({ record_id, formInstId }) {
    this.record_id = record_id;
    this.formInstId = formInstId;
  }

  async createPageLoadInfo(param) {
    const url = ''

    const data = {
      textField_l77nduyf: this.objcet_id,
      textField_l77nduyg: this.record_id,
      textField_l77nduyh: param.LayoutDuration,
      textField_l77nduyi: param.RecalcStyleDuration,
      textField_l77nduyj: param.ScriptDuration,
      textField_l77nduym: param.TaskDuration,
      textField_l77nduyn: param.WhiteDuration,
      textField_l77nduyp: param.errRequest,
      textField_l77nduyq: param.jsError,
      textField_l77nduyr: param.url,
    };
    await makeHttpRequest(url, { method: 'POST', data, dataType: 'text' });
  }

  async listenNetwork(page) {
    console.log('listenNetwork start');
    const getRequestInfo = async responseInfo => {
      try {
        const resJson = await responseInfo.json();
        const resData = {
          url: await responseInfo.url(),
          method: await responseInfo.request().method(),
          failure: (await responseInfo.request().failure()?.errorText) || null,
          postData: await responseInfo.request().postData(),
          response: resJson,
          headers: await responseInfo.request().headers(),
          cookies: await page.cookies(),
          success: await resJson?.success,
        };
        return resData;
      } catch (e) {
        console.log('执行请求返回异常', e);
      }
    };

    await page.on('response', async response => {
      if (response.url().indexOf('/h5api') > -1) {
        const res = await getRequestInfo(response);
        if (res?.success) {
          this.ErrorReducer.pushRequest(res);
        } else if (res) {
          this.ErrorReducer.pushErrRequest(res);
        }
      }
    });

    const logStackTrace = async error => {
      this.ErrorReducer.pushJsError(error);
    };

    // 页面崩溃时触发
    page.on('error', logStackTrace);
    // 当页面中的脚本有未捕获异常时发出
    page.on('pageerror', logStackTrace);
  }

  async screenshot({ imgName, projectName }, page) {
    const path = `${process.cwd()}/screenshot/${projectName}/${imgName}.png`;
    await page.screenshot({
      path,
      fullPage: true,
    });
    this.ErrorReducer.pushImgList(path);
  }

  async finish(projectName) {
    const data = {
      textField_l77iynx6: this.objcet_id, //项目ID
      textField_l77iynx7: this.record_id, //记录ID
      textField_l77iynx8: this.ErrorReducer.jsError,
      textField_l77iynxe: this.ErrorReducer.errRequest,
      textField_l7j9n6bk: this.ErrorReducer.imgList.join(','),
    };
  }
}
RecordService中共包含五个方法,如下:
- config,配置测试记录ID,表单ID,用于插入到数据表中,口径为执行脚本时npm命令带入;
- createPageLoadInfo,创建测试执行记录;
- listenNetwork,核心API,包含JS错误、接口异常、页面错误、sourceMap还原信息的记录,监听测试的整个生命周期;
- screenshot,异常快照截图;
- finish,脚本执行结束组装所有数据上报接口;
在RecordService中引用到的ErrorReducer类,创建类实例用于保存所有测试数据,代码如下:
class ErrorReducer {
  constructor() {
    this.jsError = [];
    this.errRequest = [];
    this.request = [];
    this.imgList = [];
  }

  async pushRequest(params) {
    this.request.push(params);
  }
  async pushJsError(params) {
    this.jsError.push(params);
  }
  async pushErrRequest(params) {
    this.errRequest.push(params);
  }
  async pushImgList(params) {
    this.imgList.push(params);
  }
}
有了监听器后,我们再回归之前的测试用例,在测试执行前后进行改造,代码如下:
describe('开始执行创建任务操作', () => {
  let exeObj;
  beforeAll(async () => {
    exeObj = global.__AUTOPROJECT__[process.env.npm_config_project_id] =
      new RecordService(process.env.npm_config_project_id);
    exeObj.config({
      record_id: process.env.npm_config_record_id,
      formInstId: process.env.npm_config_forminstid,
    });
    await exeObj.listenNetwork(page);
    await page.goto('http://www.projectA.com');
  });

  // 测试用例...

  afterAll(async () => {
    await exeObj.finish(projectName);
    console.log('用例都执行完啦');
  });
});
进行了改造后,我们在finish方法中已经可以获取到监听器的数据了,并且在执行前传入了项目ID、测试记录ID、表单ID,在finish中调新增执行记录接口即可初步实现测试链路。
视频呢?有点复杂,这里使用了puppeteer-screen-recorder包,我们安装一下:
npm i puppeteer-screen-recorder --save
然后在RecordService中加入一个recordVideo方法:
 async recordVideo(page, projectName) {
    const screenRecorderOptions = {
      followNewTab: true,
      fps: 25,
      ffmpeg_Path: null,
      videoFrame: {
        width: 1024,
        height: 768,
      },
      videoCrf: 18,
      videoCodec: 'libx264',
      videoPreset: 'ultrafast',
      videoBitrate: 1000,
      autopad: {
        color: 'black' | '#1890ff',
      },
      aspectRatio: '4:3',
    };
    this.recorder = new PuppeteerScreenRecorder(page, screenRecorderOptions);
    await this.recorder
      .start(`./video/${projectName}/result.mp4`)
      .then(res => {
        console.log('视频录制开启成功了');
      })
      .catch(err => {
        console.log('视频录制开启失败了', err);
      });
  }
然后在测试用例中beforeAll中加入视频录制,在脚本执行结束后,项目根目录video/${projectName}即可看到录制完毕的视频。
sourcemap还原
这样会有个问题,通过puppeteer拦截到的错误是项目打包后的错误,无法找到报错的代码信息(文件路径、行数、列数),我们需要进行映射,这样可以更高效的排查解决问题。
这里我们需要安装依赖包:
npm i error-stack-parser source-map-js --save
我们先看一下sourcemap还原线上代码映射到源码的逻辑:
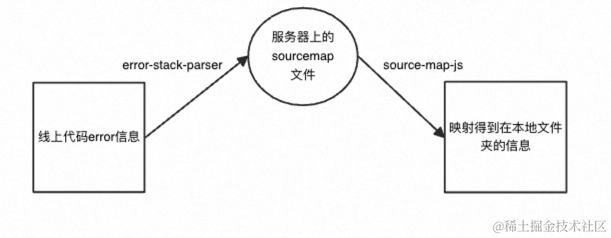
error-stack-parser可以基于js error类还原出错误信息的堆栈、行数、构建后的报错文件名;source-map-js可以基于线上异常信息和服务器上的sourcemap文件,来得到最后的源文件信息;
最后我们改装监听器中的logStackTrace方法:
const logStackTrace = async error => {
      let errorInfo = `错误信息:${error}`;
      // sourcemap代码映射,获取源代码位置信息
      try {
        const res = ErrorStackParser.parse(new Error(error));
        // 文件名路径分组
        const errorFileNameGroup = res[0].fileName.split('/');
        // 线上版本,0.0.160
        const version = errorFileNameGroup.find(_ => _.includes('0.0')) || '';
        // 文件名 xxx.js
        const fileName = errorFileNameGroup[errorFileNameGroup.length - 1];
        const aoneNameIndex = errorFileNameGroup.findIndex(_ =>
          _.includes('eleme')
        );
        // aone名,xxxx
        const aoneName = errorFileNameGroup[aoneNameIndex];
        // 项目名,projectA
        const projectName = errorFileNameGroup[aoneNameIndex + 1];
        if (version && fileName && aoneName && projectName) {
          const sourceMapPath = `https://sourcemap.def.alibaba-inc.com/sourcemap/${aoneName}/${projectName}/${version}/client/js/${fileName}.map`;
          let sourceRes = await loadSourceMap(sourceMapPath);
          if (sourceRes.includes('Redirecting to')) {
            // sourcemap的文件在OSS,需要重定向请求一次
            let ossPath = sourceRes.split('Redirecting to')[1].trim();
            ossPath = ossPath.slice(0, ossPath.length - 1);
            sourceRes = await loadSourceMap(ossPath);
          }
          const sourceData = JSON.parse(sourceRes);
          const consumer = await new sourceMap.SourceMapConsumer(sourceData);
          const result = consumer.originalPositionFor({
            line: Number(res[0].lineNumber),
            column: Number(res[0].columnNumber),
          });
          errorInfo += `,文件路径为:${result.source},报错代码行数:${result.line}行,报错代码列数:${result.column}列`;
        }
      } catch (e) {
        console.log('捕捉sourcemap出错:', e);
      } finally {
        this.ErrorReducer.pushJsError(errorInfo);
      }
    };
代码块中主要是公司中获取sourcemap文件的思路逻辑,如果是普通项目对于sourcemap文件没有保护机制的话,直接通过网络请求访问应该就可以了,这个结合自身而定。
实现手动执行脚本接口
在上面,我们实现了基于我们从终端输入jest projectA --coverage来运行项目测试的能力,那如何把能力暴露出去在平台上用呢?其实很简单,我们把这条命令抽离到接口里,暴露出去就可以了。
首先定义一个runScript接口:
@Provide()
export class ScriptService {
  async runScript(options: ProjectOptions) {
    const resData = await runScript(options);
    return resData;
  }
}
然后实现runScript的逻辑,主要思路就是接收项目ID,执行指定项目的jest终端命令,最后把监听器的数据上报到数据库里,如果有异常,则进行钉钉群告警(公司内部的需求,这里简化)。
const runScript = async (options: ProjectOptions) => {
  const { pid } = options;
  const yidaService = await useInject(YidaService);
  const dingdingService = await useInject(DingDingService);
  const uploadService = await useInject(UploadService);
  const { pid } = options;

  // 根据pid查scriptName,代码略过
  return new Promise(async resolve => {
    if (scriptName) {
      // 新增记录 获取 record_id
      console.log('project_id', pid);
      // 数据表新建一条执行记录初始数据,代码略过
      await exec(
        `tnpm run ${scriptName} --project_id=${pid} --record_id=${record_id} --formInstId=${result} --host=${hostPath}`, // 项目参数带入
        async (_err, _stdout, _stderr) => {
          await yidaService.updateProject({
            formInstId,
            textField_l7fxypdj: '', //解除当前项目正在执行状态
            textareaField_l7gcpy7t: _stderr,
          });
          const { passed, total, time } = splitTestResult(_stderr);
          // 将完整数据更新到当次执行记录中,代码略过
          // 如果有异常,调钉钉服务告警,代码略过

          resolve({
            _err,
            _stdout,
            _stderr,
          });
        }
      );
    } else {
      resolve({});
    }
  });
}
因为依赖到公司内部的服务能力,代码块中忽略了一部分代码,通过注释代替了,如果有疑问可以评论或者私信我。
前端建设
后端逻辑基本已经讲完了,接下来枚举出前端页面,我们来看一下最后的效果。
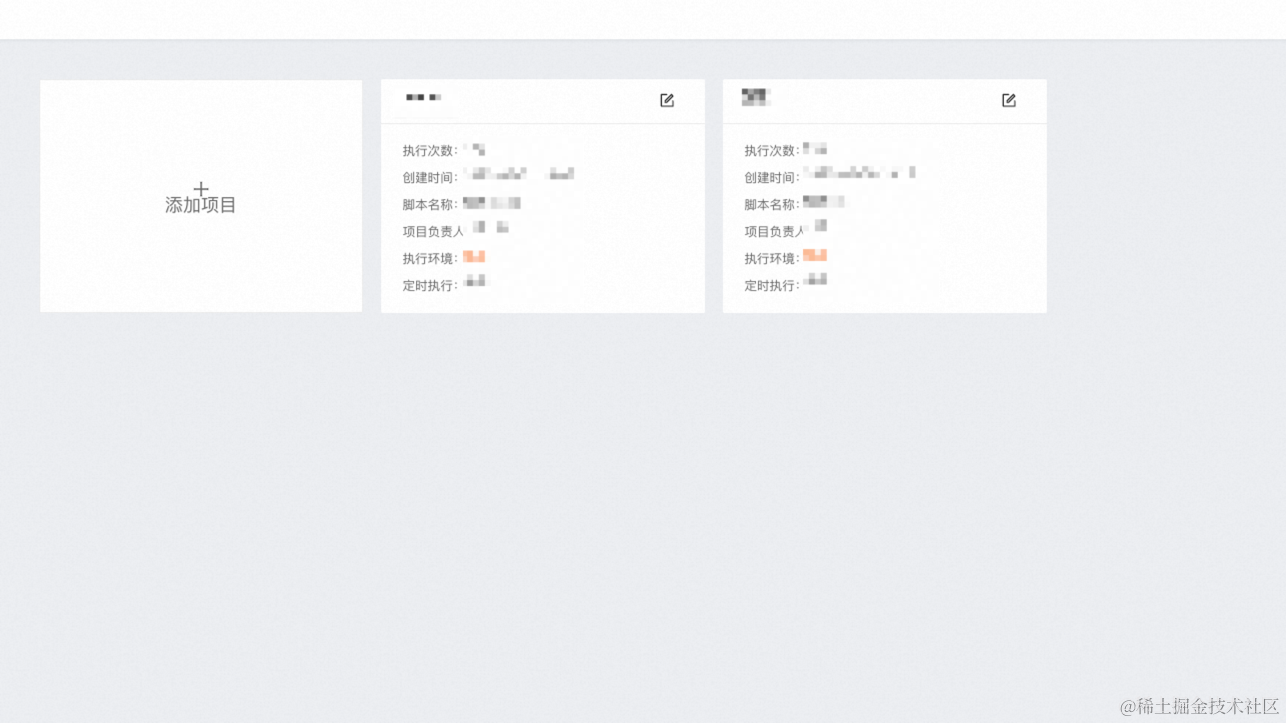
项目首页,展示项目列表:
项目详情页,展示所有测试执行记录以及手动执行项目所有脚本的按钮,也就是调用runScript接口
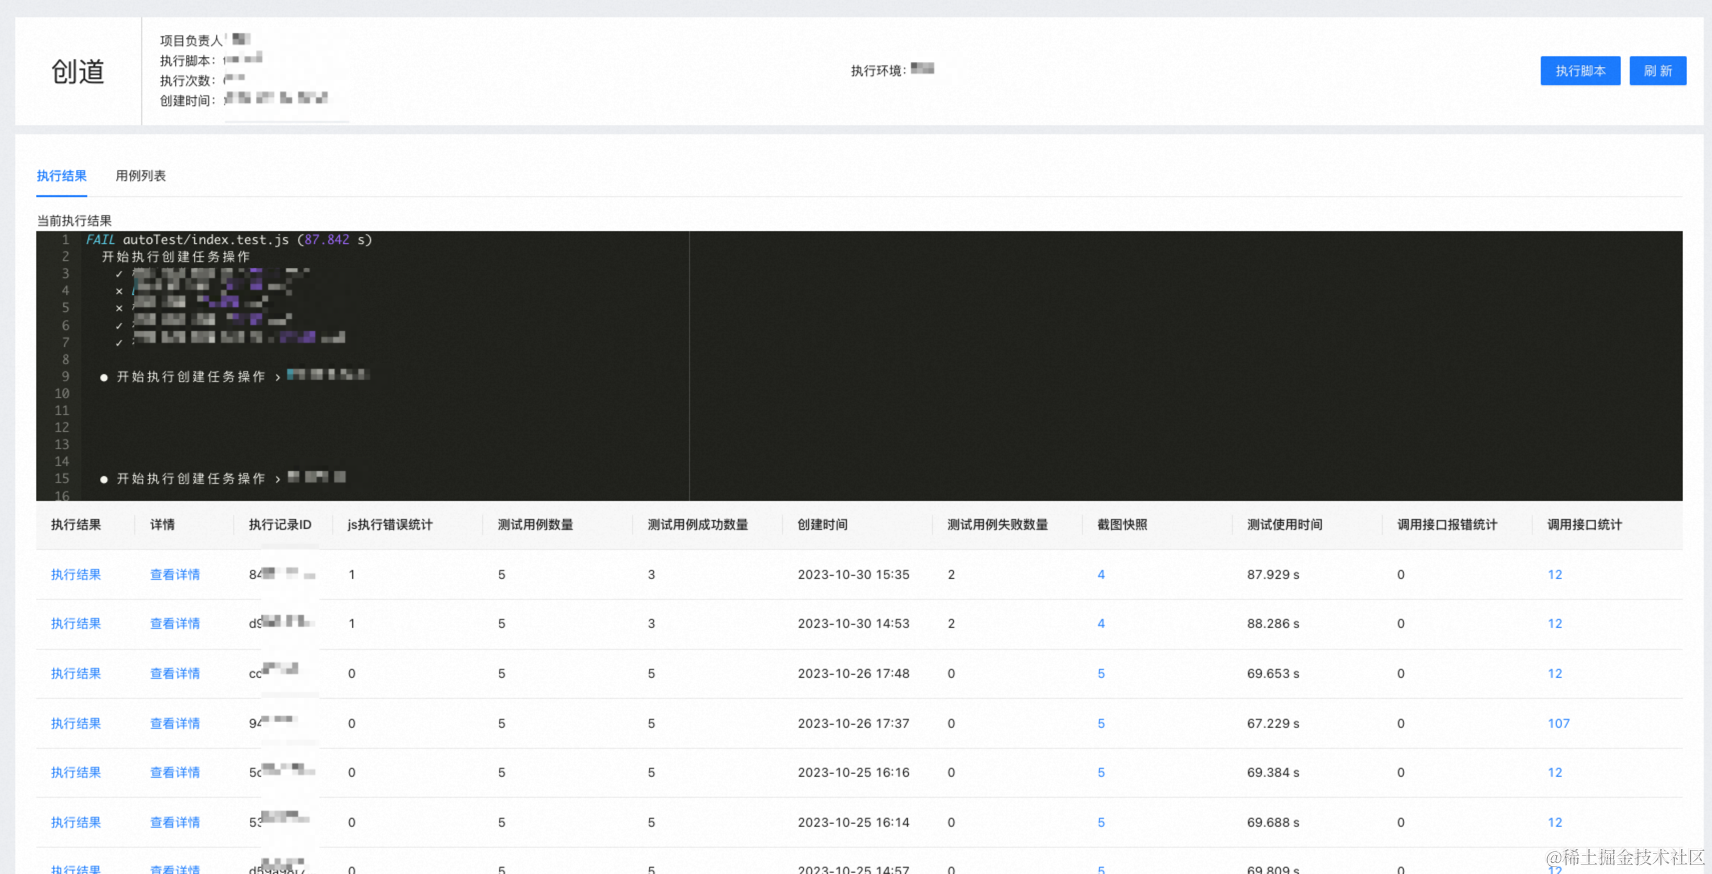
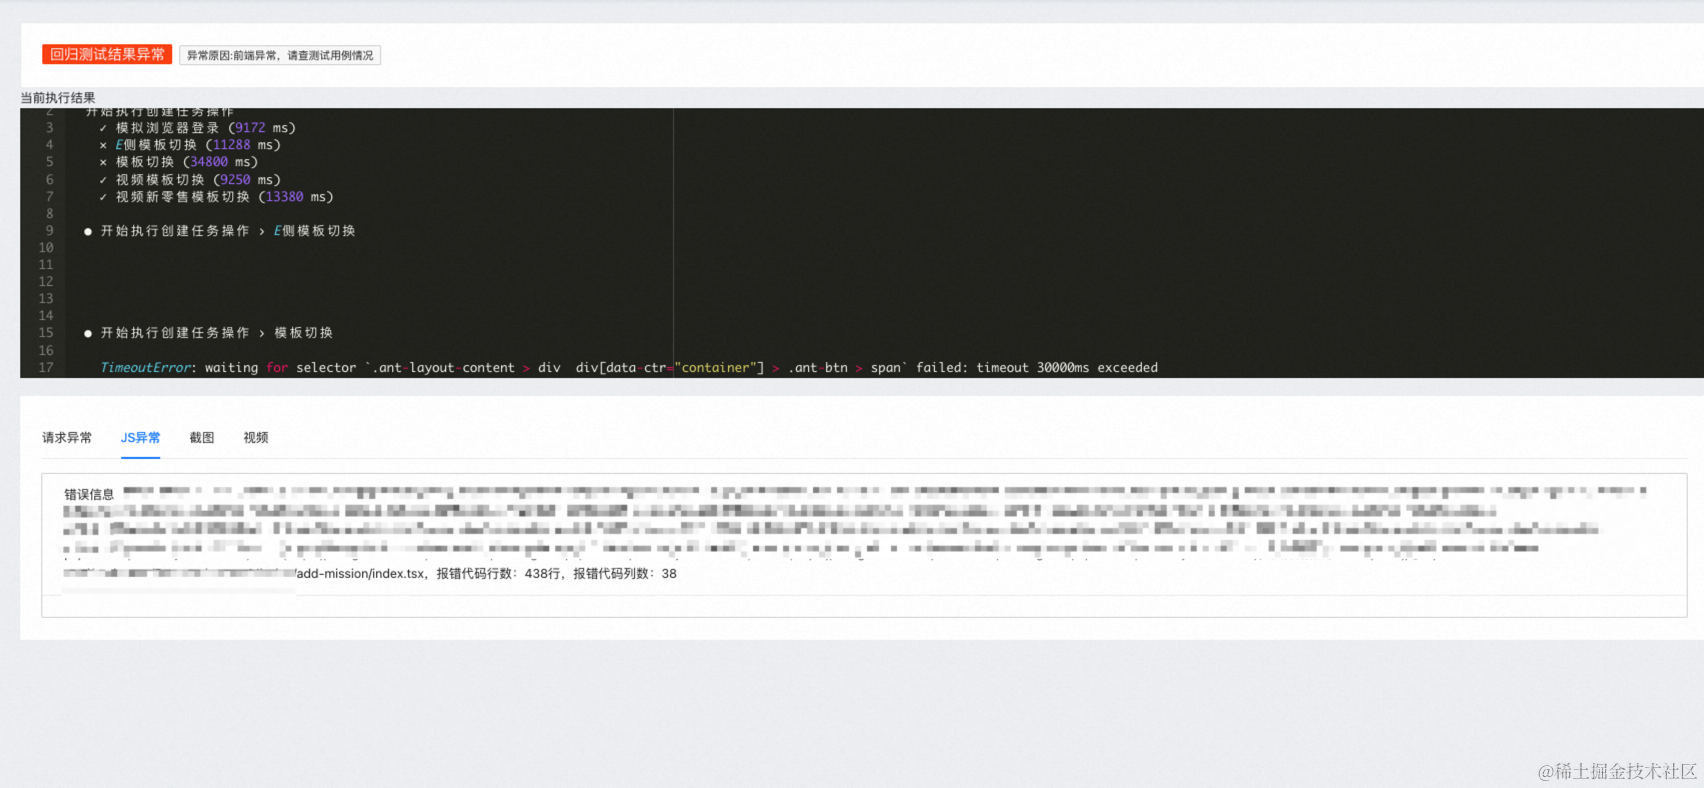
执行记录详情页,展示该条执行记录的详细详细,包含异常信息、截图、视频、sourcemap源码信息。
写在最后
至此,UI自动化测试平台的重要思路逻辑已经实现了,当然一篇文章肯定有很多细节点是无法讲到的并且有涉及到内部相关的能力,所以会直接忽略,主要包含如下:
- 数据库、数据表的逻辑;
- 图片、视频上传OSS;
- 项目、执行记录的接口;
如果你从这篇文章中得到了思路和灵感,但是对于一些细节觉得没了解清楚的,可以评论或者私信来讨论。
如果喜欢我的文章或者想上岸大厂,可以关注公众号「量子前端」,将不定期关注推送前端好文、分享就业资料秘籍,也希望有机会一对一帮助你实现梦想。
![二叉搜索树的最小绝对差[简单]](https://img-blog.csdnimg.cn/14b249fd6ed94cd1b8ab4ef9268280b9.png)

