OAuth2
OAuth2的使用场景
一、OAuth2解决什么问题
1. OAuth2提出的背景
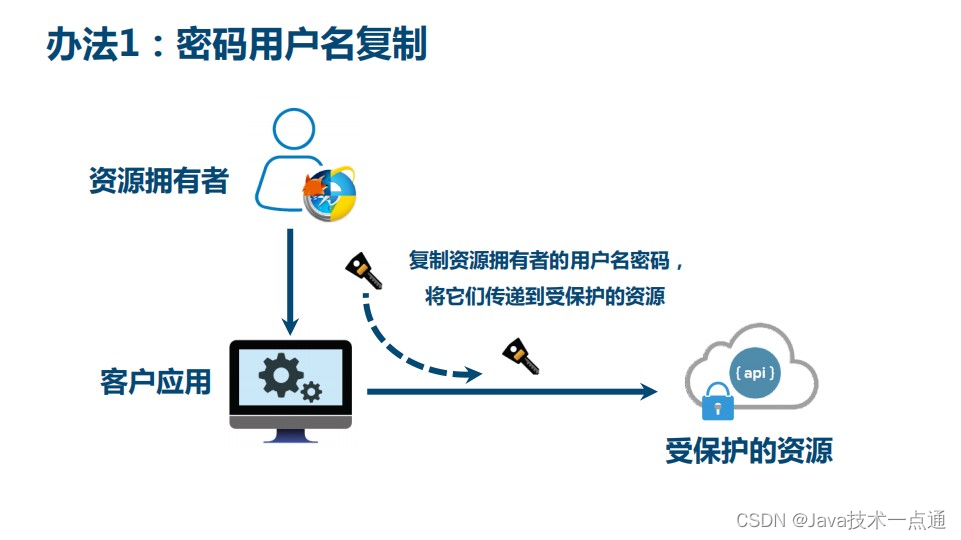
照片拥有者想要在云冲印服务上打印照片,云冲印服务需要访问云存储服务上的资源。

2. 图例
资源拥有者:照片拥有者。
客户应用:云冲印。
受保护的资源:照片。

3. 方式一:用户名密码复制
适用于同一公司内部的多个系统,不适用于不受信的第三方应用。
4. 方式二:通用开发者key
适用于合作商或者授信的不同业务部门之间。

5. 方式三:办法令牌
接近OAuth2方式,需要考虑如何管理令牌、颁发令牌、吊销令牌,需要统一的协议,因此就有了OAuth2协议。

二、现代微服务安全
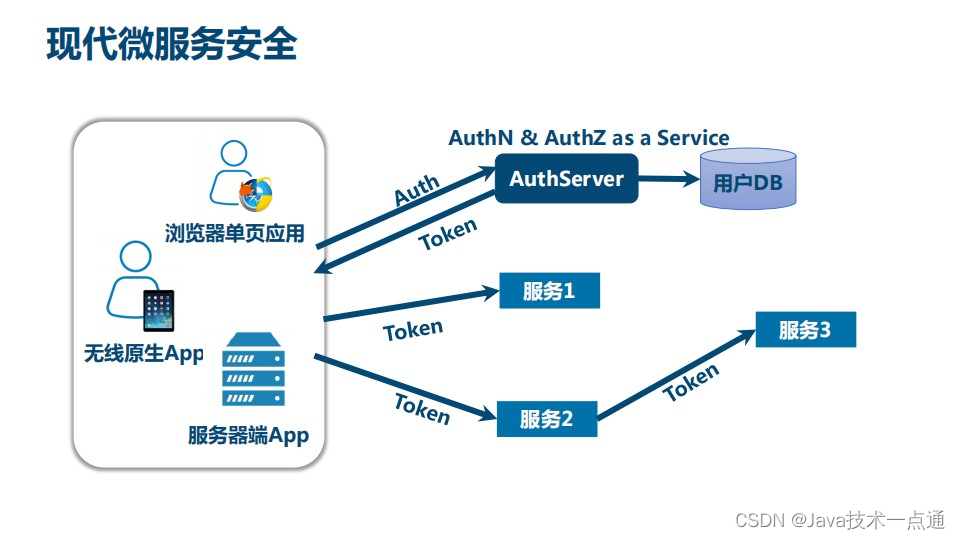
除了开放系统授权,OAuth2还可以应用于现代微服务安全。
1. 传统单块应用的安全

2. 现代微服务安全
现代微服务中系统微服务化以及应用的形态和设备类型增多,不能用传统的登录方式。
核心的技术不是用户名和密码,而是token,由AuthServer颁发token,用户使用token进行登录。
3. 典型的OAuth2应用

三、总结

四、OAuth2最简向导
川崎高彦:OAuth2领域专家,开发了一个OAuth2 sass服务,OAuth2 as Service,并且做成了一个公司。
再融资的过程中为了向投资人解释OAuth2是什么,于是写了一篇文章,《OAuth2最简向导》。
二、OAuth2的正式定义
一、什么是OAuth2
1. OAuth2正式定义

2. 令牌的核心
3. OAuth2的历史

4. OAuth2的优势

5. OAuth2的不足

6. Auth2涉及的角色

7. OAuth2术语


8. OAuth2令牌的类型

9. OAuth2的误解

二、回顾

微信扫描登录
一、生成授权URL
一、准备工作
-
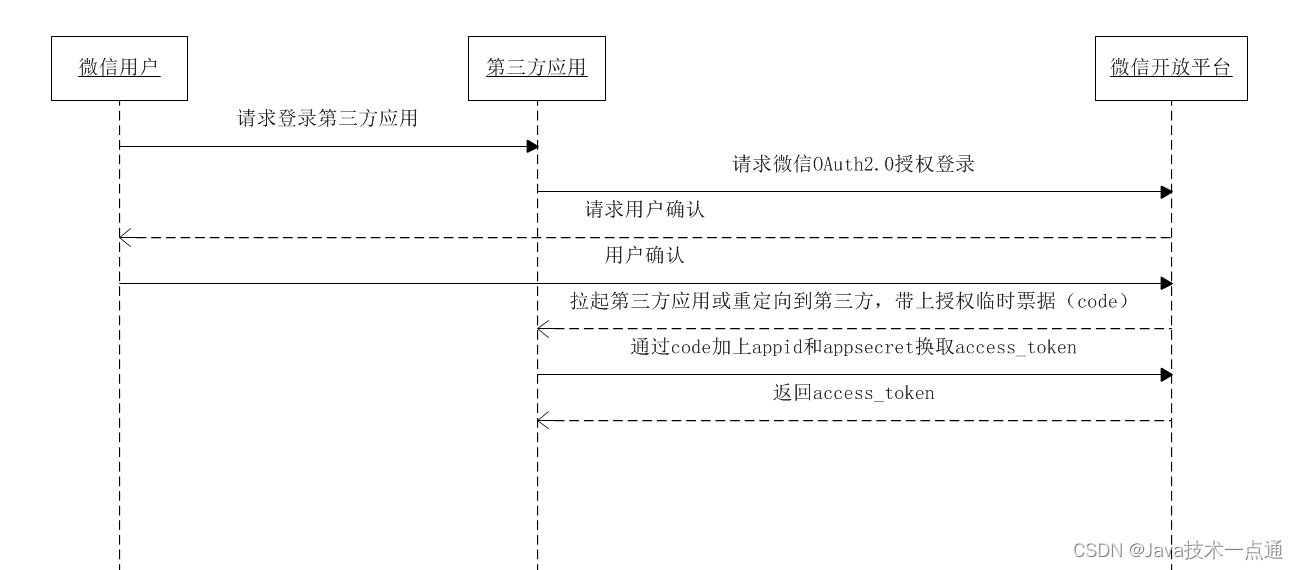
熟悉微信登录流程
参考文档:https://open.weixin.qq.com/cgi-bin/showdocument?action=dir_list&t=resource/res_list&verify=1&id=open1419316505&token=e547653f995d8f402704d5cb2945177dc8aa4e7e&lang=zh_CN -
获取access_token时序图
二、后端开发
1. 添加配置
application.properties添加相关配置信息:
# 微信开放平台 appid
wx.open.app_id=你的appid
# 微信开放平台 appsecret
wx.open.app_secret=你的appsecret
# 微信开放平台 重定向url
wx.open.redirect_url=http://你的服务器名称/api/ucenter/wx/callback
2. 创建常量类
创建 util 包,创建 ConstantWxUtils.java 常量类:
@Component
public class ConstantWxUtils implements InitializingBean {
    @Value("${wx.open.app_id}")
    private String appID;

    @Value("${wx.open.app_secret}")
    private String appSecret;

    @Value("${wx.open.redirect_url}")
    private String redirectUrl;

    public static String WX_APP_ID;
    public static String WX_APP_SECRET;
    public static String WX_REDIRECT_URL;

    @Override
    public void afterPropertiesSet() throws Exception {
        WX_APP_ID=this.appID;
        WX_APP_SECRET=this.appSecret;
        WX_REDIRECT_URL=this.redirectUrl;
    }

}
3. 创建controller
@Controller //注意这里没有配置 @RestController
@CrossOrigin
@RequestMapping("/api/ucenter/wx")
public class WxApiController {

    //生成微信扫描二维码,   %s 相当于?占位符
    @GetMapping("/login")
    public String getWxCode(){
        String baseUrl ="https://open.weixin.qq.com/connect/qrconnect"
                +"?appid=%s"
                +"&redirect_uri=%s"
                +"&response_type=code"
                +"&scope=snsapi_login"
                +"&state=%s"
                +"#wechat_redirect";

        //对redirect_uri进行URLEncoder编码
        String redirect_uri = ConstantWxUtils.WX_REDIRECT_URL;
        try {
            //参数1:待编码字符串 参数2:编码方式
            redirect_uri = URLEncoder.encode(redirect_uri, "utf-8");
        } catch (UnsupportedEncodingException e) {
            e.printStackTrace();
        }

        //设置 %s 占位符的参数,上面有3处
        String url = String.format(baseUrl,
                ConstantWxUtils.WX_APP_ID,
                redirect_uri,
                "atguigu");


        //请求微信地址
        return "redirect:" + url;
    }
}
授权url参数说明:
| 参数 | 是否必须 | 说明 |
|---|---|---|
| appid | 是 | 应用唯一标识 |
| redirect_uri | 是 | 请使用urlEncode对链接进行处理 |
| response_type | 是 | 填code |
| scope | 是 | 应用授权作用域,拥有多个作用域用逗号(,)分隔,网页应用目前仅填写snsapi_login即 |
| state | 否 | 用于保持请求和回调的状态,授权请求后原样带回给第三方。该参数可用于防止csrf攻击(跨站请求伪造攻击),建议第三方带上该参数,可设置为简单的随机数加session进行校验 |
4. 测试
访问:http://localhost:8160/api/ucenter/wx/login
访问授权url后会得到一个微信登录二维码:
用户扫描二维码会看到确认登录的页面:
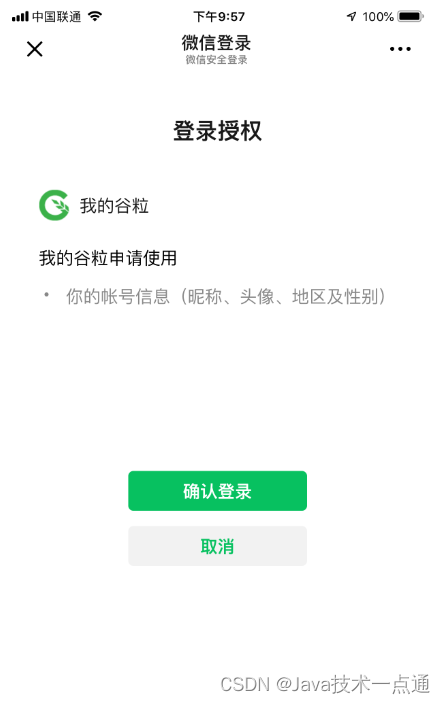
用户点击“确认登录”后,微信服务器会向谷粒学院的业务服务器发起回调,因此接下来我们需要开发回调controller。
二、开发回调URL
一、准备工作
1. 全局配置的跳转路径
# 微信开放平台 重定向url
wx.open.redirect_url=http://回调地址/api/ucenter/wx/callback
2. 修改当前项目启动端口号为8160
3. 测试回调是否可用
在 WxApiController 中添加方法:
 @GetMapping("/callback")
    public String callback(String code, String state, HttpSession session){
        //得到授权临时票据code
        System.out.println("code = " + code);
        System.out.println("state = " + state);
        return "redirect:http://localhost:3000";
    }
生成微信二维码后,手机扫码点击确认后在控制台会打印出获取到的扫码人的信息:

二、后台开发
1. 添加依赖
<dependencies>
    <!--httpclient-->
    <dependency>
        <groupId>org.apache.httpcomponents</groupId>
        <artifactId>httpclient</artifactId>
    </dependency>
    <!--commons-io-->
    <dependency>
        <groupId>commons-io</groupId>
        <artifactId>commons-io</artifactId>
    </dependency>
    <!--gson-->
    <dependency>
        <groupId>com.google.code.gson</groupId>
        <artifactId>gson</artifactId>
    </dependency>
</dependencies>
2. 创建httpclient工具类
HttpClientUtils
public class HttpClientUtils {

    public static final int connTimeout=10000;
    public static final int readTimeout=10000;
    public static final String charset="UTF-8";
    private static HttpClient client = null;

    static {
        PoolingHttpClientConnectionManager cm = new PoolingHttpClientConnectionManager();
        cm.setMaxTotal(128);
        cm.setDefaultMaxPerRoute(128);
        client = HttpClients.custom().setConnectionManager(cm).build();
    }

    public static String postParameters(String url, String parameterStr) throws ConnectTimeoutException, SocketTimeoutException, Exception{
        return post(url,parameterStr,"application/x-www-form-urlencoded",charset,connTimeout,readTimeout);
    }

    public static String postParameters(String url, String parameterStr,String charset, Integer connTimeout, Integer readTimeout) throws ConnectTimeoutException, SocketTimeoutException, Exception{
        return post(url,parameterStr,"application/x-www-form-urlencoded",charset,connTimeout,readTimeout);
    }

    public static String postParameters(String url, Map<String, String> params) throws ConnectTimeoutException,
            SocketTimeoutException, Exception {
        return postForm(url, params, null, connTimeout, readTimeout);
    }

    public static String postParameters(String url, Map<String, String> params, Integer connTimeout,Integer readTimeout) throws ConnectTimeoutException,
            SocketTimeoutException, Exception {
        return postForm(url, params, null, connTimeout, readTimeout);
    }

    public static String get(String url) throws Exception {
        return get(url, charset, null, null);
    }

    public static String get(String url, String charset) throws Exception {
        return get(url, charset, connTimeout, readTimeout);
    }

    /**
     * 发送一个 Post 请求, 使用指定的字符集编码.
     *
     * @param url
     * @param body RequestBody
     * @param mimeType 例如 application/xml "application/x-www-form-urlencoded" a=1&b=2&c=3
     * @param charset 编码
     * @param connTimeout 建立链接超时时间,毫秒.
     * @param readTimeout 响应超时时间,毫秒.
     * @return ResponseBody, 使用指定的字符集编码.
     * @throws ConnectTimeoutException 建立链接超时异常
     * @throws SocketTimeoutException  响应超时
     * @throws Exception
     */
    public static String post(String url, String body, String mimeType,String charset, Integer connTimeout, Integer readTimeout)
            throws ConnectTimeoutException, SocketTimeoutException, Exception {
        HttpClient client = null;
        HttpPost post = new HttpPost(url);
        String result = "";
        try {
            if (StringUtils.isNotBlank(body)) {
                HttpEntity entity = new StringEntity(body, ContentType.create(mimeType, charset));
                post.setEntity(entity);
            }
            // 设置参数
            RequestConfig.Builder customReqConf = RequestConfig.custom();
            if (connTimeout != null) {
                customReqConf.setConnectTimeout(connTimeout);
            }
            if (readTimeout != null) {
                customReqConf.setSocketTimeout(readTimeout);
            }
            post.setConfig(customReqConf.build());

            HttpResponse res;
            if (url.startsWith("https")) {
                // 执行 Https 请求.
                client = createSSLInsecureClient();
                res = client.execute(post);
            } else {
                // 执行 Http 请求.
                client = HttpClientUtils.client;
                res = client.execute(post);
            }
            result = IOUtils.toString(res.getEntity().getContent(), charset);
        } finally {
            post.releaseConnection();
            if (url.startsWith("https") && client != null&& client instanceof CloseableHttpClient) {
                ((CloseableHttpClient) client).close();
            }
        }
        return result;
    }


    /**
     * 提交form表单
     *
     * @param url
     * @param params
     * @param connTimeout
     * @param readTimeout
     * @return
     * @throws ConnectTimeoutException
     * @throws SocketTimeoutException
     * @throws Exception
     */
    public static String postForm(String url, Map<String, String> params, Map<String, String> headers, Integer connTimeout,Integer readTimeout) throws ConnectTimeoutException,
            SocketTimeoutException, Exception {

        HttpClient client = null;
        HttpPost post = new HttpPost(url);
        try {
            if (params != null && !params.isEmpty()) {
                List<NameValuePair> formParams = new ArrayList<NameValuePair>();
                Set<Entry<String, String>> entrySet = params.entrySet();
                for (Entry<String, String> entry : entrySet) {
                    formParams.add(new BasicNameValuePair(entry.getKey(), entry.getValue()));
                }
                UrlEncodedFormEntity entity = new UrlEncodedFormEntity(formParams, Consts.UTF_8);
                post.setEntity(entity);
            }

            if (headers != null && !headers.isEmpty()) {
                for (Entry<String, String> entry : headers.entrySet()) {
                    post.addHeader(entry.getKey(), entry.getValue());
                }
            }
            // 设置参数
            Builder customReqConf = RequestConfig.custom();
            if (connTimeout != null) {
                customReqConf.setConnectTimeout(connTimeout);
            }
            if (readTimeout != null) {
                customReqConf.setSocketTimeout(readTimeout);
            }
            post.setConfig(customReqConf.build());
            HttpResponse res = null;
            if (url.startsWith("https")) {
                // 执行 Https 请求.
                client = createSSLInsecureClient();
                res = client.execute(post);
            } else {
                // 执行 Http 请求.
                client = HttpClientUtils.client;
                res = client.execute(post);
            }
            return IOUtils.toString(res.getEntity().getContent(), "UTF-8");
        } finally {
            post.releaseConnection();
            if (url.startsWith("https") && client != null
                    && client instanceof CloseableHttpClient) {
                ((CloseableHttpClient) client).close();
            }
        }
    }


    /**
     * 发送一个 GET 请求
     *
     * @param url
     * @param charset
     * @param connTimeout  建立链接超时时间,毫秒.
     * @param readTimeout  响应超时时间,毫秒.
     * @return
     * @throws ConnectTimeoutException   建立链接超时
     * @throws SocketTimeoutException   响应超时
     * @throws Exception
     */
    public static String get(String url, String charset, Integer connTimeout,Integer readTimeout)
            throws ConnectTimeoutException,SocketTimeoutException, Exception {

        HttpClient client = null;
        HttpGet get = new HttpGet(url);
        String result = "";
        try {
            // 设置参数
            Builder customReqConf = RequestConfig.custom();
            if (connTimeout != null) {
                customReqConf.setConnectTimeout(connTimeout);
            }
            if (readTimeout != null) {
                customReqConf.setSocketTimeout(readTimeout);
            }
            get.setConfig(customReqConf.build());

            HttpResponse res = null;

            if (url.startsWith("https")) {
                // 执行 Https 请求.
                client = createSSLInsecureClient();
                res = client.execute(get);
            } else {
                // 执行 Http 请求.
                client = HttpClientUtils.client;
                res = client.execute(get);
            }

            result = IOUtils.toString(res.getEntity().getContent(), charset);
        } finally {
            get.releaseConnection();
            if (url.startsWith("https") && client != null && client instanceof CloseableHttpClient) {
                ((CloseableHttpClient) client).close();
            }
        }
        return result;
    }


    /**
     * 从 response 里获取 charset
     *
     * @param ressponse
     * @return
     */
    @SuppressWarnings("unused")
    private static String getCharsetFromResponse(HttpResponse ressponse) {
        // Content-Type:text/html; charset=GBK
        if (ressponse.getEntity() != null  && ressponse.getEntity().getContentType() != null && ressponse.getEntity().getContentType().getValue() != null) {
            String contentType = ressponse.getEntity().getContentType().getValue();
            if (contentType.contains("charset=")) {
                return contentType.substring(contentType.indexOf("charset=") + 8);
            }
        }
        return null;
    }


    /**
     * 创建 SSL连接
     * @return
     * @throws GeneralSecurityException
     */
    private static CloseableHttpClient createSSLInsecureClient() throws GeneralSecurityException {
        try {
            SSLContext sslContext = new SSLContextBuilder().loadTrustMaterial(null, new TrustStrategy() {
                public boolean isTrusted(X509Certificate[] chain,String authType) throws CertificateException {
                    return true;
                }
            }).build();

            SSLConnectionSocketFactory sslsf = new SSLConnectionSocketFactory(sslContext, new X509HostnameVerifier() {

                @Override
                public boolean verify(String arg0, SSLSession arg1) {
                    return true;
                }

                @Override
                public void verify(String host, SSLSocket ssl)
                        throws IOException {
                }

                @Override
                public void verify(String host, X509Certificate cert)
                        throws SSLException {
                }

                @Override
                public void verify(String host, String[] cns,
                                   String[] subjectAlts) throws SSLException {
                }

            });

            return HttpClients.custom().setSSLSocketFactory(sslsf).build();

        } catch (GeneralSecurityException e) {
            throw e;
        }
    }

    public static void main(String[] args) {
        try {
            String str= post("https://localhost:443/ssl/test.shtml","name=12&page=34","application/x-www-form-urlencoded", "UTF-8", 10000, 10000);
            //String str= get("https://localhost:443/ssl/test.shtml?name=12&page=34","GBK");
            /*Map<String,String> map = new HashMap<String,String>();
            map.put("name", "111");
            map.put("page", "222");
            String str= postForm("https://localhost:443/ssl/test.shtml",map,null, 10000, 10000);*/
            System.out.println(str);
        } catch (ConnectTimeoutException e) {
            // TODO Auto-generated catch block
            e.printStackTrace();
        } catch (SocketTimeoutException e) {
            // TODO Auto-generated catch block
            e.printStackTrace();
        } catch (Exception e) {
            // TODO Auto-generated catch block
            e.printStackTrace();
        }
    }

}
3. 创建回调controller方法
@Controller //注意这里没有配置 @RestController
@CrossOrigin
@RequestMapping("/api/ucenter/wx")
public class WxApiController {

    @Autowired
    private UcenterMemberService ucenterMemberService;

    //2.获取扫描人信息,添加数据
    @GetMapping("/callback")
    public String callback(String code, String state, HttpSession session){
        //得到授权临时票据code
//        System.out.println("code = " + code);
//        System.out.println("state = " + state);

        //获取code值,临时票据,类似于验证码

        //拿着code,去请求微信固定的地址,得到两个值 access_token 和 openid
        String baseAccessTokenUrl = "https://api.weixin.qq.com/sns/oauth2/access_token"+
                "?appid=%s" +
                "&secret=%s" +
                "&code=%s" +
                "&grant_type=authorization_code";

        //拼接三个参数:id 秘钥 和 code值
        String accessTokenUrl = String.format(baseAccessTokenUrl,
                ConstantWxUtils.WX_APP_ID,
                ConstantWxUtils.WX_APP_SECRET,
                code);


        //请求上面拼接好的地址,得到两个值 access_token 和 openid
        //使用httpclient【不用浏览器,也能模拟器出浏览器的请求和响应过程】发送请求,得到返回的结果
        String accessTokenInfo = null;
        try {
            accessTokenInfo = HttpClientUtils.get(accessTokenUrl);
            System.out.println("accessTokenInfo:" +accessTokenInfo);
        } catch (Exception e) {
            e.printStackTrace();
        }

        //从accessTokenInfo中获取出  access_token 和 openid 的值
        //将 accessTokenInfo 转换成 map集合,根据map的key 就可以获取对应的value
        //使用json转换工具
        Gson gson = new Gson();
        HashMap mapAccessToken = gson.fromJson(accessTokenInfo, HashMap.class);
        String access_token = (String) mapAccessToken.get("access_token");
        String openid = (String) mapAccessToken.get("openid");

        //判断数据库是否存在相同的微信内容,根据openid判断
        UcenterMember member = ucenterMemberService.getMemberByOpenId(openid);

        if (member == null) {

            //拿着 access_token 和 openid 的值再去请求微信提供的固定地址
            //访问微信的资源服务器,获取用户信息
            String baseUserInfoUrl = "https://api.weixin.qq.com/sns/userinfo" +
                    "?access_token=%s" +
                    "&openid=%s";
            String userInfoUrl = String.format(baseUserInfoUrl, access_token, openid);

            String resultUserInfo = null;
            try {
                resultUserInfo = HttpClientUtils.get(userInfoUrl);
                System.out.println(resultUserInfo);
            } catch (Exception e) {
                e.printStackTrace();
            }

            HashMap<String, Object> userInfoMap = gson.fromJson(resultUserInfo, HashMap.class);

            String nickname = (String) userInfoMap.get("nickname"); // 昵称
            String headimgurl = (String) userInfoMap.get("headimgurl"); // 头像


            //向数据库插入一条记录
            member = new UcenterMember();
            member.setNickname(nickname);
            member.setAvatar(headimgurl);
            member.setOpenid(openid);
            ucenterMemberService.save(member);

        }

        //使用jwt根据member对象生成token字符串
        String jwtToken = JwtUtils.getJwtToken(member.getId(), member.getNickname());

        // 返回首页面
        return "redirect:http://localhost:3000?token="+jwtToken;
    }


    //1. 生成微信扫描二维码
    @GetMapping("/login")
    public String getWxCode(){
        String baseUrl ="https://open.weixin.qq.com/connect/qrconnect"
                +"?appid=%s"
                +"&redirect_uri=%s"
                +"&response_type=code"
                +"&scope=snsapi_login"
                +"&state=%s"
                +"#wechat_redirect";

        //对redirect_uri进行URLEncoder编码
        String redirect_uri = ConstantWxUtils.WX_REDIRECT_URL;
        try {
            //参数1:待编码字符串 参数2:编码方式
            redirect_uri = URLEncoder.encode(redirect_uri, "utf-8");
        } catch (UnsupportedEncodingException e) {
            e.printStackTrace();
        }

        //设置 %s 占位符的参数,上面有3处
        String url = String.format(baseUrl,
                ConstantWxUtils.WX_APP_ID,
                redirect_uri,
                "atguigu");


        //请求微信地址
        return "redirect:" + url;

    }

}
4. 业务层
UcenterMemberService:
public interface UcenterMemberService extends IService<UcenterMember> {

    // 登录的方法
    String login(LoginVo loginVo);

    // 注册的方法
    void register(RegisterVo registerVo);

    UcenterMember getMemberByOpenId(String openid);
}
UcenterMemberServiceImpl:
 @Override
    public UcenterMember getMemberByOpenId(String openid) {
        QueryWrapper<UcenterMember> wrapper = new QueryWrapper<>();
        wrapper.eq("openid", openid);
        UcenterMember member = baseMapper.selectOne(wrapper);
        return member;
    }
5. 测试


三、前端整合和显示用户登录信息
1. 修改default.vue页面脚本
<script>
import "~/assets/css/reset.css";
import "~/assets/css/theme.css";
import "~/assets/css/global.css";
import "~/assets/css/web.css";

import loginApi from "@/api/login"
import cookie from "js-cookie";

export default {
  data() {
    return {
      token: "",
      loginInfo: {
        id: "",
        age: "",
        avatar: "",
        mobile: "",
        nickname: "",
        sex: "",
      }
    }
  },
  created() {

    //获取路径中token的值【用于微信二维码登录】
    this.token = this.$route.query.token
    if (this.token) {
      //判断路径中是否有token值
      this.wxLogin()
    }

    this.showInfo()
  },
  methods: {

    //微信登录显示的方法
    wxLogin() {
      //把token值放到cookie里面
      cookie.set("guli_token", this.token, { domain: "localhost" })
      cookie.set("guli_ucenter", "", { domain: "localhost" })

      //调用接口,根据token获取用户信息
      loginApi.getLoginUserInfo()
        .then(response => {
            this.loginInfo = response.data.data.userInfo
            cookie.set("guli_ucenter", this.loginInfo, { domain: "localhost" })
        })


    },

    // 退出登录
    logout() {
      //清空cookie值
      cookie.set("guli_token", "", {domain: "localhost"})
      cookie.set("guli_ucenter", "", {domain: "localhost"})

      //跳转首页面
      window.location.href = "/";
    },

    //创建方法从cookie中获取信息
    showInfo() {
      //从cookie中获取信息
      var userStr = cookie.get("guli_ucenter");

      //转字符串转换成json对象(js对象)
      if (userStr) {
        this.loginInfo = JSON.parse(userStr);
      }
    }
  }
};
</script>
2. 测试
访问:http://localhost:8160/api/ucenter/wx/login
扫描进行确认,会在首页显示扫码人的信息:

创作不易,如果有帮助到你,请给文章点个赞和收藏,让更多的人看到!!!
关注博主不迷路,内容持续更新中。







![[编程语言][C++][Qt]单独添加UI文件](https://img-blog.csdnimg.cn/acac9d73e7674108b28e571db11d049f.png#pic_center)