背景
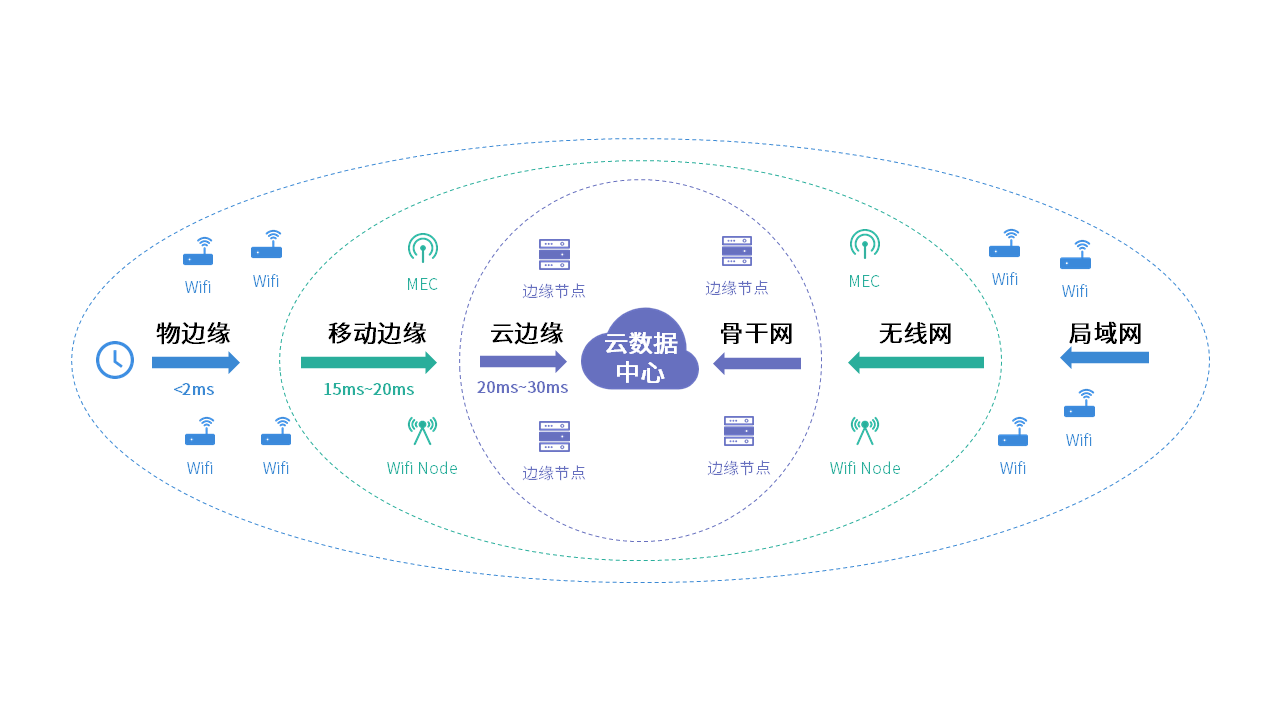
随着5G技术的发展,物联网边缘侧主要应用于数据传输量大、安全要求高以及数据实时处理等行业与应用场景中。其中,边缘计算是一种分布式计算模式,其将计算资源和数据处理能力推向接近数据源的边缘设备,以减少延迟并提高响应速度。
对前端领域而言,面对边缘场景下的应用开发也发生了相应的变化,其通常需要考虑边缘侧与终端侧的实现方式,并且还需考虑相较于传统 B/S 架构下的部署方案。本文旨在通过工业互联网场景下的一个实践案例,浅析面向边缘情形下的前端研发模式升级,以期能够给有边缘场景应用开发需求的读者提供一定的思路与借鉴。
架构设计
相较于传统前端研发场景,面对边缘情境下的前端研发模式,最重要的变化在于其环境的特殊性,包括:网络、存储等。在前期调研了部署环境后,为考虑用户体验,故而从架构设计上对整体系统进行了如下分层,分别是:应用层、服务层、平台层,如下图所示:
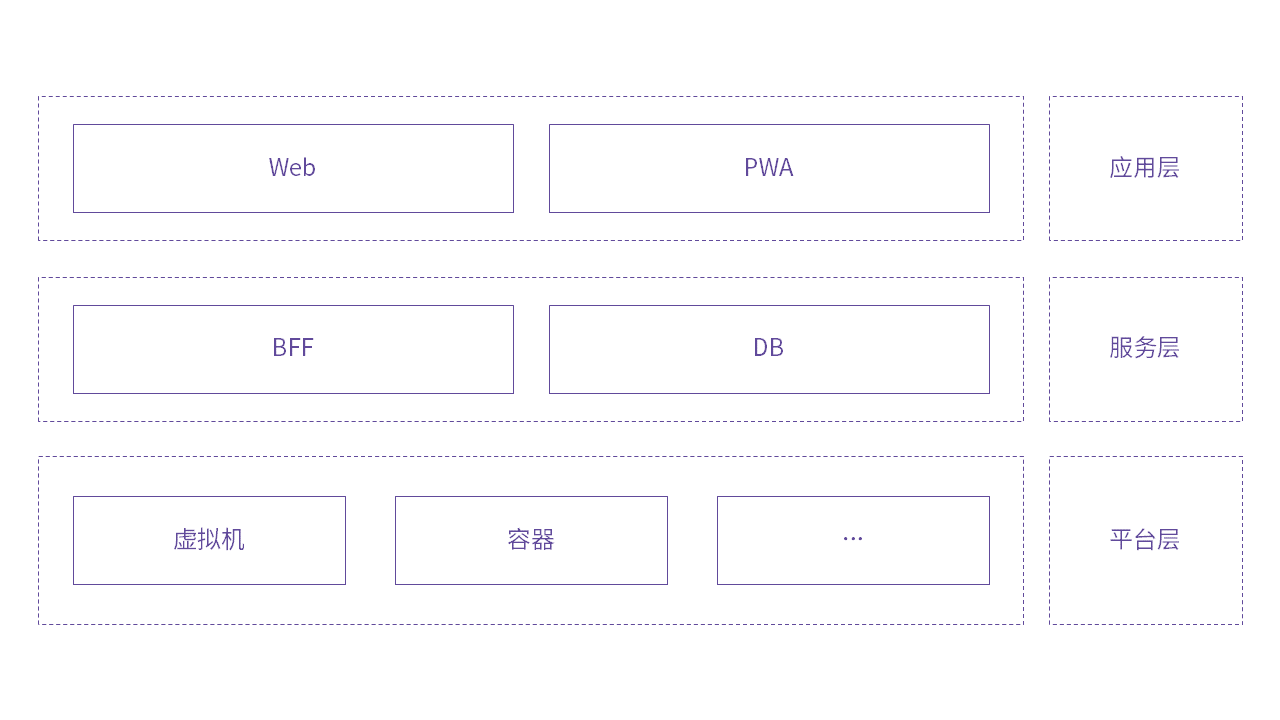
其中,应用层为了更好的体现离线与 Web 各自的优势,故而采用“Web+PWA”的形式进行呈现;案例中业务逻辑较为简单,服务层采用以Node.js为主的BFF形式的Serverless进行处理;对于平台层,本身案例应用部署环境为虚拟机环境,但考虑到多端的一致性,故而也支持容器化的部署。
技术选型
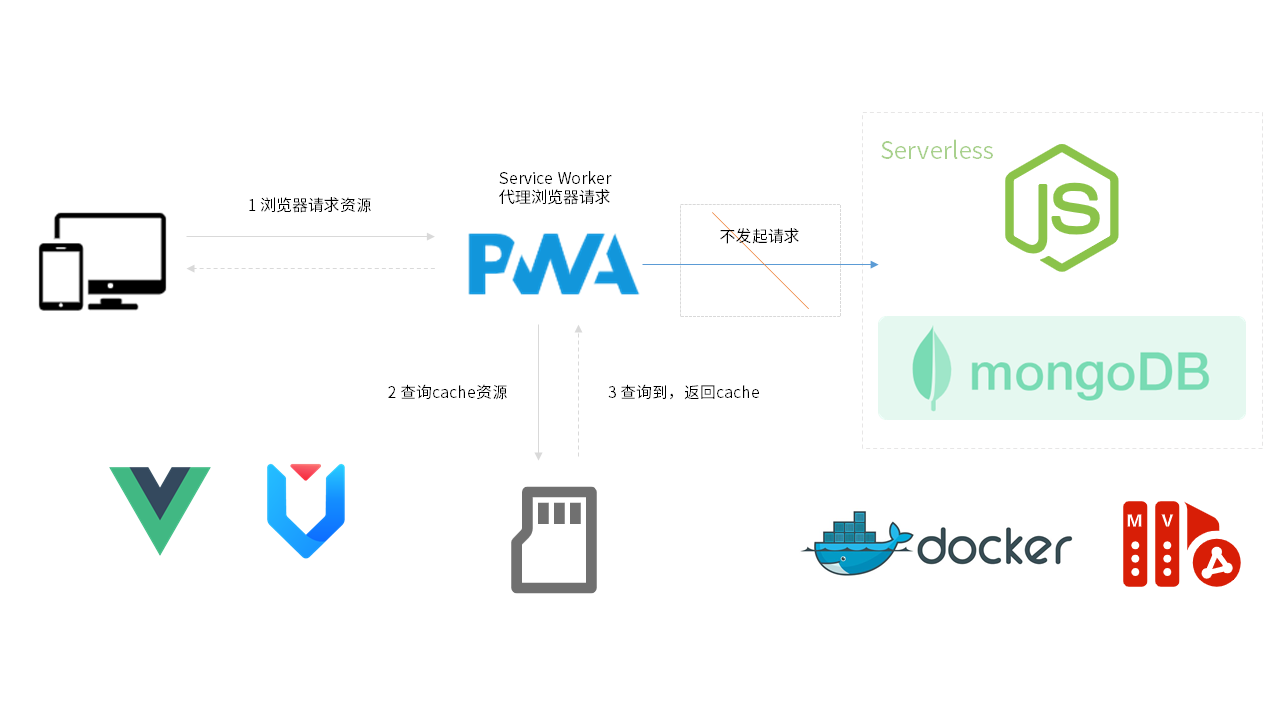
前期调研后,由于虚拟机Windows侧可能需要兼容IE 11,故而选择以Vue 2.x为主的全家桶构建,同时安装 PWA 的相关依赖。BFF侧,提供以mongoDB + Node.js的类 Serverless 服务,通过Docker容器、虚拟机及其他runtime进行调度,如下图所示:
源码分析
端侧
目录结构
- public
    - img
        - icons----------------------------------------------------- PWA所需icon物料
            - android-chrome-192x192.png
            - android-chrome-512x512.png
            - android-chrome-maskable-192x192.png
            - android-chrome-maskable-512x512.png
            - apple-touch-icon-60x60.png
            - apple-touch-icon-76x76.png
            - apple-touch-icon-120x120.png
            - apple-touch-icon-152x152.png
            - apple-touch-icon-180x180.png
            - apple-touch-icon.png
            - favicon-32x32.png
            - favicon.svg
            - msapplication-icon-144x144.png
            - mstile-150x150.png
            - safari-pinned-tab.svg
    - favicon.ico
    - index.html
    - robots.txt
- src
    - api
        - auth------------------------------------------------------- 登录接口
        - list------------------------------------------------------- 列表及查询接口
    - assets
        - logo.png
    - components
        - Footer.vue------------------------------------------------- 底部组件
        - Header.vue------------------------------------------------- 头部组件
        - Item.vue--------------------------------------------------- 列表组件
        - Layout.vue------------------------------------------------- 布局组件
    - router
        - index.js--------------------------------------------------- 路由拦截等相关逻辑
        - routes.js-------------------------------------------------- 路由表
    - store
        - index.js
    - styles
        - index.less
    - utils
        - http.js---------------------------------------------------- 封装http请求,axios拦截器
    - views
        - Home.vue--------------------------------------------------- 首页,用于路由表层级渲染
        - Login.vue-------------------------------------------------- 登录页
        - NotFound.vue----------------------------------------------- 路由未匹配页
    - App.vue-------------------------------------------------------- 根组件
    - main.js-------------------------------------------------------- Webpack打包的入口
    - registerServiceWorker.js--------------------------------------- PWA声明周期,service worker处理逻辑
- base.config.js----------------------------------------------------- 基础配置,用于脚手架读取
- default.conf------------------------------------------------------- nginx的conf配置
核心逻辑
router
构建路由表,用于处理页面的跳转,是一个树形结构,代码如下:
const routes = [
  {
    path: "/login",
    name: "Login",
    component: () => import("@/views/Login.vue"),
  },
  {
    path: "/",
    name: "/",
    redirect: "/home",
    component: () => import("@/components/Layout.vue"),
    children: [
      {
        path: "/home",
        name: "Home",
        component: () => import("@/views/Home.vue"),
        children: [
          {
            path: "/home/equipment",
            name: "Equipment",
            children: [
              {
                path: "/home/equipment/management",
                name: "Management",
                children: [
                  {
                    path: "/home/equipment/management/cpe",
                    name: "CPE",
                  },
                  {
                    path: "/home/equipment/management/hub",
                    name: "Hub",
                  },
                  {
                    path: "/home/equipment/management/switch",
                    name: "Switch",
                  },
                  {
                    path: "/home/equipment/management/robot",
                    name: "Robot",
                  },
                ],
              },
            ],
          },
        ],
      },
    ],
  },
  {
    path: "*",
    name: "NotFound",
    component: () => import("@/views/NotFound.vue"),
  },
];

export default routes;
对于router的入口,需要处理一下登录的拦截,使用路由拦截进行处理,代码如下:
import Vue from "vue";
import VueRouter from "vue-router";

Vue.use(VueRouter);

import routes from "./routes";

const router = new VueRouter({
  mode: "hash",
  base: process.env.BASE_URL,
  routes,
});

router.beforeEach(async (to, from, next) => {
  if (to.path === "/login") {
    next();
  } else {
    const token = sessionStorage.getItem("token");
    if (!token) {
      next("/login");
    } else {
      next();
    }
  }
});

export default router;
store
对于状态管理,需要对整体业务逻辑进行统一处理,由于比较简单,不需要用modules进行隔离,代码如下:
import Vue from "vue";
import Vuex from "vuex";
import createPersistedstate from "vuex-persistedstate";
Vue.use(Vuex);

const store = new Vuex.Store({
  state: {
    mode: "",
    searchValue: "",
    count: 0,
    checkedList: [],
  },
  mutations: {
    changeMode(state, p) {
      state.mode = p;
    },
    changeValue(state, v) {
      state.searchValue = v;
    },
    changeCount(state, n) {
      state.count = n;
    },
    addItem(state, id) {
      console.log("addItem", id);
      if (state.checkedList.indexOf(id) == -1) {
        state.checkedList.push(id);
      }
      console.log("checkedList", state.checkedList);
    },
    deleteItem(state, id) {
      console.log("deleteItem", id);
      const idx = state.checkedList.indexOf(id);
      if (idx != -1) {
        state.checkedList.splice(idx, 1);
      }
      console.log("checkedList", state.checkedList);
    },
  },
  actions: {},
  modules: {},
  plugins: [
    createPersistedstate({
      key: "vwaver-iiot-end",
    }),
  ],
});

export default store;
views
对于登录页,进行一个简单的验证,代码如下:
<template>
  <div class="login-view">
    <section class="login-box">
      <div class="login-box-header">
        <img
          class="login-box-logo"
          :src="require('@/assets/logo.png')"
          alt="logo"
        />
        <span class="login-box-title">{{ title }}</span>
      </div>
      <Form class="login-box-form" :form="form">
        <FormItem>
          <Input
            v-decorator="[
              'uname',
              { rules: [{ required: true, message: '请输入用户名!' }] },
            ]"
            placeholder="请输入用户名"
          >
            <Icon
              slot="prefix"
              type="user"
              style="color: rgba(0, 0, 0, 0.25);"
            />
          </Input>
        </FormItem>
        <FormItem>
          <Input
            v-decorator="[
              'password',
              {
                rules: [
                  { required: true, message: 'Please input your Password!' },
                ],
              },
            ]"
            type="password"
            placeholder="请输入密码"
          >
            <Icon
              slot="prefix"
              type="lock"
              style="color: rgba(0, 0, 0, 0.25);"
            />
          </Input>
        </FormItem>
      </Form>
      <Button class="login-box-button" type="primary" @click="handleLogin">
        登录
      </Button>
    </section>
  </div>
</template>

<script>
import { Form, Input, Button, Icon } from "ant-design-vue";

import { APILogin } from "@/api/auth";

const { title } = require("../../base.config");

export default {
  name: "Login",
  components: {
    Form,
    FormItem: Form.Item,
    Input,
    Button,
    Icon,
  },
  data() {
    return {
      form: this.$form.createForm(this, { name: "login" }),
      title,
    };
  },
  methods: {
    handleLogin() {
      this.form.validateFields(async (err, values) => {
        if (!err) {
          console.log("Received values of form: ", values);
          const res = await APILogin(values);
          console.log("res", res);
          if (res.success) {
            sessionStorage.setItem(`token`, res.data.token);
            this.$router.push("/");
          }
        }
      });
    },
  },
};
</script>

<style lang="less" scoped>
.login-view {
  width: 100%;
  height: 100%;
  background: linear-gradient(135deg, #513691, #61499b);
  display: flex;
  justify-content: center;
  align-items: center;

  .login-box {
    border: 1px solid #ececec;
    background: #fcfcfc;
    width: 80%;
    border-radius: 8px;
    box-shadow: 0 0 10px #ccc;
    display: flex;
    flex-direction: column;
    padding: 2rem 0;
    align-items: center;

    &-header {
      display: flex;
      align-items: center;
      justify-content: center;
      margin-bottom: 10px;
    }

    &-logo {
      height: 24px;
    }

    &-title {
      font-weight: bold;
      font-size: 24px;
      background: linear-gradient(135deg, #513691, #61499b);
      background-clip: text;
      color: transparent;
      margin-left: 6px;
    }

    &-form {
      width: 80%;
    }

    &-button {
      width: 80%;
      background: linear-gradient(135deg, #513691, #61499b);
      border-color:  #61499b;
    }
  }
}
</style>
对于Home页面,需要对页面的路由进行相应的渲染,代码如下:
<template>
  <div class="home">
    <section v-if="$store.state.mode != 'search'" class="home-nav">
      <Breadcrumb separator=">">
        <BreadcrumbItem v-for="item in nav" :key="item.path">
          <a :href="'#' + item.path">{{ item.name }}</a>
        </BreadcrumbItem>
      </Breadcrumb>
    </section>
    <section class="home-list">
      <Item
        :mode="$store.state.mode"
        v-for="l in list"
        :key="l.id"
        :title="l.title"
        :subTitle="l.subTitle"
        :id="l.id"
        @jump="handleJump"
        :count="
          l.children.filter((l) => $store.state.checkedList.indexOf(l) != -1)
            .length
        "
        :children="l.children"
        :prev="l.prev"
      />
    </section>
  </div>
</template>

<script>
import { Breadcrumb } from "ant-design-vue";
import Item from "@/components/Item";
import { APIList, APINav, APISearch } from "@/api/list";
import { mapMutations } from "vuex";

export default {
  name: "Home",
  components: {
    Breadcrumb,
    BreadcrumbItem: Breadcrumb.Item,
    Item,
  },
  data() {
    return {
      nav: [],
      list: [],
      count: 0,
    };
  },
  mounted() {
    console.log("$route", this.$route);
    console.log("$router", this.$router);
    if (this.$mode !== "search") {
      this.onGetList();
      this.onGetNav();
    } else {
      this.onSearchList();
    }
  },
  watch: {
    "$route.path": {
      handler(val, oldVal) {
        console.log("val", val);
        if (oldVal != val) {
          this.onGetList();
        }
      },
    },
    "$store.state.mode": {
      handler(val) {
        if (val == "search") {
          this.list = this.onSearchList();
        }
      },
    },
    "$store.state.searchValue": {
      handler(value) {
        if (value) {
          this.onSearchList();
        }
      },
    },
  },
  beforeDestroy() {},
  methods: {
    ...mapMutations(["changeCount"]),
    handleJump(id) {
      console.log("id", id);
      this.$router.push({
        path: `${this.$route.path}/${id}`,
      });
      this.$router.go(0);
    },
    async onGetList() {
      const res = await APIList({
        params: {
          name: this.$route.name,
        },
      });
      console.log("APIList", res);
      if (res.success) {
        this.list = res.data.list;
      }
    },
    async onGetNav() {
      const res = await APINav({
        params: {
          name: this.$route.name,
        },
      });
      console.log("APINav", res);
      if (res.success) {
        this.nav = res.data.nav;
      }
    },
    async onSearchList() {
      const res = await APISearch({
        value: this.$store.state.searchValue,
      });
      console.log("APISearch", res);
      if (res.success) {
        this.list = res.data.list;
        console.log("list.length", this.list.length);
        this.changeCount(this.list.length);
      }
    },
  },
};
</script>

<style lang="less" scoped>
// 鼠标hover时候的颜色
/deep/ .ant-checkbox-wrapper:hover .ant-checkbox-inner,
.ant-checkbox:hover .ant-checkbox-inner,
.ant-checkbox-input:focus + .ant-checkbox-inner {
  border: 1px solid #61499b !important;
}
// 设置默认的颜色
/deep/ .ant-checkbox {
  .ant-checkbox-inner {
    border: 1px solid #61499b;
    background-color: transparent;
  }
}
// 设置选中的颜色
/deep/ .ant-checkbox-checked .ant-checkbox-inner,
.ant-checkbox-indeterminate .ant-checkbox-inner {
  background-color: #61499b;
  border: 1px solid #61499b;
}

.home {
  width: 100%;
  height: calc(100% - 3rem);

  &-nav {
    background: #fdfdfd;
    padding: 0.25rem 0.5rem;
  }

  &-list {
  }
}
</style>
components
对于顶部搜索,实现组件Header,代码如下:
<template>
  <div class="header">
    <Search v-model="value" @search="handleSearch" />
  </div>
</template>

<script>
import { Input } from "ant-design-vue";
import { APISearch } from "@/api/list";
import { mapMutations } from "vuex";
export default {
  name: "Header",
  components: {
    Search: Input.Search,
  },
  data() {
    return {
      value: "",
    };
  },
  methods: {
    ...mapMutations(["changeMode", "changeValue"]),
    async handleSearch(value) {
      console.log("value", value);
      const res = await APISearch({
        value,
      });
      console.log("search", res);
      if (value) {
        this.changeMode("search");
        this.changeValue(value);
      } else {
        this.changeMode("");
        this.changeValue(value);
        this.$router.go(0);
      }
    },
  },
};
</script>

<style lang="less" scoped>
.header {
  height: 1rem;
  width: 100%;
  background: #fff;
  display: flex;
  justify-content: center;
  align-items: center;
  padding: 0 0.5rem;
}
</style>
对于底部显示数量,实现组件Footer,代码如下:
<template>
  <div class="footer">
    <template v-if="mode == 'search'">
      <span class="footer-text">已搜到{{ $store.state.count }}项</span>
    </template>
    <span class="footer-text" v-else>
      已选{{ $store.state.checkedList.length }}项
    </span>
  </div>
</template>

<script>
export default {
  name: "Footer",
  props: {
    mode: {
      type: String,
    },
  },
};
</script>

<style lang="less" scoped>
.footer {
  width: 100%;
  height: 2rem;
  background: #fff;
  padding: 0.25rem 0.5rem;

  &-text {
    color: #1778fe;
    font-weight: bold;
  }
}
</style>
对于列表的每项的显示,则进行一个统一的抽离,这也是本案例中最为核心的一个组件,代码如下:
<template>
  <div class="item">
    <section class="item-left">
      <Checkbox
        @change="handleChange"
        :indeterminate="indeterminate"
        :checked="checkAll"
      />
      <div class="item-left-text">
        <span class="item-left-title">{{ title }}</span>
        <span v-if="mode == 'search'" class="item-left-subtitle">
          {{ subTitle }}
        </span>
      </div>
    </section>
    <section
      v-if="children.length != 0"
      class="item-right"
      @click="handleClick"
    >
      <span class="item-right-count"
        >已选 {{ checkAll ? children.length : count }}</span
      >
      <Icon type="right" />
    </section>
  </div>
</template>

<script>
import { Checkbox, Icon } from "ant-design-vue";
import { mapMutations } from "vuex";
import routes from "@/router/routes";

console.log("children", routes[1].children);

const createTree = (children) => {
  const r = [];
  children.forEach((child) => {
    const key = child.path.split("/").pop();
    if (child.children) {
      r.push({
        key,
        children: createTree(child.children),
      });
    } else {
      r.push({
        key,
      });
    }
  });
  return r;
};

const tree = createTree(routes[1].children);

console.log("tree", tree);

export default {
  name: "Item",
  props: {
    mode: {
      type: String,
    },
    title: {
      type: String,
      default: "",
    },
    subTitle: {
      type: String,
      default: "",
    },
    count: {
      type: Number,
      default: 0,
    },
    id: {
      type: String,
    },
    children: {
      type: Array,
    },
    prev: {
      type: Array,
    },
  },
  components: {
    Checkbox,
    Icon,
  },
  data() {
    return {
      checkAll: false,
      indeterminate: false,
    };
  },
  watch: {},
  methods: {
    handleClick() {
      this.$emit("jump", this.id);
    },
    handleChange(e) {
      console.log("e", e.target.checked, this.id);
      if (e.target.checked) {
        this.checkAll = true;
        this.indeterminate = false;
        if (this.children.length != 0) {
          this.children.forEach((child) => {
            this.addItem(child);
          });
        }
        this.addItem(this.id);
      } else {
        this.checkAll = false;
        this.indeterminate = false;
        if (this.children.length != 0) {
          this.children.forEach((child) => {
            this.deleteItem(child);
          });
        }
        this.deleteItem(this.id);
        if (this.prev.length != 0) {
          this.prev.forEach((pre) => {
            this.deleteItem(pre);
          });
        }
      }
    },
    ...mapMutations(["addItem", "deleteItem"]),
  },
  mounted() {
    console.log("this.id", this.id);
    if (this.$store.state.checkedList.includes(this.id)) {
      this.checkAll = true;
    } else {
      this.checkAll = false;
      this.children.forEach((child) => {
        if (this.$store.state.checkedList.includes(child)) {
          this.indeterminate = true;
        }
      });
    }
  },
};
</script>

<style lang="less" scoped>
.item {
  padding: 0.25rem 0.5rem;
  margin: 1px 0;
  background: #fff;
  display: flex;
  justify-content: space-between;
  align-items: center;

  &-left {
    display: flex;
    align-items: center;
    &-text {
      margin-left: 0.125rem;
      display: flex;
      flex-direction: column;
    }

    &-subtitle {
      color: #ccc;
      margin-top: 0.125rem;
    }
  }

  &-right {
    flex: right;

    &-count {
      margin-right: 0.125rem;
    }
  }

  &-right:hover {
    cursor: pointer;
    color: #1778fe;
  }
}
</style>
边侧
目录结构
- db
  - __resource__
  - __temp__
- edge
  - model.js
  - operator.js
  - read.js
  - sync.js
  - utils.js
  - write.js
- public
    - index.html
- routes
    - api
    - auth.js-------------------------------------------------------- 登录接口
    - list.js-------------------------------------------------------- 列表及查询接口
    - object.js------------------------------------------------------ 对象存储接口
- app.js------------------------------------------------------------- express应用
- cluster.js--------------------------------------------------------- 用于监听app.js
- router.js---------------------------------------------------------- 统一的路由
- minio.js----------------------------------------------------------- minio设置
- mongodb.js--------------------------------------------------------- mongodb设置
- run.sh------------------------------------------------------------- wasmedge边缘运行时
核心逻辑
app.js
BFF采用简单的express服务,实例化入口app,代码如下:
const express = require("express");
const app = express();
const bodyParser = require("body-parser");

app.use(express.static("public"));

app.use(bodyParser.json());
app.use(
  bodyParser.urlencoded({
    extended: false,
  })
);

app.use("/auth", require("./routes/auth"));

app.use("/list", require("./routes/list"));

app.use('/object', require('./routes/object'));

app.listen(4000, () => {
  console.log("server running");
});
cluster.js
基于child_process构建app的监听,代码如下:
var fork = require("child_process").fork;

//保存被子进程实例数组
var workers = [];

//这里的被子进程理论上可以无限多
var appsPath = ["./app.js"];

var createWorker = function(appPath) {
  //保存fork返回的进程实例
  var worker = fork(appPath); //监听子进程exit事件

  worker.on("exit", function() {
    console.log("worker:" + worker.pid + "exited");
    delete workers[worker.pid];
    createWorker(appPath);
  });

  workers[worker.pid] = worker;
  console.log("Create worker:" + worker.pid);
};

//启动所有子进程
for (var i = appsPath.length - 1; i >= 0; i--) {
  createWorker(appsPath[i]);
}

//父进程退出时杀死所有子进程
process.on("exit", function() {
  for (var pid in workers) {
    workers[pid].kill();
  }
});
routes
对于鉴权部分,采用jwt进行验证,代码如下:
const router = require("../router");
const jwt = require("jsonwebtoken");

const { mongoose } = require("../mongodb");

const Schema = mongoose.Schema;

const expireTime = 60 * 60;

router.post("/login", async function (req, res) {
  const { uname, upwd } = req.body;

  const registerSchema = new Schema({
    uname: String,
    upwd: String,
  });

  const Register = mongoose.model("Register", registerSchema);

  const register = new Register({
    uname,
    upwd,
  });

  const token = jwt.sign({ uname, upwd }, "auth", { expiresIn: expireTime });

  register.save().then(
    (result) => {
      console.log("成功的回调", result);

      res.json({
        code: "0",
        data: {
          token,
        },
        msg: "成功",
        success: true,
      });
    },
    (err) => {
      console.log("失败的回调", err);

      res.json({
        code: "-1",
        data: {
          err: err,
        },
        msg: "失败",
        success: false,
      });
    }
  );
});

module.exports = router;
对于列表及查询相关接口,代码如下:
const router = require("../router");
const url = require("url");

const { mongoose } = require("../mongodb");

const Schema = mongoose.Schema;

const navMapSchema = new Schema({
    Home: [{ name: String, path: String }],
    Equipment: [{ name: String, path: String }],
    Management: [{ name: String, path: String }],
    CPE: [{ name: String, path: String }],
    Hub: [{ name: String, path: String }],
    Switch: [{ name: String, path: String }],
    Robot: [{ name: String, path: String }],
  }),
  columnMapSchema = new Schema({
    Home: [
      {
        id: String,
        title: String,
        subTitle: String,
        prev: [String],
        children: [String],
      },
    ],
    Equipment: [
      {
        id: String,
        title: String,
        subTitle: String,
        prev: [String],
        children: [String],
      },
    ],
    Management: [
      {
        id: String,
        title: String,
        subTitle: String,
        prev: [String],
        children: [String],
      },
    ],
    CPE: [
      {
        id: String,
        title: String,
        subTitle: String,
        prev: [String],
        children: [String],
      },
    ],
    Hub: [
      {
        id: String,
        title: String,
        subTitle: String,
        prev: [String],
        children: [String],
      },
    ],
    Switch: [
      {
        id: String,
        title: String,
        subTitle: String,
        prev: [String],
        children: [String],
      },
    ],
    Robot: [
      {
        id: String,
        title: String,
        subTitle: String,
        prev: [String],
        children: [String],
      },
    ],
  });
const NavMap = mongoose.model("NavMap", navMapSchema),
  ColumnMap = mongoose.model("ColumnMap", columnMapSchema);

// 简单化操作,设计时可对mongodb数据库进行更细粒度的集合处理
const navMap = new NavMap({
  Home: [
    {
      name: "全部",
      path: "/home",
    },
  ],
  Equipment: [
    {
      name: "全部",
      path: "/home",
    },
    {
      name: "工业设备",
      path: "/home/equipment",
    },
  ],
  Management: [
    {
      name: "全部",
      path: "/home",
    },
    {
      name: "工业设备",
      path: "/home/equipment",
    },
    {
      name: "设备管理",
      path: "/home/equipment/management",
    },
  ],
  CPE: [
    {
      name: "全部",
      path: "/home",
    },
    {
      name: "工业设备",
      path: "/home/equipment",
    },
    {
      name: "设备管理",
      path: "/home/equipment/management",
    },
    {
      name: "CPE设备",
      path: "/home/equipment/management/cpe",
    },
  ],
  Hub: [
    {
      name: "全部",
      path: "/home",
    },
    {
      name: "工业设备",
      path: "/home/equipment",
    },
    {
      name: "设备管理",
      path: "/home/equipment/management",
    },
    {
      name: "Hub设备",
      path: "/home/equipment/management/hub",
    },
  ],
  Switch: [
    {
      name: "全部",
      path: "/home",
    },
    {
      name: "工业设备",
      path: "/home/equipment",
    },
    {
      name: "设备管理",
      path: "/home/equipment/management",
    },
    {
      name: "交换机设备",
      path: "/home/equipment/management/switch",
    },
  ],
  Robot: [
    {
      name: "全部",
      path: "/home",
    },
    {
      name: "工业设备",
      path: "/home/equipment",
    },
    {
      name: "设备管理",
      path: "/home/equipment/management",
    },
    {
      name: "机器人设备",
      path: "/home/equipment/management/robot",
    },
  ],
});

router.get("/nav", async function (req, res) {
  const { name } = url.parse(req.url, true).query;
  console.log("/nav", name);
  console.log("nav", navMap[`${name}`]);
  navMap.save().then(
    (result) => {
      console.log("成功的回调", result);
      res.json({
        code: "0",
        data: {
          nav: navMap[`${name}`],
        },
        msg: "成功",
        success: true,
      });
    },
    (err) => {
      console.log("失败的回调", err);

      res.json({
        code: "-1",
        data: {
          err: err,
        },
        msg: "失败",
        success: false,
      });
    }
  );
});

const columnMap = new ColumnMap({
  Home: [
    {
      id: "equipment",
      title: "工业设备",
      subTitle: "全部",
      prev: [],
      children: [
        "management",
        "cpe",
        "camera",
        "wifi",
        "hub",
        "usb",
        "ethernet",
        "switch",
        "two",
        "three",
        "four",
        "robot",
        "arm",
        "leg",
      ],
    },
  ],
  Equipment: [
    {
      id: "management",
      title: "设备管理",
      subTitle: "全部 - 工业设备",
      prev: ["equipment"],
      children: [
        "cpe",
        "camera",
        "wifi",
        "hub",
        "usb",
        "ethernet",
        "switch",
        "two",
        "three",
        "four",
        "robot",
        "arm",
        "leg",
      ],
    },
  ],
  Management: [
    {
      id: "cpe",
      title: "CPE设备",
      subTitle: "全部 - 工业设备 - 设备管理",
      prev: ["equipment", "management"],
      children: ["camera", "wifi"],
    },
    {
      id: "hub",
      title: "Hub设备",
      subTitle: "全部 - 工业设备 - 设备管理",
      prev: ["equipment", "management"],
      children: ["usb", "ethernet"],
    },
    {
      id: "switch",
      title: "交换机设备",
      subTitle: "全部 - 工业设备 - 设备管理",
      prev: ["equipment", "management"],
      children: ["two", "three", "four"],
    },
    {
      id: "robot",
      title: "机器人设备",
      subTitle: "全部 - 工业设备 - 设备管理",
      prev: ["equipment", "management"],
      children: ["arm", "leg"],
    },
  ],
  CPE: [
    {
      id: "camera",
      title: "摄像头",
      prev: ["equipment", "management", "cpe"],
      subTitle: "全部 - 工业设备 - 设备管理 - CPE设备",
      children: [],
    },
    {
      id: "wifi",
      title: "WiFi",
      prev: ["equipment", "management", "cpe"],
      subTitle: "全部 - 工业设备 - 设备管理 - CPE设备",
      children: [],
    },
  ],
  Hub: [
    {
      id: "usb",
      title: "USB Hub",
      prev: ["equipment", "management", "hub"],
      subTitle: "全部 - 工业设备 - 设备管理 - Hub设备",
      children: [],
    },
    {
      id: "ethernet",
      title: "Ethernet Hub",
      prev: ["equipment", "management", "hub"],
      subTitle: "全部 - 工业设备 - 设备管理 - Hub设备",
      children: [],
    },
  ],
  Switch: [
    {
      id: "two",
      title: "二层交换机",
      prev: ["equipment", "management", "switch"],
      subTitle: "全部 - 工业设备 - 设备管理 - 交换机设备",
      children: [],
    },
    {
      id: "three",
      title: "三层交换机",
      prev: ["equipment", "management", "switch"],
      subTitle: "全部 - 工业设备 - 设备管理 - 交换机设备",
      children: [],
    },
    {
      id: "four",
      title: "四层交换机",
      prev: ["equipment", "management", "switch"],
      subTitle: "全部 - 工业设备 - 设备管理 - 交换机设备",
      children: [],
    },
  ],
  Robot: [
    {
      id: "arm",
      title: "机械臂",
      prev: ["equipment", "management", "robot"],
      subTitle: "全部 - 工业设备 - 设备管理 - 机器人设备",
      children: [],
    },
    {
      id: "leg",
      title: "腿式机器人",
      prev: ["equipment", "management", "robot"],
      subTitle: "全部 - 工业设备 - 设备管理 - 机器人设备",
      children: [],
    },
  ],
});

router.get("/columns", async function (req, res) {
  const { name } = url.parse(req.url, true).query;
  console.log("/columns", name);

  columnMap.save().then(
    (result) => {
      console.log("成功的回调", result);
      res.json({
        code: "0",
        data: {
          list: columnMap[`${name}`],
        },
        msg: "成功",
        success: true,
      });
    },
    (err) => {
      console.log("失败的回调", err);

      res.json({
        code: "-1",
        data: {
          err: err,
        },
        msg: "失败",
        success: false,
      });
    }
  );
});

router.post("/search", async function (req, res) {
  const { value } = req.body;
  console.log("/columns", value);

  const names = Object.values(columnMap).flat();

  console.log("names", names);
  const list = names.filter((f) => f.title.indexOf(value) != -1);

  res.json({
    code: "0",
    data: {
      list,
    },
    msg: "成功",
    success: true,
  });
});

module.exports = router;
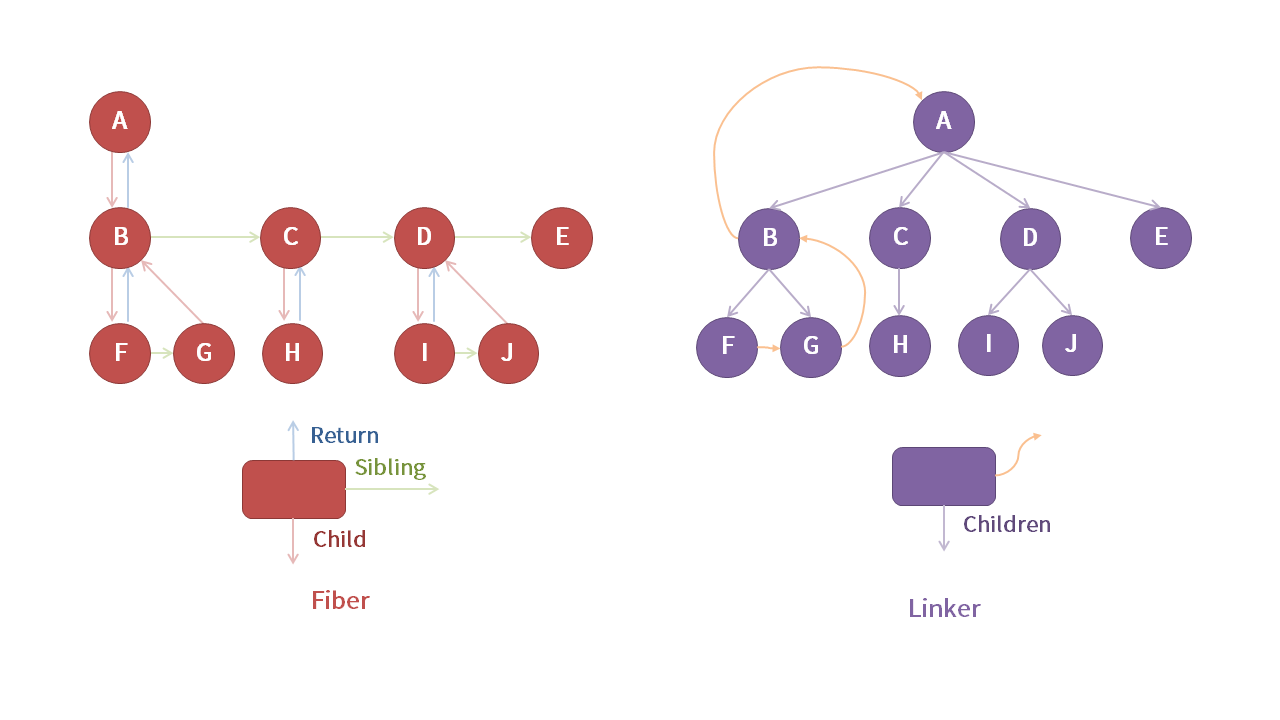
其中,对于树形结构的构建,采用双向链表的形式进行prev及children的派发,如下图所示:
router.js
构建统一的 express 路由,用于各routes模块的引用,代码如下:
const express = require('express');
const router = express.Router();

module.exports = router;
minio.js
使用minio来对对象存储中的资源进行处理,边缘侧对网络要求较高,对于某些离线场景,需要将静态资源托管到本地,代码如下:
const Minio = require('minio');

// 对于静态资源,在边缘侧可进行图片、视频等静态资源计算和缓存,与边缘侧部署存储方式有关
const minio = key => {
    return new Minio.Client({
        endPoint: 'ip',
        port: 9090,
        useSSL: false,
        accessKey: 'accessKey',
        secretKey: 'secretKey'
    });
}

module.exports = minio;
对于同步操作,可以使用edge目录下的sync模块进行处理,代码如下:
const axios = require("axios");
const fs = require("fs");

const url = "http://localhost:4000",
  bucketName = "bucketName",
  destDirName = "db/__resource__";

const prefixFilter = (prefix) => prefix.substring(0, prefix.length - 1);

const createImage = (bucketName, objectName) => {
  axios
    .post(`${url}/object/presignedGetObject`, {
      bucketName: bucketName,
      objectName: objectName,
    })
    .then((res) => {
      if (res.data.success) {
        axios({
          method: "get",
          url: res.data.data,
          responseType: "arraybuffer",
        }).then((r) => {
          fs.writeFile(
            `./${destDirName}/${objectName}`,
            r.data,
            "binary",
            function (err) {
              if (err) console.error(err);
              console.log(`创建图片${objectName}成功`);
            }
          );
        });
      }
    });
};

const recursive = (bucketName, prefix) => {
  axios
    .post(`${url}/object/listObjects`, {
      bucketName: bucketName,
      prefix: prefix,
      pageNum: -1,
    })
    .then((res) => {
      console.log("获取图片信息", res.data.data);
      if (res.data.success) {
        return res.data.data.lists;
      }
    })
    .then((data) => {
      data?.forEach((d) => {
        if (d.prefix) {
          if (fs.existsSync(`./${destDirName}/${prefixFilter(d.prefix)}`)) {
            recursive(bucketName, d.prefix);
          } else {
            fs.promises
              .mkdir(`./${destDirName}/${prefixFilter(d.prefix)}`)
              .then(() => {
                recursive(bucketName, d.prefix);
              })
              .catch((err) => console.error(err));
          }
        } else {
          if (/\.(png|svg|jepg|jpg|gif|mp4|mp3|avi|flv)$/.test(d.name)) {
            console.log("d.name", d.name);
            createImage(bucketName, d.name);
          }
        }
      });
    });
};

recursive(bucketName, "");
mongodb.js
对于数据的存储与隔离,则采用“边侧+云侧”的方式进行备份存储。其中,对于云侧,使用mongodb进行数据的存储与操作,代码如下:
const mongoose = require('mongoose');

const uname = 'admin',
      upwd = 'abc123';

const url = [
    'ip:port',
    // 127.0.0.1:27017 本地启动的mongodb
];

// console.log(`mongodb://${uname}:${upwd}@${url.join(',')}`)


async function db() {
    await mongoose.connect(`mongodb://${uname}:${upwd}@${url.join(',')}`);
}

exports.db = db;

exports.mongoose = mongoose;
对于边缘侧,则可以使用模拟的集合操作来进行磁盘的挂载与存储,代码如下:
// model.js
exports.DOCUMENTS_SCHEMA = {
  _name: String,
  _collections: Array,
};

exports.COLLECTIONS_SCHEMA = {
  _id: String,
};

// operator.js
const { read } = require('./read');

const { write } = require('./write');

exports.find = async (...args) => await read('FIND', ...args);

exports.remove = async (...args) => await write('REMOVE', ...args);

exports.add = async (...args) => await write('ADD', ...args);

exports.update = async (...args) => await write('UPDATE', ...args);

// read.js
const {
    isExit,
    genCollection,
    genDocument,
    findCollection,
    findLog,
    stringify,
    fs,
    compose,
    path
} = require('./utils');

exports.read = async (method, ...args) => {
    let col = '', log = '';
    const isFileExit = isExit(args[0], `${args[1]}_${args[2]['phone']}.json`);
    console.log('isFileExit', isFileExit)
    const doc = genDocument(...args);
    switch (method) {
        case 'FIND':
            col = compose( stringify, findCollection )(doc, genCollection(...args));
            log = compose( stringify, findLog, genCollection )(...args);
            break;
    };

    if(isFileExit) {
        return fs.promises.readFile(path.resolve(__dirname, `../db/${args.slice(0,2).join('/')}`), {encoding: 'utf-8'}).then(res => {
            console.log('res', res);
            console.log(log)
            return {
                flag: true,
                data: res,
            };
        })
    } else {
        return {
            flag: false,
            data: {}
        };
    }
};

// write.js
const {
    isExit,
    fs,
    path,
    stringify,
    compose,
    genCollection,
    addCollection,
    addLog,
    updateCollection,
    updateLog,
    removeCollection,
    removeLog,
    genDocument
} = require('./utils');

exports.write = async (method, ...args) => {
    console.log('write args', args, typeof args[2]);
    const isDirExit = isExit(args.slice(0, 1));
    const doc = genDocument(...args);
    let col = '', log = '';
    switch (method) {
        case 'ADD':
            col = compose( stringify, addCollection )(doc, genCollection(...args));
            log = compose( stringify, addLog, genCollection )(...args);
            break;
        case 'REMOVE':
            col = compose( stringify, removeCollection )(doc, genCollection(...args));
            log = compose( stringify ,removeLog, genCollection )(...args);
            break;
        case 'UPDATE':
            col = compose( stringify, updateCollection )(doc, genCollection(...args));
            log = compose( stringify, updateLog, genCollection )(...args);
            break;
    }

    if (!isDirExit) {
        return fs.promises.mkdir(path.resolve(__dirname, `../db/${args[0]}`))
            .then(() => {
                console.log(`创建数据库${args[0]}成功`);
                return true;
            })
            .then(flag => {
                if (flag) {
                    return fs.promises.writeFile(path.resolve(__dirname, `../db/${args.slice(0,2).join('/')}`), col)
                        .then(() => {
                            console.log(log);
                            return true;
                        })
                        .catch(err => console.error(err))
                }
            })
            .catch(err => console.error(err))
    } else {
        return fs.promises.writeFile(path.resolve(__dirname, `../db/${args.slice(0,2).join('/')}`), col)
            .then(() => {
                console.log(log)
                return true;
            })
            .catch(err => console.error(err))
    }
};
对于工具函数utils,代码如下:
// utils
const { DOCUMENTS_SCHEMA, COLLECTIONS_SCHEMA } = require('./model');

const { v4: uuidv4 } = require('uuid');

const path = require('path');

const fs = require('fs');

exports.path = path;
exports.uuid = uuidv4;
exports.fs = fs;

exports.compose = (...funcs) => {
    if(funcs.length===0){
        return arg=>arg;
    }
    if(funcs.length===1){
        return funcs[0];
    }
    return funcs.reduce((a,b)=>(...args)=>a(b(...args)));
};

exports.stringify = arg => JSON.stringify(arg);

exports.isExit = (...args) => fs.existsSync(path.resolve(__dirname, `../db/${args.join('/')}`));

console.log('DOCUMENTS_SCHEMA', DOCUMENTS_SCHEMA);

exports.genDocument = (...args) => {
    return {
        _name: args[1],
        _collections: []
    }
};

console.log('COLLECTIONS_SCHEMA', COLLECTIONS_SCHEMA);

exports.genCollection = (...args) => {
    return {
        _id: uuidv4(),
        ...args[2]
    }
};

exports.addCollection = ( doc, col ) => {
    doc._collections.push(col);
    return doc;
};

exports.removeCollection = ( doc, col ) => {
    for(let i = 0; i < doc._collections.length; i++) {
        if(doc._collections[i][`_id`] == col._id) {
            doc._collections.splice(i,1)
        }
    }
    return doc;
};

exports.findCollection = ( doc, col ) => {
    return doc._collections.filter(f => f._id == col._id)[0];
};

exports.updateCollection = ( doc, col ) => {
    doc._collections = [col];
    return doc;
};

exports.addLog = (arg) => {
    return `增加了集合 ${JSON.stringify(arg)}`
};

exports.removeLog = () => {
    return `移除集合成功`
};

exports.findLog = () => {
    return `查询集合成功`
};

exports.updateLog = (arg) => {
    return `更新了集合 ${JSON.stringify(arg)}`
};
run.sh
对于边缘侧,由于其自身的环境限制,通常来说构建边缘侧运行时便成为了边缘计算性能好坏的关键因素。近年来,各大厂商及开发者都致力于对边缘侧运行时环境的探索。
其中,个人以为以“Rust+WebAssembly"的运行时构建技术方案相对来说具有一定的优势。首先,Rust自身是内存安全的,其对边缘场景有着天然的优势;其次,WebAssembly是各大语言转换方案中的一种重要桥梁,尤其对于以大前端为技术底座的体系而言,更可谓是恰如其分的弥补了前端体系的缺陷;最后,基于“rust+wasm”的方案相较于docker而言具有更小的初始体积。故而,这里采用了业界已有的WasmEdge的现成运行时方案,运行脚本代码如下:
# 下载wasmedge边缘运行时
wget https://github.com/second-state/wasmedge-quickjs/releases/download/v0.5.0-alpha/wasmedge_quickjs.wasm

# 运行边缘侧node.js服务
$ wasmedge --dir .:. wasmedge_quickjs.wasm app.js
云侧
目录结构
- go
  - compute
    - machine.go
    - metal.go
    - service.go
  - network
    - balance.go
    - virtual.go
  - storage
    - block.go
    - container.go
    - file.go
    - object.go
  - build.sh
  - main.go
- src
    - database.js----------------------------------------------------- 云数据库封装
    - index.js-------------------------------------------------------- 云函数sdk打包入口
    - storage.js------------------------------------------------------ 云存储封装
- minio.yaml---------------------------------------------------------- 云端对象存储部署
- mongo.yaml---------------------------------------------------------- 云端数据库部署
核心逻辑
go
go部分是进行云中间件相关产物的构建,这里不是前端Serverless构建的核心,需要配合云产商或者云相关的部门进行协作,这里以go语言为基础蓝本,简写下相关产品的一些伪码逻辑
database.js
基于云端数据库产品的封装,对于Serverless而言,主要是以mongodb的NoSQL数据库为主
storage.js
基于云端存储产品的封装,包括:对象存储、块存储、文件存储等
index.js
Serverless云函数相关的sdk封装,代码如下:
import database from './database';
import storage from './storage';

function cloud() {
    console.log('vwaver-cloud-sdk');
}

cloud.prototype.database = database;

cloud.prototype.storage = storage;

export default cloud;
minio.yaml
对于云平台的对象存储,采用minio的k8s相关部署,代码如下:
apiVersion: v1
kind: Pod
metadata:
  labels:
    app: minio
  name: minio
spec:
  containers:
  - name: minio
    image: quay.io/minio/minio:latest
    command:
    - /bin/bash
    - -c
    args:
    - minio server /minio --console-address :9090
    volumeMounts:
    - mountPath: /minio
      name: minio-volume
  volumes:
  - name: minio-volume
    hostPath:
      path: /mnt/minio
      type: DirectoryOrCreate
---
apiVersion: v1
kind: Service
metadata:
  name: minio
spec:
  type: ClusterIP
  selector:
    app: minio
  ports:
  - port: 9090
    targetPort: 9090
mongo.yaml
对于云平台的mongodb数据库,部署代码如下:
apiVersion: apps/v1
kind: Deployment
metadata:
  name: mongodb
  labels:
    app: mongodb
spec:
  replicas: 3
  selector:
    matchLabels:
      app: mongodb
  template:
    metadata:
      labels:
        app: mongodb
    spec:
      containers:
      - name: mongodb
        image: hub.docker.com/mongo:latest
        imagePullPolicy: Always
        resources:
            limits:
              cpu: 5
              memory: 10G
            requests:
              cpu: 1
              memory: 1G
        env:
          - name: MONGO_INITDB_ROOT_USERNAME  # 设置用户名
            value: admin
          - name: MONGO_INITDB_ROOT_PASSWORD  # 设置密码
            value: abc123
        volumeMounts:
          - mountPath: /mongodb
            name: mongodb-volume
      volumes:
        - name: mongodb-volume
          hostPath:
            path: /mnt/mongodb
            type: DirectoryOrCreate
---
apiVersion: v1
kind: Service
metadata:
  name: mongodb
spec:
  type: ClusterIP
  selector:
    app: mongodb
  ports:
  - port: 27017
    targetPort: 27017
总结
对于本次应用构建,对于业务的逻辑而言,其实还是相对简单的,但是对于环境的部署与调试带来的不确定性还是需要各位开发者去思考和延展的,尤其是对于复杂边缘场景的生产化过程,其本身的复杂性也要远远超过业务逻辑本身,可进行如下总结:
- 端侧:提供高适配性能的应用兼容,要注意某些特殊尺寸及渲染引擎剪切造成的功能问题
- 边侧:渲染场景中对于离线要求较高,提供高性能的
runtime是重中之重,例如:wasmedge(rust+wasm) - 云侧:提供基于
k8s或者k3s的服务编排集群,支持Serverless化,提供云、边、端一致性的环境部署及开发
业务开发本身并不仅仅是考察如何对业务逻辑进行拆解,更重要的是能够透过业务本身来思考今后开发过程中的研发模式以及一些痛点问题的解决与规避,前端工程师并不仅仅是一个业务逻辑的实现者,更要是问题的发现者,发现问题、解决问题并形成一套统一的模板方案,这才是工程师的标准与要求,共勉!!!
最后,本次业务实践的代码也进行了开源,有需要的同学可以进行查看,如果觉得还可以还可以的话,欢迎点个 star~
- vwaver-iiot-end
- vwaver-iiot-edge
- vwaver-iiot-cloud
参考
- 【华为云 IoTEdge 学习笔记】四大常见边缘场景如何深度使用
- 史上最全的边缘计算应用场景
- UCS(优势)—边缘计算五大典型应用场景
- 一文读懂边缘计算及其应用场景
- 带你走进 PWA 在业务中的实践方案
- 现代化 Web 开发实践之 PWA
- PWA 技术在游戏落地中的探索
- 使用 workbox 开发 PWA
- PWA实践/应用(Google Workbox)
- k8s部署MongoDB
- Minio官网
- WasmEdge官网
- Mongoose官网
- 边缘云上的微服务:使用 WasmEdge 和 Rust 构建高性能且安全的应用
