上一篇《迭代器模式》 下一篇《备忘录模式》
简介:
中介者模式,它是是一种行为设计模式,它允许将一组对象之间的交互封装到一个单独的类中,从而降低对象之间的耦合性,提高系统的灵活性和可维护性。
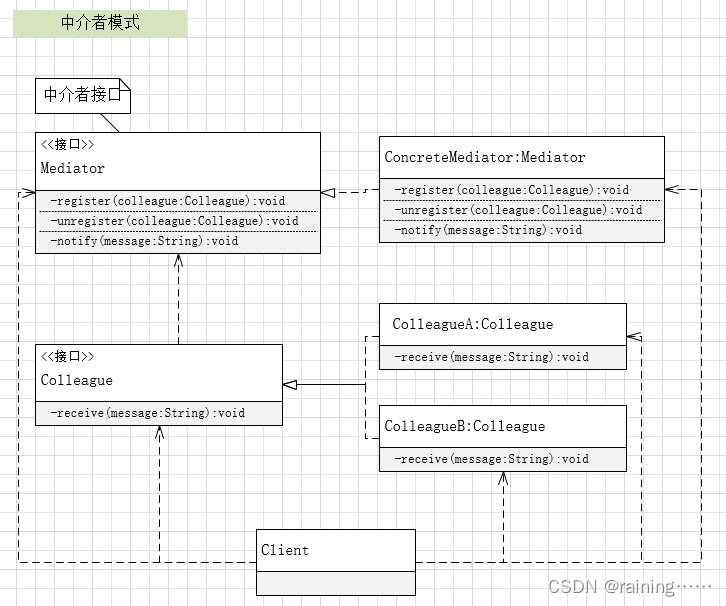
中介者模式涉及到一个中介者对象和多个同事对象。中介者对象负责协调和管理同事对象之间的交互,而同事对象之间则通过中介者对象进行通信。这样,同事对象之间不再直接通信,而是通过中介者对象来进行间接交互。
中介者模式适用于系统中存在一组密切相关的对象,并且这些对象之间的交互很复杂。通过引入中介者对象,可以将这些对象的交互逻辑集中到一个单独的类中,降低对象之间的耦合性,并提高系统的可维护性和可扩展性。
实现中介者模式的关键步骤包括定义抽象中介者接口和具体中介者类,以及定义抽象同事类和具体同事类。中介者接口应该定义统一的接口用于各个同事角色之间的通信,具体中介者类则实现该接口并协调各个同事间的协作。同事类应该依赖中介者角色,并通过中介者进行通信。
中介者模式的使用场景:
1、系统中对象之间存在复杂的引用关系,产生的相互依赖关系结构混乱,难以理解。中介者模式可以将这些对象之间的交互逻辑集中到一个单独的类中,降低对象之间的耦合性,并提高系统的可维护性和可扩展性。
2、一个对象由于引用了其他很多对象并且直接和这些对象通信,导致难以复用该对象。通过引入中介者对象,可以将该对象的依赖关系转移到中介者对象上,从而实现对象的松散耦合,提高对象的可复用性。
3、需要在多个对象间定义一些公共行为,并且希望能够灵活地增加或修改这些行为。中介者模式可以通过定义抽象中介者接口和具体中介者类来封装一组对象之间的交互逻辑,并在需要时增加新的中介者类来实现行为的扩展。
中介者模式的创建步骤:
1、定义中介者接口:中介者接口应该定义统一的接口用于各个同事角色之间的通信。
2、创建具体中介者类:具体中介者类实现中介者接口,并协调各个同事间的协作。
3、定义同事接口:同事接口应该定义与中介者对象交互的接口。
4、创建具体同事类:具体同事类实现同事接口,并定义与中介者对象交互的具体实现。
5、创建同事对象:创建多个同事对象,每个对象都具有自己的行为和状态。
6、创建中介者对象:创建中介者对象,并将各个同事对象作为参数传递给中介者对象。
7、使用中介者对象:通过中介者对象调用各个同事对象的方法,实现对象之间的间接交互。
中介者模式的优点,主要包括:
1、降低对象之间的耦合性:通过引入中介者对象,可以将原本相互依赖的对象之间的关系转化为中介者和同事对象之间的交互,从而降低对象之间的耦合性,提高系统的灵活性和可维护性。
2、提高系统的可维护性和可扩展性:中介者模式可以将一组对象的交互逻辑集中到一个单独的类中,使得系统的维护和扩展变得更加方便。当需要修改对象之间的交互逻辑时,只需要修改中介者对象即可,而不需要修改各个同事对象的代码。
3、符合迪米特法则:中介者模式使得各个同事对象之间解耦,符合迪米特法则。同时,由于各个同事对象之间的交互都通过中介者对象来完成,也符合里氏替换原则。
4、提高代码的可读性和可维护性:通过将复杂的交互逻辑集中到一个单独的类中,中介者模式使得代码更加清晰易懂,也方便后续的维护和扩展。
中介者模式的缺点,主要包括:
1、中介者对象可能会变得复杂且庞大:当系统中需要协调的对象越来越多时,中介者对象也可能会变得复杂且庞大,导致系统变得难以理解和维护。
2、中介者对象可能会成为系统的瓶颈:由于所有对象之间的交互都需要通过中介者对象来完成,当系统中需要交互的对象非常多时,中介者对象可能会成为系统的瓶颈,影响系统的性能。
3、中介者模式可能会导致系统的可扩展性降低:由于中介者对象负责协调各个对象之间的交互,当需要添加新的对象或新的交互逻辑时,可能需要对中介者对象进行修改,这会限制系统的可扩展性。
4、中介者模式可能会导致代码的可读性和可维护性降低:由于中介者对象需要处理多个对象之间的交互逻辑,代码可能会变得复杂且难以理解,这会降低代码的可读性和可维护性。
示例:
一、C#中介者模式
以下是一个示例,展示了如何在C#中实现中介者模式:
using System;

namespace MediatorPatternExample
{
    // 中介者接口
    public interface IMediator
    {
        void Register(Colleague colleague);
        void Unregister(Colleague colleague);
        void Notify(string message);
    }

    // 中介者类
    public classMediator : IMediator
    {
        private List<Colleague> colleagues = new List<Colleague>();

        public void Register(Colleague colleague)
        {
            colleagues.Add(colleague);
        }

        public void Unregister(Colleague colleague)
        {
            colleagues.Remove(colleague);
        }

        public void Notify(string message)
        {
            foreach (var colleague in colleagues)
            {
                colleague.Receive(message);
            }
        }
    }

    // 同事接口
    public interface IColleague
    {
        void Receive(string message);
    }

    // 具体同事类A
    public class ColleagueA : IColleague
    {
        public void Receive(string message)
        {
            Console.WriteLine("Colleague A received message: " + message);
        }
    }

    // 具体同事类B
    public class ColleagueB : IColleague
    {
        public void Receive(string message)
        {
            Console.WriteLine("Colleague B received message: " + message);
        }
    }

    // 客户端代码
    class Program
    {
        static void Main(string[] args)
        {
            IMediator mediator = newMediator();
            IColleague colleagueA = new ColleagueA();
            IColleague colleagueB = new ColleagueB();
            mediator.Register(colleagueA); // 注册同事对象A和B到中介者对象中
            mediator.Register(colleagueB); // 注册同事对象A和B到中介者对象中,也可以在程序运行过程中随时取消注册或添加新的同事对象,非常灵活方便。
        }
    }
}
二、java中介者模式
中介者模式通常通过以下方式实现:
// 中介者接口
interface Mediator {
    void register(Colleague colleague);
    void unregister(Colleague colleague);
    void notify(String message);
}

// 具体中介者类
class ConcreteMediator implements Mediator {
    private List<Colleague> colleagues = new ArrayList<>();

    @Override
    public void register(Colleague colleague) {
        colleagues.add(colleague);
    }

    @Override
    public void unregister(Colleague colleague) {
        colleagues.remove(colleague);
    }

    @Override
    public void notify(String message) {
        for (Colleague colleague : colleagues) {
            colleague.receive(message);
        }
    }
}

// 同事接口
interface Colleague {
    void receive(String message);
}

// 具体同事类A
class ColleagueA implements Colleague {
    @Override
    public void receive(String message) {
        System.out.println("Colleague A received message: " + message);
    }
}

// 具体同事类B
class ColleagueB implements Colleague {
    @Override
    public void receive(String message) {
        System.out.println("Colleague B received message: " + message);
    }
}

// 客户端代码
public class Client {
    public static void main(String[] args) {
        Mediator mediator = new ConcreteMediator();
        Colleague colleagueA = new ColleagueA();
        Colleague colleagueB = new ColleagueB();
        mediator.register(colleagueA); // 注册同事对象A和B到中介者对象中
        mediator.register(colleagueB); // 注册同事对象A和B到中介者对象中,也可以在程序运行过程中随时取消注册或添加新的同事对象,非常灵活方便。

    }
}
三、javascript中介者模式
在JavaScript中,中介者实现方式如下:
// 定义中介者接口
var Mediator = {
  register: function(colleague),
  unregister: function(colleague),
  notify: function(message)
};

// 具体中介者类
var ConcreteMediator = Object.create(Mediator);

ConcreteMediator.register = function(colleague) {
  this.colleagues.push(colleague);
};

ConcreteMediator.unregister = function(colleague) {
  this.colleagues = this.colleagues.filter(function(obj) {
    return obj !== colleague;
  });
};

ConcreteMediator.notify = function(message) {
  this.colleagues.forEach(function(colleague) {
    colleague.receive(message);
  });
};

// 定义同事接口
var Colleague = {
  receive: function(message)
};

// 具体同事类A
var ColleagueA = Object.create(Colleague);
ColleagueA.receive = function(message) {
  console.log("Colleague A received message: " + message);
};

// 具体同事类B
var ColleagueB = Object.create(Colleague);
ColleagueB.receive = function(message) {
  console.log("Colleague B received message: " + message);
};

// 客户端代码
var mediator = new ConcreteMediator();
var colleagueA = new ColleagueA();
var colleagueB = new ColleagueB();
mediator.register(colleagueA); // 注册同事对象A和B到中介者对象中
mediator.register(colleagueB);
四、C++中介者模式
以下是在C++中实现中介者模式:
#include <iostream>
#include <vector>

// 中介者接口
class Mediator {
public:
    virtual void registerColleague(std::string name, Mediator* colleague) = 0;
    virtual void unregisterColleague(std::string name) = 0;
    virtual void notify(std::string message) = 0;
};

// 具体中介者类
class ConcreteMediator : public Mediator {
public:
    ConcreteMediator() {
        colleagues.reserve(3); // 预分配内存空间,提高性能
    }

    void registerColleague(std::string name, Mediator* colleague) override {
        colleagues[name] = colleague; // 将同事对象存储在字典中,以名称作为键
    }

    void unregisterColleague(std::string name) override {
        colleagues.erase(name); // 从字典中删除同事对象
    }

    void notify(std::string message) override {
        for (auto& [name, colleague] : colleagues) {
            colleague->receive(message); // 遍历字典,通知所有注册的同事对象某个事件发生了
        }
    }

private:
    std::unordered_map<std::string, Mediator*> colleagues; // 将同事对象存储在字典中,以名称作为键,便于查找和删除
};

// 同事接口
class Colleague {
public:
    virtual void receive(std::string message) = 0;
};

// 具体同事类A
class ColleagueA : public Colleague {
public:
    void receive(std::string message) override {
        std::cout << "Colleague A received message: " << message << std::endl;
    }
};

// 具体同事类B
class ColleagueB : public Colleague {
public:
    void receive(std::string message) override {
        std::cout << "Colleague B received message: " << message << std::endl;
    }
};

int main() {
    ConcreteMediator mediator; // 创建具体中介者对象
    ColleagueA colleagueA; // 创建同事对象A和B,并将它们注册到中介者对象中。
    ColleagueB colleagueB;
    mediator.registerColleague("A", colleagueA);
    mediator.registerColleague("B", colleagueB);

    mediator.notify("test colleagueA receive");//
}
五、python中介者模式
以下是在python中实现中介者模式:
from abc import ABC, abstractmethod

# 中介者接口
class Mediator(ABC):
    @abstractmethod
    def register(self, colleague):
        pass

    @abstractmethod
    def unregister(self, colleague):
        pass

    @abstractmethod
    def notify(self, message):
        pass

# 具体中介者类
class ConcreteMediator(Mediator):
    def __init__(self):
        self.colleagues = []

    def register(self, colleague):
        self.colleagues.append(colleague)

    def unregister(self, colleague):
        self.colleagues = [c for c in self.colleagues if c != colleague]

    def notify(self, message):
        for colleague in self.colleagues:
            colleague.receive(message)

# 同事接口
class Colleague(ABC):
    @abstractmethod
    def receive(self, message):
        pass

# 具体同事类A和B,并将它们注册到中介者对象中。同时,当需要通知所有同事某个事件发生时,中介者对象可以调用 `notify()` 方法。
class ColleagueA(Colleague):
    def receive(self, message):
        print(f"Colleague A received message: {message}")

class ColleagueB(Colleague):
    def receive(self, message):
        print(f"Colleague B received message: {message}")

# 创建具体中介者对象和同事对象A和B,并将它们注册到中介者对象中。同时,当需要通知所有同事某个事件发生时,中介者对象可以调用 `notify()` 方法。
mediator = ConcreteMediator()
colleague_a = ColleagueA()
colleague_b = ColleagueB()
mediator.register(colleague_a)
mediator.register(colleague_b)
mediator.notify("Hello World!")
六、go中介者模式
以下是一个示例,展示了如何在go中实现中介者模式:
package main

import "fmt"

// 同事接口
type Colleague interface {
 Receive(message string)
}

// 中介者接口
type Mediator interface {
 Register(colleague Colleague)
 Unregister(colleague Colleague)
 Notify(message string)
}

// 具体同事类A
type ColleagueA struct {
 mediator Mediator
}

func (c *ColleagueA) Receive(message string) {
 fmt.Println("Colleague A received message:", message)
 c.mediator.Notify("Colleague A received message: " + message)
}

// 具体同事类B
type ColleagueB struct {
 mediator Mediator
}

func (c *ColleagueB) Receive(message string) {
 fmt.Println("Colleague B received message:", message)
 c.mediator.Notify("Colleague B received message: " + message)
}

// 具体中介者类
type ConcreteMediator struct {
 colleagues []Colleague
}

func (m *ConcreteMediator) Register(colleague Colleague) {
 m.colleagues = append(m.colleagues, colleague)
}

func (m *ConcreteMediator) Unregister(colleague Colleague) {
 for i, c := range m.colleagues {
 if c == colleague {
 m.colleagues = append(m.colleagues[:i], m.colleagues[i+1:]...)
 break
 }
 }
}

func (m *ConcreteMediator) Notify(message string) {
 for _, colleague := range m.colleagues {
 colleague.Receive(message)
 }
}

func main() {
 mediator := &ConcreteMediator{}
 colleagueA := &ColleagueA{mediator}
 colleagueB := &ColleagueB{mediator}
 mediator.Register(colleagueA)
 mediator.Register(colleagueB)
 mediator.Notify("Hello World!")
}
注意:在实现中介者模式时,需要谨慎处理同事对象之间的通信,避免产生无限循环或其他不良后果。
七、PHP中介者模式
以下是一个示例,展示了如何在PHP中实现中介者模式:
<?php

// 定义中介者接口
interface Mediator {
    public function register($colleague);
    public function unregister($colleague);
    public function notify($message);
}

// 具体中介者类
class ConcreteMediator implements Mediator {
    private $colleagues;

    public function __construct() {
        $this->colleagues = [];
    }

    public function register($colleague) {
        $this->colleagues[] = $colleague;
    }

    public function unregister($colleague) {
        $index = array_search($colleague, $this->colleagues);
        if ($index !== false) {
            unset($this->colleagues[$index]);
        }
    }

    public function notify($message) {
        foreach ($this->colleagues as $colleague) {
            $colleague->receive($message);
        }
    }
}

// 定义同事接口
interface Colleague {
    public function receive($message);
}

// 具体同事类A
class ColleagueA implements Colleague {
    private $mediator;

    public function __construct(Mediator $mediator) {
        $this->mediator = $mediator;
    }

    public function receive($message) {
        echo "Colleague A received message: " . $message . "\n";
        $this->mediator->notify("Colleague A received message: " . $message);
    }
}

// 具体同事类B
class ColleagueB implements Colleague {
    private $mediator;

    public function __construct(Mediator $mediator) {
        $this->mediator = $mediator;
    }

    public function receive($message) {
        echo "Colleague B received message: " . $message . "\n";
        $this->mediator->notify("Colleague B received message: " . $message);
    }
}

// 使用示例
$mediator = new ConcreteMediator();
$colleagueA = new ColleagueA($mediator);
$colleagueB = new ColleagueB($mediator);
$mediator->register($colleagueA);
$mediator->register($colleagueB);
$mediator->notify("Hello World!");

?>
《完结》
上一篇《迭代器模式》 下一篇《备忘录模式》
