DAY1
一、引言
1.1 原生web开发中存在哪些问题?
传统Web开发存在硬编码所造成的过度程序耦合(例如:Service中作为属性Dao对象)。
部分Java EE API较为复杂,使用效率低(例如:JDBC开发步骤)。
侵入性强,移植性差(例如:DAO实现的更换,从Connection到SqlSession)。
总结:代码的耦合度太高 操作数据库比较复杂 移植性差
1.2 解决方案
目标:
  A.降低代码是耦合度  UserService 与UserDao紧密联系
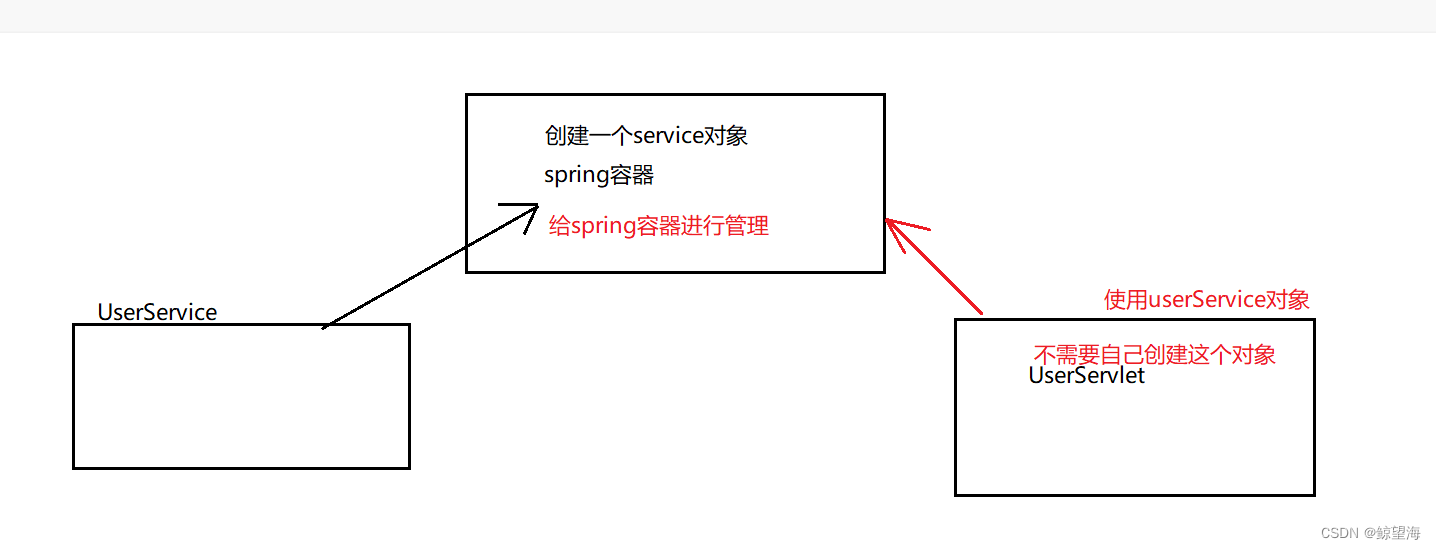
  B.把创建对象的主动权交给容器 由容器来创建对象以及管理对象
解决:
  A.使用反射来创建对象
  B.使用map容器来存储对象
  C.使用配置文件来保存对象的信息 在运行期间编译修改
step01 新建配置文件
userDao=com.qf.dao.UserDaoImpl
userService=com.qf.service.impl.UserServiceImpl
step02 新建一个工厂类
package com.qf.utils;

import java.io.IOException;
import java.io.InputStream;
import java.util.Enumeration;
import java.util.HashMap;
import java.util.Map;
import java.util.Properties;

public class BeanFactory {
    //用于加载配置文件
    private static Properties properties;
    //定义一个容器来管理对象
    private static Map<String,Object> map;

    static {
        //实例化Properties 对象
        properties = new Properties();
        InputStream is = BeanFactory.class.getClassLoader().getResourceAsStream("bean.properties");
        //加载配置文件
        try {

            properties.load(is);
            //实例化Map集合
            map = new HashMap<String, Object>();
            //获取所有的key
            Enumeration<Object> enume = properties.keys();
            //使用循环遍历
            while (enume.hasMoreElements()){

                    //获取key
                    String key = enume.nextElement().toString();
                    //获取value值
                    String  value = properties.getProperty(key);
                    //通过反射来实例化对象
                    Class cla = Class.forName(value);
                    //创建对象
                    Object o = cla.newInstance();
                    //将对象存入容器中
                    map.put(key,o);

            }
        } catch (IOException e) {
            e.printStackTrace();
        } catch (ClassNotFoundException e) {
            e.printStackTrace();
        } catch (InstantiationException e) {
            e.printStackTrace();
        } catch (IllegalAccessException e) {
            e.printStackTrace();
        }


    }

    //根据key获取值
    public static  Object  getObject(String key){
        return  map.get(key);
    }


}
step03 测试类
package com.qf.test;

import com.qf.service.UserService;
import com.qf.utils.BeanFactory;

public class Test {
    public static void main(String[] args) {
        //获取Userservice对象
//        UserService userService = (UserService) BeanFactory.getObject("userService");
//       // System.out.println(userService);
//        userService.add();

        for (int i=0;i<=5;i++){
            UserService userService = (UserService) BeanFactory.getObject("userService");
            System.out.println(userService);

        }

    }
}
二、Spring框架
2.1 概念
- Spring是一个项目管理框架,同时也是一套Java EE解决方案。
- Spring是众多优秀设计模式的组合(工厂、单例、代理、适配器、包装器、观察者、模板、策略)。
- Spring并未替代现有框架产品,而是将众多框架进行有机整合,简化企业级开发,俗称"胶水框架"。
- Spring框架是由于软件开发的复杂性而创建的。Spring使用的是基本的JavaBean来完成以前只可能由EJB完成的事情。然而,Spring的用途不仅限于服务器端的开发。从简单性、可测试性和松耦合性角度而言,绝大部分Java应用都可以从Spring中受益
2.2 访问与下载
官方网站:https://spring.io/
三、Spring架构组成
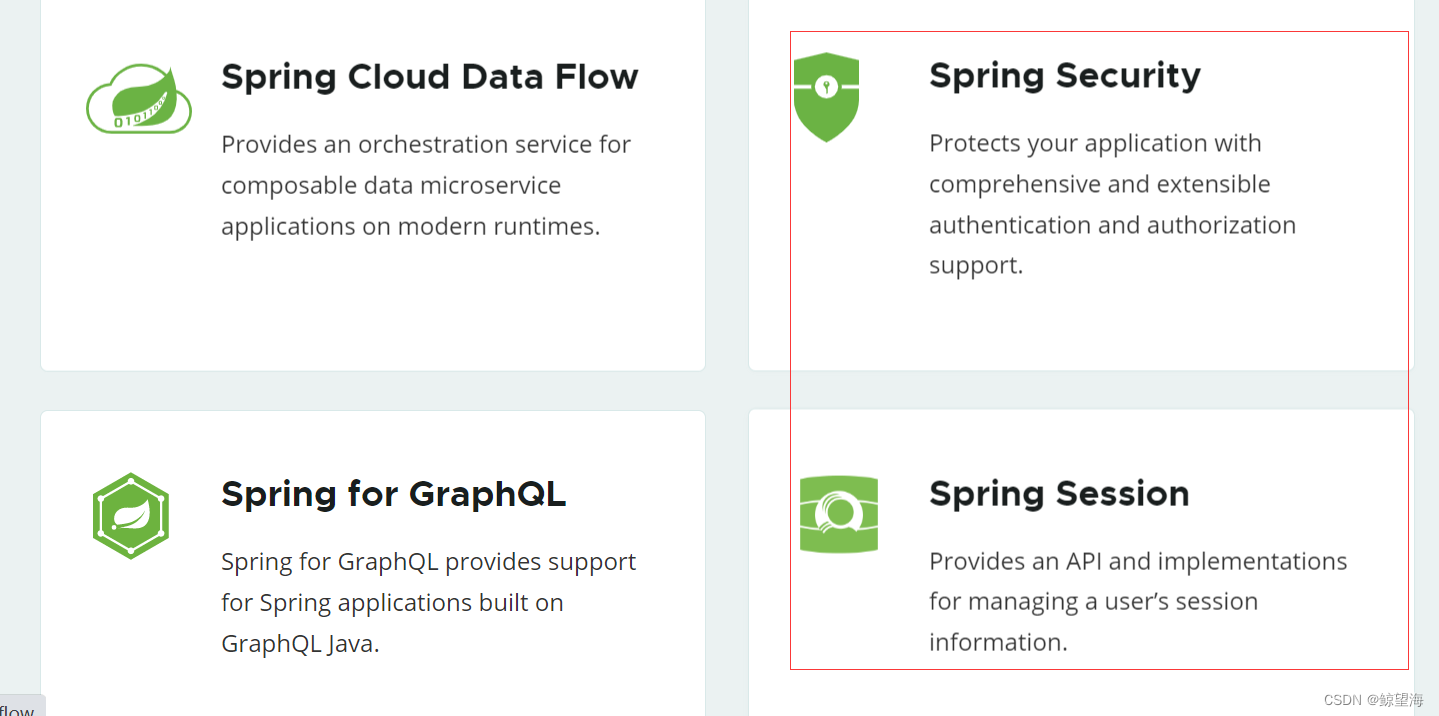
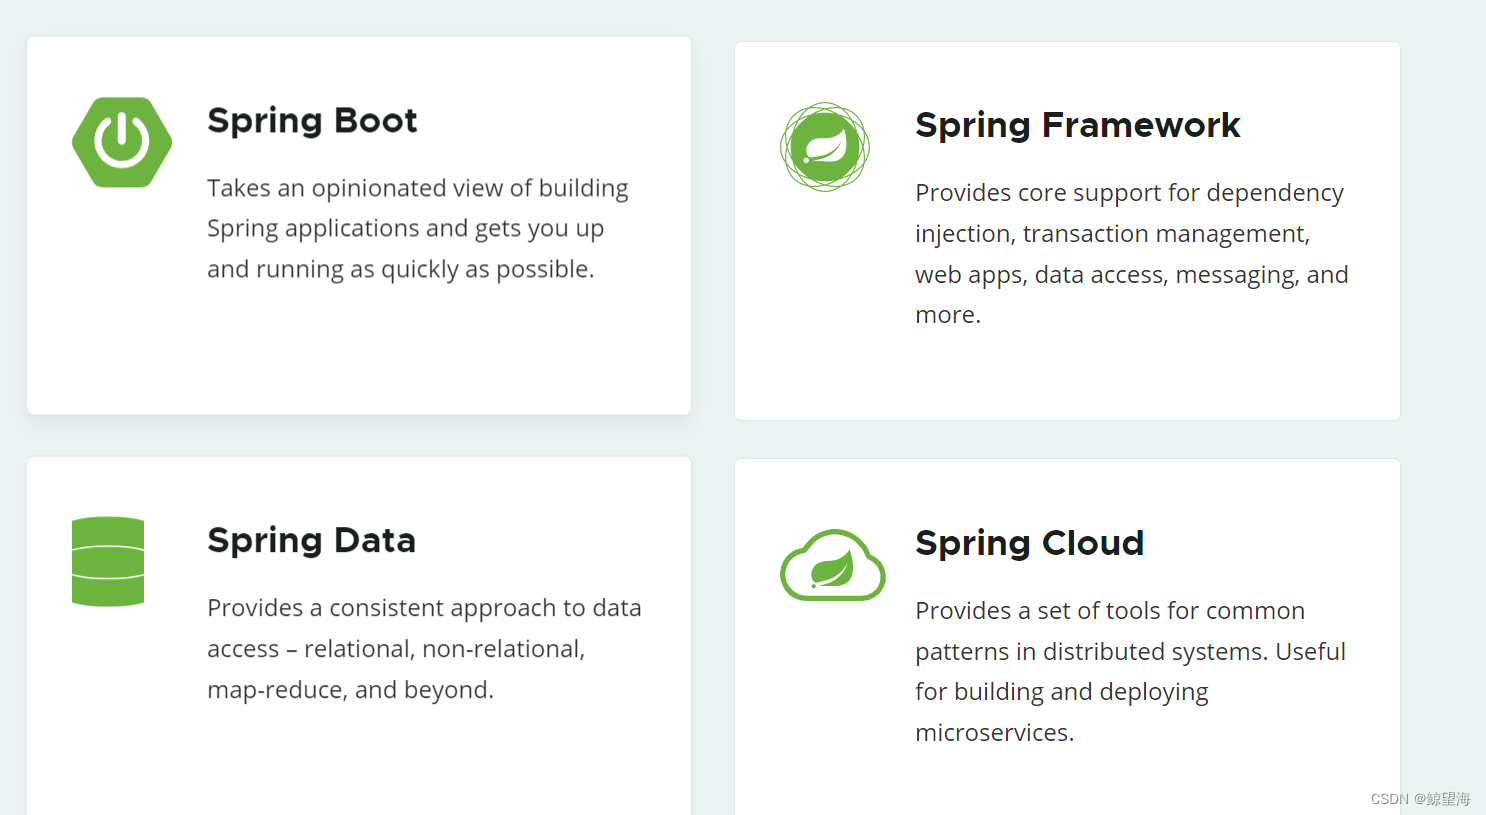
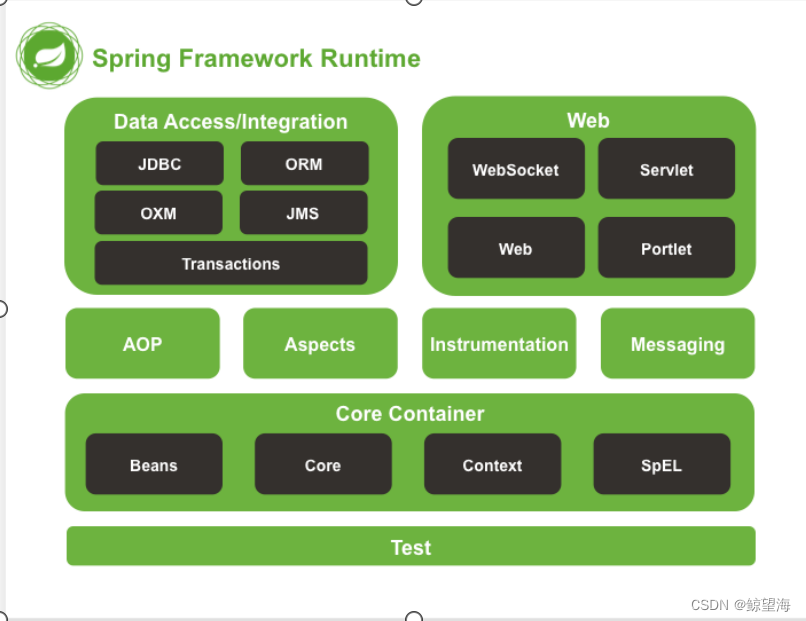
Spring架构由诸多模块组成,可分类为
- 核心技术:依赖注入,事件,资源,i18n,验证,数据绑定,类型转换,SpEL,AOP。
- 测试:模拟对象,TestContext框架,Spring MVC测试,WebTestClient。
- 数据访问:事务,DAO支持,JDBC,ORM,封送XML。
- Spring MVC和 Spring WebFlux Web框架。
- 集成:远程处理,JMS,JCA,JMX,电子邮件,任务,调度,缓存。
- 语言:Kotlin,Groovy,动态语言。
- IOC 控制反转 DI 依赖注入
- AOP 动态代理
- spring jdbcTemplate
- spring事物管理
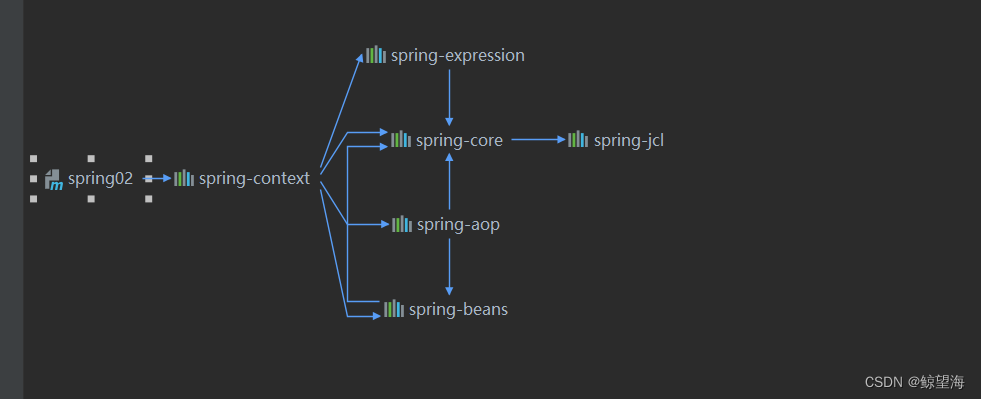
四、Spring Framework 体系
五 Spring 搭建
5.1 搭建
step01 导入依赖
<dependencies>
        <dependency>
            <groupId>org.springframework</groupId>
            <artifactId>spring-context</artifactId>
            <version>5.3.18</version>
        </dependency>
    </dependencies>
step02创建spring 配置文件 applicationConext.xml
<?xml version="1.0" encoding="UTF-8"?>
<beans xmlns="http://www.springframework.org/schema/beans"
       xmlns:xsi="http://www.w3.org/2001/XMLSchema-instance"
       xsi:schemaLocation="http://www.springframework.org/schema/beans http://www.springframework.org/schema/beans/spring-beans.xsd">
    <bean id="userService" class="com.qf.service.UserService"></bean>

</beans>
step03 测试类
package com.qf.test;

import com.qf.service.UserService;
import org.springframework.context.ApplicationContext;
import org.springframework.context.support.ClassPathXmlApplicationContext;

public class Test01 {
    public static void main(String[] args) {
        ApplicationContext app = new ClassPathXmlApplicationContext("applicationContext.xml");
        Object userService = app.getBean("userService");
        System.out.println(userService);
        UserService userService1 = app.getBean("userService", UserService.class);
        System.out.println(userService1);

        UserService userService2 = app.getBean("userService", UserService.class);
        System.out.println(userService2);

    }
}
5.2 执行流程

六 Spring 控制反转(IOC)
6.1 控制反转

6.2 Bean的管理
6.2.1 使用默认的构造方法实例化对象
注意点:这种方式最常用 但是类中必须定义无参构造方法(特别是注解的时候)
6.2.2 使用工厂实例化
在很多情况下,对于第三方的代码或之前的老代码,很可能对象的创建是通过工厂来完成的。对于工厂创建出的对象交给spring容器管理。
step01 新建一个工厂类
package com.qf.utils;

import com.qf.entity.Student;
import com.qf.service.UserService;

public class BeanFactory {
     Student stu(){
        return   new Student();
     }

}
step02 新建spring 配置文件
<?xml version="1.0" encoding="UTF-8"?>
<beans xmlns="http://www.springframework.org/schema/beans"
       xmlns:xsi="http://www.w3.org/2001/XMLSchema-instance"
       xsi:schemaLocation="http://www.springframework.org/schema/beans http://www.springframework.org/schema/beans/spring-beans.xsd">
       <!--工厂对象-->
      <bean id="beanFactory" class="com.qf.utils.BeanFactory" ></bean>
    <!--需要工厂类创建对象 由 spring进行管理-->
    <!--
         factory-bean  找到spring容器创建这个对象的工厂
         factory-method 创建对象的方法
      -->
    <bean id="student" factory-bean="beanFactory" factory-method="stu"></bean>
</beans>
step03 测试类
package com.qf.test;

import com.qf.entity.Student;
import org.springframework.context.support.ClassPathXmlApplicationContext;

public class Test02 {
    public static void main(String[] args) {
        ClassPathXmlApplicationContext app = new ClassPathXmlApplicationContext("bean01.xml");
        Student s = app.getBean("student", Student.class);
        System.out.println(s);
    }
}
6.2.3 使用静态工厂实例化
ste01 新建一个静态工厂类
package com.qf.utils;

import com.qf.entity.Student;

public class StudentFactory {
    public static Student getStudent(){
       return  new Student();
    }
}
step02 修改配置文件
<?xml version="1.0" encoding="UTF-8"?>
<beans xmlns="http://www.springframework.org/schema/beans"
       xmlns:xsi="http://www.w3.org/2001/XMLSchema-instance"
       xsi:schemaLocation="http://www.springframework.org/schema/beans http://www.springframework.org/schema/beans/spring-beans.xsd">
       <!--工厂对象-->
<!--      <bean id="beanFactory" class="com.qf.utils.BeanFactory" ></bean>-->
    <!--需要工厂类创建对象 由 spring进行管理-->
    <!--
         factory-bean  找到spring容器创建这个对象的工程
         factory-method 创建对象的方法
      -->
<!--    <bean id="student" factory-bean="beanFactory" factory-method="stu"></bean>-->

    <bean id="stu" class="com.qf.utils.StudentFactory" factory-method="getStudent"></bean>


</beans>
step03 测试类
package com.qf.test;

import com.qf.entity.Student;
import org.springframework.context.support.ClassPathXmlApplicationContext;

public class Test02 {
    public static void main(String[] args) {
        ClassPathXmlApplicationContext app = new ClassPathXmlApplicationContext("bean01.xml");
        Student s = app.getBean("stu", Student.class);
        System.out.println(s);
    }
}
6.2.4 bean的作用范围
业务层和持久层、表现层(Servlet、Filter等)对象一般使用单例对象。实体类一般使用多例对象。使用spring框架不用再自己编写单例模式了。默认情况下,交给spring容器管理的对象就是单例对象。
singleton:表示这个 bean 是单例的,默认即此。
- prototype:表示这个 bean 多多例的,每次从容器中获取 bean,都会拿到一个全新的 bean
下面这三个 scope ,在 web 环境下生效(将来我们学了 SpringMVC 之后,就可以使用这三个了)。 - request:在同一个请求中,拿到的始终是同一个对象。
- session:在同一个会话中,拿到的始终是同一个对象。
- application:在应用重启之前,拿到的始终是同一个对象。
代码-配置文件
<?xml version="1.0" encoding="UTF-8"?>
<beans xmlns="http://www.springframework.org/schema/beans"
       xmlns:xsi="http://www.w3.org/2001/XMLSchema-instance"
       xsi:schemaLocation="http://www.springframework.org/schema/beans http://www.springframework.org/schema/beans/spring-beans.xsd">


    <bean id="actor" class="com.qf.entity.Actor"></bean>

</beans>
代码-测试类
package com.qf.test;

import com.qf.entity.Actor;
import com.qf.entity.Student;
import org.springframework.context.support.ClassPathXmlApplicationContext;

public class Test02 {
    public static void main(String[] args) {
        ClassPathXmlApplicationContext app = new ClassPathXmlApplicationContext("bean01.xml");
        Actor a1= app.getBean("actor", Actor.class);
        Actor a2= app.getBean("actor", Actor.class);
        System.out.println(a1==a2);

    }
}
6.2.5 bean生命周期中的两个特殊方法
初始化方法:是在构造方法执行后执行。
销毁方法:销毁对象之前执行。 (由jvm执行 由gc来进行垃圾回收)
step01 修改类
package com.qf.entity;

public class Actor {

    public   Actor(){
        System.out.println("执行了构造方法......");
    }
    public void init(){
        System.out.println("初始化");
    }

    public   void  destroy(){
        System.out.println("销毁");
    }

}
step02 配置文件
<?xml version="1.0" encoding="UTF-8"?>
<beans xmlns="http://www.springframework.org/schema/beans"
       xmlns:xsi="http://www.w3.org/2001/XMLSchema-instance"
       xsi:schemaLocation="http://www.springframework.org/schema/beans http://www.springframework.org/schema/beans/spring-beans.xsd">


    <bean id="actor" class="com.qf.entity.Actor" scope="prototype"
          init-method="init" destroy-method="destroy"></bean>

</beans>
七 spring依赖注入
7.1 依赖注入简介
1.依赖注入Dependency Injection 简称DI和IoC 是一回事。指原来自己创建对象,现在让别人传给你,就相当于注入进来。
2.依赖注入有两种方式 A.通过构造方法  B.通过set方法
7.2 依赖注入-构造方法
step01 新建User类
package com.qf.entity;

public class User {
    private  Integer uid;
    private  String uname;

    public User() {
    }

    public User(Integer uid, String uname) {
        this.uid = uid;
        this.uname = uname;
    }
}
step02 编写配置文件
<?xml version="1.0" encoding="UTF-8"?>
<beans xmlns="http://www.springframework.org/schema/beans"
       xmlns:xsi="http://www.w3.org/2001/XMLSchema-instance"
       xsi:schemaLocation="http://www.springframework.org/schema/beans http://www.springframework.org/schema/beans/spring-beans.xsd">
    <bean id="user" class="com.qf.entity.User">
        <!--通过构造方法注入值
              name 表示属性名
              value 表示属性值
         -->
        <constructor-arg name="uid" value="10"/>
        <constructor-arg name="uname" value="张三"/>
    </bean>


</beans>
step03 修改测试类
package com.qf.test;

import com.qf.entity.User;
import org.springframework.context.support.ClassPathXmlApplicationContext;

public class Test01 {
    public static void main(String[] args) {
        ClassPathXmlApplicationContext applicationContext = new ClassPathXmlApplicationContext("applicationContext.xml");
        User user = applicationContext.getBean("user", User.class);
        System.out.println(user);

    }
}
7.3 依赖注入-set方法注入
step01 修改类 添加set get方法
step02 修改配置文件
<?xml version="1.0" encoding="UTF-8"?>
<beans xmlns="http://www.springframework.org/schema/beans"
       xmlns:xsi="http://www.w3.org/2001/XMLSchema-instance"
       xsi:schemaLocation="http://www.springframework.org/schema/beans http://www.springframework.org/schema/beans/spring-beans.xsd">


    <bean id="u" class="com.qf.entity.User">
        <property name="uid" value="12"></property>
        <property name="uname" value="您好"></property>
    </bean>


</beans>
7.4 依赖注入 -注入其它类型
step01 新建一个类
package com.qf.entity;

import java.util.*;

public class Person {
    private Date bornDate;
    private String[] hobbys;
    private Set<String> phones;
    private List<String> names;
    private Map<String,String> countries;
    private Properties files;
    //注入自定义对象
    private  User user;

    public Date getBornDate() {
        return bornDate;
    }

    public void setBornDate(Date bornDate) {
        this.bornDate = bornDate;
    }

    public String[] getHobbys() {
        return hobbys;
    }

    public void setHobbys(String[] hobbys) {
        this.hobbys = hobbys;
    }

    public Set<String> getPhones() {
        return phones;
    }

    public void setPhones(Set<String> phones) {
        this.phones = phones;
    }

    public List<String> getNames() {
        return names;
    }

    public void setNames(List<String> names) {
        this.names = names;
    }

    public Map<String, String> getCountries() {
        return countries;
    }

    public void setCountries(Map<String, String> countries) {
        this.countries = countries;
    }

    public Properties getFiles() {
        return files;
    }

    public void setFiles(Properties files) {
        this.files = files;
    }

    public User getUser() {
        return user;
    }

    public void setUser(User user) {
        this.user = user;
    }

    @Override
    public String toString() {
        return "Person{" +
                "bornDate=" + bornDate +
                ", hobbys=" + Arrays.toString(hobbys) +
                ", phones=" + phones +
                ", names=" + names +
                ", countries=" + countries +
                ", files=" + files +
                ", user=" + user +
                '}';
    }
}
step02 新建一个配置文件
<?xml version="1.0" encoding="UTF-8"?>
<beans xmlns="http://www.springframework.org/schema/beans"
       xmlns:xsi="http://www.w3.org/2001/XMLSchema-instance"
       xsi:schemaLocation="http://www.springframework.org/schema/beans http://www.springframework.org/schema/beans/spring-beans.xsd">
    <bean id="user" class="com.qf.entity.User">
        <property name="uid" value="11"></property>
        <property name="uname" value="kkk"></property>
    </bean>

    <bean id="person" class="com.qf.entity.Person">
       <property name="bornDate" value="2010/11/23"/>
       <property name="hobbys">
           <array>
               <value>kkkkk</value>
               <value>wwww</value>
           </array>
       </property>

        <property name="phones">
            <set>
                <value>111111</value>
                <value>222222</value>
            </set>
        </property>

        <property name="names">
           <list>
               <value>3333333</value>
               <value>4444444</value>
           </list>
        </property>

        <property name="countries">
            <props>
                <prop key="aa">aaa</prop>
                <prop key="bb">bbb</prop>
                <prop key="cc">ccc</prop>
            </props>
        </property>
        <property name="files">
            <props>
                <prop key="dd">dddd</prop>
                <prop key="zz">zzzz</prop>
                <prop key="kkk">lkkkk</prop>
            </props>
        </property>

        <property name="user" ref="user"></property>

    </bean>


</beans>
7.5 FactoryBean创建复杂对象【了解】
作用:让Spring可以创建复杂对象、或者无法直接通过反射创建的对象。
| FactoryBean解决复杂对象创建 |
|---|
![[外链图片转存失败,源站可能有防盗链机制,建议将图片保存下来直接上传(img-OYzngdDC-1671822832619)(spring.assets/image-20221211154051983.png)]](https://img-blog.csdnimg.cn/dc1f68499d9c4b78885d0a274331fe74.png) |
7.5.1 实现-FactoryBean
step01 依赖文件
<dependencies>
        <dependency>
            <groupId>org.springframework</groupId>
            <artifactId>spring-context</artifactId>
            <version>5.3.18</version>
        </dependency>
        <dependency>
            <groupId>com.squareup.okhttp3</groupId>
            <artifactId>okhttp</artifactId>
            <version>4.9.3</version>
        </dependency>

    </dependencies>
step02 定义一个类 实现 FactoryBean
package com.qf.utils;


import okhttp3.Request;
import org.springframework.beans.factory.FactoryBean;

public class MyFactoryBean implements FactoryBean<Request.Builder> {


    public Request.Builder getObject() throws Exception {
        return new Request.Builder();
    }

    public Class<?> getObjectType() {
        return Request.Builder.class;
    }

    public boolean isSingleton() {
        return true;
    }
}
step03 修改测试类
package com.qf.test;

import com.qf.entity.Person;
import com.qf.entity.User;
import okhttp3.Request;
import org.springframework.context.support.ClassPathXmlApplicationContext;

public class Test01 {
    public static void main(String[] args) {
        ClassPathXmlApplicationContext applicationContext = new ClassPathXmlApplicationContext("bean.xml");
        Request.Builder mfb = applicationContext.getBean("mfb", Request.Builder.class);
        System.out.println(mfb);

    }
}
八 配置文件模块化
1.问题:
    随着应用的增大,spring的配置文件也会越来越臃肿。编码时不清晰。也不方便代码的管理,
    将来出错几率会非常高。
2.解决
     解决办法就是分模块化编写配置文件
8.1 主从配置文件
step01 新建配置文件
<?xml version="1.0" encoding="UTF-8"?>
<beans xmlns="http://www.springframework.org/schema/beans"
       xmlns:xsi="http://www.w3.org/2001/XMLSchema-instance"
       xsi:schemaLocation="http://www.springframework.org/schema/beans http://www.springframework.org/schema/beans/spring-beans.xsd">

    <import resource="application_dao.xml"/>
 <bean id="userService" class="com.qf.service.UserService">


 </bean>

</beans>
step02 测试类
package com.qf.test;

import com.qf.dao.UserDao;
import org.springframework.context.support.ClassPathXmlApplicationContext;

public class Test03 {
    public static void main(String[] args) {
        ClassPathXmlApplicationContext application = new ClassPathXmlApplicationContext("application_service.xml");
        UserDao userDao = application.getBean("userDao", UserDao.class);
        System.out.println(userDao);
    }
}
九 spring整合jdbc
9.1 简介
spring框架有对持久层的支持,叫做spring jdbc。和apache的commons-dbutils非常类似。仅仅是对
jdbc的访问进行了薄薄的封装。
9.2 spring jdbc中的主要类
| 类与方法 | 描述 |
|---|---|
| JdbcTemplate | spring提供主要操作数据库 |
| update | 增 删 改 |
| queryForObject | 查询一条记录 |
| query | 查询所有 |
9.3 使用spring jdbc完成增删改查
step01 依赖
    <dependencies>

        <dependency>
            <groupId>org.springframework</groupId>
            <artifactId>spring-context</artifactId>
            <version>5.3.18</version>
        </dependency>
        <dependency>
            <groupId>org.springframework</groupId>
            <artifactId>spring-jdbc</artifactId>
            <version>5.3.18</version>
        </dependency>
        <dependency>
            <groupId>mysql</groupId>
            <artifactId>mysql-connector-java</artifactId>
            <version>5.1.47</version>
            <scope>runtime</scope>
        </dependency>
        <dependency>
            <groupId>com.alibaba</groupId>
            <artifactId>druid</artifactId>
            <version>1.1.22</version>
        </dependency>
        <dependency>
            <groupId>junit</groupId>
            <artifactId>junit</artifactId>
            <version>4.12</version>
            <scope>test</scope>
        </dependency>

        <dependency>
            <groupId>org.projectlombok</groupId>
            <artifactId>lombok</artifactId>
            <version>1.18.12</version>
            <scope>provided</scope>
        </dependency>

    </dependencies>
![[外链图片转存失败,源站可能有防盗链机制,建议将图片保存下来直接上传(img-WCGvjqvv-1671822832620)(spring0.assets/image-20221212152308205.png)]](https://img-blog.csdnimg.cn/8dcb0546f36b4bd2a5f235eda11ada65.png)
step02 配置数据源
   <!--配置数据源-->
    <bean id="dataSource" class="com.alibaba.druid.pool.DruidDataSource">
        <property name="driverClassName" value="com.mysql.jdbc.Driver"/>
        <property name="url" value="jdbc:mysql:///mybatis_01"/>
        <property name="username" value="root"/>
        <property name="password" value="root"/>
    </bean>
step03 配置文件
<?xml version="1.0" encoding="UTF-8"?>
<beans xmlns="http://www.springframework.org/schema/beans"
       xmlns:xsi="http://www.w3.org/2001/XMLSchema-instance"
       xsi:schemaLocation="http://www.springframework.org/schema/beans
        http://www.springframework.org/schema/beans/spring-beans.xsd">

    <!--配置数据源-->
    <bean id="dataSource" class="com.alibaba.druid.pool.DruidDataSource">
        <property name="driverClassName" value="com.mysql.jdbc.Driver"/>
        <property name="url" value="jdbc:mysql:///mybatis_01"/>
        <property name="username" value="root"/>
        <property name="password" value="root"/>

    </bean>

    <!--配置jdbcTemplate-->
    <bean id="jdbcTemplate" class="org.springframework.jdbc.core.JdbcTemplate">
        <property name="dataSource" ref="dataSource"></property>
    </bean>


    <!--配置dao-->
    <bean id="userDao" class="com.qf.dao.impl.UserDaoImpl">
        <property name="jdbcTemplate" ref="jdbcTemplate"></property>
    </bean>

    <!--配置service层-->
    <bean id="userService" class="com.qf.service.impl.UserServiceImpl">
        <property name="userDao" ref="userDao"></property>
    </bean>

</beans>
9.4 整合数据源 HikariCP
最快数据源
数据源
<bean id="dataSource" class="com.zaxxer.hikari.HikariDataSource">
    <property name="driverClassName" value="com.mysql.jdbc.Driver"/>
    <property name="jdbcUrl" value="jdbc:mysql:///ee0608"/>
    <property name="username" value="root"/>
    <property name="password" value="root"/>
</bean>
十 注解 配置IOC
| 注解 | 说明 |
|---|---|
| @Configuration | 配置类 |
| @Bean | 将对象交给spring容器进行管理 |
| @Qualifier | 按照名称来查找spring容器中的对象 |
| @Scope | 设置单例多例 |
step01 新建User
package com.qf.entity;

public class User {
    private  Integer uid;
    private  String uname;

    public User() {
    }

    public User(Integer uid, String uname) {
        this.uid = uid;
        this.uname = uname;
    }

    public Integer getUid() {
        return uid;
    }

    public void setUid(Integer uid) {
        this.uid = uid;
    }

    public String getUname() {
        return uname;
    }

    public void setUname(String uname) {
        this.uname = uname;
    }

    @Override
    public String toString() {
        return "User{" +
                "uid=" + uid +
                ", uname='" + uname + '\'' +
                '}';
    }
}
step02 新建UserConfig
package com.qf.utils;

import com.qf.entity.User;
import org.springframework.context.annotation.Bean;
import org.springframework.context.annotation.Configuration;
import org.springframework.context.annotation.Scope;

/*
*  @Configuration 表示是一个配置类
*   相当于编写的applicationContext.xml文件
* */
@Configuration
public class UserConfig {
    /*
    *     @Bean 表示将对象交给spring容器来进行管理 bean 的id 默认是方法名称
    *            设置id的设置 通过设置注解value的属性值
    *     @Scope 设置单例或者多例
    *
    * */
    @Bean(value = "u")
    @Scope("prototype")
    User user(){
        User user = new User();
        user.setUid(1001);
        user.setUname("张三");
        return  user;
    }


}
step03 测试类
package com.qf.utils;

import com.qf.entity.User;
import org.springframework.context.annotation.Bean;
import org.springframework.context.annotation.Configuration;
import org.springframework.context.annotation.Scope;

/*
*  @Configuration 表示是一个配置类
*   相当于编写的applicationContext.xml文件
* */
@Configuration
public class UserConfig {
    /*
    *     @Bean 表示将对象交给spring容器来进行管理 bean 的id 默认是方法名称
    *            设置id的设置 通过设置注解value的属性值
    *     @Scope 设置单例或者多例
    *
    * */
    @Bean(value = "u")
    @Scope("prototype")
    User user(){
        User user = new User();
        user.setUid(1001);
        user.setUname("张三");
        return  user;
    }


}
step01 新建 Author类
package com.qf.entity;

public class Author {
    private  Integer aid;
    private  String aname;

    public Author() {
    }

    public Author(Integer aid, String aname) {
        this.aid = aid;
        this.aname = aname;
    }

    public Integer getAid() {
        return aid;
    }

    public void setAid(Integer aid) {
        this.aid = aid;
    }

    public String getAname() {
        return aname;
    }

    public void setAname(String aname) {
        this.aname = aname;
    }

    @Override
    public String toString() {
        return "Author{" +
                "aid=" + aid +
                ", aname='" + aname + '\'' +
                '}';
    }
}
step02 新建Book类
package com.qf.entity;

public class Book {
    private  String bookName;
    private  Author author;

    public Book() {
    }

    public Book(String bookName, Author author) {
        this.bookName = bookName;
        this.author = author;
    }

    public String getBookName() {
        return bookName;
    }

    public void setBookName(String bookName) {
        this.bookName = bookName;
    }

    public Author getAuthor() {
        return author;
    }

    public void setAuthor(Author author) {
        this.author = author;
    }

    @Override
    public String toString() {
        return "Book{" +
                "bookName='" + bookName + '\'' +
                ", author=" + author +
                '}';
    }
}
step03 新建配置类
package com.qf.utils;

import com.qf.entity.Author;
import com.qf.entity.Book;
import org.springframework.beans.factory.annotation.Qualifier;
import org.springframework.context.annotation.Bean;
import org.springframework.context.annotation.Configuration;
import org.springframework.context.annotation.Scope;

@Configuration
public class BookConfig {

    @Bean
    Author author(){
        Author a= new Author();
        a.setAid(1001);
        a.setAname("李国庆");
        return  a;
    }

    @Bean
    Author author1(){
        Author a1= new Author();
        a1.setAid(1002);
        a1.setAname("赵宇龙");
        return  a1;
    }

    @Bean
    Book book(@Qualifier("author1") Author a){
        Book b = new Book();
        b.setBookName("李国庆与波多老师故事");
        b.setAuthor(a);
        return b;
    }


}
step04 测试类
package com.qf.test;

import com.qf.entity.Book;
import com.qf.entity.User;
import com.qf.utils.BookConfig;
import com.qf.utils.UserConfig;
import org.springframework.context.ApplicationContext;
import org.springframework.context.annotation.AnnotationConfigApplicationContext;

public class Test02 {
    public static void main(String[] args) {
        ApplicationContext application =
                new AnnotationConfigApplicationContext(BookConfig.class);
        Book book = application.getBean("book", Book.class);
        System.out.println(book);

    }
}
DAY2
一 基于注解的IoC配置
1.1 搭建
step01 导入依赖
 <dependencies>
        <dependency>
            <groupId>org.springframework</groupId>
            <artifactId>spring-context</artifactId>
            <version>5.3.18</version>
        </dependency>
    </dependencies>
step02 新建UserDao
package com.qf.dao;

public interface UserDao {
    void addUser();
}
step03 新建UserDaoImpl
package com.qf.dao.impl;

import com.qf.dao.UserDao;
import org.springframework.stereotype.Repository;
@Repository
public class UserDaoImpl implements UserDao {


    public void addUser() {
        System.out.println("我是dao层的方法.....");
    }
}
step04 新建xml文件
<beans xmlns="http://www.springframework.org/schema/beans"
       xmlns:xsi="http://www.w3.org/2001/XMLSchema-instance"
       xmlns:context="http://www.springframework.org/schema/context"
       xsi:schemaLocation="http://www.springframework.org/schema/beans
       http://www.springframework.org/schema/beans/spring-beans.xsd
       http://www.springframework.org/schema/context
       https://www.springframework.org/schema/context/spring-context.xsd">
    <!--扫描注解
      base-package 扫描指定包下的注解
      扫描的包是当前包以及其子包-->
    <context:component-scan base-package="com.qf"/>


</beans>
step05 新建测试类
package com.qf.test;

import com.qf.dao.impl.UserDaoImpl;
import org.springframework.context.support.ClassPathXmlApplicationContext;

public class Test01 {
    public static void main(String[] args) {
        ClassPathXmlApplicationContext applicationContext = new ClassPathXmlApplicationContext("applicationContext.xml");
        UserDaoImpl userDaoImpl = applicationContext.getBean("userDaoImpl", UserDaoImpl.class);
        System.out.println(userDaoImpl);

    }
}
1.2 bean实例化注解
![[外链图片转存失败,源站可能有防盗链机制,建议将图片保存下来直接上传(img-TM6DBY6s-1671822832620)(spring0.assets/image-20221212223455734.png)]](https://img-blog.csdnimg.cn/023faa558951403f881999a39957a532.png)
1.3 存活范围和生命周期注解
1.3.1 @Scope(“singleton(默认值)|prototype”)
package com.qf.dao.impl;

import com.qf.dao.UserDao;
import org.springframework.context.annotation.Scope;
import org.springframework.stereotype.Component;
import org.springframework.stereotype.Controller;
import org.springframework.stereotype.Repository;
import org.springframework.stereotype.Service;

/*@Repository*/
/*默认bean 的id 就是 类名 首字母改为小写*/
@Component
@Scope("prototype")
public class UserDaoImpl implements UserDao {


    public void addUser() {
        System.out.println("我是dao层的方法.....");
    }
}
1.3.2 生命周期有关注解
package com.qf.dao.impl;

import com.qf.dao.UserDao;
import org.springframework.context.annotation.Scope;
import org.springframework.stereotype.Component;
import org.springframework.stereotype.Controller;
import org.springframework.stereotype.Repository;
import org.springframework.stereotype.Service;

import javax.annotation.PostConstruct;
import javax.annotation.PreDestroy;

/*@Repository*/
/*默认bean 的id 就是 类名 首字母改为小写*/
@Component
@Scope("prototype")
public class UserDaoImpl implements UserDao {

    public UserDaoImpl(){
        System.out.println("执行了构造方法");
    }


    public void addUser() {
        System.out.println("我是dao层的方法.....");
    }
    @PostConstruct
    public void  init(){
        System.out.println("创建了.....");
    }
    @PreDestroy
    public  void  destory(){
        System.out.println("销毁了......");
    }
}
注意:@PostConstruct和@PreDestroy是JDK(1.6+)中的注解,spring框架对这两个注解进行了支 持。
1.4 依赖注入的注解
1.4.1 注解展示
| 注解 | 说明 | 位置 |
|---|---|---|
| @Autowired | 先按照类型查找,找到多个再按照名字查找 | 一般用于私有字段上(spring) |
| @Qualifier | 只能按照指定的名称进行查找 | 此处和@Autowired配合使用,不能单独使用(spring) |
| @Resource | jdk提供的注解(先按照指定名称查找对象,没有找到,在按照类型查找) | 一般用于私有字段上 |
@Autowired 说明
1、带有改注解的方法,spring容器会自动调用。
2、如果改方法带有参数,会按照类型从容器中查找对象并注入进来。
3、如果在容器中找到类型相同的多个对象,再按照参数的名字查找对象。
14.2 代码
1.5 使用注解完成单表CRUD(DBUtils)
step01 导入依赖
<dependencies>

        <dependency>
            <groupId>org.springframework</groupId>
            <artifactId>spring-context</artifactId>
            <version>5.3.18</version>
        </dependency>
        <dependency>
            <groupId>org.springframework</groupId>
            <artifactId>spring-jdbc</artifactId>
            <version>5.3.18</version>
        </dependency>
        <dependency>
            <groupId>mysql</groupId>
            <artifactId>mysql-connector-java</artifactId>
            <version>5.1.47</version>
            <scope>runtime</scope>
        </dependency>
        <dependency>
            <groupId>com.alibaba</groupId>
            <artifactId>druid</artifactId>
            <version>1.1.22</version>
        </dependency>
        <dependency>
            <groupId>junit</groupId>
            <artifactId>junit</artifactId>
            <version>4.12</version>
            <scope>test</scope>
        </dependency>
        <dependency>
            <groupId>commons-dbutils</groupId>
            <artifactId>commons-dbutils</artifactId>
            <version>1.6</version>
        </dependency>

        <dependency>
            <groupId>org.projectlombok</groupId>
            <artifactId>lombok</artifactId>
            <version>1.18.12</version>
            <scope>provided</scope>
        </dependency>

    </dependencies>
step02 数据库配置文件
 <!--配置数据源-->
    <bean id="dataSource" class="com.alibaba.druid.pool.DruidDataSource">
        <property name="driverClassName" value="com.mysql.jdbc.Driver"/>
        <property name="url" value="jdbc:mysql:///mybatis_01"/>
        <property name="username" value="root"/>
        <property name="password" value="root"/>
    </bean>
step03 新建User
package com.qf.entity;

import lombok.AllArgsConstructor;
import lombok.Data;
import lombok.NoArgsConstructor;
import org.springframework.beans.factory.annotation.Autowired;

import java.io.Serializable;
import java.util.Date;

@Data
@AllArgsConstructor
@NoArgsConstructor
public class User implements Serializable {

    private  int uid;
    private  String uname;
    private  String upwd;
    private Date udate;


}
step04 新建UserDao层
package com.qf.dao;

import com.qf.entity.User;

import java.util.List;

public interface UserDao {
    List<User> selectAllList();
}
step05 新建UserDaoImpl
package com.qf.dao.impl;

import com.qf.dao.UserDao;
import com.qf.entity.User;
import org.apache.commons.dbutils.QueryRunner;
import org.apache.commons.dbutils.handlers.BeanListHandler;
import org.springframework.beans.factory.annotation.Autowired;
import org.springframework.beans.factory.annotation.Qualifier;
import org.springframework.stereotype.Repository;

import java.sql.SQLException;
import java.util.List;
@Repository
public class UserDaoImpl implements UserDao {
    @Autowired
    //需要给一个名称 对应的xml中bean id
    @Qualifier("queryRunner")
    private QueryRunner queryRunner;
    public List<User> selectAllList() {
        List<User> userList = null;
        try {
            String sql="select * from  user";

            userList = queryRunner.query(sql, new BeanListHandler<User>(User.class));
        } catch (SQLException e) {
            e.printStackTrace();
        }
        return userList;
    }
}
step06 新建UserService
package com.qf.service;

import com.qf.entity.User;

import java.util.List;

public interface UserService {
    List<User> selectAllList();
}
step07 新建UserServiceImpl
package com.qf.service.impl;

import com.qf.dao.UserDao;
import com.qf.dao.impl.UserDaoImpl;
import com.qf.entity.User;
import com.qf.service.UserService;
import org.springframework.stereotype.Service;

import javax.annotation.Resource;
import java.util.List;
@Service
public class UserServiceImpl implements UserService {
    @Resource
    private UserDaoImpl userDao;
    public List<User> selectAllList() {
        return userDao.selectAllList();
    }
}
step08 新建配置文件
<beans xmlns="http://www.springframework.org/schema/beans"
       xmlns:xsi="http://www.w3.org/2001/XMLSchema-instance"
       xmlns:context="http://www.springframework.org/schema/context"
       xsi:schemaLocation="http://www.springframework.org/schema/beans
       http://www.springframework.org/schema/beans/spring-beans.xsd
       http://www.springframework.org/schema/context
       https://www.springframework.org/schema/context/spring-context.xsd">
    <!--扫描注解包-->
    <context:component-scan base-package="com.qf"/>
    <!--配置数据源-->
    <bean id="dataSource" class="com.alibaba.druid.pool.DruidDataSource">
        <property name="driverClassName" value="com.mysql.jdbc.Driver"/>
        <property name="url" value="jdbc:mysql:///mybatis_01"/>
        <property name="username" value="root"/>
        <property name="password" value="root"/>
    </bean>

    <!--配置QueryRunner-->
    <bean id="queryRunner" class="org.apache.commons.dbutils.QueryRunner">
        <constructor-arg name="ds" ref="dataSource"></constructor-arg>
    </bean>
</beans>
step09 新建测试类
package com.qf.test;

import com.qf.entity.User;
import com.qf.service.impl.UserServiceImpl;
import org.springframework.context.support.ClassPathXmlApplicationContext;

import java.util.List;

public class Test01 {
    public static void main(String[] args) {
        ClassPathXmlApplicationContext applicationContext = new ClassPathXmlApplicationContext("applicationContext.xml");
        UserServiceImpl serviceImpl = applicationContext.getBean("userServiceImpl", UserServiceImpl.class);
        List<User> userList = serviceImpl.selectAllList();
        for (User user :userList){
            System.out.println(user);
        }

    }
}
1.6 基于类的Spring配置 纯注解
step01 新建一个注解类
package com.qf.utils;

import com.alibaba.druid.pool.DruidDataSource;
import org.apache.commons.dbutils.QueryRunner;
import org.springframework.beans.factory.annotation.Qualifier;
import org.springframework.beans.factory.annotation.Value;
import org.springframework.context.annotation.Bean;
import org.springframework.context.annotation.ComponentScan;
import org.springframework.context.annotation.Configuration;
import org.springframework.context.annotation.PropertySource;
import org.springframework.jdbc.datasource.DriverManagerDataSource;

import javax.sql.DataSource;

@Configuration //配置注解类
@ComponentScan(basePackages = "com.qf")
/*注解加载配置文件的信息*/
@PropertySource(value = "classpath:jdbcConfig.properties")
public class SpringConfig {
    @Value("${jdbc.driver}")
    private  String driver;
    @Value("${jdbc.url}")
    private  String url;
    @Value("${jdbc.username}")
    private  String username;
    @Value("${jdbc.password}")
    private  String password;


    //定义一个方法获取数据源
    @Bean
    public DataSource getDataSource() {
//        jdbc.driver=com.mysql.jdbc.Driver
//        jdbc.url=jdbc:mysql://localhost:3306/mybatis_01
//        jdbc.username=root
//        jdbc.password=root
        DriverManagerDataSource dataSource = new DriverManagerDataSource();
        dataSource.setDriverClassName(driver);
        dataSource.setUrl(url);
        dataSource.setUsername(username);
        dataSource.setPassword(password);
        return  dataSource;

    }

    //定义一个方法来获取QueryRunner对象
    @Bean
    public QueryRunner  queryRunner(@Qualifier("getDataSource") DataSource ds){
        return  new QueryRunner(ds);
    }


  /*   <bean id="dataSource" class="com.alibaba.druid.pool.DruidDataSource">
        <property name="driverClassName" value="com.mysql.jdbc.Driver"/>
        <property name="url" value="jdbc:mysql:///mybatis_01"/>
        <property name="username" value="root"/>
        <property name="password" value="root"/>
    </bean>

    <!--配置QueryRunner-->
    <bean id="queryRunner" class="org.apache.commons.dbutils.QueryRunner">
        <constructor-arg name="ds" ref="dataSource"></constructor-arg>
    </bean>*/


}
二 代理设计模式
- JDK 动态代理
- 优势:
- 官方提供的,可以直接使用,不需要添加依赖
- 效率高
- 劣势:
- 只支持有接口的类
- 优势:
- CGLIB 动态代理
- 优势:
- 无论类是否有接口,都支持通过 CGLIB 创建代理对象。
- 劣势:
- 第三方的工具,使用时需要添加第三方依赖。
- 效率略低
- 优势:
Spring 中的 AOP 底层就是动态代理:
- 在 Spring 中,如果代理的对象有接口,默认就自动使用 JDK 动态代理;如果没有接口,就是用 CGLIB 动态代理。
- Spring Boot2.0 之前和 Spring 是一样的;2.0 之后,Spring Boot 中的 AOP 统一都是 CGLIB 动态代理。
2.1 概念
将核心功能与辅助功能(事务、日志、性能监控代码)分离,达到核心业务功能更纯粹、辅助业务功能可复用。
| 功能分离 |
|---|
![[外链图片转存失败,源站可能有防盗链机制,建议将图片保存下来直接上传(img-q4dq5EXA-1671822832621)(spring.assets/image-20221213001941201.png)]](https://img-blog.csdnimg.cn/4b894841d13c49788257ed5ff8550b23.png) |
2.2 静态代理设计模式
通过代理类的对象,为原始类的对象(目标类的对象)添加辅助功能,更容易更换代理实现类、利于维护。
| 静态代理 |
|---|
![[外链图片转存失败,源站可能有防盗链机制,建议将图片保存下来直接上传(img-5oLvy58D-1671822832621)(spring.assets/image-20221213142412161.png)]](https://img-blog.csdnimg.cn/afb331e23fad4d6d83631234b55e45c0.png) |
-
代理类 = 实现原始类相同接口 + 添加辅助功能 + 调用原始类的业务方法。
-
静态代理的问题
-
代理类数量过多,不利于项目的管理。
-
多个代理类的辅助功能代码冗余,修改时,维护性差。
接口一旦新增加方法,目标对象和代理对象都要进行修改*)且麻烦(需要对每个目标类都单独写一个代理类***
-
step01 定义一个接口
package com.qf.pp;

public interface TeacherService {

    // 提供服务的方法
     void  service();
}
step02 定义一个实现类
package com.qf.pp;

public class CanTeacher implements  TeacherService {


    public void service() {

        System.out.println("我的各项服务都比较到位");
    }
}
step03 定义一个经理人类
package com.qf.pp;

public class Proxy implements  TeacherService {

    //创建一个老师类
    private  TeacherService canTeacher;

    public Proxy() {
    }

    public Proxy(TeacherService canTeacher) {
        this.canTeacher = canTeacher;
    }


    public void service() {
        //在前面做一些事情
        System.out.println("我已经体验过苍老师的活,放心体验");
         canTeacher.service();

         //在后面执行一些事情
        System.out.println("体验之后!感觉怎么样......");
    }
}
step04 测试类
package com.qf.pp;

public class Test {

    public static void main(String[] args) {
        TeacherService teacherService = new CanTeacher();
        Proxy p = new Proxy(teacherService);
        p.service();
    }
}
2.3 动态代理设计模式
动态创建代理类的对象,为原始类的对象添加辅助功能。
有两种实现方式:
- 基于 JDK(不需要额外引入jar):被代理的对象存在接口。
- 基于 cglib(需要引入外部jar):被代理的对象可以没有接口。
2.3. 1 基于jdk
step01 新建一个接口
package com.qf.aa;

public interface Service {
    //服务
    void service();


}
step02 新建一个实现类
package com.qf.service;

//波多老师的角色
public class ServiceImpl implements  Service {
    public void service() {
        System.out.println("正在进行服务....");

    }
}
step03 定义一个 动态执行代理对象的方法
package com.qf.aa;

import java.lang.reflect.InvocationHandler;
import java.lang.reflect.Method;

public class MyInvocationHandler implements InvocationHandler {
    //传递一个目标对象
    private  Object object;

    public MyInvocationHandler(Object object) {
        this.object = object;
    }

    //第一个参数表示动态生成的代理类
    //代理类对象调用的方法相对应
    //代理类对象方法的参数
    public Object invoke(Object proxy, Method method, Object[] args) throws Throwable {
        System.out.println("哈哈哈");
        method.invoke(object,args);
        System.out.println("hhh");
        return null;
    }
}
step04 测试类
package com.qf.aa;


import java.lang.reflect.Proxy;

public class Test01 {
    public static void main(String[] args) {
        Service service = new ServiceImpl();
        //动态创建代理对象
        //第一个参数表示被代理对象的类加载器
        //第二个参数表示的是 被代理对象中的接口
        //第三个参数表示处理器 会动态的执行被代理对象中的方法
        MyInvocationHandler h = new MyInvocationHandler(service);
        Service userService = (Service) Proxy.newProxyInstance(service.getClass().getClassLoader(), service.getClass().getInterfaces(), h);
        userService.service();
    }
}
2.3. 1 基于 cglib
step01 引入依赖
<dependency>
    <groupId>cglib</groupId>
    <artifactId>cglib</artifactId>
    <version>3.3.0</version>
</dependency>
step02 新建一个被代理类
package com.qf.aa;

public class Teacher {

    public  void  showInfo(){
        System.out.println("需要增强的方法");
    }
}
step02 新建一个代理器拦截类
package com.qf.aa;

import org.springframework.cglib.proxy.MethodInterceptor;
import org.springframework.cglib.proxy.MethodProxy;

import java.lang.reflect.Method;

public class MyMethodInterceptor implements MethodInterceptor {
    private  Object obj;

    public MyMethodInterceptor(Object obj) {
        this.obj = obj;
    }

    /**
     *
     * @param o 代理对象
     * @param method 被拦截的方法
     * @param objects 方法的参数
     * @param methodProxy 代理的方法
     * @return
     * @throws Throwable
     */
    @Override
    public Object intercept(Object o, Method method, Object[] objects, MethodProxy methodProxy) throws Throwable {
        System.out.println("前置增强");
        methodProxy.invoke(obj,objects);
        System.out.println("猴子增强");
        return null;
    }
}
step03 新建测试类
package com.qf.aa;

import org.springframework.cglib.proxy.Enhancer;

public class Test01 {
    public static void main(String[] args) {
        Teacher t= new Teacher();
        //创建动态代理增强类  用于来创建代理对象
        Enhancer enhancer = new Enhancer();
        //设置类加载器 注意这个被代理对象的类加载器
        enhancer.setClassLoader(t.getClass().getClassLoader());
        //设置被代理类
        enhancer.setSuperclass(t.getClass());
        //设置方法的拦截
        enhancer.setCallback(new MyMethodInterceptor(t));
        //创建代理对象
       Teacher t1= (Teacher) enhancer.create();
       t1.showInfo();


    }
}
三 Spring AOP
3.1 简介
AOP叫做面向切面编程,不是替代OOP,而是作为OOP的有益补充。
3.2 有关术语
- 被代理对象:只包含核心代码的对象。
- 代理对象:对被代理对象增强的对象。
- 连接点(joinpoint):指核心代码中的所有方法。
- 切入点(pointcut):指核心代码中需要增强的方法。
- 通知(advice):指事务、日志等代码,增强代码。
- 织入(weaving):是一个动作,指将增强代码加入到切入点中执行。
- 切面(aspect):通知+切入点。
3.3 基于XML配置的aop入门案例
step1、建立一个新的模块
day08_01_aopXml
step2、引入坐标
 <dependencies>
        <dependency>
            <groupId>org.springframework</groupId>
            <artifactId>spring-context</artifactId>
            <version>5.3.18</version>
        </dependency>
        <dependency>
            <groupId>org.springframework</groupId>
            <artifactId>spring-aspects</artifactId>
            <version>5.3.18</version>
        </dependency>
step3、编写核心业务代码
public interface UserService {
    void saveUser(String name);
    int deleteUser(Integer id);
    Object findUser();
}
package com.qf.service.impl;

import com.qf.service.UserService;

public class UserServiceImpl implements UserService {
    public void saveUser(String name) {
        System.out.println("void saveUser(String name)");
    }

    public int deleteUser(Integer id) {
        System.out.println("int deleteUser(Integer id)");
        return 0;
    }

    public Object findUser() {
        System.out.println("Object findUser()");
        return null;
    }
}
step4、编写一个简答的日志通知类
package com.qf.commons;

public class MyLogger {
    public void a(){
        System.out.println("aaaaaaaaaa..........");
    }
    public void b(){
        System.out.println("bbbbbbbbbbbb..........");
    }
}
step5、(关键点)spring配置切面
<?xml version="1.0" encoding="UTF-8"?>
<beans xmlns="http://www.springframework.org/schema/beans"
       xmlns:xsi="http://www.w3.org/2001/XMLSchema-instance"
       xmlns:aop="http://www.springframework.org/schema/aop"
       xsi:schemaLocation="http://www.springframework.org/schema/beans
       http://www.springframework.org/schema/beans/spring-beans.xsd
       http://www.springframework.org/schema/aop
       https://www.springframework.org/schema/aop/spring-aop.xsd">
    <!--核心代码对象交给spring容器管理-->
    <bean id="userService" class="com.qf.service.impl.UserServiceImpl"/>
    <!--通知对象(增强)交给spring容器管理-->
    <bean id="logAdvice" class="com.qf.commons.MyLogger"/>
        <!--配置aop:切面配置(通知+切入点)-->
    <aop:config><!--aop配置都是在该标签中完成的-->
        <aop:aspect ref="logAdvice"><!--配置切面,指定增强对象-->
            <!--
            指定增强对象中的哪个方法在核心对象的哪个方法”之前before“执行。
                method:指定通知方法
                pointcut:指定切入点。需要使用切入点表达式
            -->
            <aop:before method="a" pointcut="execution(void com.qf.service.impl.UserServiceImpl.saveUser(java.lang.String))"/>
        </aop:aspect>
    </aop:config>
</beans>
step6、测试类
step7、测试结果
![[外链图片转存失败,源站可能有防盗链机制,建议将图片保存下来直接上传(img-9NlPQxGQ-1671822832621)(spring0.assets/image-20200812114135395.png)]](https://img-blog.csdnimg.cn/242e63b02f024efb8a94fe350c53b806.png)
3.4 通知类型:五种类型
3.4.1 四种基本的
四个基本通知的特点就是执行的位置是固定的。
特别注意:after-returning和after-throwing是互斥的。
try{
	//before:核心代码执行前(前置通知)
	核心代码;
	//after-returning:核心代码正常执行后(后置通知)
}catch(Exception e){
	//after-throwing:出现异常后执行(异常通知)
}finally{
	//after:最终执行(最终通知)
}
<aop:before method="a" pointcut="execution(void com.qf.service.impl.UserServiceImpl.saveUser(java.lang.String))"/>
            <aop:after-returning method="b" pointcut="execution(void com.qf.service.impl.UserServiceImpl.saveUser(java.lang.String))"/>
            <aop:after-throwing method="c" pointcut="execution(void com.qf.service.impl.UserServiceImpl.saveUser(java.lang.String))"/>
            <aop:after method="d" pointcut="execution(void com.qf.service.impl.UserServiceImpl.saveUser(java.lang.String))"/>
3.4.2 一种特殊的
环绕通知。该通知不能以字面含义进行理解。实际上一种自己编写通知代码的方式,属于自定通知。
它有着4个基本通知的所有功能。
step1、增强方法
//环绕通知:ProceedingJoinPoint该对象spring回自动注入进来。如果有多个参数,必须位于第一个
    //ProceedingJoinPoint该对象封装了核心对象的方法信息
    public void e(ProceedingJoinPoint pjp){
//        Object[] args = pjp.getArgs();//当前执行的核心方法的参数
//        String name = pjp.getSignature().getName();//当前执行的核心方法的方法名
        try {
            System.out.println("before...............");
            pjp.proceed();//调用核心方法
            System.out.println("after-returning...............");
        } catch (Throwable throwable) {
            throwable.printStackTrace();
            System.out.println("after-throwning...............");
        } finally {
            System.out.println("after...............");
        }
    }
step2、spring配置文件
<aop:around method="e" pointcut="execution(void com.ujiuye.service.impl.UserServiceImpl.saveUser(java.lang.String))"/>
3.5 切入点表达式
step1、抽取切入点表达式

step2、切入点表达式的编写
非常灵活自由
<!--
  * com.qf.service.impl.*.*(..)

            切入点表达式指定切入点是哪些,表达式必须写在execution()括号内
            void方法的返回值:可以使用通配符*
            com.qf.service.impl包:可以使用通配符*,一个*表示一级包。*..*任意包
            UserServiceImpl类:可以使用通配符*
            saveUser方法名称:可以使用通配符*
            (java.lang.String)参数的类型:可以使用通配符*,一个*表示一个参数。忽略参数个数请使用..
            -->
            <aop:pointcut id="myTarget" expression="execution(* com.qf.service.impl.*.*(..))"/>
3.6 基于注解的aop配置
step1、靠别建立一个新的模块

step2、修改spring配置文件
<?xml version="1.0" encoding="UTF-8"?>
<beans xmlns="http://www.springframework.org/schema/beans"
       xmlns:xsi="http://www.w3.org/2001/XMLSchema-instance"
       xmlns:context="http://www.springframework.org/schema/context"
       xmlns:aop="http://www.springframework.org/schema/aop"
       xsi:schemaLocation="http://www.springframework.org/schema/beans
       http://www.springframework.org/schema/beans/spring-beans.xsd
      http://www.springframework.org/schema/context
      https://www.springframework.org/schema/context/spring-context.xsd
      http://www.springframework.org/schema/aop
      https://www.springframework.org/schema/aop/spring-aop.xsd">
    <!--开启扫描-->
    <context:component-scan base-package="com.qf"/>
    <!--开启aop注解的支持-->
    <aop:aspectj-autoproxy/>
</beans>
step3、业务对象交给spring容器管理

step4、增强对象
package com.ujiuye.commons;

import org.aspectj.lang.ProceedingJoinPoint;
import org.aspectj.lang.annotation.*;
import org.springframework.stereotype.Component;

@Aspect //切面
@Component
public class MyLogger {
    //抽取切入点表达式。方法名就是引用名称
    @Pointcut("execution(* com.qf.service.impl.*.*(..))")
    public void myTarget(){}

//    @Before("myTarget()")
    public void a(){
        System.out.println("aaaaaaaaaa..........");
    }
//    @AfterReturning("myTarget()")
    public void b(){
        System.out.println("bbbbbbbbbbbb..........");
    }
//    @AfterThrowing("myTarget()")
    public void c(){
        System.out.println("ccccccc..........");
    }
//    @After("myTarget()") //此通知顺序错乱。请使用环绕通知
    public void d(){
        System.out.println("dddddddd..........");
    }
    //环绕通知:ProceedingJoinPoint该对象spring回自动注入进来。如果有多个参数,必须位于第一个
    //ProceedingJoinPoint该对象封装了核心对象的方法信息
    @Around("myTarget()")
    public void e(ProceedingJoinPoint pjp){
//        Object[] args = pjp.getArgs();//当前执行的核心方法的参数
//        String name = pjp.getSignature().getName();//当前执行的核心方法的方法名
        try {
            System.out.println("before...............");
            pjp.proceed();//调用核心方法
            System.out.println("after-returning...............");
        } catch (Throwable throwable) {
            throwable.printStackTrace();
            System.out.println("after-throwning...............");
        } finally {
            System.out.println("after...............");
        }
    }
}
Day3
一 事务
1.1 什么是事务
事务是逻辑上的一组操作,要么都执行,要么都不执行。
我们系统的每个业务方法可能包括了多个原子性的数据库操作,比如下面的 savePerson() 方法中就有两个原子性的数据库操作。这些原子性的数据库操作是有依赖的,它们要么都执行,要不就都不执行。
	public void savePerson() {
		personDao.save(person);
		personDetailDao.save(personDetail);
	}
另外,需要格外注意的是:**事务能否生效数据库引擎是否支持事务是关键。比如常用的 MySQL 数据库默认使用支持事务的innodb引擎。但是,如果把数据库引擎变为 myisam,那么程序也就不再支持事务了
1.2 事务的特性(ACID)
- 原子性(Atomicity): 一个事务(transaction)中的所有操作,或者全部完成,或者全部不完成,不会结束在中间某个环节。事务在执行过程中发生错误,会被回滚(Rollback)到事务开始前的状态,就像这个事务从来没有执行过一样。即,事务不可分割、不可约简。
- 一致性(Consistency): 在事务开始之前和事务结束以后,数据库的完整性没有被破坏。这表示写入的资料必须完全符合所有的预设约束、触发器、级联回滚等。
- 隔离性(Isolation): 数据库允许多个并发事务同时对其数据进行读写和修改的能力,隔离性可以防止多个事务并发执行时由于交叉执行而导致数据的不一致。事务隔离分为不同级别,包括未提交读(Read uncommitted)、提交读(read committed)、可重复读(repeatable read)和串行化(Serializable)。
- 持久性(Durability): 事务处理结束后,对数据的修改就是永久的,即便系统故障也不会丢失。
1.3 Spring 对事务的支持
**你的程序是否支持事务首先取决于数据库 ,比如使用 MySQL 的话,如果你选择的是 innodb 引擎,那么恭 喜你,是可以支持事务的。但是,如果你的 MySQL 数据库使用的是 myisam 引擎的话,那不好意思,从根上就是不支持事务的
1.4 Spring 支持两种方式的事务管理
1.4.1 编程式事务管理(需要自身编写代码)
通过 TransactionTemplate或者TransactionManager手动管理事务,实际应用中很少使用,但是对于你理解 Spring 事务管理原理有帮助
1.4.1.1 基于 TransactionTemplate6
step01 依赖
 <dependencies>
        <dependency>
            <groupId>org.springframework</groupId>
            <artifactId>spring-context</artifactId>
            <version>5.3.18</version>
        </dependency>
        <dependency>
            <groupId>org.springframework</groupId>
            <artifactId>spring-jdbc</artifactId>
            <version>5.3.18</version>
        </dependency>
        <dependency>
            <groupId>mysql</groupId>
            <artifactId>mysql-connector-java</artifactId>
            <version>5.1.47</version>
            <scope>runtime</scope>
        </dependency>
        <dependency>
            <groupId>org.springframework</groupId>
            <artifactId>spring-aspects</artifactId>
            <version>5.3.18</version>
        </dependency>
        <dependency>
            <groupId>org.projectlombok</groupId>
            <artifactId>lombok</artifactId>
            <version>1.18.12</version>
            <scope>provided</scope>
        </dependency>


    </dependencies>
step02 新建applicationContext.xml
<?xml version="1.0" encoding="UTF-8"?>
<beans xmlns="http://www.springframework.org/schema/beans"
       xmlns:xsi="http://www.w3.org/2001/XMLSchema-instance"
       xmlns:context="http://www.springframework.org/schema/context"
       xmlns:tx="http://www.springframework.org/schema/tx"
       xmlns:aop="http://www.springframework.org/schema/aop"
       xsi:schemaLocation="http://www.springframework.org/schema/beans
       http://www.springframework.org/schema/beans/spring-beans.xsd
       http://www.springframework.org/schema/context
       https://www.springframework.org/schema/context/spring-context.xsd
       http://www.springframework.org/schema/tx
       http://www.springframework.org/schema/tx/spring-tx.xsd
       http://www.springframework.org/schema/aop
       https://www.springframework.org/schema/aop/spring-aop.xsd">
    <!--引入数据库配置信息-->
    <context:property-placeholder location="classpath:jdbcConfig.properties"/>
    <!--配置数据源-->

    <bean class="org.springframework.jdbc.datasource.DriverManagerDataSource" id="dataSource">
        <property name="driverClassName" value="${jdbc.driver}"></property>
        <property name="url" value="${jdbc.url}"></property>
        <property name="username" value="${jdbc.username}"></property>
        <property name="password" value="${jdbc.password}"></property>
    </bean>

    <!--配置jdbcTemplate-->
    <bean id="jdbcTemplate" class="org.springframework.jdbc.core.JdbcTemplate">
        <property name="dataSource" ref="dataSource"></property>
    </bean>


    <!--配置事务管理器-->
    <bean class="org.springframework.jdbc.datasource.DataSourceTransactionManager" id="transactionManager">
        <property name="dataSource" ref="dataSource"/>
    </bean>

    <!--配置事务模板对象-->
    <bean class="org.springframework.transaction.support.TransactionTemplate" id="transactionTemplate">
        <property name="transactionManager" ref="transactionManager"></property>
    </bean>

    <bean class="com.qf.service.AccountService" id="accountService">

        <constructor-arg name="jdbcTemplate" ref="jdbcTemplate"></constructor-arg>
        <constructor-arg name="platformTransactionManager" ref="transactionManager"></constructor-arg>
        <constructor-arg name="transactionTemplate" ref="transactionTemplate"></constructor-arg>
    </bean>


</beans>
step02 新建AccountService
package com.qf.service;

import org.springframework.dao.DataAccessException;
import org.springframework.jdbc.core.JdbcTemplate;
import org.springframework.transaction.PlatformTransactionManager;
import org.springframework.transaction.TransactionStatus;
import org.springframework.transaction.support.TransactionCallbackWithoutResult;
import org.springframework.transaction.support.TransactionTemplate;

public class AccountService {

    private PlatformTransactionManager  platformTransactionManager;

    private TransactionTemplate  transactionTemplate;

    private JdbcTemplate jdbcTemplate;

    public AccountService(PlatformTransactionManager platformTransactionManager, TransactionTemplate transactionTemplate, JdbcTemplate jdbcTemplate) {
        this.platformTransactionManager = platformTransactionManager;
        this.transactionTemplate = transactionTemplate;
        this.jdbcTemplate = jdbcTemplate;
    }

    public  void  udpate(){
        transactionTemplate.execute(new TransactionCallbackWithoutResult() {
            @Override
            protected void doInTransactionWithoutResult(TransactionStatus status) {
                try {
                    String sql ="update account set  amoney=? where aname=?";
                    jdbcTemplate.update(sql,8888,"张三");
                    System.out.println(1/0);
                } catch (DataAccessException e) {
                    //表示回滚
                   status.setRollbackOnly();
                }

            }
        });


    }
}
1.4.1.1 基于 TransactionManager
step01 修改Service层代码
    public    void  update02(){

        TransactionStatus transactionStatus =platformTransactionManager.getTransaction(new DefaultTransactionDefinition());

        try {
            String sql ="update account set  amoney=? where aname=?";
            jdbcTemplate.update(sql,8888,"李四");
            System.out.println(1/0);
            platformTransactionManager.commit(transactionStatus);

        } catch (Exception e) {
            platformTransactionManager.rollback(transactionStatus);
        }


    }
1.4.2 声明式事务
A.配置数据源
B.配置事务管理器
C.配置切面
D.配置Aop
step01 修改 applicationContext.xml
 <!--配置切面-->
    <tx:advice id="tvadvice" transaction-manager="transactionManager">
        <tx:attributes>
        <!--
name="find*":匹配切入点方法。可以使用*通配符
read-only="false":是否是只读事务。默认是false,查询方法建议为true。增删改如果
为只读,则报错。
propagation="REQUIRED":传播行为。默认REQUIRED(增删改)。查询使用SUPPORTS
timeout="-1":事务超时时间
isolation="DEFAULT":隔离级别
rollback-for="excep":如果代码抛出异常,异常名字中含有excep,那么就回滚。一般
不配。
no-rollback-for="excep":如果代码抛出异常,异常名字中含有excep,那么不回滚。一
般不配。
-->
            <tx:method name="find*"/>
            <tx:method name="update*"/>
            <tx:method name="insert*"/>
        </tx:attributes>
    </tx:advice>

    <!--配置aop 事务生效的部分是两个部分的交际-->
    <aop:config>
        <aop:pointcut id="pct" expression="execution(* com.qf.service.AccountService.*(..))"/>

        <!--引入切面-->
        <aop:advisor advice-ref="tvadvice" pointcut-ref="pct"/>
    </aop:config>
step02 修改AccountService
 public  void  update03(){
        String sql ="update account set  amoney=? where aname=?";
        jdbcTemplate.update(sql,666,"李四");
        System.out.println(1/0);
    }
1.5 Spring 事务管理接口介绍
Spring 框架中,事务管理相关最重要的 3 个接口如下:
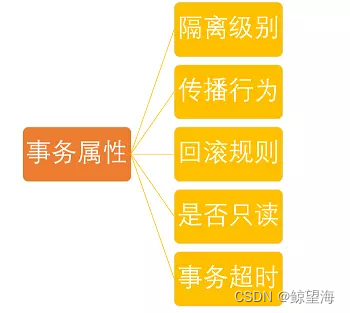
PlatformTransactionManager: (平台)事务管理器,Spring 事务策略的核心。TransactionDefinition: 事务定义信息(事务隔离级别、传播行为、超时、只读、回滚规则)。TransactionStatus: 事务运行状态。
我们可以把 PlatformTransactionManager 接口可以被看作是事务上层的管理者,而 TransactionDefinition 和 TransactionStatus 这两个接口可以看作是事务的描述。
PlatformTransactionManager 会根据 TransactionDefinition 的定义比如事务超时时间、隔离级别、传播行为等来进行事务管理 ,而 TransactionStatus 接口则提供了一些方法来获取事务相应的状态比如是否新事务、是否可以回滚等等。
1.5.1. PlatformTransactionManager:事务管理接口
Spring 并不直接管理事务,而是提供了多种事务管理器 。Spring 事务管理器的接口是: PlatformTransactionManager 。
通过这个接口,Spring 为各个平台如 JDBC(DataSourceTransactionManager)、Hibernate(HibernateTransactionManager)、JPA(JpaTransactionManager)等都提供了对应的事务管理器,但是具体的实现就是各个平台自己的事情了。
PlatformTransactionManager 接口的具体实现如下:

PlatformTransactionManager接口中定义了三个方法:
package org.springframework.transaction;
import org.springframework.lang.Nullable;
public interface PlatformTransactionManager {
    //获得事务
    TransactionStatus getTransaction(@Nullable TransactionDefinition var1) throws TransactionException;
    //提交事务
    void commit(TransactionStatus var1) throws TransactionException;
    //回滚事务
    void rollback(TransactionStatus var1) throws TransactionException;
}
这里多插一嘴。为什么要定义或者说抽象出来PlatformTransactionManager这个接口呢?
主要是因为要将事务管理行为抽象出来,然后不同的平台去实现它,这样我们可以保证提供给外部的行为不变,方便我们扩展。
1.5.2. TransactionDefinition:事务属性
事务管理器接口 PlatformTransactionManager 通过 getTransaction(TransactionDefinition definition) 方法来得到一个事务,这个方法里面的参数是 TransactionDefinition 类 ,这个类就定义了一些基本的事务属性。
那么什么是 事务属性 呢?
事务属性可以理解成事务的一些基本配置,描述了事务策略如何应用到方法上。
1.5 基于注解的声明式事务
step01 添加依赖
<dependencies>
        <dependency>
            <groupId>org.springframework</groupId>
            <artifactId>spring-context</artifactId>
            <version>5.3.18</version>
        </dependency>
        <dependency>
            <groupId>org.springframework</groupId>
            <artifactId>spring-jdbc</artifactId>
            <version>5.3.18</version>
        </dependency>
        <dependency>
            <groupId>mysql</groupId>
            <artifactId>mysql-connector-java</artifactId>
            <version>5.1.47</version>
            <scope>runtime</scope>
        </dependency>
        <dependency>
            <groupId>org.springframework</groupId>
            <artifactId>spring-aspects</artifactId>
            <version>5.3.18</version>
        </dependency>
        <dependency>
            <groupId>org.projectlombok</groupId>
            <artifactId>lombok</artifactId>
            <version>1.18.12</version>
            <scope>provided</scope>
        </dependency>


    </dependencies>
step02 新建applicationContext.xml
<?xml version="1.0" encoding="UTF-8"?>
<beans xmlns="http://www.springframework.org/schema/beans"
       xmlns:xsi="http://www.w3.org/2001/XMLSchema-instance"
       xmlns:context="http://www.springframework.org/schema/context"
       xmlns:tx="http://www.springframework.org/schema/tx"
       xmlns:aop="http://www.springframework.org/schema/aop"
       xsi:schemaLocation="http://www.springframework.org/schema/beans
       http://www.springframework.org/schema/beans/spring-beans.xsd
       http://www.springframework.org/schema/context
       https://www.springframework.org/schema/context/spring-context.xsd
       http://www.springframework.org/schema/tx
       http://www.springframework.org/schema/tx/spring-tx.xsd
       http://www.springframework.org/schema/aop
       https://www.springframework.org/schema/aop/spring-aop.xsd">
    <!--引入数据库配置信息-->
    <context:property-placeholder location="classpath:jdbcConfig.properties"/>
    <!--配置数据源-->

    <bean class="org.springframework.jdbc.datasource.DriverManagerDataSource" id="dataSource">
        <property name="driverClassName" value="${jdbc.driver}"></property>
        <property name="url" value="${jdbc.url}"></property>
        <property name="username" value="${jdbc.username}"></property>
        <property name="password" value="${jdbc.password}"></property>
    </bean>

    <!--配置jdbcTemplate-->
    <bean id="jdbcTemplate" class="org.springframework.jdbc.core.JdbcTemplate">
        <property name="dataSource" ref="dataSource"></property>
    </bean>


    <!--配置事务管理器-->
    <bean class="org.springframework.jdbc.datasource.DataSourceTransactionManager" id="transactionManager">
        <property name="dataSource" ref="dataSource"/>
    </bean>

    <!--开启事务注解的支持-->
    <tx:annotation-driven transaction-manager="transactionManager"/>


</beans>
step03 新建AccountService
package com.qf.servcie;
public interface AccountService {
      void addAccount();
}
step04 新建AccountServiceImpl
package com.qf.servcie.impl;

import com.qf.servcie.AccountService;
import org.springframework.jdbc.core.JdbcTemplate;
import org.springframework.stereotype.Service;
import org.springframework.transaction.annotation.Propagation;
import org.springframework.transaction.annotation.Transactional;

import javax.annotation.Resource;

@Service("accountService")
@Transactional(readOnly = false,propagation = Propagation.REQUIRED)
public class AccountServiceImpl implements AccountService {
    @Resource
    private JdbcTemplate jdbcTemplate;
    public void addAccount() {
        String sql ="update account set amoney=? where aname=?";
        jdbcTemplate.update(sql,2222,"张三");
        System.out.println(1/0);


    }
}
step05 新建测试类
package com.qf.test;

import com.qf.servcie.AccountService;
import com.qf.servcie.impl.AccountServiceImpl;
import org.springframework.context.support.ClassPathXmlApplicationContext;

public class Test01 {
    public static void main(String[] args) {
        ClassPathXmlApplicationContext applicationContext = new ClassPathXmlApplicationContext("applicationContext.xml");
        AccountService accountService = (AccountService) applicationContext.getBean("accountService");
        accountService.addAccount();
    }
}
二 mybatis整合spring
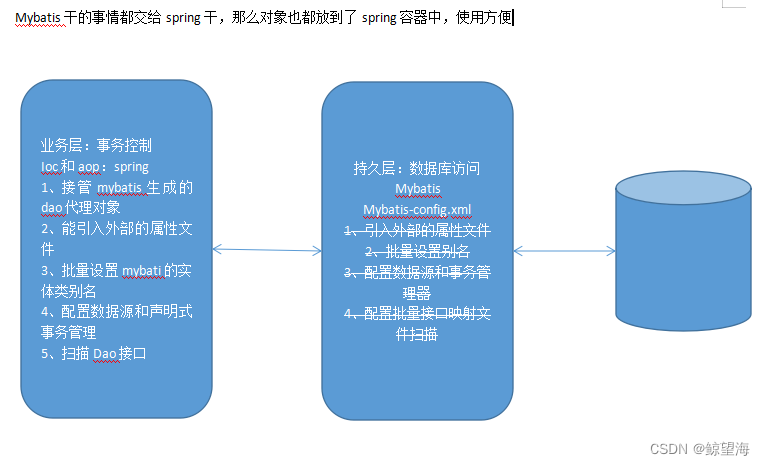
整合思路
单独搭建mybatis并测试通过
step1、建立一个java模块
day08_05_mybatisSpring
step2、导入坐标
<dependency>
    <groupId>org.mybatis</groupId>
    <artifactId>mybatis</artifactId>
    <version>3.5.1</version>
</dependency>
<dependency>
    <groupId>mysql</groupId>
    <artifactId>mysql-connector-java</artifactId>
    <version>5.1.47</version>
    <scope>runtime</scope>
</dependency>
<dependency>
    <groupId>junit</groupId>
    <artifactId>junit</artifactId>
    <version>4.12</version>
    <scope>test</scope>
</dependency>
step3、建立mybatis的配置文件
<?xml version="1.0" encoding="UTF-8" ?>
<!DOCTYPE configuration
        PUBLIC "-//mybatis.org//DTD Config 3.0//EN"
        "http://mybatis.org/dtd/mybatis-3-config.dtd">
<configuration>
    <typeAliases>
        <package name="com.ujiuye.domain"/>
    </typeAliases>
    <environments default="ee0608">
        <environment id="ee0608">
            <transactionManager type="JDBC"></transactionManager>
            <dataSource type="POOLED">
                <property name="driver" value="com.mysql.jdbc.Driver"/>
                <property name="url" value="jdbc:mysql:///ee0608"/>
                <property name="username" value="root"/>
                <property name="password" value="sorry"/>
            </dataSource>
        </environment>
    </environments>
    <mappers>
        <package name="com.ujiuye.mapper"/>
    </mappers>
</configuration>
step4、建立实体类
public class Account implements Serializable {
    private Integer id;
    private String number;
    private Float balance;
step5、建立接口
package com.ujiuye.mapper;

import com.ujiuye.domain.Account;

import java.util.List;

public interface AccountMapper {
    List<Account> findAllAccounts();
}
step6、建立映射文件
<!DOCTYPE mapper
        PUBLIC "-//mybatis.org//DTD Mapper 3.0//EN"
        "http://mybatis.org/dtd/mybatis-3-mapper.dtd">
<mapper namespace="com.ujiuye.mapper.AccountMapper">
    <select id="findAllAccounts" resultType="account">
        select * from t_accounts
    </select>
</mapper>
step7、测试
package com.ujiuye.test;

import com.ujiuye.domain.Account;
import com.ujiuye.mapper.AccountMapper;
import org.apache.ibatis.io.Resources;
import org.apache.ibatis.session.SqlSession;
import org.apache.ibatis.session.SqlSessionFactory;
import org.apache.ibatis.session.SqlSessionFactoryBuilder;
import org.junit.Test;

import java.io.InputStream;
import java.util.List;

import static org.junit.Assert.*;

public class AccountMapperTest {

    @Test
    public void findAllAccounts() throws Exception {
        InputStream stream = Resources.getResourceAsStream("mybatis-config.xml");
        SqlSessionFactory sqlSessionFactory = new SqlSessionFactoryBuilder().build(stream);
        SqlSession sqlSession = sqlSessionFactory.openSession();
        AccountMapper mapper = sqlSession.getMapper(AccountMapper.class);
        List<Account> allAccounts = mapper.findAllAccounts();
        System.out.println(allAccounts);
        sqlSession.close();
    }
}
单独搭建spring并测试通过
step1、导入坐标
 <dependency>
            <groupId>org.springframework</groupId>
            <artifactId>spring-context</artifactId>
            <version>5.1.15.RELEASE</version>
        </dependency>
        <dependency>
            <groupId>org.springframework</groupId>
            <artifactId>spring-jdbc</artifactId>
            <version>5.1.15.RELEASE</version>
        </dependency>
        <dependency>
            <groupId>org.springframework</groupId>
            <artifactId>spring-test</artifactId>
            <version>5.1.15.RELEASE</version>
        </dependency>
step2、建立配置文件
<?xml version="1.0" encoding="UTF-8"?>
<beans xmlns="http://www.springframework.org/schema/beans"
       xmlns:xsi="http://www.w3.org/2001/XMLSchema-instance"
       xmlns:context="http://www.springframework.org/schema/context"
       xsi:schemaLocation="http://www.springframework.org/schema/beans
       http://www.springframework.org/schema/beans/spring-beans.xsd http://www.springframework.org/schema/context https://www.springframework.org/schema/context/spring-context.xsd">
    <context:component-scan base-package="com.ujiuye.service.impl"/>
</beans>
step3、建立业务接口和实现类
package com.ujiuye.service;

import com.ujiuye.domain.Account;

import java.util.List;

public interface AccountService {
    List<Account> findAllAccounts();
}
package com.ujiuye.test;

import com.ujiuye.domain.Account;
import com.ujiuye.service.AccountService;
import org.junit.Test;
import org.junit.runner.RunWith;
import org.springframework.beans.factory.annotation.Autowired;
import org.springframework.test.context.ContextConfiguration;
import org.springframework.test.context.junit4.SpringJUnit4ClassRunner;

import java.util.List;

import static org.junit.Assert.*;
@RunWith(SpringJUnit4ClassRunner.class)
@ContextConfiguration(locations = "classpath:applicationContext.xml")
public class AccountServiceTest {
    @Autowired
    private AccountService accountService;
    @Test
    public void findAllAccounts() {
        List<Account> allAccounts = accountService.findAllAccounts();
        System.out.println(allAccounts);
    }
}
mybatis整合spring
step1、导入整合坐标
<dependency>
            <groupId>org.mybatis</groupId>
            <artifactId>mybatis-spring</artifactId>
            <version>2.0.3</version>
        </dependency>
step2、修改spring配置文件
<?xml version="1.0" encoding="UTF-8"?>
<beans xmlns="http://www.springframework.org/schema/beans"
       xmlns:xsi="http://www.w3.org/2001/XMLSchema-instance"
       xmlns:context="http://www.springframework.org/schema/context"
       xsi:schemaLocation="http://www.springframework.org/schema/beans
       http://www.springframework.org/schema/beans/spring-beans.xsd http://www.springframework.org/schema/context https://www.springframework.org/schema/context/spring-context.xsd">
    <context:component-scan base-package="com.qf.service.impl"/>
    <context:property-placeholder location="classpath:jdbc.properties"/>
    <bean id="dataSource" class="org.springframework.jdbc.datasource.DriverManagerDataSource">
        <property name="driverClassName" value="${jdbc.driverClassName}"/>
        <property name="url" value="${jdbc.url}"/>
        <property name="username" value="${jdbc.username}"/>
        <property name="password" value="${jdbc.password}"/>
    </bean>

    <!--接管SqlSessionFactory-->
    <bean id="sqlSessionFactory" class="org.mybatis.spring.SqlSessionFactoryBean">
        <property name="dataSource" ref="dataSource"/>
        <property name="typeAliasesPackage" value="com.qf.domain"/>
        <property name="configLocation" value="classpath:mybatis-config.xml"/>
    </bean>
    <!--扫描映射文件-->
    <bean id="scanner" class="org.mybatis.spring.mapper.MapperScannerConfigurer">
        <property name="basePackage" value="com.qf.mapper"/>
    </bean>
</beans>
step3、myubatis-config.xml中的内容只留下根元素,其他删掉
step4、修改业务实现类
package com.ujiuye.service.impl;

import com.ujiuye.domain.Account;
import com.ujiuye.mapper.AccountMapper;
import com.ujiuye.service.AccountService;
import org.springframework.beans.factory.annotation.Autowired;
import org.springframework.stereotype.Service;

import java.util.List;
@Service
public class AccountServiceImpl implements AccountService {
    @Autowired
    private AccountMapper accountMapper;

    public List<Account> findAllAccounts() {
        return accountMapper.findAllAccounts();
    }
}
三 spring 条件注解
3.1 简介
在实际公司中开发项目的时候 会有很多环境   测试环境  开发环境  生成环境 需要进行反复切换
就需要多次改变配置文件的信息(数据库 redis ...) 这种时候我们就需要有一个开关给我们动态的切换环境
3.2 自定义条件注解
step01 新建 接口 ShowInfoCmd
package com.qf;

public interface ShowInfoCmd {
    String showCmd();
}
step02 实现类
package com.qf;

public class WindowsCmd implements  ShowInfoCmd {
    public String showCmd() {
        return "windows";
    }
}
step03 实现类
package com.qf;

public class LinuxCmd implements  ShowInfoCmd {
    public String showCmd() {
        return "ls";
    }
}
step04
package com.qf;

import org.springframework.context.annotation.Condition;
import org.springframework.context.annotation.ConditionContext;
import org.springframework.core.type.AnnotatedTypeMetadata;

public class LinuxConfig implements Condition {
    public boolean matches(ConditionContext context, AnnotatedTypeMetadata metadata) {
        return context.getEnvironment().getProperty("os.name").toLowerCase().contains("linux");
    }
}
step05
package com.qf;

import org.springframework.context.annotation.Condition;
import org.springframework.context.annotation.ConditionContext;
import org.springframework.core.type.AnnotatedTypeMetadata;

public class WindowsConfig implements Condition {

    /**
     * 这个是匹配的方法 如果返回true 则可以匹配
     * @param context
     * @param metadata
     * @return
     */
    public boolean matches(ConditionContext context, AnnotatedTypeMetadata metadata) {
        return context.getEnvironment().getProperty("os.name").toLowerCase().contains("window");
    }
}
step06 新建测试类
package com.qf;

import org.springframework.context.annotation.AnnotationConfigApplicationContext;

public class Test01 {
    public static void main(String[] args) {
        AnnotationConfigApplicationContext applicationContext = new AnnotationConfigApplicationContext(JavaConfig.class);
        String showCmd = applicationContext.getBean("showCmd", ShowInfoCmd.class).showCmd();
        System.out.println(showCmd);

    }
}
3.3. 使用spring提供的条件注解
step01 新建一个类
package p1;

public class DataSource {
    private String url;
    private  String username;
    private  String password;

    public DataSource() {
    }

    public DataSource(String url, String username, String password) {
        this.url = url;
        this.username = username;
        this.password = password;
    }

    public String getUrl() {
        return url;
    }

    public void setUrl(String url) {
        this.url = url;
    }

    public String getUsername() {
        return username;
    }

    public void setUsername(String username) {
        this.username = username;
    }

    public String getPassword() {
        return password;
    }

    public void setPassword(String password) {
        this.password = password;
    }
}
step02 新建一个配置类
package p1;

import org.springframework.context.annotation.AnnotationConfigApplicationContext;

public class Test01 {
    public static void main(String[] args) {
        AnnotationConfigApplicationContext applicationContext = new AnnotationConfigApplicationContext();
        //设置当前环境
        applicationContext.getEnvironment().setActiveProfiles("test");
        //注册配置类
        applicationContext.register(JavaConfig.class);
        //刷新
        applicationContext.refresh();
        DataSource dataSource = applicationContext.getBean(DataSource.class);
        System.out.println(dataSource.getUrl());

    }
}


