1、完全注解开发理解
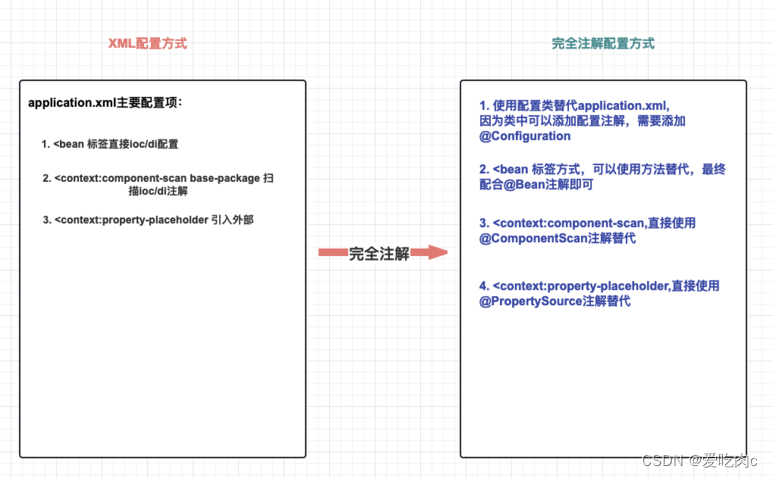
Spring 完全注解配置(Fully Annotation-based Configuration)是指通过 Java配置类 代码来配置 Spring 应用程序,使用注解来替代原本在 XML 配置文件中的配置。相对于 XML 配置,完全注解配置具有更强的类型安全性和更好的可读性。
上篇的最后我们总结说即使有了注解,我们仍需要xml来配置
①扫描包 ②外部配置文件 ③第三方组件
这里我们使用完全注解配置方式,通过此来替代xml的方式。
两种方式转换图:
2、配置类和扫描注解
①xml+注解方式
配置xml文件
<?xml version="1.0" encoding="UTF-8"?>
<beans xmlns="http://www.springframework.org/schema/beans"
xmlns:xsi="http://www.w3.org/2001/XMLSchema-instance"
xmlns:context="http://www.springframework.org/schema/context"
xsi:schemaLocation="http://www.springframework.org/schema/beans http://www.springframework.org/schema/beans/spring-beans.xsd http://www.springframework.org/schema/context https://www.springframework.org/schema/context/spring-context.xsd">
<!-- 配置自动扫描的包 -->
<!-- 1.包要精准,提高性能!
2.会扫描指定的包和子包内容
3.多个包可以使用,分割 例如: com.atguigu.controller,com.atguigu.service等
-->
<context:component-scan base-package="com.atguigu.components"/><!-- 引入外部配置文件-->
<context:property-placeholder location="application.properties" />
</beans>
②配置类+注解方式(完全注解方式)
a. 组件类
package demo04;

import demo03.UserDao;
import demo03.UserSerivein;
import org.springframework.beans.factory.annotation.Autowired;
import org.springframework.beans.factory.annotation.Qualifier;
import org.springframework.beans.factory.annotation.Value;
import org.springframework.stereotype.Service;
@Service
public class JavaBean {

    private int age=8;
    @Value("${url}")
    private String url;
    @Value("${a:cui}")
    private String name;

    @Override
    public String toString() {
        return "JavaBean{" +
                "age=" + age +
                ", url='" + url + '\'' +
                ", name='" + name + '\'' +
                '}';
    }
}
b. 外部配置

c.配置类 MyConfig.java
package configjava;
import org.springframework.context.annotation.ComponentScan;
import org.springframework.context.annotation.Configuration;
import org.springframework.context.annotation.PropertySource;
import org.springframework.stereotype.Component;
//此注解代表该类是一个配置类,
@Configuration
//使用注解读取外部配置,替代 <context:property-placeholder标签,外部配置可以有多个{}
@PropertySource("classpath:aoo.properties")
//使用@ComponentScan注解,可以配置扫描包,替代<context:component-scan标签,扫描包可以有多个basePackages={"xx","xx"}
@ComponentScan(basePackages = {"demo04"})
public class MyConfig { }
d. 测试
public void test_05(){
  //实例化容器 方法1
  AnnotationConfigApplicationContext context=new AnnotationConfigApplicationContext(MyConfig.class);
// AnnotationConfigApplicationContext-IOC容器对象 方法2
        AnnotationConfigApplicationContext iocContainerAnnotation = new AnnotationConfigApplicationContext();
//外部设置配置类
        iocContainerAnnotation.register(MyConfig.class);
//刷新后方可生效!!
        iocContainerAnnotation.refresh();
        //得到Bean对象
        JavaBean javaBean=iocContainerAnnotation.getBean(JavaBean.class);
        System.out.println(javaBean);
        iocContainerAnnotation.close();
    }
使用配置类,我们要使用AnnotationConfigApplicationContext 该实现类
总结:
@Configuration指定一个类为配置类,可以添加配置注解,替代配置xml文件
@ComponentScan(basePackages = {"包","包"}) 替代<context:component-scan标签实现注解扫描
@PropertySource("classpath:配置文件地址") 替代 <context:property-placeholder标签
配合IoC/DI注解 如@Service @Autowried,可以进行完整注解开发!
3、使用@Bean定义组件
对于第三方组件,我们不需要使用<bean>标签写在xml里,我们用配置类的方式来代替该功能。
java1
package demo04;

public class Java1 {
    private Java2 java2;

    public void setJava2(Java2 java2) {
        this.java2 = java2;
    }
    public void init(){

        System.out.println("111init");
    }
}
java2
package demo04;

public class Java2 {
    public void show(){
        System.out.println("java2");
    }
}
java3
package demo04;

import org.springframework.stereotype.Component;

@Component
public class Java3 {
    public  void show(){
        System.out.println("java3");
    }
}
MyConfig.java 配置类
package configjava;

import com.alibaba.druid.pool.DruidDataSource;
import demo04.Java1;
import demo04.Java2;
import org.springframework.beans.factory.config.ConfigurableBeanFactory;
import org.springframework.context.annotation.*;
import org.springframework.jdbc.core.JdbcTemplate;
import org.springframework.stereotype.Component;

import javax.annotation.PostConstruct;

//此注解代表该类是一个配置类,
@Configuration
//使用注解读取外部配置,替代 <context:property-placeholder标签,外部配置可以有多个{}
@PropertySource("classpath:aoo.properties")
//使用@ComponentScan注解,可以配置扫描包,替代<context:component-scan标签,扫描包可以有多个{xx,xx}
@ComponentScan(basePackages = {"demo04"})
@PropertySource("aoo.properties")
public class MyConfig {
  引入第三方组件
    @Bean(value = "cui")修改id名称
    @Scope(ConfigurableBeanFactory.SCOPE_SINGLETON)  作用域
     public DruidDataSource druidDataSource(){
         DruidDataSource druidDataSource = new DruidDataSource();
         druidDataSource.setUrl("");
         druidDataSource.setPassword("");
         druidDataSource.setUsername("");
         druidDataSource.setDriverClassName("");

         return druidDataSource;

     }
   @Bean
   public Java2 java2(){
        return new Java2();
   }
//    @Bean
//    public Java2 java2_1(){
//        return new Java2();
//    }
//     @Bean
//     public Java1 java1(Java2 java2_1){ 有多个 则根据id名称来匹配对应组件 通过形参来进行di配置
//        java2_1.show();
//     return new Java1();
//     }
    @Bean
    public Java1 java1(){
        Java1 java1=new Java1();
        java1.setJava2(java2());都是@Bean组件 直接调用方法 来进行di配置
        return new Java1();
    }


     @Bean
    public JdbcTemplate jdbcTemplate(){
        JdbcTemplate jdbcTemplate = new JdbcTemplate();
        jdbcTemplate.setDataSource(druidDataSource()); 直接调用方法
         return jdbcTemplate;
    }
}
我们通过配置类来进行讲解。
1.在配置类中 添加上了@Bean 就代表将来在创建容器类时,会自动将该组件添加进ioc容器
2、我们已经解决了扫描包和读取外部配置类的问题 在这里我们来解决 如何引用第三方组建的问题 我们可以使用@Bean 标签 方法返回值 是我们要添加进ioc组件的类型名,方法名默认是组件id名称
问题1 如何修改组件id名称 我们可以利用Bean标签的参数 value或name
问题2: 组件生命周期
方法1:我们仍然可以使用之前的@PostConstruct和@PreDestory 注解
方法2:我们可以利用Bean标签的参数 initMethod = "",destroyMethod = ""
问题3: 组件作用域 默认单例
可以通过@Scope来修改
问题4 :如何依赖注入
方法1:我们可以直接将需要的类型 在参数中进行传递
只有1个的情况下 直接匹配
如果该组件类型不在ioc容器中 则报错
如果该组件类型有多个 则会按照id名称来 匹配其中一个组件
方法2:如果都是@bean组件,则可以直接调用方法
4、@import 拓展
使用@import可以将其它配置类整合到一个配置类中,最后在AnnotationConfigApplicationContext中只需导入最后一个整合过的配置类即可,简化操作。
package configjava;

import org.springframework.context.annotation.Configuration;
import org.springframework.context.annotation.Import;
//使用@Import 将多个配置类整合到一个,如果有多个 value={,,,}
@Import(value = MyConfig2.class)
@Configuration
public class MyConfig1 {
}
package configjava;

import org.springframework.context.annotation.Configuration;

@Configuration
public class MyConfig2 {
}
5、三种配置方式总结
(1)XML方式
1. 所有内容写到xml格式配置文件中
2. 声明bean通过<bean标签
3. <bean标签包含基本信息(id,class)和属性信息 <property name value / ref property是通过setter注入时。通过构造函数的在xml中通过constructor-arg 来编写信息
4. 引入外部的properties文件可以通过<context:property-placeholder
5. IoC具体容器实现选择ClassPathXmlApplicationContext对象
(2) 注解类+XML方式
1. 注解负责标记IoC的类和进行属性装配
2. xml文件依然需要,需要通过<context:component-scan标签指定注解范围
3. 标记IoC注解:@Component,@Service,@Controller,@Repository
4. 标记DI注解:@Autowired @Qualifier @Resource @Value
5. IoC具体容器实现选择ClassPathXmlApplicationContext对象
(3)完全注解方式
1. 完全注解方式指的是去掉xml文件,使用配置类 + 注解实现
2. xml文件替换成使用@Configuration注解标记的类
3. 标记IoC注解:@Component,@Service,@Controller,@Repository
4. 标记DI注解:@Autowired @Qualifier @Resource @Value
5. <context:component-scan标签指定注解范围使用@ComponentScan(basePackages = {"com.atguigu.components"})替代
6. <context:property-placeholder引入外部配置文件使用@PropertySource({"classpath:application.properties","classpath:jdbc.properties"})替代
7. <bean 标签使用@Bean注解和方法实现
8. IoC具体容器实现选择AnnotationConfigApplicationContext对象


![2023年中国功能型内窥镜市场发展趋势分析:市场渗透潜力空间广阔[图]](https://img-blog.csdnimg.cn/img_convert/6f88891e2b7ed1d7005dc088e2f459d8.png)