文章目录
- 前言
- 数据的处理
- 数据集的下载
- 数据集的划分
- AlexNet介绍
- 程序的实现
- model.py
- Dropout()函数
- train.py
- 数据预处理
- 导入数据集
前言
搭建AlexNet来进行分类模型的训练,大致训练流程和图像分类:Pytorch图像分类之–LetNet模型差不多,两者最大的不同就是,读取训练数据的方式不同,前者读取是通过torchvision.datasets.CIFAR10 来导入数据;但是我们这篇博文中需要用到的数据在torchvision.datasets中没有包含,因此需要用到datasets.ImageFolder()来导入数据。
数据的处理
在本文中我们应用花分类数据集
数据集的下载
- 数据集下载链接:
http://download.tensorflow.org/example_images/flower_photos.tgz
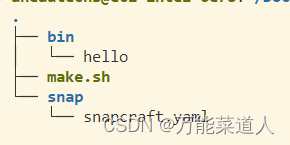
该数据集中包含 5 中类型的花,每种类型有600~900张图像不等。 - 数据集下载完成后,解压后结构如下:

数据集的划分
下载的数据集需要我们自己通过程序进行划分训练集和测试集;划分数据集的脚本为:split_data.py其代码实现如下:
import os
from shutil import copy
import random

def mkfile(file):
    if not os.path.exists(file):
        os.makedirs(file)

#获取flower_photos文件夹下除.txt文件以外所有文件夹名(即5种花的类名)
file_path = '../data/flower_photos'
flower_class = [cla for cla in os.listdir(file_path) if ".txt" not in cla]

#创建训练集train文件夹,并由5种类名在其目录下创建5个子目录
mkfile('../data/train')
for cla in flower_class:
    mkfile('../data/train/' + cla)

#创建测试集test,并由5种类名在其目录下创建5个子目录
mkfile('../data/test')
for cla in flower_class:
    mkfile('../data/test/' + cla)

#划分训练集和测试集的比例 训练集:测试集=9:1
split_rate = 0.1

#遍历5种花的全部图像并按比例分成训练集和测试集
for cla in flower_class:
    cla_path = file_path + '/' + cla + '/'   #某一类别花的子目录
    images = os.listdir(cla_path)      #images 列表存储了该目录下所有图像的名称
    print(images)
    images_num = len(images)
    test_index = random.sample(images, k=int(images_num*split_rate))   #从image列表中随机抽取K个图像名称
    for index, image in enumerate(images):
        # test_index中保存测试集的图片名称
        if image in test_index:
            image_path = cla_path + image
            new_path = '../data/test/' + cla
            copy(image_path, new_path)
        #其余的图像保存到训练集
        else:
            image_path = cla_path + image
            new_path = '../data/train/' + cla
            copy(image_path, new_path)
        print("\r[{}] processing [{}/{}]".format(cla, index + 1, images_num), end="")  # processing bar
        print()

print("processing done!")
划分后如下图所示:

AlexNet介绍
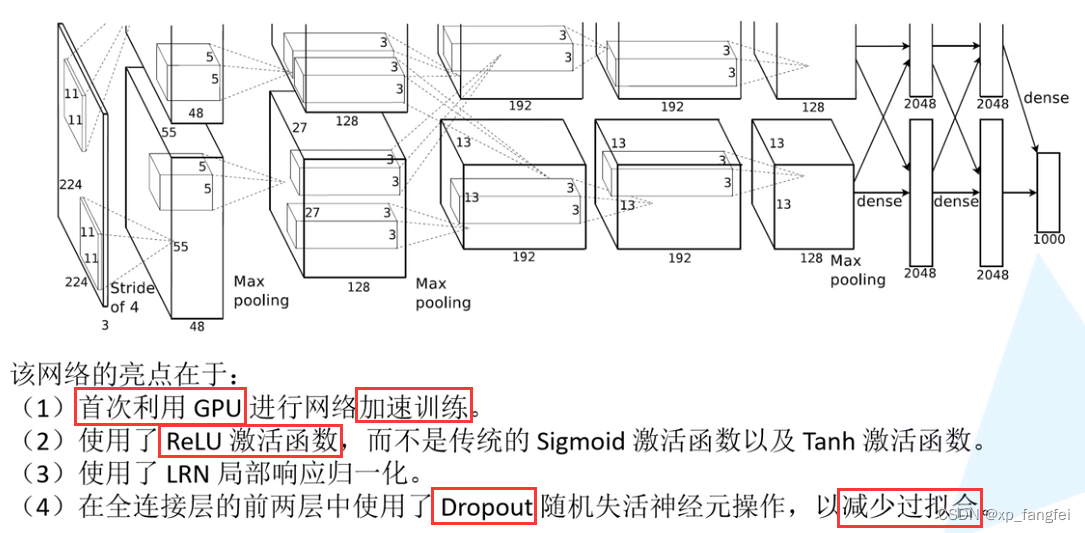
- AlexNet和LetNet没有明显结构上的不同,都是卷积和池化的堆叠,只不过,AlexNet深度要比LetNet深。AlexNet有五个卷积层、三个池化层和三个全连接层。
具体结构如下图所示:

- AlexNet 是2012年 ISLVRC ( ImageNet Large Scale Visual Recognition Challenge)竞赛的冠军网络,分类准确率由传统的70%+提升到80%+。它是由Hinton和他的学生Alex Krizhevsky设计的。 也是在那年之后,深度学习开始迅速发展。
程序的实现
model.py
import torch
import torch.nn as nn
import torch.functional as F
from torchinfo import summary


class AlexNet(nn.Module):             #继承nn.Module这个父类
    def __init__(self):
        super(AlexNet, self).__init__()
        # Conv2d(in_channels, out_channels, kernel_size, stride, padding, ...)
        self.conv1 = nn.Conv2d(in_channels=3, out_channels=48, kernel_size=11, stride=5, padding=2)         #input[3, 224, 224]  output[48, 55, 55]
        self.pool1 = nn.MaxPool2d(kernel_size=3, stride=2)                                                  #output[48, 27, 27]
        self.conv2 = nn.Conv2d(in_channels=48, out_channels=128, kernel_size=5, padding=2)                  #output[128, 27, 27]
        self.pool2 = nn.MaxPool2d(kernel_size=3, stride=2)                                                  #output[128, 13, 13]
        self.conv3 = nn.Conv2d(in_channels=128, out_channels=192, kernel_size=3, padding=1)                 #output[192, 13, 13]
        self.conv4 = nn.Conv2d(in_channels=192, out_channels=192, kernel_size=3, padding=1)                 #output[192, 13, 13]
        self.conv5 = nn.Conv2d(in_channels=192, out_channels=128, kernel_size=3,padding= 1)                 #output[128, 13, 13]
        self.pool3 = nn.MaxPool2d(kernel_size=3, stride=2)                                                  #output[128, 6, 6]

        self.fc1 = nn.Linear(128 * 6 * 6, 2048)
        self.fc2 = nn.Linear(2048, 2048)
        self.fc3 = nn.Linear(2048, 1000)

    def forward(self, x):
        x = F.relu(self.conv1(x))    #input[3, 224, 224]  output[48, 55, 55]
        x = self.pool1(x)            #input[48, 55, 55]  output[48, 27, 27]
        x = F.relu(self.conv2(x))    #input[48, 27, 27]  output[128, 27, 27]
        x = self.pool2(x)            #input[128, 27, 27]  output[128, 13, 13]
        x = F.relu(self.conv3(x))    #input[128, 13, 13]  output[192, 13, 13]
        x = F.relu(self.conv4(x))    #input[192, 13, 13]  output[192, 13, 13]
        x = F.relu(self.conv5(x))    #input[192, 13, 13]  output[128, 13, 13]
        x = self.pool3(x)            #input[128, 13, 13]  output[128, 6, 6]
        x = F.relu(self.fc1(x))      #input[128, 6, 6]  output(2048)
        x = nn.Dropout(0.5)
        x = F.relu(self.fc2(x))      #input(2048)  output(2048)
        x = nn.Dropout(0.5)
        x = self.fc3(x)              #input(2048)  output(1000)

        return x


alexnet = AlexNet()
summary(alexnet)
说明:原论文中用了两块GPU进行训练,每块GPU上对应参数第一层卷积输出通道为48,以上程序中参数是实现胡一块GPU的。
Dropout()函数
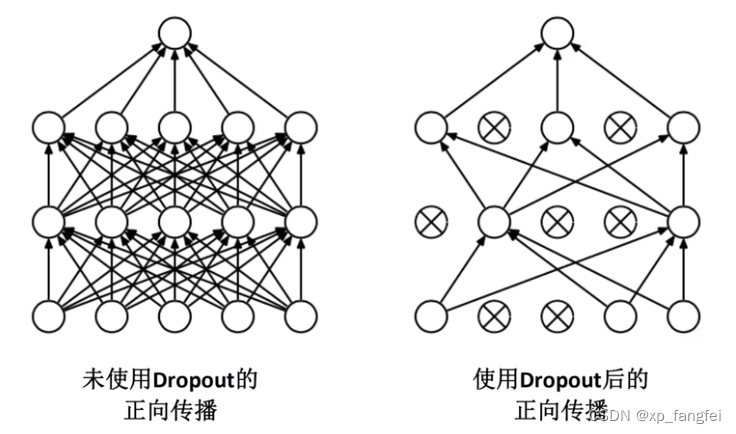
nn.Dropout(0.5) #该函数的作用是参与训练的参数会随机失活50%
train.py
数据预处理
transform = {
    "train": transforms.Compose([transforms.Resize((224, 224)),   #随机裁剪,再缩放成224*224
                                 transforms.RandomHorizontalFlip(p=0.5), #水平方向随机翻转,概率为0.5
                                 transforms.ToTensor(),
                                 transforms.Normalize((0.5, 0.5, 0.5),(0.5, 0.5, 0.5))]),
    "test": transforms.Compose([transforms.Resize((224, 224)),
                               transforms.ToTensor(),
                               transforms.Normalize((0.5, 0.5, 0.5),(0.5, 0.5, 0.5))])}
导入数据集
#导入加载数据集
#获取图像数据集的路径
data_root = os.getcwd()  #获取当前路径
image_path = data_root + "/data/"

#导入训练集并进行处理
train_dataset = datasets.ImageFolder(root=image_path + "/train",
                                     transform=transform["train"])
#加载训练集
train_loader = torch.utils.data.DataLoader(train_dataset,  #导入的训练集
                                           batch_size=32,  #每批训练样本个数
                                           shuffle=True,   #打乱训练集
                                           num_workers=0)  #使用线程数
测试集数据导入同理
import torch
import torch.nn as nn
from torchvision import transforms, datasets, utils
import matplotlib.pyplot as plt
import numpy as np
import torch.optim as optim
import os
from model import AlexNet
from train_tool import TrainTool


#使用GPU训练
device = torch.device("cuda" if torch.cuda.is_available() else "cpu")
print(device)
#数据预处理
transform = {
    "train": transforms.Compose([transforms.Resize((224, 224)),   #随机裁剪,再缩放成224*224
                                 transforms.RandomHorizontalFlip(p=0.5), #水平方向随机翻转,概率为0.5
                                 transforms.ToTensor(),
                                 transforms.Normalize((0.5, 0.5, 0.5),(0.5, 0.5, 0.5))]),
    "test": transforms.Compose([transforms.Resize((224, 224)),
                               transforms.ToTensor(),
                               transforms.Normalize((0.5, 0.5, 0.5),(0.5, 0.5, 0.5))])}
#导入加载数据集
#获取图像数据集的路径
# data_root = os.path.abspath(os.path.join(os.getcwd(), "../.."))
data_root = os.getcwd()
image_path = data_root + "/data/"

#导入训练集并进行处理
train_dataset = datasets.ImageFolder(root=image_path + "/train",
                                     transform=transform["train"])
train_num = len(train_dataset)
#加载训练集
train_loader = torch.utils.data.DataLoader(train_dataset,  #导入的训练集
                                           batch_size=32,  #每批训练样本个数
                                           shuffle=True,   #打乱训练集
                                           num_workers=0)  #使用线程数

#导入测试集并进行处理
test_dataset = datasets.ImageFolder(root=image_path + "/test",
                                     transform=transform["test"])
test_num = len(test_dataset)
#加载测试集
test_loader = torch.utils.data.DataLoader(test_dataset,  #导入的测试集
                                           batch_size=32,  #每批测试样本个数
                                           shuffle=True,   #打乱测试集
                                           num_workers=0)  #使用线程数

#定义超参数
alexnet = AlexNet(num_classes=5).to(device)   #定义网络模型
loss_function = nn.CrossEntropyLoss()  #定义损失函数为交叉熵
optimizer = optim.Adam(alexnet.parameters(), lr=0.0002)  #定义优化器定义参数学习率


#正式训练
train_acc = []
train_loss = []
test_acc = []
test_loss = []

epoch = 0

#for epoch in range(epochs):
while True:
    epoch = epoch + 1;
    alexnet.train()

    epoch_train_acc, epoch_train_loss = TrainTool.train(train_loader, alexnet, optimizer, loss_function, device)

    alexnet.eval()
    epoch_test_acc, epoch_test_loss = TrainTool.test(test_loader,alexnet, loss_function,device)

    # train_acc.append(epoch_train_loss)
    # train_loss.append(epoch_train_loss)
    # test_acc.append(epoch_test_acc)
    # test_loss.append(epoch_test_loss)
    if epoch_train_acc < 0.90:
       template = ('Epoch:{:2d}, train_acc:{:.1f}%, train_loss:{:.2f}, test_acc:{:.1f}%, test_loss:{:.2f}')
       print(template.format(epoch, epoch_train_acc * 100, epoch_train_loss, epoch_test_acc * 100, epoch_test_loss))
       continue
    else:
       torch.save(alexnet.state_dict(),'./model/alexnet_params.pth')
       print('Done')
       break
train_tool.py 和predict.py和文章图像分类:Pytorch图像分类之–LetNet模型中一样,可以参考这篇文章中代码。
如有错误欢迎指正!


