Redis 集群 & Redis 事务 & Redis 流水线 & Redis 发布订阅
- Redis 集群
- linux安装redis
- 主从配置
- 查看当前实例主从信息
- Redis Sentinel
- sentinel
- Redis Cluster
- Redis 事务
- Redis 流水线
- Redis 发布订阅
- Redis Lua脚本操作
Redis 集群
linux安装redis
- 下载安装包,解压
tar -zxvf redis-xx.tar.gz
- 编译安装
yum install gcc-c++
make
make install
# 打开后台运行 daemonize yes
redis-server redis.conf
redis-cli
主从配置
查看当前实例主从信息
info replication
- 可以直接在配置文件中指定(永久)
replicaof 主节点ip 主节点端口
masterauth 主节点密码
- 直接在运行中的实例上通过命令行指定(临时)
slaveof host port
- 主节点宕机,从节点晋升(手动选择主节点)
slaveof no one
Redis Sentinel
在原有redis主从的基础上,额外部署一套sentinel服务,用于对现有集群的监控,官方文档,实现高可用
故障转移后,恢复节点作为从节点存在。
sentinel
port 26379
dir /tmp
sentinel monitor myreplicas 127.0.0.1 6379 2
sentinel down-after-milliseconds myreplicas 30000
sentinel parallel-syncs myreplicas 1
sentinel failover-timeout myreplicas 180000
sentinel deny-scripts-reconfig yes
daemonize yes
- 可用两种方式启动
- redis-sentinel /path/to/sentinel.conf
- redis-server /path/to/sentinel.conf --sentinel
1.port 26379
sentinel监听端口,默认是26379,可以修改。
2.sentinel monitor
sentinel monitor mymaster ip port 2
3.sentinel auth-pass
Redis节点的认证密码(如果有设置密码的话,主节点需一致)
sentinel auth-pass mymaster 123456
4.sentinel down-after-milliseconds
Sentinel主观下线Redis节点超时时间 默认30s
sentinel down-after-milliseconds mymaster 30000
5.sentinel parallel-syncs
并发同步新主节点个数,同步时该节点不可用,
sentinel parallel-syncs mymaster 1
- sentinel failover-timeout
failover-timeout 可以用在以下这些方面:
  1. 同一个sentinel对同一个master两次failover之间的间隔时间。

  2. 当一个slave从一个错误的master那里同步数据开始计算时间。直到slave被纠正为向正确的master那里同步数据时。

  3.当想要取消一个正在进行的failover所需要的时间。

  4.当进行failover时,配置所有slaves指向新的master所需的最大时间。不过,即使过了这个超时,slaves依然会被正确配置为指向master,但是就不按parallel-syncs所配置的规则来了。
配置示例:
sentinel failover-timeout mymaster1 20000
7.sentinel的notification-script和reconfig-script是用来配置当某一事件发生时所需要执行的脚本,可以通过脚本来通知管理员,例如当系统运行不正常时发邮件通知相关人员。对于脚本的运行结果有以下规则:
    若脚本执行后返回1,那么该脚本稍后将会被再次执行,重复次数目前默认为10

    若脚本执行后返回2,或者比2更高的一个返回值,脚本将不会重复执行。

    如果脚本在执行过程中由于收到系统中断信号被终止了,则同返回值为1时的行为相同。

    一个脚本的最大执行时间为60s,如果超过这个时间,脚本将会被一个SIGKILL信号终止,之后重新执行。
1).sentinel notification-script
通知型脚本:当sentinel有任何警告级别的事件发生时(比如说redis实例的主观失效和客观失效等等),将会去调用这个脚本,这时这个脚本应该通过邮件,SMS等方式去通知系统管理员关于系统不正常运行的信息。调用该脚本时,将传给脚本两个参数,一个是事件的类型,一个是事件的描述。如果sentinel.conf配置文件中配置了这个脚本路径,那么必须保证这个脚本存在于这个路径,并且是可执行的,否则sentinel无法正常启动成功。
配置示例:
sentinel notification-script mymaster /var/redis/notify.sh
2).sentinel client-reconfig-script
当一个master由于failover而发生改变时,这个脚本将会被调用,通知相关的客户端关于master地址已经发生改变的信息。以下参数将会在调用脚本时传给脚本:
<master-name> <role> <state> <from-ip> <from-port> <to-ip> <to-port>
目前总是“failover”, 是“leader”或者“observer”中的一个。 参数 from-ip, from-port, to-ip, to-port是用来和旧的master和新的master(即旧的slave)通信的。这个脚本应该是通用的,能被多次调用,不是针对性的。
配置示例:
sentinel client-reconfig-script mymaster /var/redis/reconfig.sh
Redis Cluster
Redis Cluster 是一个分布式的概念,数据按一定规则分散在 16379 个槽点内
而 Redis Sentinel 则是依据 Sentinel 实现的高可用,本质上还是集中式的存储,只是提供了故障主从故障转移
- 每个节点单独启动
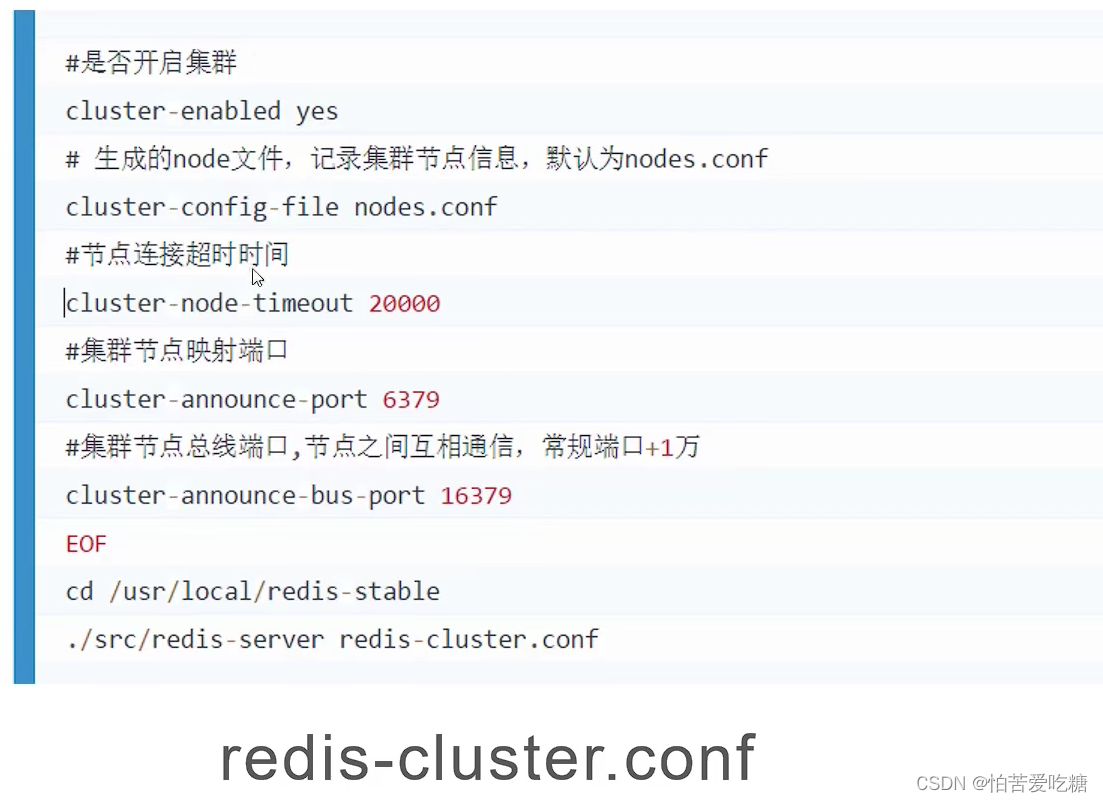
- 在任意节点执行 replicas 意味着每个主节点有几个从节点 这里为 3主3从
即每个主一个从

redis-cli --cluster create 127.0.0.1:7000 127.0.0.1:7001
127.0.0.1:7002 127.0.0.1:7003 127.0.0.1:7004 127.0.0.1:7005
–cluster-replicas 1
Redis 事务
- Redis事务是对多条命令打包,对涉及的键进行排他(其他客户端连接)的操作。
如果开启了指定键的监听,只要其他客户端对该键进行了操作,则本次事务的所有操作均不会提交。 - 一个事务中,只要不是命令本身有问题,即使操作失败,也不影响其他命令的执行。
- 另外在事务中的命令由于是将命令加入队列中,尚未执行,所有在事务中是无法获取到相关操作后的数据的。
    @Test
    public void testRedisTransaction(){
        redisTemplate.opsForValue().set("key2", "value2");
        List list = (List)redisTemplate.execute((RedisOperations redisOperations) -> {
            redisOperations.watch("key2");
            redisOperations.multi();
            redisOperations.opsForValue().set("key3", "value3");
            redisOperations.opsForValue().increment("key2", 1);
            Object key3 = redisOperations.opsForValue().get("key3");
            log.info("key3 = {}", key3);
            redisOperations.opsForValue().set("key4", "value4");
            Object key4 = redisOperations.opsForValue().get("key4");
            log.info("key4 = {}", key4);
            return redisOperations.exec();
        });

        log.info("list = {}", list);
    }
Redis 流水线
- Redis流水线操作,适用于同时执行多条命令的场景,将所有命令一次性打包发送到服务器,减少网络耗时,提高整体性能
- 与Redis事务类似,命令也是先入队列,所以提交之前,命令不会生效,此时获取不到执行后的数据
    @Test
    public void testPipeLine(){
        StopWatch stopWatch = new StopWatch();
        stopWatch.start();
        redisTemplate.executePipelined((RedisOperations redisOperation) -> {
            for(int i = 1; i <= 100000; i++){
                redisOperation.opsForValue().set("pipeline_"+i, "value_" + i);
                Object o = redisOperation.opsForValue().get("pipeline_" + i);
                if(i == 100000){
                    log.info("第 {}个数的值 = {}", i, o);
                }
            }
           return null;
        });
        stopWatch.stop();
        log.info("耗时:{}毫秒", stopWatch.getTotalTimeMillis());
    }
Redis 发布订阅
Redis发布订阅
注意发送message 采用的是value 序列化器,可能乱码,需调整value序列化器,可直接使用 stringRedisTemplate 省事
- 发布消息
    @Test
    public void testRedisPublishSubscribe(){
//        log.info("testRedisPublishSubscribe...");
//        stringRedisTemplate.convertAndSend("你的topic", "Hello Redis 你的 Message");
        redisTemplate.convertAndSend("你的topic", "Hello Redis 你的 Message");
    }
- 订阅消息
@Component
@Slf4j
public class RedisMessageListener implements MessageListener {
    @Override
    public void onMessage(Message message, byte[] pattern) {
        String body = new String(message.getBody());
//        String body = new String(message.getBody(), Charset.forName("UTF-8"));
        String channel = new String(pattern, Charset.forName("UTF-8"));
        log.info("监听渠道: {}, 消息: {}", channel, body);
    }
}
Redis Lua脚本操作
Redis 支持 以 lua 脚本操作
/**
     * IDEA 最好安装 EmmyLua 插件,编写lua脚本更轻松
     * Redis Lua 脚本支持
     * 注意 lua脚本参数下标从1开始
     * 键:KEYS[1]
     * 参数值: ARGV[1]
     * 两个序列化器:第一个是指定方法入参的序列化器包括键和参数值;第二个是Redis执行结果返回时的序列化器
     *
     * lua基本语法
     *  拼接 ..
     *  如果是两个数字,就是传的 "3","5"这样的, 使用 + 依然会做加法而不是拼接
     *
     *  基本脚本如下,其他逻辑自行实现
     *
     * local key1 = KEYS[1]
     * local key2 = KEYS[2]
     * local value1 = ARGV[1]
     * local value2 = ARGV[2]
     *
     * redis.call('set', key1, value1)
     * redis.call('set', key2, value2)
     *
     * local dbValue1 = redis.call('get', key1)
     * local dbValue2 = redis.call('get', key2)
     *
     * return dbValue1 + dbValue2
      */
    @Test
    public void testRedisLua(){
        RedisScript<Long> script = RedisScript.of(applicationContext.getResource("classpath:lua/redis.lua"), Long.class);
        RedisSerializer stringSerializer = redisTemplate.getStringSerializer();
        List<String> keys = new ArrayList<>();
        keys.add("key1");
        keys.add("key2");
        String[] values = new String[]{"3", "5"};
        Object result = redisTemplate.execute(script, stringSerializer, stringSerializer, keys, values);
        System.out.println(result);
    }


