MyBatis 详解
- 一. MyBatis 是什么
- 二. MyBatis 在整个框架中的定位
- 三. MyBatis 的操作
- 1. 先创建好数据库和表
- 2. 添加MyBatis框架⽀持
- 3. 修改配置文件
- 4. 添加业务代码
- 5. 增、删、改操作
- ① 增加⽤户
- ② 修改用户操作
- ③ 删除操作
- 6. 查询操作
- ① 单表查询
- ② 多表查询
一. MyBatis 是什么
MyBatis 是⼀款优秀的持久层框架,它⽀持⾃定义 SQL、存储过程以及⾼级映射。MyBatis 去除了⼏乎所有的 JDBC 代码以及设置参数和获取结果集的⼯作。MyBatis 可以通过简单的 XML 或注解来配置和映射原始类型、接⼝和 Java 对象为数据库中的记录。
简单来说 MyBatis 是更简单完成程序和数据库交互的⼯具,也就是更简单的操作和读取数据库⼯具。
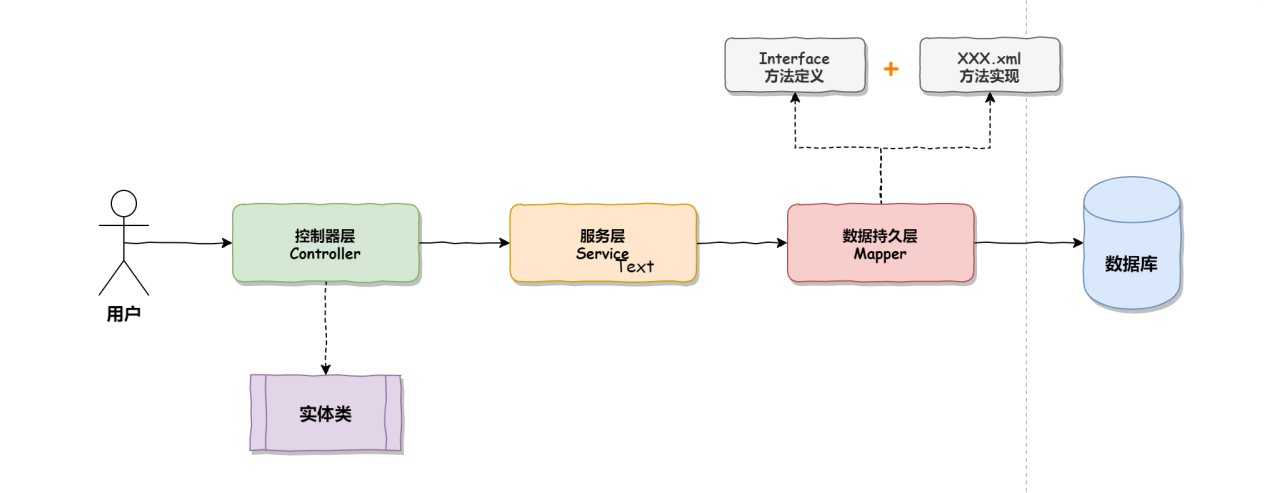
二. MyBatis 在整个框架中的定位
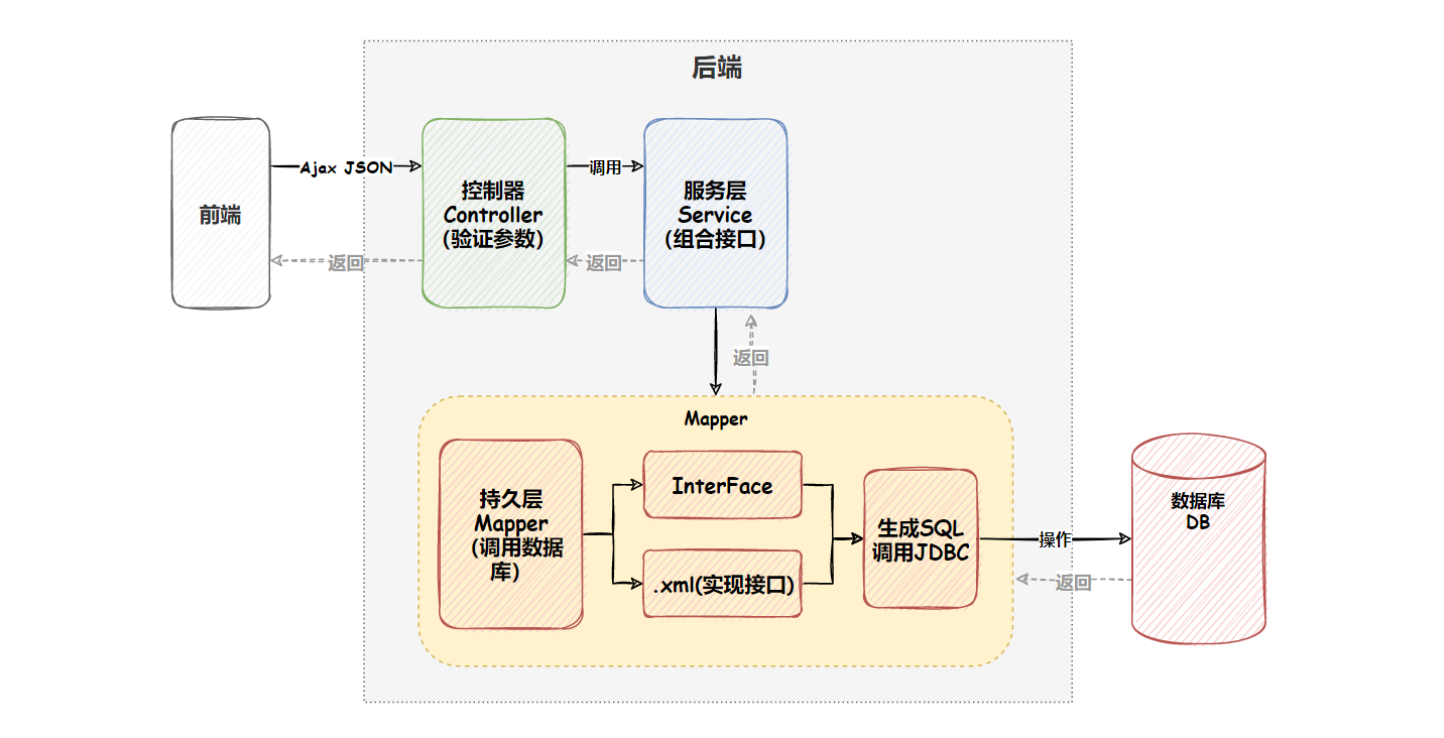
MyBatis 也是⼀个 ORM 框架,ORM(Object Relational Mapping),即对象关系映射。在⾯向对象编程语⾔中,将关系型数据库中的数据与对象建⽴起映射关系,进⽽⾃动的完成数据与对象的互相转换:
- 数据库表(table)–> 类(class)
- 记录(record,⾏数据)–> 对象(object)
- 字段(field) --> 对象的属性(attribute)
由图可以看出: MyBatis 包括两个部分:
- 接口: 定义方法的声明
- xml 文件: 接口中方法的实现
两者结合生成数据库可执行的 sql, 可以看到 MyBatis 基于 JDBC
三. MyBatis 的操作
1. 先创建好数据库和表
-- 创建数据库
drop database if exists mycnblog;
create database mycnblog DEFAULT CHARACTER SET utf8mb4;
-- 使⽤数据数据
use mycnblog;
-- 创建表[⽤户表]
drop table if exists userinfo;
create table userinfo(
                         id int primary key auto_increment,
                         username varchar(100) not null,
                         password varchar(32) not null,
                         photo varchar(500) default '',
                         createtime datetime default now(),
                         updatetime datetime default now(),
                         `state` int default 1
) default charset 'utf8mb4';
-- 创建⽂章表
drop table if exists articleinfo;
create table articleinfo(
                            id int primary key auto_increment,
                            title varchar(100) not null,
                            content text not null,
                            createtime datetime default now(),
                            updatetime datetime default now(),
                            uid int not null,
                            rcount int not null default 1,
                            `state` int default 1
)default charset 'utf8mb4';
-- 创建视频表
drop table if exists videoinfo;
create table videoinfo(
                          vid int primary key,
                          `title` varchar(250),
                          `url` varchar(1000),
                          createtime datetime default now(),
                          updatetime datetime default now(),
                          uid int
)default charset 'utf8mb4';
-- 添加⼀个⽤户信息
INSERT INTO `mycnblog`.`userinfo` (`id`, `username`, `password`, `photo`,
                                   `createtime`, `updatetime`, `state`) VALUES
    (1, 'admin', 'admin', '', '2021-12-06 17:10:48', '2021-12-06 17:10:48', 1);
-- ⽂章添加测试数据
insert into articleinfo(title,content,uid) values('Java','Java正⽂',1);

-- 添加视频
insert into videoinfo(vid,title,url,uid) values(1,'java title','http://www.baidu.com',1);
2. 添加MyBatis框架⽀持
- 已创建的项⽬中添加 MyBatis
        <!-- 添加 MyBatis 框架 -->
        <dependency>
            <groupId>org.mybatis.spring.boot</groupId>
            <artifactId>mybatis-spring-boot-starter</artifactId>
            <version>2.1.4</version>
        </dependency>
        <!-- 添加 MySQL 驱动 -->
        <dependency>
            <groupId>mysql</groupId>
            <artifactId>mysql-connector-java</artifactId>
            <version>5.1.38</version>
            <scope>runtime</scope>
        </dependency>
MyBatis 就像⼀个桥梁,⽽数据库驱动才是真正干活的, 并且数据库驱动有很多种,不⽌有 MySQL,还有 SQL Server、DB2 等等…因此 MyBatis 和 MySQL 驱动这两个都是需要添加的。
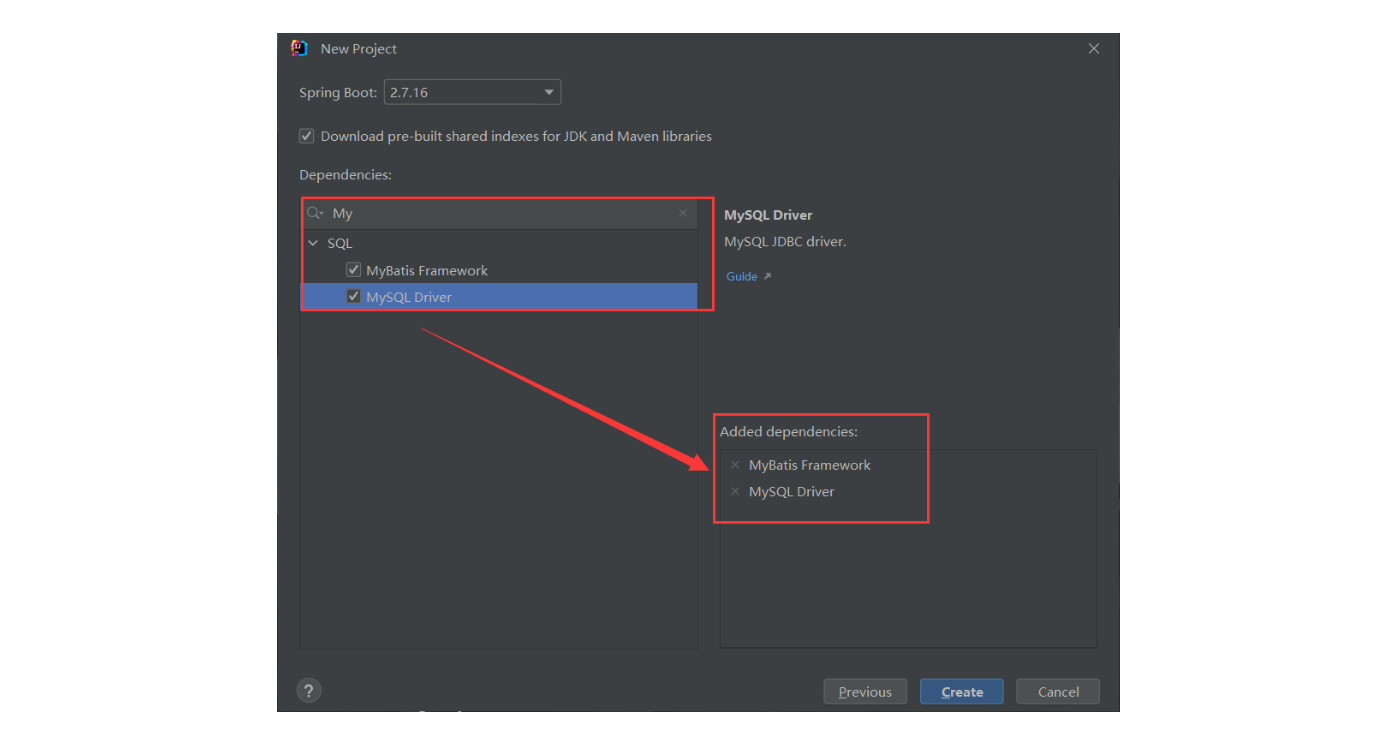
- 新项⽬添加 MyBatis
新项⽬创建 Spring Boot 项⽬的时候添加引⽤就可以了
3. 修改配置文件
- 数据库连接配置
# 数据库连接配置
spring:
  datasource:
    url: jdbc:mysql://localhost:3306/mycnblog?characterEncoding=utf8&useSSL=false
    username: root
    password: root
    driver-class-name: com.mysql.jdbc.Driver
注意:
如果使⽤ mysql-connector-java 是 5.x 之前的使⽤的是“com.mysql.jdbc.Driver”,如果是⼤于 5.x使⽤的是“com.mysql.cj.jdbc.Driver”。
- 配置 MyBatis xml 文件的存放路径
# 配置 mybatis xml 的⽂件路径,在 resources/mapper 目录下创建所有表的 xml ⽂件
mybatis:
  mapper-locations: classpath:mapper/**Mapper.xml
这个 classpath 指当前目录中的 resources 目录
- 开启 MyBatis SQL 日志打印
# 开启 MyBatis SQL 打印
# 开启之后可以在控制台上直接看到执行的SQL
#如
#Preparing: insert into userinfo values(?,?,?)
#Parameters: null, laoliu(String), 门头沟(String)
#Updates: 1
# 配置打印 MyBatis 执行的 SQL
mybatis:
  configuration:
    log-impl: org.apache.ibatis.logging.stdout.StdOutImpl

# 设置日志级别
logging:
  level:
    com:
      example:
        demo: debug
4. 添加业务代码
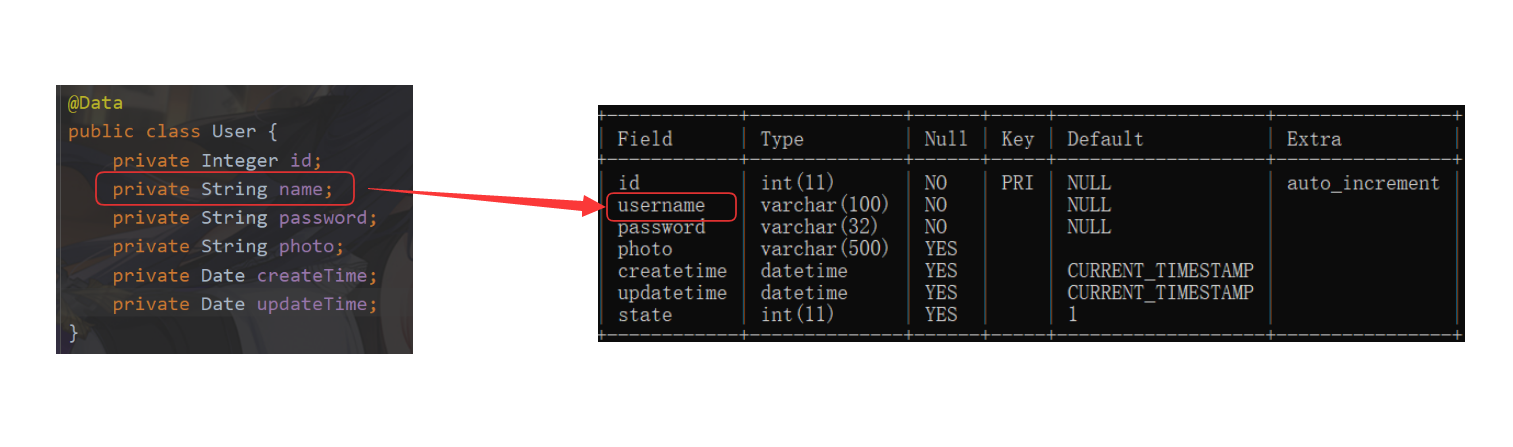
- ⽤户的实体类:
@Data
public class User {
    private Integer id;
    private String username;
    private String password;
    private String photo;
    private Date createTime;
    private Date updateTime;
}
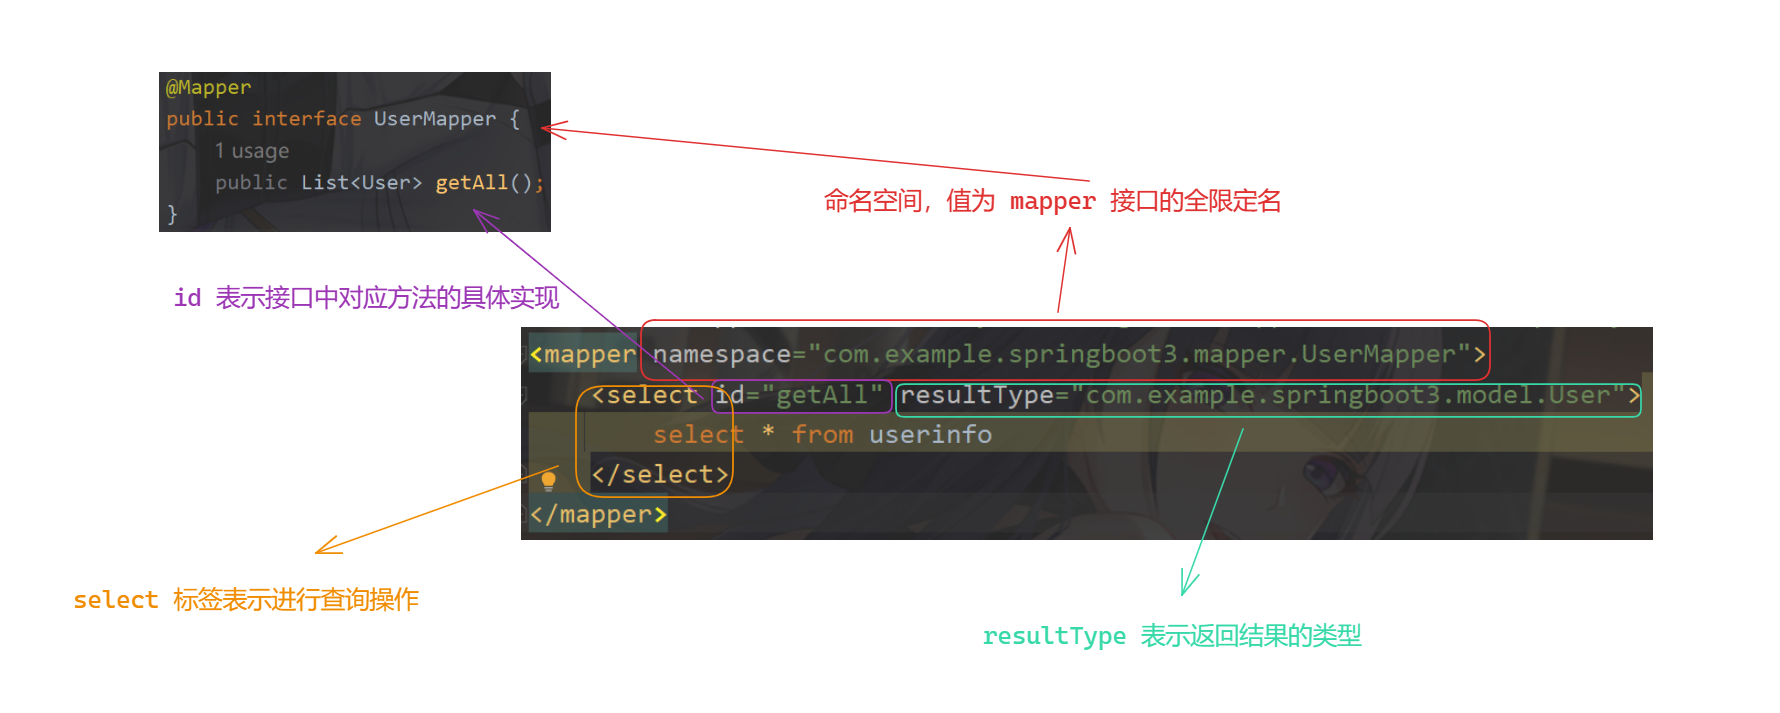
- 添加 mapper 接⼝
@Mapper
public interface UserMapper {
    public List<User> getAll();
}
使用 @Mapper 就不是普通的接口了, 而是 MyBatis 中的接口,可以注入到 Spring Boot 中
- 在 resourse/mapper 包下添加 UserMapper.xml
数据持久层的实现,mybatis 的固定 xml 格式:
<?xml version="1.0" encoding="UTF-8"?>
<!DOCTYPE mapper PUBLIC "-//mybatis.org//DTD Mapper 3.0//EN" "http://mybatis.org/dtd/mybatis-3-mapper.dtd">
<mapper namespace="com.example.springboot3.mapper.UserMapper">

</mapper>
UserMapper.xml 查询所有⽤户的具体实现 SQL:
<?xml version="1.0" encoding="UTF-8"?>
<!DOCTYPE mapper PUBLIC "-//mybatis.org//DTD Mapper 3.0//EN" "http://mybatis.org/dtd/mybatis-3-mapper.dtd">
<mapper namespace="com.example.springboot3.mapper.UserMapper">
    <select id="getAll" resultType="com.example.springboot3.model.User">
        select * from userinfo
    </select>
</mapper>
- 添加 服务层 (Service)代码
@Service
public class UserService {
    @Resource
    private UserMapper userMapper;
    public List<User> getAll() {
        return userMapper.getAll();
    }
}
- 添加 Controller
@RestController
@RequestMapping("/u")
public class UserController {
    @Resource
    private UserService userService;
    @RequestMapping("/getall")
    public List<User> getAll(){
        return userService.getAll();
    }
}
- 使用 postman 进行测试
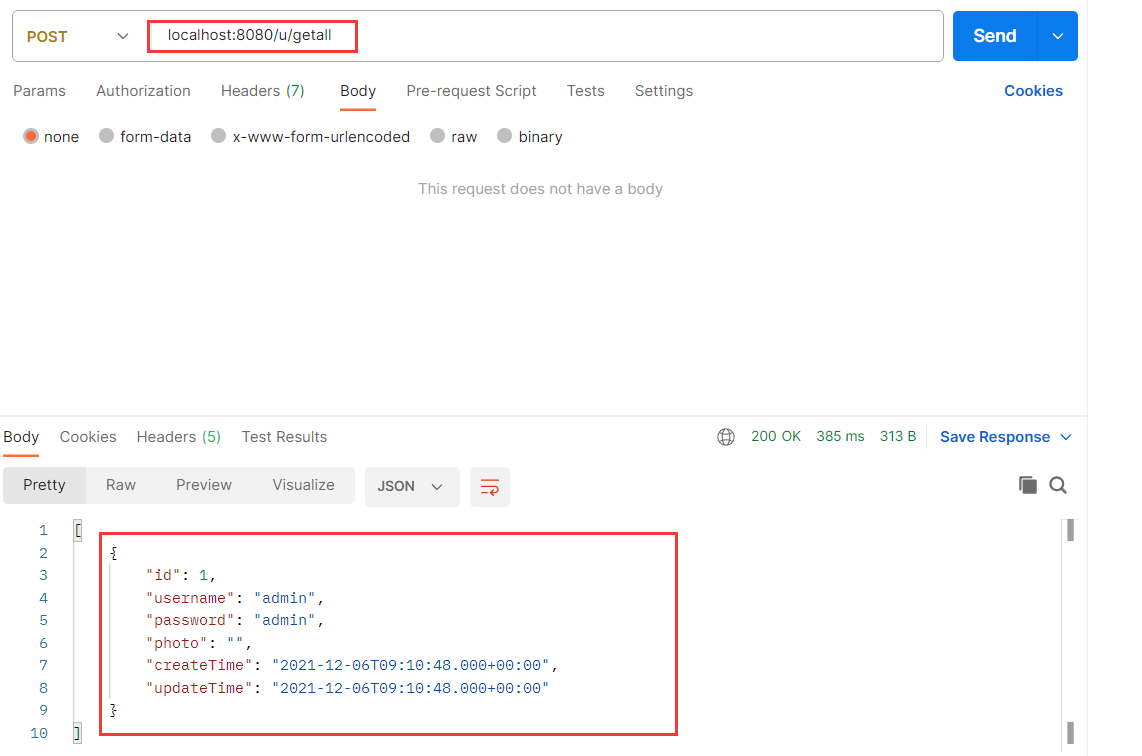
5. 增、删、改操作
增加、删除和修改的操作,对应使⽤ MyBatis 的标签如下:
- <insert>标签:插⼊语句
- <update>标签:修改语句
- <delete>标签:删除语句
① 增加⽤户
mapper interface:
Integer add(User user);
mapper.xml
    <insert id="add">
        insert into userinfo(username,password,photo,state)
        values(#{username},#{password},#{photo},1)
    </insert>
注意:
- insert into userinfo(username,password,photo,state) 中是数据库中的字段
- values(#{username},#{password},#{photo},1) 中是类中的属性
- 当 controller 接收参数时 使用 @RequestParam 注解时, 这里面的 username , password, photo 参数要与 @RequestParam 里面的参数名称一致
service
    public Integer add(User user) {
        return userMapper.add(user);
    }
就算这里面使用的是 对象, 不是直接写的属性, xml 中也直接写属性名称即可, MyBatis 会自动识别,但是注意名称要对应相同
controller
    @RequestMapping(value = "/add",method = RequestMethod.POST)
    public Integer add(@RequestBody User user){
        return userService.add(user);
    }
使用 postman 进行访问
{"username":"mysql","password":"mysql","photo":"img.png"}
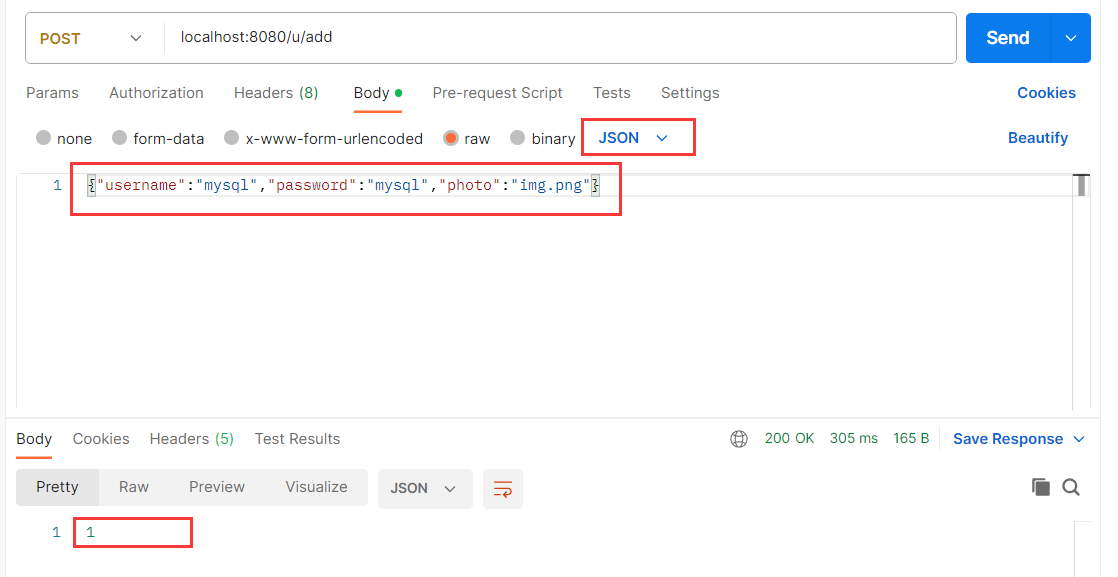
默认返回的是受影响的行数
到数据库中进行查看

特殊的添加:返回⾃增 id
默认情况下返回的是受影响的⾏号,如果想要返回⾃增 id,具体实现如下。
mapper 接⼝:
    // 添加,返回⾃增id
    void add2(User user);
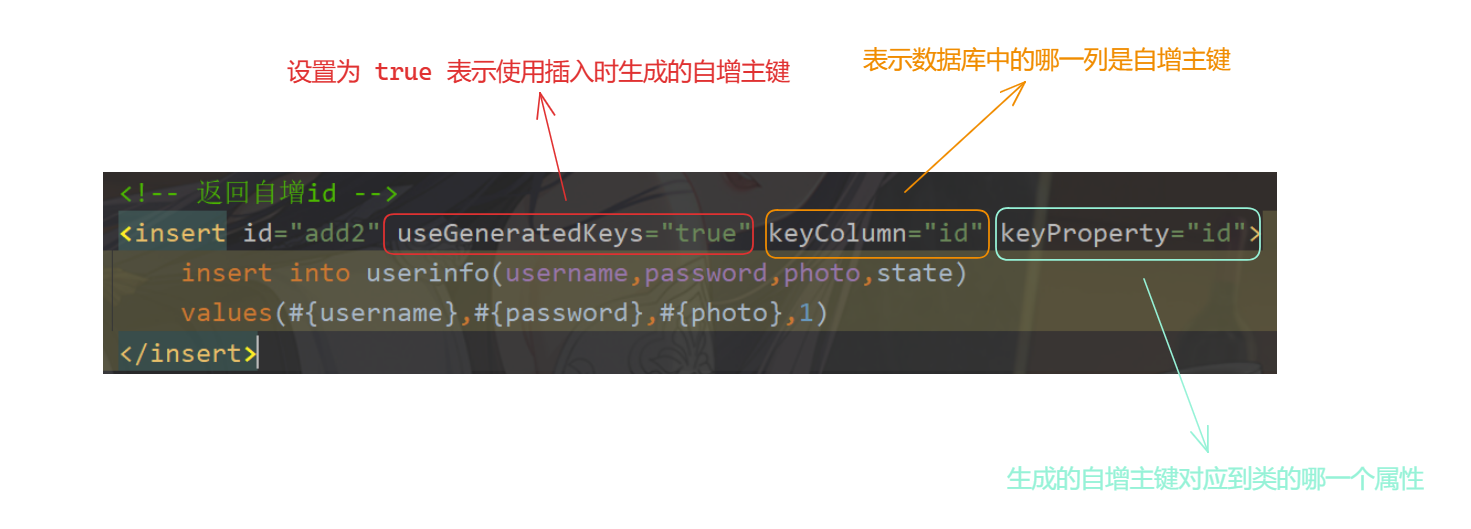
mapper.xml :
    <!-- 返回自增id -->
    <insert id="add2" useGeneratedKeys="true" keyProperty="id">
        insert into userinfo(username,password,photo,state)
        values(#{username},#{password},#{photo},1)
    </insert>
service:
    public void add2(User user) {
        userMapper.add(user);
    }
controller:
    @RequestMapping(value = "/add2", method = RequestMethod.POST)
    public Integer add2(@RequestBody User user) {
        userService.add2(user);
        return user.getId();
    }
使用 Postman 进行测试:
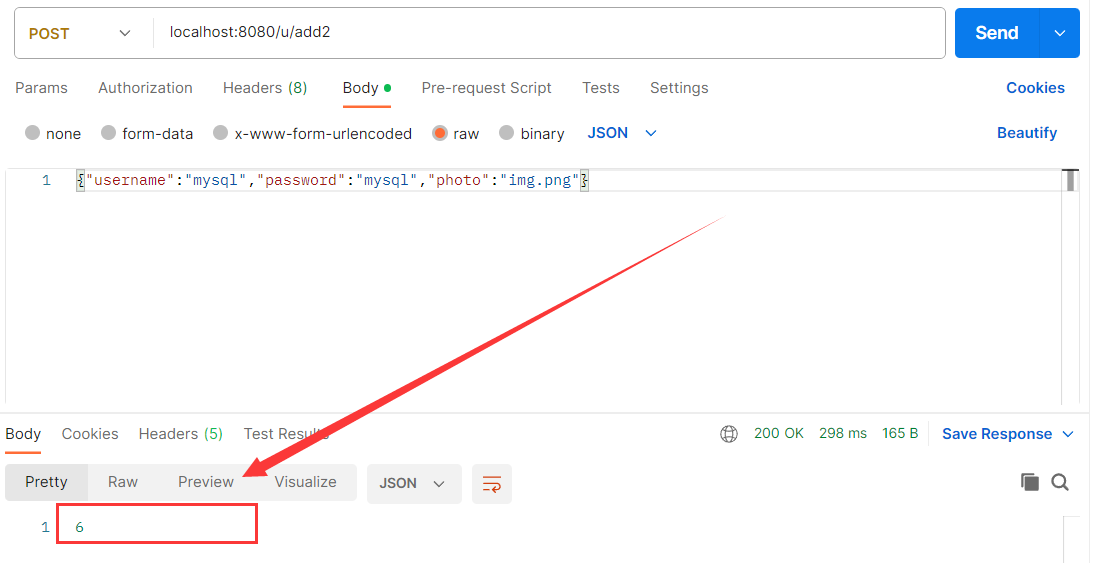

所以返回自增 id 并不是像返回受影响的行数一样能够直接返回的, 而是放到类的属性中的, 所以想要返回自增 id 就要返回类中对应的属性.
② 修改用户操作
<update id="update">
	update userinfo set username=#{name} where id=#{id}
</update>
③ 删除操作
<delete id="delById" parameterType="java.lang.Integer">
	delete from userinfo where id=#{id}
</delete>
6. 查询操作
① 单表查询
根据⽤户 id 查询⽤户信息的功能
mapper 接口:
User getUserById(Integer id);
UserMapper.xml:
    <select id="getUserById" resultType="com.example.springboot3.model.User">
        select * from userinfo where id=#{id}
    </select>
service:
    public User getUserById(Integer id) {
        return userMapper.getUserById(id);
    }
controller:
    @RequestMapping("/getuser")
    public User getUserById(Integer id) {
        return userService.getUserById(id);
    }
② 多表查询
增、删、改返回受影响的⾏数,那么在 mapper.xml 中是可以不设置返回的类型的,然⽽即使是最简单查询⽤户的名称也要设置返回的类型,否则会出错。
- 返回类型:resultType
绝⼤数查询场景可以使⽤ resultType 进⾏返回
    <select id="getUserById" resultType="com.example.springboot3.model.User">
        select * from userinfo where id=#{id}
    </select>
优点是使⽤⽅便,直接定义到某个实体类即可。
注意:就算返回的是集合,比如List, resultType 也只需要填写里面实体类的类型 User
- 返回字典映射:resultMap
resultMap 使⽤场景:
- 字段名称和程序中的属性名不同的情况,可使⽤ resultMap 配置映射;
- ⼀对⼀和⼀对多关系可以使用 resultMap 映射并查询数据。
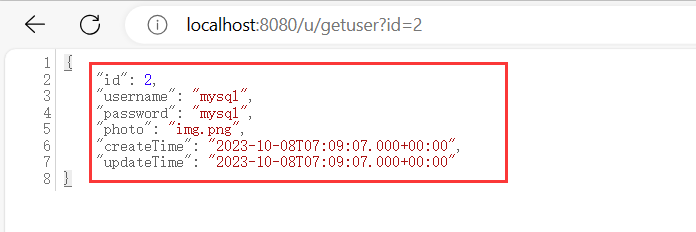
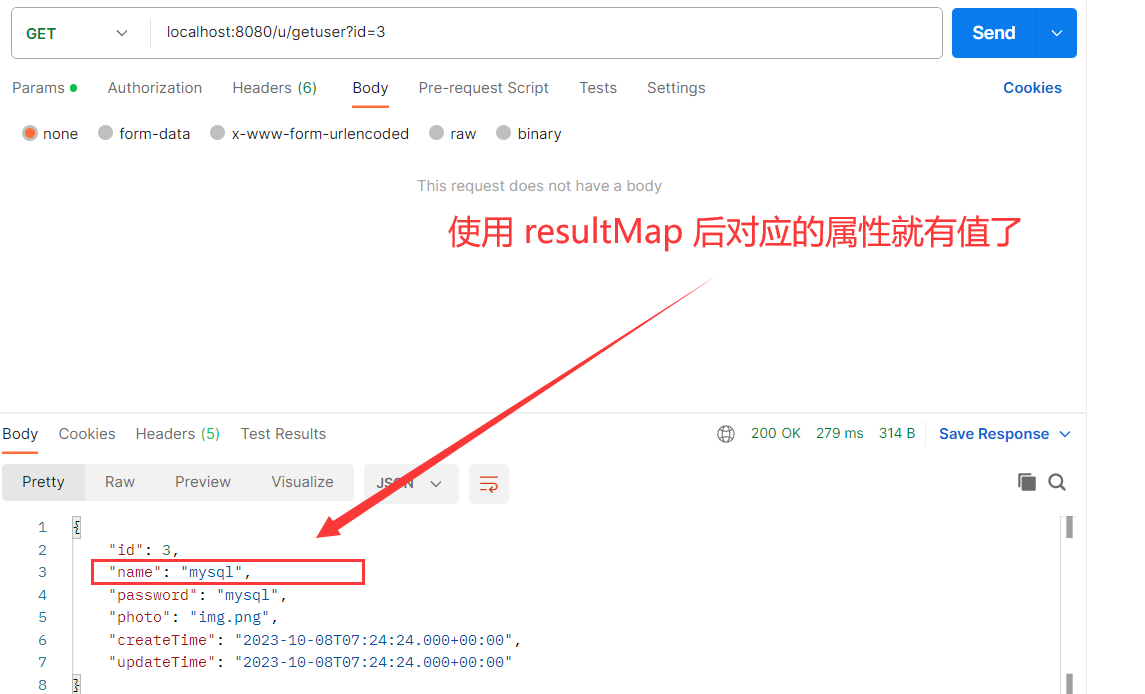
字段名和属性名不同的情况:比如类的属性为 name, 数据库中字段名为 username
此时如果直接进行查询:
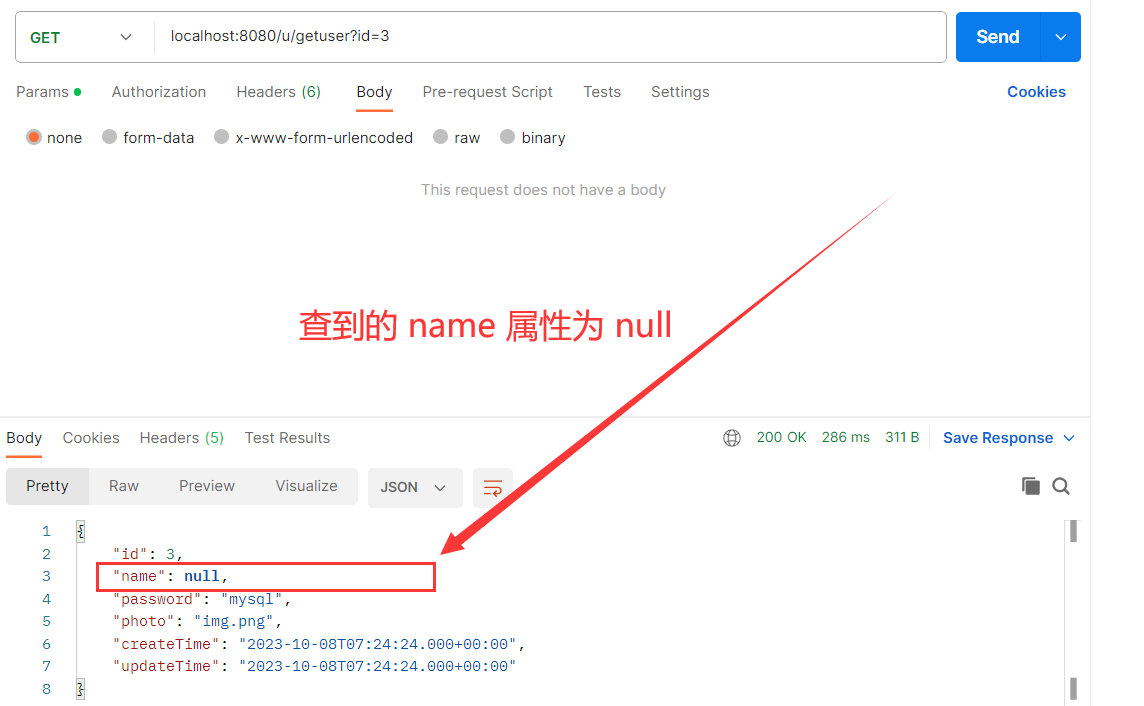
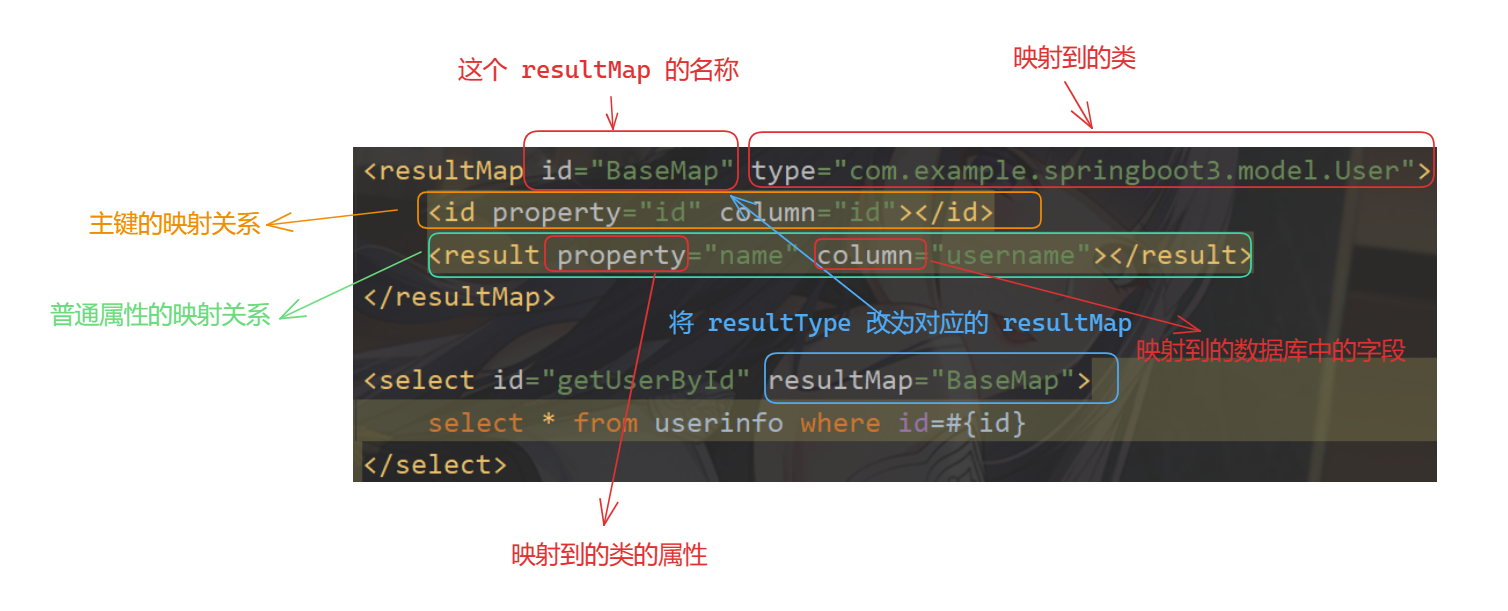
这个时候就可以使⽤ resultMap :
    <resultMap id="BaseMap" type="com.example.springboot3.model.User">
        <id property="id" column="id"></id>
        <result property="name" column="username"></result>
    </resultMap>

    <select id="getUserById" resultMap="BaseMap">
        select * from userinfo where id=#{id}
    </select>
- 多表查询
在多表查询时,如果使⽤ resultType 标签,在⼀个类中包含了另⼀个对象是查询不出来被包含的对象的, ⽐如以下实体类:
@Data
public class ArticleInfo {
    private Integer id;
    private String title;
    private String content;
    private LocalDateTime createtime;
    private LocalDateTime updatetime;
    private Integer rcount;
    // 包含了 User 对象
    private User user;
}
此时我们就需要使⽤特殊的⼿段来实现联表查询了。
⼀对⼀的表映射:
⼀对⼀映射要使⽤ <association> 标签
    <resultMap id="BaseMap" type="com.example.springboot3.model.ArticleInfo">
        <id property="id" column="id"></id>
        <result property="title" column="title"></result>
        <result property="content" column="content"></result>
        <result property="createtime" column="createtime"></result>
        <result property="updatetime" column="updatetime"></result>
        <result property="rcount" column="rcount"></result>
        <association property="user"
                     resultMap="com.example.springboot3.mapper.UserMapper.BaseMap"
                     columnPrefix="u_">
        </association>
    </resultMap>

    <select id="getAll" resultMap="BaseMap">
        select a.*, u.id  u_id, u.username u_username, u.password u_password, u.photo u_photo,
        u.createtime u_createtime, u.updatetime u_updatetime
        from articleinfo a
        left join userinfo u on a.uid=u.id
    </select>
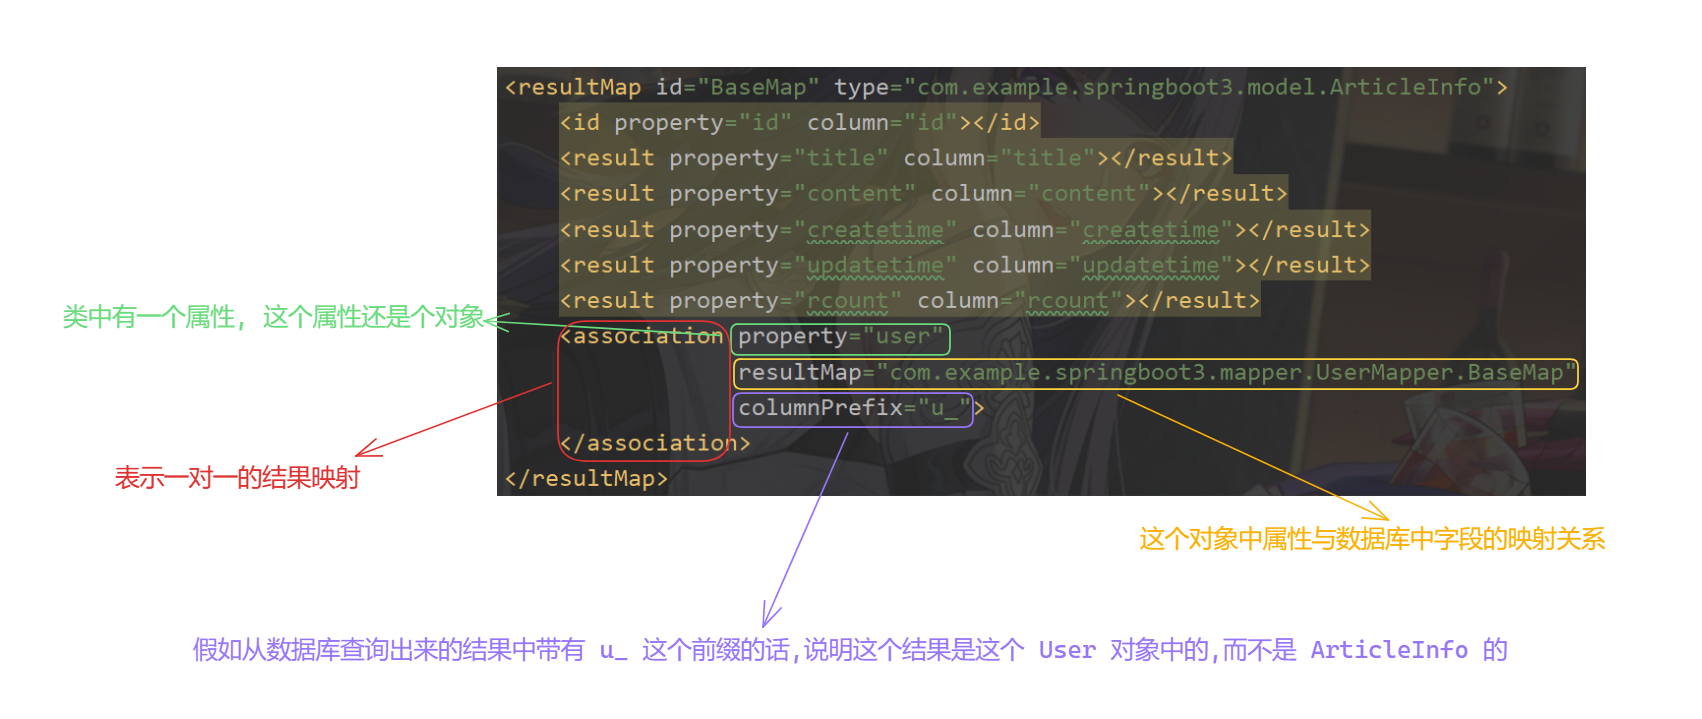
- columnPrefix 属性:绑定⼀对⼀对象时,是通过 columnPrefix + association.resultMap.column 来映射结果集字段。
association.resultMap.column是指\ 标签中 resultMap属性,对应的结果集映射中,column字段。
columnPrefix 属性不能省略,如果省略当联表中如果有相同的字段,那么就会导致查询出错。
⽐如两篇⽂章都是⼀个⼈写的,如果没有 columnPrefix 就会导致查询的⽤户 id(因为用户表和⽂章表 都有 id 这个字段 相同)查询出错。
ArticleInfo:
@Data
public class ArticleInfo {
    private Integer id;
    private String title;
    private String content;
    private LocalDateTime createtime;
    private LocalDateTime updatetime;
    private Integer rcount;
    // 包含了 User 对象
    private User user;
}
ArticleMapper:
@Mapper
public interface ArticleMapper {
    List<ArticleInfo> getAll();
}
ArticleMapper.xml
    <resultMap id="BaseMap" type="com.example.springboot3.model.ArticleInfo">
        <id column="id" property="id"></id>
        <result column="title" property="title"></result>
        <result column="content" property="content"></result>
        <association property="user"
                     resultMap="com.example.springboot3.mapper.UserMapper.BaseMap">
        </association>
    </resultMap>

    <select id="getAll" resultMap="BaseMap">
        select a.*,u.* from articleinfo a
        left join userinfo u on u.id=a.uid
    </select>
Service:
@Service
public class ArticleService {
    @Resource
    private ArticleMapper articleMapper;

    public List<ArticleInfo> getAll(){
        return articleMapper.getAll();
    }
}
Controller
@RequestMapping("/a")
@RestController
public class ArticleController {
    @Resource
    private ArticleService articleService;
    @RequestMapping("/getall")
    public List<ArticleInfo> getAll() {
        return articleService.getAll();
    }
}
数据库中的数据情况:

结果:
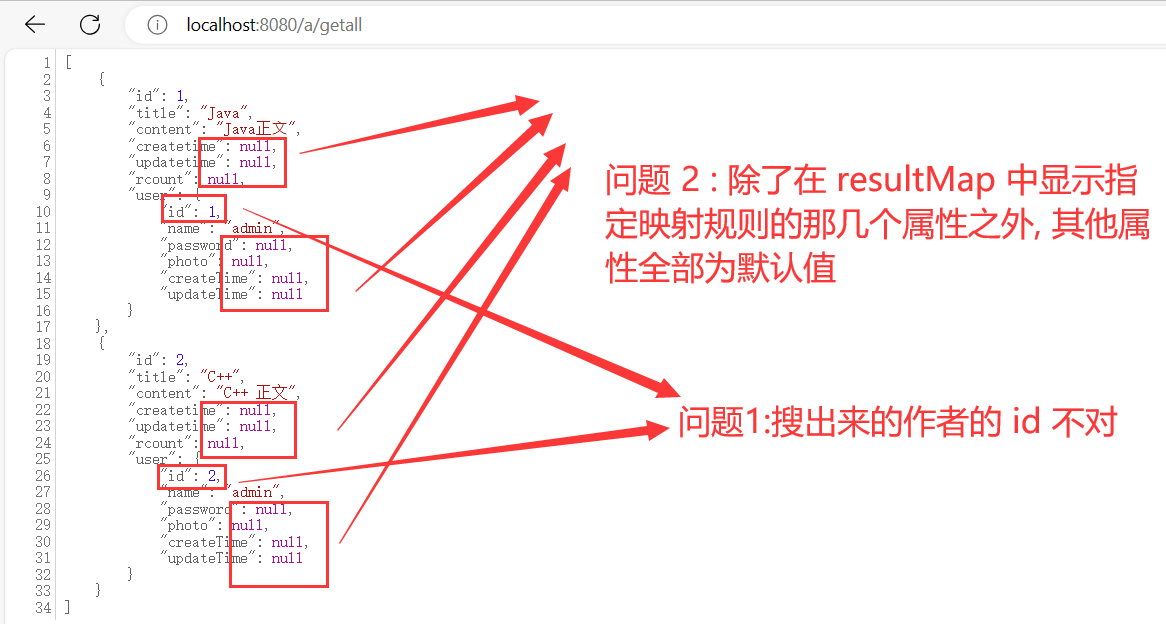
明显两篇文章的是同一个作者,但是查询结果不是。
问题 1 解决:使用 columnPrefix
原因是两张表中含有相同的字段,此时不知道将哪个字段赋值给哪个类中的属性所以使用 columnPrefix 属性:
columnPrefix 属性:绑定⼀对⼀对象时,是通过 columnPrefix+association.resultMap.column 来映射结果集字段。
association.resultMap.column是指 <association> 标签中 resultMap属性,对应的结果集映射中,column字段。
问题 2 解决:
属性值不完整的原因是使用 resultMap 是没有将所有的属性到字段的映射关系全部指定出来,
所以,将两个 resultMap 中的映射关系全部显示指定出来即可。
最终的 UserMapper.xml 和 ArticleMapper.xml :
UserMapper.xml
    <resultMap id="BaseMap" type="com.example.springboot3.model.User">
        <id property="id" column="id"></id>
        <result property="name" column="username"></result>
        <result property="password" column="password"></result>
        <result property="photo" column="photo"></result>
        <result property="createTime" column="createtime"></result>
        <result property="updateTime" column="updatetime"></result>
    </resultMap>
ArticleMapper.xml
    <resultMap id="BaseMap" type="com.example.springboot3.model.ArticleInfo">
        <id property="id" column="id"></id>
        <result property="title" column="title"></result>
        <result property="content" column="content"></result>
        <result property="createtime" column="createtime"></result>
        <result property="updatetime" column="updatetime"></result>
        <result property="rcount" column="rcount"></result>
        <association property="user"
                     resultMap="com.example.springboot3.mapper.UserMapper.BaseMap"
                     columnPrefix="u_">
        </association>
    </resultMap>

    <select id="getAll" resultMap="BaseMap">
        select a.*, u.id  u_id, u.username u_username, u.password u_password, u.photo u_photo,
        u.createtime u_createtime, u.updatetime u_updatetime
        from articleinfo a
        left join userinfo u on a.uid=u.id
    </select>
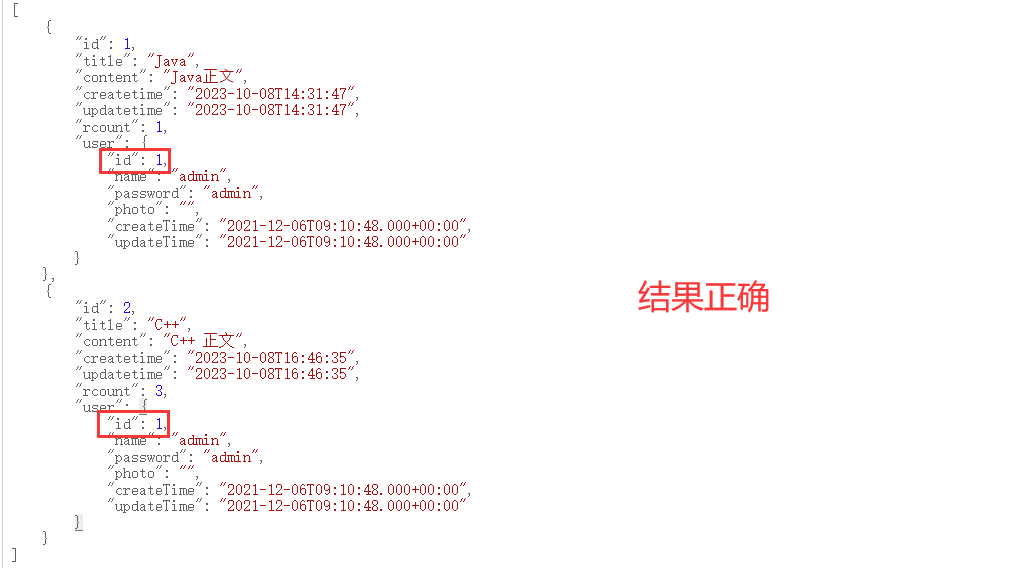
注意:
- 只增加一个 columnPrefix=“u_” 是不行的,这只是指出来查询的结果中 User 对应表中的字段会有 u_ 前缀,从而让程序能够区分
- 并不是真正的加上了前缀,只是指出了带 u_ 前缀的是 User 对应的表
- 所以我们自己要在后面的查询语句中对 user 表中查询的属性加上 u_
从上面代码看出来, 如果使用了 columnPrefix 这个属性的话, 需要将要查询出来的每一个字段都重命名, 添上前缀, 所以当要查询出来的属性比较多时, 是比较冗长的.
当然也可以不使用 /这种方式: 使用一个新的类去接收结果
比如
@Data
public class ArticleInfo {
    private Integer id;
    private String title;
    private String content;
    private LocalDateTime createtime;
    private LocalDateTime updatetime;
    private Integer rcount;
}
但是查询结果中需要由对应文章的作者名称, 那么就创建一个新的类继承 ArticleInfo 类:
@Data
public class ArticleInfoVO extends ArticleInfo{
    private String username;
}
mapper.xml
    <select id="getArticleinfo" resultType="com.example.springboot3.model.ArticleInfoVO">
        select a.*, u.username from articleinfo a left join userinfo u on a.uid = u.id
    </select>
这样就简单的多了
⼀对多:⼀个⽤户多篇⽂章
⼀对多需要使⽤ <collection> 标签,⽤法和 <association> 相同
@Data
public class UserInfo {
    private Integer id;
    private String name;
    private String password;
    private String photo;
    private Date createTime;
    private Date updateTime;
    // 文章列表
    private List<ArticleInfo> alist;
}
    <resultMap id="BaseMap" type="com.example.springboot3.model.UserInfo">
        <id column="id" property="id" />
        <result column="username" property="name"></result>
        <result column="password" property="password"></result>
        <result column="photo" property="photo"></result>
        <result column="createtime" property="createTime"></result>
        <result column="updatetime" property="updateTime"></result>
        <collection property="alist" resultMap="com.example.springboot3.mapper.ArticleMapper.BaseMap"
                    columnPrefix="a_">
        </collection>
    </resultMap>

    <select id="getUserById" resultMap="BaseMap">
        select u.*, a.id a_id, a.title a_title, a.content a_content, a.createtime a_createtime,
               a.updatetime a_updatetime, a.rcount a_rcount
        from userinfo u
        left join articleinfo a on u.id=a.uid where u.id=#{id}
    </select>
一对多也可以不使用 <collection>这种方式,也使用一个新的类去接收结果
好啦! 以上就是对 MyBatis 的讲解,希望能帮到你 !
评论区欢迎指正 !
![2023年中国非晶带材产量、竞争现状及行业市场规模前景分析[图]](https://img-blog.csdnimg.cn/img_convert/824ec5ac4d944b216bfb88bb6b452c08.png)

![2023年中国人防服务需求现状及行业市场规模前景分析[图]](https://img-blog.csdnimg.cn/img_convert/5f9a07f83d7bf0dfabba7fb45fd93bc6.png)