1.代理
1.问题:如何定义一个对象,不会被修改,也不能被遍历?
-
通过Object.defineProperty(对象,属性名,option)定义默认属性
- 无法被修改
- 无法被删除
- 无法被遍历
注意:Object.Property传入的值与返回的值是同一个地址
-
可以配置一下属性
- value:初始值
- writable:true (true允许被修改)
- enumerable:true(rue允许被遍历)
- configurable:true(rue允许被删除)
-
提供get和set2个方法
- 注意:get和set不能和value,writable一起使用,当给对象设置属性的值,会触发set
        //    var obj={}
        var o = Object.defineProperty({}, "name", {
            value: "刘德华",//初始值
            writable: true,//true 允许被修改
            enumerable: true,//true 允许被遍历
            configurable: true//true 允许被删除

        })
        //    delete o.name//删除
        // o.name="小易"//修改
        // for(let k in o){
        //     console.log(k,o[k]);//name 刘德华
        // }//遍历
        console.log(o);//{name: '刘德华'}
          var person = {
            name: "吴彦祖",
        }
        //给一个初始值
        person.age = 0
        // 问题:直接操作Person,给Person添加属性,容易出现值的不准确
        // 聘请一个代理(秘书)
        var proxy = Object.defineProperty({}, "age", {
            set(val) {
                if (!(val >= 18 && val <= 50)) {
                    console.log("值不合法");
                } else {
                    console.log("值合法");
                    person.age = val
                }
            },
            get() {
                return `年龄${person.age}岁`
            }
        })
        // 读写都要经过代理
        proxy.age = 22//设置年龄
        console.log(proxy.age);//读取年龄
        console.log(person);
2.查看方法有几个参数
使用arguments
3.hasOwnProperty
-
数组是特殊的对象,也就拥有对象的原型的属性和方法
-
for…in会遍历原型上的属性和方法
解决:
- 使用Object.prototype.hasOwnProperty如果是原型上属性和方法,就为false,不是为true
-
for…of 不会遍历原型上的属性和方法
解决:
- 使用Object.keys结合for…of
Object.prototype.address = "中国"
        function Person(name, age, sex) {
            this.name = name,
                this.age = age,
                this.sex = sex
        }
        var p = new Person("小易", 22, "女")
        // for..in会遍历到父的原型上的属性和方法
        for (let key in p) {
            console.log(key);//name, age, sex,address
        }
        // 解决方案1:使用Object.keys结合for..of
        var keys = Object.keys(p)
        for (let key of keys) {
            console.log(key);//name, age, sex
        }
        // 解决方案2:Object.prototype.hasOwnProperty如果是原型上属性和方法,就为false,不是为true
        for (let key in p) {
            // 如果是原型上属性和方法,就为false,不是为true
            console.log(key,Object.prototype.hasOwnProperty.call(p, key));
            if (Object.prototype.hasOwnProperty.call(p, key)) {
                const el = p[key]
                console.log(el);

            }
        }
4.浅拷贝
1.概念:除了第一层地址不共享,第二层以上的地址都共享,就是浅拷贝
2.对象的拷贝方法
- Object.assign()
- {…obj}
3.数组的浅拷贝
- […arr]
- arr.slice(0)
- [].concat(arr)
- arr.filter((item)=>item)
- _.clone(arr) lodash的方法
 var Person = {
            name: "老刘",
            age: 50,
            children: {
                name: "小刘",
                age: 20
            }
        }
        // 对象浅拷贝
        // 方法1
        // var newPerson=Object.assign({},Person)
        // 方法二
        var newPerson = { ...Person }
        Person.name = "老老刘"
        Person.children.name = "小小刘"
        console.log(Person);
        console.log(newPerson);
        console.log(newPerson === Person);//false
        console.log(newPerson.children === Person.children);//true

        // 数组浅拷贝
        var arr = ["00", ["11", 22], { id: 1, name: "aa" }, { id: 2, name: "bb" }]
        // var arr1=[...arr]
        // var arr1=arr.slice(0)
        // var arr1=[].concat(arr)
        var arr1 = arr.filter(function(item){
            return item
        })

        arr1[0] = "99"
        arr1[1][0] = "zzz"
        console.log(arr1);
        console.log(arr);
   // 使用lodash的clone,实现浅拷贝,数组与对象的浅拷贝
        var arr=[11,[22,33],44]
        var arr1=_.clone(arr)
        arr[1][0]="zzzz"
        arr[0]="aaa"
        console.log(arr);
        console.log(arr1);

        var obj={id:1,name:"刘德华",children:{id:2,name:"小小易"}}
        var obj1=_.clone(obj)
        obj.name="zzzz"
        obj.children.name="ffff"
        console.log(obj);
        console.log(obj1);
5.lodash的使用
1复制lodash.js
.https://www.bootcdn.cn/lodash.js/
2.打开官网,查文档
https://www.lodashjs.com/
6.深克隆
1.如何判断引用类型?
1.Object.prototype.toString.call(对象名)
2.constructor.name
2.实现深克隆的方法?
-
js提供的
JSON.stringify和JSON.parse能够实现深克隆,但是会丢失方法
var p=JSON.parse(JSON.stringify(person0))
-
自己写
//------------自己写深克隆--------- var person0 = { id: 1, name: "蔡徐坤", children: { id: 11, name: "小刘" } } console.log(p); function deep(o) { let temp; if (Object.prototype.toString.call(o).includes("Object")) { temp = {} } else if (Object.prototype.toString.call(o).includes("Array")) { temp = [] } for (const key in o) { if (Object.hasOwnProperty.call(o, key)) { // console.log(o[key]); // 如果是引用数据类型,进行递归 if (typeof o[key] === "object") { temp[key] = deep(o[key]) // console.log(deep(o[key])); } else { // 如果是值类型,直接赋值 temp[key] = (o[key]) } } } return temp } var person1 = deep(person0) person0.children.name = "jj" // console.log(person0); // console.log(person1); /* 数组实现深克隆 */ var arr0=[11,[22,33],44] var arr1=deep(arr0) arr0[1][0]="hhh" console.log(arr0); console.log(arr1); -
使用lodash cloneDeep
   var person2 = {
        id: 1,
        name: "蔡徐坤",
        children: {
            id: 11,
            name: "小刘"
        }
    }
    var person3 = _.cloneDeep(person2)
    person2.children.name = "mmmm"
    console.log(person2);
    console.log(person3);
7.闭包
1.概念:
函数嵌套函数,内部函数可以访问外部函数的变量和参数,变量和参数不会被垃圾回收机制所回收
2.闭包的好处
- 减少全局变量的污染
- 实现缓存
3.形成闭包的3个条件
- 函数嵌套函数
- 利用作用域(局部/全局)
- GC(垃圾回收机制)被使用就不会回收(标记清除法,引用计数法)
4.闭包的优点
- 保存变量,让一个变量长期驻扎在内存中,不会被释放’
 //    对于outer来说,a是局部变量
       function outer() {
            var a=100
             //    对于inner来说,a是全局变量
             function inner(){
                a+10
            }
            return inner
       }
       var f=outer()
       console.log(f);
8.节流和防抖
降低执行频率,稀释执行次数
节流 throttle
  // 节流 throttle
       var box = document.querySelector(".box")
        box.onmousemove = throttle(function (e) {
            console.log(e);
            console.log(this);
            console.log(1);
        }, 100)
        // throttle页面加载执行
        function throttle(callback, delay = 600) {
            let start = Date.now()
            return function (e) {
                let end = Date.now()
                if (end - start >= delay) {
                    callback.bind(this)(e)
                    console.log(this);
                    console.log(e);
                    //给start重写标记开始的时间
                    start = end
                }
            }
        }
防抖 debounce
   var box = document.querySelector(".box")
        // 防抖 debounce
        box.onmousemove = debounce(function (e) {
            console.log(e);
            console.log(this);
            console.log(1);
        }, 100)
        function debounce(callback, delay = 600) {
            var timer;
            return function (evt) {
                let self = this
                clearTimeout(timer)
                timer = setTimeout(function () {
                    console.log(this);
                    callback.call(self, evt)
                    // callback.call(self, evt);
                }, delay)
            }
        }
9.盒子拖拽.(原型链+继承+构造函数)
<!DOCTYPE html>
<html lang="en">

<head>
    <meta charset="UTF-8">
    <meta name="viewport" content="width=device-width, initial-scale=1.0">
    <title>Document</title>
    <style>
        .box {
            width: 100px;
            height: 100px;
            background-color: pink;
            position: absolute;
        }

        .boxRed {
            width: 100px;
            height: 100px;
            background-color: red;
            position: absolute;
            top: 115px;
        }

        .boxYellow {
            width: 100px;
            height: 100px;
            background-color: yellow;
            position: absolute;
            top: 300px;
        }
    </style>
</head>

<body>
    <div class="box"></div>
    <div class="boxRed"></div>
    <div class="boxYellow"></div>
    <script>
        // 原型拖拽
        function DragBox(cls) {
            this.el = document.querySelector(cls)
        }
        DragBox.prototype = {
            constructor: DragBox,
            dragStart() {
                let self = this
                this.el.onmousedown = function (e) {
                    let disX = e.offsetX
                    let disY = e.offsetY
                    self.dragIng(disX, disY)
                    self.dragEnd()
                }
            },
            dragIng(x, y) {
                let self = this
                document.onmousemove = function (e) {
                    console.log(this);
                    self.el.style.left = e.pageX - x + "px"
                    self.el.style.top = e.pageY - y + "px"
                }
            },
            dragEnd() {
                document.onmouseup = function () {
                    document.onmousemove = document.onmouseup = null
                }
            },
        }
        new DragBox(".box").dragStart()
        // 红色继承
        function DragBoxLimit(el) {
            DragBox.call(this, el)
        }
        DragBoxLimit.prototype = new DragBox;
        DragBoxLimit.prototype.dragIng = function (x, y) {
            let self = this;
            document.onmousemove = function (e) {
                let mX = e.pageX - x
                let mY = e.pageY - y
                if (mX < 0) {
                    mX = 0
                }
                if (mY < 0) {
                    mY = 0
                }
                self.el.style.left = mX + "px"
                self.el.style.top = mY + "px"
            }
        }
        new DragBoxLimit(".boxRed").dragStart()
        // 黄色继承
        function DragBoxLimitText(el) {
            DragBox.call(this, el)
        }
        DragBoxLimitText.prototype = new DragBox;
        DragBoxLimitText.prototype.dragIng = function (x, y) {
            let self = this;
            document.onmousemove = function (e) {
                let mX = e.pageX - x
                let mY = e.pageY - y
                if (mX < 0) {
                    mX = 0
                }
                if (mY < 0) {
                    mY = 0
                }
                self.el.style.left = mX + "px"

                self.el.style.top = mY + "px"
                self.el.innerHTML = "top:" + self.el.style.top + "<br>left:" + self.el.style.left
            }
        }
        new DragBoxLimitText(".boxYellow").dragStart()

    </script>
</body>

</html>
10.盒子拖拽(类)
<!DOCTYPE html>
<html lang="en">

<head>
    <meta charset="UTF-8">
    <meta name="viewport" content="width=device-width, initial-scale=1.0">
    <title>Document</title>
    <style>
        .box {
            width: 100px;
            height: 100px;
            background-color: pink;
            position: absolute;
        }

        .boxRed {
            width: 100px;
            height: 100px;
            background-color: red;
            position: absolute;
            top: 115px;
        }

        .boxYellow {
            width: 100px;
            height: 100px;
            background-color: yellow;
            position: absolute;
            top: 300px;
        }
    </style>
</head>

<body>
    <div class="box"></div>
    <div class="boxRed"></div>
    <div class="boxYellow"></div>
    <script>
        class box {
            constructor(el) {
                this.el = document.querySelector(el)
            }
            dragStart() {
                let self = this
                this.el.onmousedown = function (e) {
                    let disX = e.pageX-this.el.offsetLeft
                    let disY = e.offsetY
                    self.dragIng(disX, disY)
                    self.dragEnd()
                }
            }
            dragIng(x, y) {
                let self = this
                document.onmousemove = function (e) {
                    console.log(this);
                    self.el.style.left = e.pageX - x + "px"
                    self.el.style.top = e.pageY - y + "px"
                }
            }
            dragEnd() {
                document.onmouseup = function () {
                    document.onmousemove = document.onmouseup = null
                }
            }
        }
        class yellowBox extends box {
            constructor(el) {
                super(el)
                // this.left=e.pageX-e.offsetX
            }
            dragIng(x, y) {
                let self = this
                document.onmousemove = function (e) {
                    console.log(this);
                    self.el.style.left = e.pageX - x + "px"
                    self.el.innerHTML = "left:" + self.el.style.left
                    self.el.style.top = e.pageY - y + "px"
                    self.el.innerHTML = "top:" + self.el.style.top + "<br>left:" + self.el.style.left
                    console.log( self.el.style.left);
                }
            }
        }
        class RedBox extends box {
            constructor(el) {
                super(el)
                // this.left=e.pageX-e.offsetX
            }
            dragIng(x, y) {
                let self = this
                document.onmousemove = function (e) {
                    console.log(this);
                    let mX = e.pageX - x
                    let mY = e.pageY - y
                    if (mX < 0) {
                        mX = 0
                    }
                    if (mY < 0) {
                        mY = 0
                    }
                    self.el.style.left = mX + "px"

                    self.el.style.top = mY + "px"

                }
            }
        }
        var b = new yellowBox(".boxYellow")
        var p = new box(".box")
        var r=new RedBox(".boxRed")
        r.dragStart()
        b.dragStart()
        p.dragStart()
    </script>
</body>

</html>
11.tab栏切换
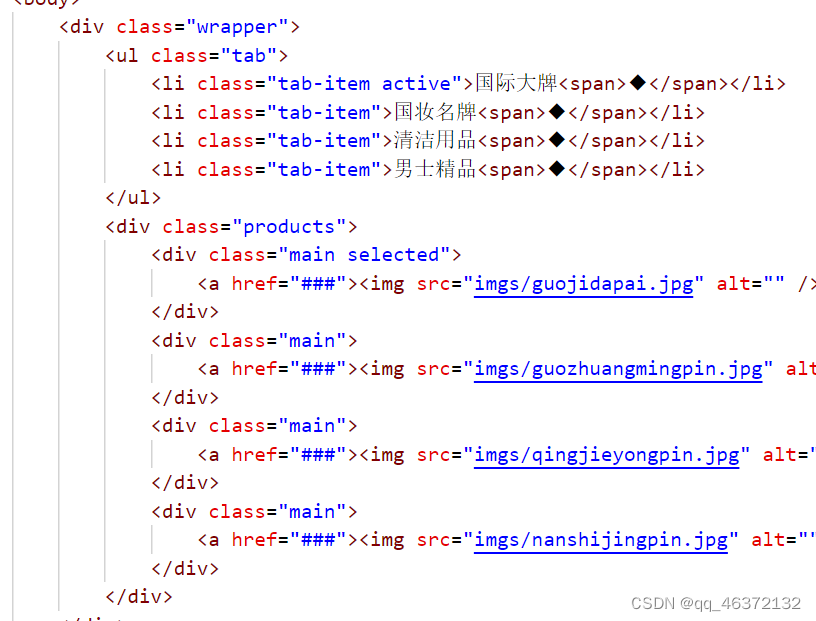
 var Main = document.querySelectorAll(".main")
    for (var i = 0; i < TabItem.length; i++) {
        TabItem[i].onclick = change(i)//change会被执行4次
        // console.log(TabItem[i].onclick);
    }
    function change(n) {
        return function (e) {
            for (var i = 0; i < TabItem.length; i++) {
                TabItem[i].className = "tab-item"
                // 下面的图片
                Main[i].className = "main"
            }
            // e.target.className="tab-item active"
            this.className = "tab-item active"
            console.log(this);
            // 下面的图片
            Main[n].className = "main selected"
        }
    }
