刚才的案例中都是以id为条件的简单CRUD,一些复杂条件的SQL语句就要用到一些更高级的功能了。
1.条件构造器
除了新增以外,修改、删除、查询的SQL语句都需要指定where条件。因此BaseMapper中提供的相关方法除了以id作为where条件以外,还支持更加复杂的where条件。
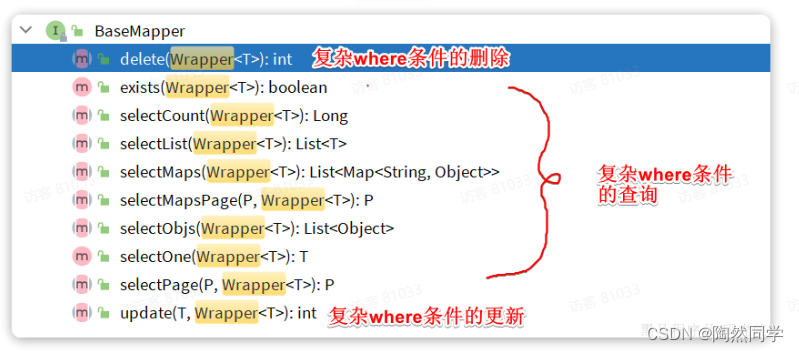
参数中的Wrapper就是条件构造的抽象类,其下有很多默认实现,继承关系如图:

Wrapper的子类AbstractWrapper提供了where中包含的所有条件构造方法:

而QueryWrapper在AbstractWrapper的基础上拓展了一个select方法,允许指定查询字段:

而UpdateWrapper在AbstractWrapper的基础上拓展了一个set方法,允许指定SQL中的SET部分:

接下来,我们就来看看如何利用Wrapper实现复杂查询。
1.1QueryWrapper
无论是修改、删除、查询,都可以使用QueryWrapper来构建查询条件。接下来看一些例子: 查询:查询出名字中带o的,存款大于等于1000元的人。代码如下:
@Test
void testQueryWrapper() {
    // 1.构建查询条件 where name like "%o%" AND balance >= 1000
    QueryWrapper<User> wrapper = new QueryWrapper<User>()
            .select("id", "username", "info", "balance")
            .like("username", "o")
            .ge("balance", 1000);
    // 2.查询数据
    List<User> users = userMapper.selectList(wrapper);
    users.forEach(System.out::println);
}更新:更新用户名为jack的用户的余额为2000,代码如下:
@Test
void testUpdateByQueryWrapper() {
    // 1.构建查询条件 where name = "Jack"
    QueryWrapper<User> wrapper = new QueryWrapper<User>().eq("username", "Jack");
    // 2.更新数据,user中非null字段都会作为set语句
    User user = new User();
    user.setBalance(2000);
    userMapper.update(user, wrapper);
}
1.2UpdateWrapper
基于BaseMapper中的update方法更新时只能直接赋值,对于一些复杂的需求就难以实现。 例如:更新id为1,2,4的用户的余额,扣200,对应的SQL应该是:
UPDATE user SET balance = balance - 200 WHERE id in (1, 2, 4)SET的赋值结果是基于字段现有值的,这个时候就要利用UpdateWrapper中的setSql功能了:
@Test
void testUpdateWrapper() {
    List<Long> ids = List.of(1L, 2L, 4L);
    // 1.生成SQL
    UpdateWrapper<User> wrapper = new UpdateWrapper<User>()
            .setSql("balance = balance - 200") // SET balance = balance - 200
            .in("id", ids); // WHERE id in (1, 2, 4)
        // 2.更新,注意第一个参数可以给null,也就是不填更新字段和数据,
    // 而是基于UpdateWrapper中的setSQL来更新
    userMapper.update(null, wrapper);
}
1.3LambdaQueryWrapper
无论是QueryWrapper还是UpdateWrapper在构造条件的时候都需要写死字段名称,会出现字符串魔法值。这在编程规范中显然是不推荐的。 那怎么样才能不写字段名,又能知道字段名呢?
其中一种办法是基于变量的gettter方法结合反射技术。因此我们只要将条件对应的字段的getter方法传递给MybatisPlus,它就能计算出对应的变量名了。而传递方法可以使用JDK8中的方法引用和Lambda表达式。 因此MybatisPlus又提供了一套基于Lambda的Wrapper,包含两个:
-
LambdaQueryWrapper
-
LambdaUpdateWrapper
分别对应QueryWrapper和UpdateWrapper
其使用方式如下:
@Test
void testLambdaQueryWrapper() {
    // 1.构建条件 WHERE username LIKE "%o%" AND balance >= 1000
    QueryWrapper<User> wrapper = new QueryWrapper<>();
    wrapper.lambda()
            .select(User::getId, User::getUsername, User::getInfo, User::getBalance)
            .like(User::getUsername, "o")
            .ge(User::getBalance, 1000);
    // 2.查询
    List<User> users = userMapper.selectList(wrapper);
    users.forEach(System.out::println);
}
2.自定义SQL
在演示UpdateWrapper的案例中,我们在代码中编写了更新的SQL语句:

这种写法在某些企业也是不允许的,因为SQL语句最好都维护在持久层,而不是业务层。就当前案例来说,由于条件是in语句,只能将SQL写在Mapper.xml文件,利用foreach来生成动态SQL。 这实在是太麻烦了。假如查询条件更复杂,动态SQL的编写也会更加复杂。
所以,MybatisPlus提供了自定义SQL功能,可以让我们利用Wrapper生成查询条件,再结合Mapper.xml编写SQL
2.1基本用法
以当前案例来说,我们可以这样写:
@Test
void testCustomWrapper() {
    // 1.准备自定义查询条件
    List<Long> ids = List.of(1L, 2L, 4L);
    QueryWrapper<User> wrapper = new QueryWrapper<User>().in("id", ids);

    // 2.调用mapper的自定义方法,直接传递Wrapper
    userMapper.deductBalanceByIds(200, wrapper);
}
然后在UserMapper中自定义SQL:
public interface UserMapper extends BaseMapper<User> {
    @Select("UPDATE user SET balance = balance - #{money} ${ew.customSqlSegment}")
    void deductBalanceByIds(@Param("money") int money, @Param("ew") QueryWrapper<User> wrapper);
}
这样就省去了编写复杂查询条件的烦恼了。
2.2多表关联
理论上来讲MyBatisPlus是不支持多表查询的,不过我们可以利用Wrapper中自定义条件结合自定义SQL来实现多表查询的效果。 例如,我们要查询出所有收货地址在北京的并且用户id在1、2、4之中的用户 要是自己基于mybatis实现SQL,大概是这样的:
<select id="queryUserByIdAndAddr" resultType="com.itheima.mp.domain.po.User">
      SELECT *
      FROM user u
      INNER JOIN address a ON u.id = a.user_id
      WHERE u.id
      <foreach collection="ids" separator="," item="id" open="IN (" close=")">
          #{id}
      </foreach>
      AND a.city = #{city}
  </select>
可以看出其中最复杂的就是WHERE条件的编写,如果业务复杂一些,这里的SQL会更变态。
但是基于自定义SQL结合Wrapper的玩法,我们就可以利用Wrapper来构建查询条件,然后手写SELECT及FROM部分,实现多表查询。
查询条件这样来构建:
@Test
void testCustomJoinWrapper() {
    // 1.准备自定义查询条件
    QueryWrapper<User> wrapper = new QueryWrapper<User>()
            .in("u.id", List.of(1L, 2L, 4L))
            .eq("a.city", "北京");

    // 2.调用mapper的自定义方法
    List<User> users = userMapper.queryUserByWrapper(wrapper);

    users.forEach(System.out::println);
}
然后在UserMapper中自定义方法:
@Select("SELECT u.* FROM user u INNER JOIN address a ON u.id = a.user_id ${ew.customSqlSegment}")
List<User> queryUserByWrapper(@Param("ew")QueryWrapper<User> wrapper);当然,也可以在UserMapper.xml中写SQL:
<select id="queryUserByIdAndAddr" resultType="com.itheima.mp.domain.po.User">
    SELECT * FROM user u INNER JOIN address a ON u.id = a.user_id ${ew.customSqlSegment}
</select>
3.Service接口
MybatisPlus不仅提供了BaseMapper,还提供了通用的Service接口及默认实现,封装了一些常用的service模板方法。 通用接口为IService,默认实现为ServiceImpl,其中封装的方法可以分为以下几类:
-
save:新增 -
remove:删除 -
update:更新 -
get:查询单个结果 -
list:查询集合结果 -
count:计数 -
page:分页查询
3.1CRUD
我们先俩看下基本的CRUD接口。 新增:

-
save是新增单个元素 -
saveBatch是批量新增 -
saveOrUpdate是根据id判断,如果数据存在就更新,不存在则新增 -
saveOrUpdateBatch是批量的新增或修改
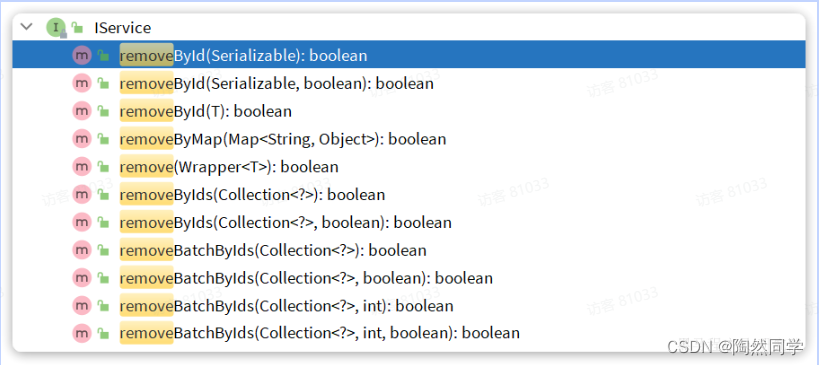
删除:
-
removeById:根据id删除 -
removeByIds:根据id批量删除 -
removeByMap:根据Map中的键值对为条件删除 -
remove(Wrapper<T>):根据Wrapper条件删除 -
~~removeBatchByIds~~:暂不支持
修改:

-
updateById:根据id修改 -
update(Wrapper<T>):根据UpdateWrapper修改,Wrapper中包含set和where部分 -
update(T,Wrapper<T>):按照T内的数据修改与Wrapper匹配到的数据 -
updateBatchById:根据id批量修改
Get:

-
getById:根据id查询1条数据 -
getOne(Wrapper<T>):根据Wrapper查询1条数据 -
getBaseMapper:获取Service内的BaseMapper实现,某些时候需要直接调用Mapper内的自定义SQL时可以用这个方法获取到Mapper
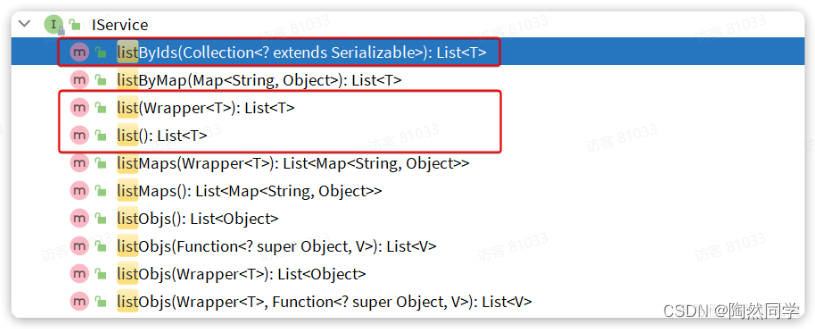
List:
-
listByIds:根据id批量查询 -
list(Wrapper<T>):根据Wrapper条件查询多条数据 -
list():查询所有
Count:
-
count():统计所有数量 -
count(Wrapper<T>):统计符合Wrapper条件的数据数量
getBaseMapper: 当我们在service中要调用Mapper中自定义SQL时,就必须获取service对应的Mapper,就可以通过这个方法:
3.2基本用法
由于Service中经常需要定义与业务有关的自定义方法,因此我们不能直接使用IService,而是自定义Service接口,然后继承IService以拓展方法。同时,让自定义的Service实现类继承ServiceImpl,这样就不用自己实现IService中的接口了。
首先,定义IUserService,继承IService:
package com.itheima.mp.service;

import com.baomidou.mybatisplus.extension.service.IService;
import com.itheima.mp.domain.po.User;

public interface IUserService extends IService<User> {
    // 拓展自定义方法
}然后,编写UserServiceImpl类,继承ServiceImpl,实现UserService:
package com.itheima.mp.service.impl;

import com.baomidou.mybatisplus.extension.service.impl.ServiceImpl;
import com.itheima.mp.domain.po.User;
import com.itheima.mp.domain.po.service.UserService;
import com.itheima.mp.mapper.UserMapper;
import org.springframework.stereotype.Service;

@Service
public class UserServiceImpl extends ServiceImpl<UserMapper, User>
                                                                                                        implements UserService {
}
项目结构如下:
 接下来,我们快速实现下面4个接口:
| 编号 | 接口 | 请求方式 | 请求路径 | 请求参数 | 返回值 |
|---|---|---|---|---|---|
| 1 | 新增用户 | POST | /users | 用户表单实体 | 无 |
| 2 | 删除用户 | DELETE | /users/{id} | 用户id | 无 |
| 3 | 根据id查询用户 | GET | /users/{id} | 用户id | 用户VO |
| 4 | 根据id批量查询 | GET | /users | 用户id集合 | 用户VO集合 |
首先,我们在项目中引入几个依赖:
<!--swagger-->
<dependency>
    <groupId>com.github.xiaoymin</groupId>
    <artifactId>knife4j-openapi2-spring-boot-starter</artifactId>
    <version>4.1.0</version>
</dependency>
<!--web-->
<dependency>
    <groupId>org.springframework.boot</groupId>
    <artifactId>spring-boot-starter-web</artifactId>
</dependency>
然后需要配置swagger信息:
knife4j:
  enable: true
  openapi:
    title: 用户管理接口文档
    description: "用户管理接口文档"
    email: zhanghuyi@itcast.cn
    concat: 虎哥
    url: https://www.itcast.cn
    version: v1.0.0
    group:
      default:
        group-name: default
        api-rule: package
        api-rule-resources:
          - com.itheima.mp.controller
然后,接口需要两个实体:
-
UserFormDTO:代表新增时的用户表单
-
UserVO:代表查询的返回结果
首先是UserFormDTO:
package com.itheima.mp.domain.dto;

import com.baomidou.mybatisplus.annotation.TableField;
import com.baomidou.mybatisplus.extension.handlers.JacksonTypeHandler;
import io.swagger.annotations.ApiModel;
import io.swagger.annotations.ApiModelProperty;
import lombok.Data;

@Data
@ApiModel(description = "用户表单实体")
public class UserFormDTO {

    @ApiModelProperty("id")
    private Long id;

    @ApiModelProperty("用户名")
    private String username;

    @ApiModelProperty("密码")
    private String password;

    @ApiModelProperty("注册手机号")
    private String phone;

    @ApiModelProperty("详细信息,JSON风格")
    private String info;

    @ApiModelProperty("账户余额")
    private Integer balance;
}
然后是UserVO:
package com.itheima.mp.domain.vo;

import io.swagger.annotations.ApiModel;
import io.swagger.annotations.ApiModelProperty;
import lombok.Data;

@Data
@ApiModel(description = "用户VO实体")
public class UserVO {

    @ApiModelProperty("用户id")
    private Long id;

    @ApiModelProperty("用户名")
    private String username;

    @ApiModelProperty("详细信息")
    private String info;

    @ApiModelProperty("使用状态(1正常 2冻结)")
    private Integer status;

    @ApiModelProperty("账户余额")
    private Integer balance;
}
最后,按照Restful风格编写Controller接口方法:
package com.itheima.mp.controller;

import cn.hutool.core.bean.BeanUtil;
import com.itheima.mp.domain.dto.UserFormDTO;
import com.itheima.mp.domain.po.User;
import com.itheima.mp.domain.vo.UserVO;
import com.itheima.mp.service.IUserService;
import io.swagger.annotations.Api;
import io.swagger.annotations.ApiOperation;
import lombok.RequiredArgsConstructor;
import org.springframework.web.bind.annotation.*;

import java.util.List;

@Api(tags = "用户管理接口")
@RequiredArgsConstructor
@RestController
@RequestMapping("users")
public class UserController {

    private final IUserService userService;

    @PostMapping
    @ApiOperation("新增用户")
    public void saveUser(@RequestBody UserFormDTO userFormDTO){
        // 1.转换DTO为PO
        User user = BeanUtil.copyProperties(userFormDTO, User.class);
        // 2.新增
        userService.save(user);
    }

    @DeleteMapping("/{id}")
    @ApiOperation("删除用户")
    public void removeUserById(@PathVariable("id") Long userId){
        userService.removeById(userId);
    }

    @GetMapping("/{id}")
    @ApiOperation("根据id查询用户")
    public UserVO queryUserById(@PathVariable("id") Long userId){
        // 1.查询用户
        User user = userService.getById(userId);
        // 2.处理vo
        return BeanUtil.copyProperties(user, UserVO.class);
    }

    @GetMapping
    @ApiOperation("根据id集合查询用户")
    public List<UserVO> queryUserByIds(@RequestParam("ids") List<Long> ids){
        // 1.查询用户
        List<User> users = userService.listByIds(ids);
        // 2.处理vo
        return BeanUtil.copyToList(users, UserVO.class);
    }
}
可以看到上述接口都直接在controller即可实现,无需编写任何service代码,非常方便。
不过,一些带有业务逻辑的接口则需要在service中自定义实现了。例如下面的需求:
-
根据id扣减用户余额
这看起来是个简单修改功能,只要修改用户余额即可。但这个业务包含一些业务逻辑处理:
-
判断用户状态是否正常
-
判断用户余额是否充足
这些业务逻辑都要在service层来做,另外更新余额需要自定义SQL,要在mapper中来实现。因此,我们除了要编写controller以外,具体的业务还要在service和mapper中编写。
首先在UserController中定义一个方法:
@PutMapping("{id}/deduction/{money}")
@ApiOperation("扣减用户余额")
public void deductBalance(@PathVariable("id") Long id, @PathVariable("money")Integer money){
    userService.deductBalance(id, money);
}
然后是UserService接口:
package com.itheima.mp.service;

import com.baomidou.mybatisplus.extension.service.IService;
import com.itheima.mp.domain.po.User;

public interface IUserService extends IService<User> {
    void deductBalance(Long id, Integer money);
}
最后是UserServiceImpl实现类:
package com.itheima.mp.service.impl;

import com.baomidou.mybatisplus.extension.service.impl.ServiceImpl;
import com.itheima.mp.domain.po.User;
import com.itheima.mp.mapper.UserMapper;
import com.itheima.mp.service.IUserService;
import org.springframework.stereotype.Service;

@Service
public class UserServiceImpl extends ServiceImpl<UserMapper, User> implements IUserService {
    @Override
    public void deductBalance(Long id, Integer money) {
        // 1.查询用户
        User user = getById(id);
        // 2.判断用户状态
        if (user == null || user.getStatus() == 2) {
            throw new RuntimeException("用户状态异常");
        }
        // 3.判断用户余额
        if (user.getBalance() < money) {
            throw new RuntimeException("用户余额不足");
        }
        // 4.扣减余额
        baseMapper.deductMoneyById(id, money);
    }
}
最后是mapper:
@Update("UPDATE user SET balance = balance - #{money} WHERE id = #{id}")
void deductMoneyById(@Param("id") Long id, @Param("money") Integer money);
3.3Lambda
IService中还提供了Lambda功能来简化我们的复杂查询及更新功能。我们通过两个案例来学习一下。
案例一:实现一个根据复杂条件查询用户的接口,查询条件如下:
-
name:用户名关键字,可以为空
-
status:用户状态,可以为空
-
minBalance:最小余额,可以为空
-
maxBalance:最大余额,可以为空
可以理解成一个用户的后台管理界面,管理员可以自己选择条件来筛选用户,因此上述条件不一定存在,需要做判断。
我们首先需要定义一个查询条件实体,UserQuery实体:
package com.itheima.mp.domain.query;

import io.swagger.annotations.ApiModel;
import io.swagger.annotations.ApiModelProperty;
import lombok.Data;

@Data
@ApiModel(description = "用户查询条件实体")
public class UserQuery {
    @ApiModelProperty("用户名关键字")
    private String name;
    @ApiModelProperty("用户状态:1-正常,2-冻结")
    private Integer status;
    @ApiModelProperty("余额最小值")
    private Integer minBalance;
    @ApiModelProperty("余额最大值")
    private Integer maxBalance;
}
接下来我们在UserController中定义一个controller方法:
@GetMapping("/list")
@ApiOperation("根据id集合查询用户")
public List<UserVO> queryUsers(UserQuery query){
    // 1.组织条件
    String username = query.getName();
    Integer status = query.getStatus();
    Integer minBalance = query.getMinBalance();
    Integer maxBalance = query.getMaxBalance();
    LambdaQueryWrapper<User> wrapper = new QueryWrapper<User>().lambda()
            .like(username != null, User::getUsername, username)
            .eq(status != null, User::getStatus, status)
            .ge(minBalance != null, User::getBalance, minBalance)
            .le(maxBalance != null, User::getBalance, maxBalance);
    // 2.查询用户
    List<User> users = userService.list(wrapper);
    // 3.处理vo
    return BeanUtil.copyToList(users, UserVO.class);
}
在组织查询条件的时候,我们加入了 username != null 这样的参数,意思就是当条件成立时才会添加这个查询条件,类似Mybatis的mapper.xml文件中的<if>标签。这样就实现了动态查询条件效果了。
不过,上述条件构建的代码太麻烦了。 因此Service中对LambdaQueryWrapper和LambdaUpdateWrapper的用法进一步做了简化。我们无需自己通过new的方式来创建Wrapper,而是直接调用lambdaQuery和lambdaUpdate方法:
基于Lambda查询:
@GetMapping("/list")
@ApiOperation("根据id集合查询用户")
public List<UserVO> queryUsers(UserQuery query){
    // 1.组织条件
    String username = query.getName();
    Integer status = query.getStatus();
    Integer minBalance = query.getMinBalance();
    Integer maxBalance = query.getMaxBalance();
    // 2.查询用户
    List<User> users = userService.lambdaQuery()
            .like(username != null, User::getUsername, username)
            .eq(status != null, User::getStatus, status)
            .ge(minBalance != null, User::getBalance, minBalance)
            .le(maxBalance != null, User::getBalance, maxBalance)
            .list();
    // 3.处理vo
    return BeanUtil.copyToList(users, UserVO.class);
}可以发现lambdaQuery方法中除了可以构建条件,还需要在链式编程的最后添加一个list(),这是在告诉MP我们的调用结果需要是一个list集合。这里不仅可以用list(),可选的方法有:
-
.one():最多1个结果 -
.list():返回集合结果 -
.count():返回计数结果
MybatisPlus会根据链式编程的最后一个方法来判断最终的返回结果。
与lambdaQuery方法类似,IService中的lambdaUpdate方法可以非常方便的实现复杂更新业务。
例如下面的需求:
需求:改造根据id修改用户余额的接口,要求如下
如果扣减后余额为0,则将用户status修改为冻结状态(2)
也就是说我们在扣减用户余额时,需要对用户剩余余额做出判断,如果发现剩余余额为0,则应该将status修改为2,这就是说update语句的set部分是动态的。
实现如下:
@Override
@Transactional
public void deductBalance(Long id, Integer money) {
    // 1.查询用户
    User user = getById(id);
    // 2.校验用户状态
    if (user == null || user.getStatus() == 2) {
        throw new RuntimeException("用户状态异常!");
    }
    // 3.校验余额是否充足
    if (user.getBalance() < money) {
        throw new RuntimeException("用户余额不足!");
    }
    // 4.扣减余额 update tb_user set balance = balance - ?
    int remainBalance = user.getBalance() - money;
    lambdaUpdate()
            .set(User::getBalance, remainBalance) // 更新余额
            .set(remainBalance == 0, User::getStatus, 2) // 动态判断,是否更新status
            .eq(User::getId, id)
            .eq(User::getBalance, user.getBalance()) // 乐观锁
            .update();
}
3.4批量新增
IService中的批量新增功能使用起来非常方便,但有一点注意事项,我们先来测试一下。 首先我们测试逐条插入数据:
@Test
void testSaveOneByOne() {
    long b = System.currentTimeMillis();
    for (int i = 1; i <= 100000; i++) {
        userService.save(buildUser(i));
    }
    long e = System.currentTimeMillis();
    System.out.println("耗时:" + (e - b));
}

private User buildUser(int i) {
    User user = new User();
    user.setUsername("user_" + i);
    user.setPassword("123");
    user.setPhone("" + (18688190000L + i));
    user.setBalance(2000);
    user.setInfo("{\"age\": 24, \"intro\": \"英文老师\", \"gender\": \"female\"}");
    user.setCreateTime(LocalDateTime.now());
    user.setUpdateTime(user.getCreateTime());
    return user;
}
执行结果如下:

可以看到速度非常慢。
然后再试试MybatisPlus的批处理:
@Test
void testSaveBatch() {
    // 准备10万条数据
    List<User> list = new ArrayList<>(1000);
    long b = System.currentTimeMillis();
    for (int i = 1; i <= 100000; i++) {
        list.add(buildUser(i));
        // 每1000条批量插入一次
        if (i % 1000 == 0) {
            userService.saveBatch(list);
            list.clear();
        }
    }
    long e = System.currentTimeMillis();
    System.out.println("耗时:" + (e - b));
}
执行最终耗时如下:

可以看到使用了批处理以后,比逐条新增效率提高了10倍左右,性能还是不错的。
不过,我们简单查看一下MybatisPlus源码:
@Transactional(rollbackFor = Exception.class)
@Override
public boolean saveBatch(Collection<T> entityList, int batchSize) {
    String sqlStatement = getSqlStatement(SqlMethod.INSERT_ONE);
    return executeBatch(entityList, batchSize, (sqlSession, entity) -> sqlSession.insert(sqlStatement, entity));
}
// ...SqlHelper
public static <E> boolean executeBatch(Class<?> entityClass, Log log, Collection<E> list, int batchSize, BiConsumer<SqlSession, E> consumer) {
    Assert.isFalse(batchSize < 1, "batchSize must not be less than one");
    return !CollectionUtils.isEmpty(list) && executeBatch(entityClass, log, sqlSession -> {
        int size = list.size();
        int idxLimit = Math.min(batchSize, size);
        int i = 1;
        for (E element : list) {
            consumer.accept(sqlSession, element);
            if (i == idxLimit) {
                sqlSession.flushStatements();
                idxLimit = Math.min(idxLimit + batchSize, size);
            }
            i++;
        }
    });
}可以发现其实MybatisPlus的批处理是基于PrepareStatement的预编译模式,然后批量提交,最终在数据库执行时还是会有多条insert语句,逐条插入数据。SQL类似这样:
Preparing: INSERT INTO user ( username, password, phone, info, balance, create_time, update_time ) VALUES ( ?, ?, ?, ?, ?, ?, ? )
Parameters: user_1, 123, 18688190001, "", 2000, 2023-07-01, 2023-07-01
Parameters: user_2, 123, 18688190002, "", 2000, 2023-07-01, 2023-07-01
Parameters: user_3, 123, 18688190003, "", 2000, 2023-07-01, 2023-07-01
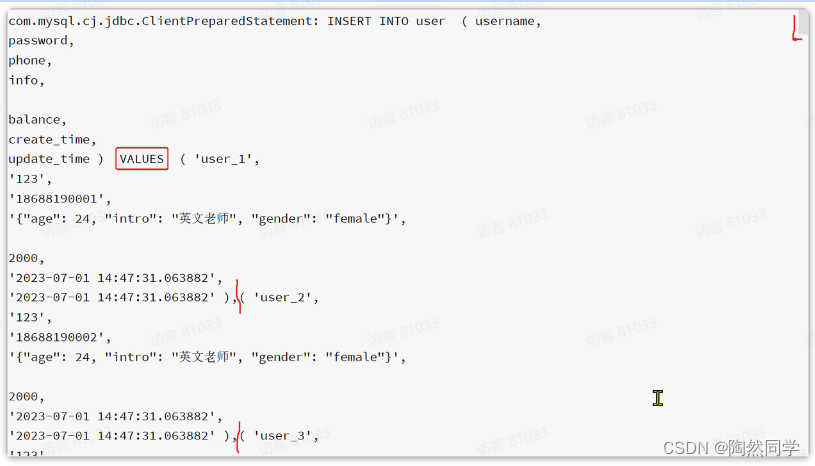
而如果想要得到最佳性能,最好是将多条SQL合并为一条,像这样:
INSERT INTO user ( username, password, phone, info, balance, create_time, update_time )
VALUES
(user_1, 123, 18688190001, "", 2000, 2023-07-01, 2023-07-01),
(user_2, 123, 18688190002, "", 2000, 2023-07-01, 2023-07-01),
(user_3, 123, 18688190003, "", 2000, 2023-07-01, 2023-07-01),
(user_4, 123, 18688190004, "", 2000, 2023-07-01, 2023-07-01);
该怎么做呢?
MySQL的客户端连接参数中有这样的一个参数:rewriteBatchedStatements。顾名思义,就是重写批处理的statement语句。参考文档:
https://dev.mysql.com/doc/connector-j/8.1/en/connector-j-connp-props-performance-extensions.html#cj-conn-prop_rewriteBatchedStatements
这个参数的默认值是false,我们需要修改连接参数,将其配置为true
修改项目中的application.yml文件,在jdbc的url后面添加参数&rewriteBatchedStatements=true:
spring:
  datasource:
    url: jdbc:mysql://127.0.0.1:3306/mp?useUnicode=true&characterEncoding=UTF-8&autoReconnect=true&serverTimezone=Asia/Shanghai&rewriteBatchedStatements=true
    driver-class-name: com.mysql.cj.jdbc.Driver
    username: root
    password: MySQL123
再次测试插入10万条数据,可以发现速度有非常明显的提升:

在ClientPreparedStatement的executeBatchInternal中,有判断rewriteBatchedStatements值是否为true并重写SQL的功能:
最终,SQL被重写了:
![[黑马程序员TypeScript笔记]------一篇就够了](https://img-blog.csdnimg.cn/0f044f450122461cb43c393334a4ce0e.png)

