本文所有代码均位于https://github.com/MADMAX110/CatChat
之前使用过标签页布局可以让用户在应用中轻松地导航。
当只有为数不多地几个类别屏幕,而且它们都在应用层次结构地同一级上,标签页布局就很适用。
而抽屉导航可以实现更多选择,这是一个滑出式面板,包含了应用其他部分地链接。这可以把链接分组为不同的区段。
一、新建一个Email应用
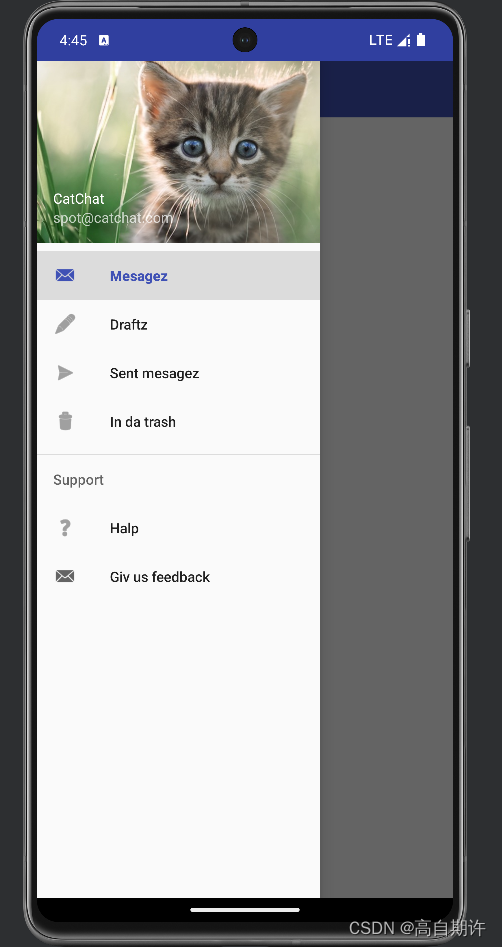
在这里新建一个email应用创建一个抽屉导航,这个应用名为CatChat,这个导航抽屉将包含一个头部和一组选项,主要选项分别对应用户的收件箱,草稿箱,已发送邮件和废纸篓。这里还会为帮助和反馈选项包含一个单独的支持区段。
要实现一个导航抽屉,需要向活动的布局增加一个抽屉布局,这会定义一个可以打开和关闭的抽屉,它需要包含两个视图:一个对应主要内容,一个对应抽屉内容。
主要步骤:
1、为应用的内容创建基本片段和活动。
创建片段:IndexFragment、DraftsFragments、SentItemsFragment和TrashFragment。
创建活动:Helpactivity、FeedbackActivity。
2、创建抽屉的头部
抽屉头部布局为nav_header.xml,包含一个图像和一些文本。
3、创建抽屉的选项
为抽屉要显示的选项建立一个菜单menu_nav.xml。
4、创建导航抽屉
将为应用的主活动增加这个导航抽屉,让它显示头部和选项。然后编写活动代码控制抽屉的行为。
二、创建CatChat工程
如图创建新工程CatChat。
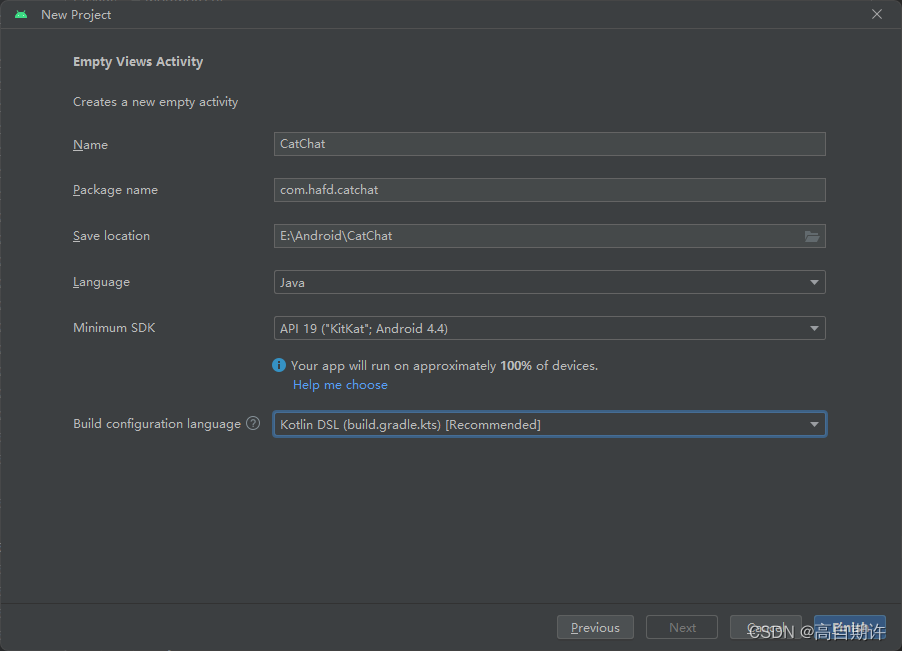
在carchat包中创建一个名为InboxFragment的新片段,然后把它的布局名命名为fragment_inbox.xml。更新其中IndexFragment.java和fragment_inbox.xml的代码:
package com.hafd.catchat;

import android.os.Bundle;
import androidx.fragment.app.Fragment;
import android.view.LayoutInflater;
import android.view.View;
import android.view.ViewGroup;

public class InboxFragment extends Fragment {

    @Override
    public View onCreateView(LayoutInflater inflater, ViewGroup container,
                             Bundle savedInstanceState) {
        // Inflate the layout for this fragment
        return inflater.inflate(R.layout.fragment_inbox, container, false);
    }
}
<?xml version="1.0" encoding="utf-8"?>
<LinearLayout xmlns:android="http://schemas.android.com/apk/res/android"
    xmlns:tools="http://schemas.android.com/tools"
    android:layout_width="match_parent"
    android:layout_height="match_parent"
    android:orientation="vertical"
    tools:context=".InboxFragment">

    <!-- TODO: Update blank fragment layout -->
    <TextView
        android:layout_width="match_parent"
        android:layout_height="match_parent"
        android:text="inbox" />

</LinearLayout>
创建DraftsFragment,其布局名为fragment_drafts.xml
package com.hafd.catchat;

import android.os.Bundle;
import androidx.fragment.app.Fragment;
import android.view.LayoutInflater;
import android.view.View;
import android.view.ViewGroup;

public class DraftsFragment extends Fragment {

    @Override
    public View onCreateView(LayoutInflater inflater, ViewGroup container,
                             Bundle savedInstanceState) {
        // Inflate the layout for this fragment
        return inflater.inflate(R.layout.fragment_inbox, container, false);
    }
}
<?xml version="1.0" encoding="utf-8"?>
<FrameLayout xmlns:android="http://schemas.android.com/apk/res/android"
    xmlns:tools="http://schemas.android.com/tools"
    android:layout_width="match_parent"
    android:layout_height="match_parent"
    android:orientation="vertical"
    tools:context=".DraftsFragment">

    <!-- TODO: Update blank fragment layout -->
    <TextView
        android:layout_width="match_parent"
        android:layout_height="match_parent"
        android:text="Drafts" />

</FrameLayout>
创建SentItemsFragment
package com.hafd.catchat;

import android.os.Bundle;
import androidx.fragment.app.Fragment;
import android.view.LayoutInflater;
import android.view.View;
import android.view.ViewGroup;

public class SentItemsFragment extends Fragment {

    @Override
    public View onCreateView(LayoutInflater inflater, ViewGroup container,
                             Bundle savedInstanceState) {
        // Inflate the layout for this fragment
        return inflater.inflate(R.layout.fragment_inbox, container, false);
    }
}
<?xml version="1.0" encoding="utf-8"?>
<FrameLayout xmlns:android="http://schemas.android.com/apk/res/android"
    xmlns:tools="http://schemas.android.com/tools"
    android:layout_width="match_parent"
    android:layout_height="match_parent"
    android:orientation="vertical"
    tools:context=".SentItemsFragment">

    <!-- TODO: Update blank fragment layout -->
    <TextView
        android:layout_width="match_parent"
        android:layout_height="match_parent"
        android:text="Sent items" />

</FrameLayout>
创建TrashFragment
package com.hafd.catchat;

import android.os.Bundle;
import androidx.fragment.app.Fragment;
import android.view.LayoutInflater;
import android.view.View;
import android.view.ViewGroup;

public class TrashFragment extends Fragment {

    @Override
    public View onCreateView(LayoutInflater inflater, ViewGroup container,
                             Bundle savedInstanceState) {
        // Inflate the layout for this fragment
        return inflater.inflate(R.layout.fragment_inbox, container, false);
    }
}
<?xml version="1.0" encoding="utf-8"?>
<FrameLayout xmlns:android="http://schemas.android.com/apk/res/android"
    xmlns:tools="http://schemas.android.com/tools"
    android:layout_width="match_parent"
    android:layout_height="match_parent"
    android:orientation="vertical"
    tools:context=".TrashFragment">

    <!-- TODO: Update blank fragment layout -->
    <TextView
        android:layout_width="match_parent"
        android:layout_height="match_parent"
        android:text="Trash" />

</FrameLayout>
三、创建一个工具条布局
在layou文件夹中新建一个名为toolbar_main的布局。
<?xml version="1.0" encoding="utf-8"?>
<androidx.appcompat.widget.Toolbar
    xmlns:android="http://schemas.android.com/apk/res/android"
    android:layout_width="match_parent"
    android:layout_height="?attr/actionBarSize"
    android:background="?attr/colorPrimary"
    android:theme="@style/ThemeOverlay.AppCompat.Dark.ActionBar"/>
更新AndroidManifest.xml中的 android:theme="@style/AppTheme"
更新values文件夹中的colors.xml,增加以下三个颜色:
    <color name="colorPrimary">#3F51B5</color>
    <color name="colorPrimaryDark">#303F9F</color>
    <color name="colorAccent">#FF4081</color>
更新应用的主题,在values文件夹中创建一个Values resource file,将文件命名为styles。
<?xml version="1.0" encoding="utf-8"?>
<resources>
    <style name="AppTheme" parent="Theme.AppCompat.Light.NoActionBar">
        <item name="colorPrimary">@color/colorPrimary</item>
        <item name="colorPrimaryDark">@color/colorPrimaryDark</item>
        <item name="colorAccent">@color/colorAccent</item>
    </style>
</resources>
四、创建活动
在catchat包中创建一个名为HelpActivity的活动,其布局为activity_help。
<?xml version="1.0" encoding="utf-8"?>
<androidx.constraintlayout.widget.ConstraintLayout
    xmlns:android="http://schemas.android.com/apk/res/android"
    xmlns:tools="http://schemas.android.com/tools"
    android:layout_width="match_parent"
    android:layout_height="match_parent"
    android:orientation="vertical"
    tools:context=".HelpActivity">

    <include
        layout="@layout/toolbar_main"
        android:id="@+id/toolbar" />

    <TextView
        android:layout_width="match_parent"
        android:layout_height="match_parent"
        android:text="Help"/>

</androidx.constraintlayout.widget.ConstraintLayout>
package com.hafd.catchat;

import androidx.appcompat.app.AppCompatActivity;
import androidx.appcompat.widget.Toolbar;

import android.os.Bundle;

public class HelpActivity extends AppCompatActivity {

    @Override
    protected void onCreate(Bundle savedInstanceState) {
        super.onCreate(savedInstanceState);
        setContentView(R.layout.activity_help);
        Toolbar toolbar = (Toolbar) findViewById(R.id.toolbar);
        setSupportActionBar(toolbar);
    }
}
同理,在catchat包中创建一个名为FeedbackActivity的活动,其布局为activity_feedback。
<?xml version="1.0" encoding="utf-8"?>
<androidx.constraintlayout.widget.ConstraintLayout
    xmlns:android="http://schemas.android.com/apk/res/android"
    xmlns:tools="http://schemas.android.com/tools"
    android:layout_width="match_parent"
    android:layout_height="match_parent"
    android:orientation="vertical"
    tools:context=".FeedbackActivity">

    <include
        layout="@layout/toolbar_main"
        android:id="@+id/toolbar" />

    <TextView
        android:layout_width="match_parent"
        android:layout_height="match_parent"
        android:text="Feedback"/>

</androidx.constraintlayout.widget.ConstraintLayout>
package com.hafd.catchat;

import androidx.appcompat.app.AppCompatActivity;
import androidx.appcompat.widget.Toolbar;

import android.os.Bundle;

public class FeedbackActivity extends AppCompatActivity {

    @Override
    protected void onCreate(Bundle savedInstanceState) {
        super.onCreate(savedInstanceState);
        setContentView(R.layout.activity_feedback);
        Toolbar toolbar = (Toolbar) findViewById(R.id.toolbar);
        setSupportActionBar(toolbar);
    }

}
五、创建导航抽屉
前面已经在工程中增加了需要的所有片段和活动,导航抽屉中的选项将连接到这些片段和活动。接下来要创建导航抽屉本身。
导航抽屉本身将包含一个导航抽屉头部和一组选项:
创建导航抽屉头部
在layout文件夹中新建一个名为nav_header的布局文件,这个布局包含一个图像和两个文本视图。
将下面一张图片增加到drawable文件夹中:

在string.xml中增加两个字符串资源:
    <string name="app_name">CatChat</string>
    <string name="user_name">spot@catchat.com</string>
下面是完整的nav_header.xml代码
<?xml version="1.0" encoding="utf-8"?>
<FrameLayout xmlns:android="http://schemas.android.com/apk/res/android"
    android:layout_width="match_parent"
    android:layout_height="180dp"
    android:theme="@style/ThemeOverlay.AppCompat.Dark">

    <ImageView
        android:layout_width="wrap_content"
        android:layout_height="wrap_content"
        android:scaleType="centerCrop"
        android:src="@drawable/kitten_small" />

    <LinearLayout
        android:layout_width="wrap_content"
        android:layout_height="match_parent"
        android:orientation="vertical"
        android:gravity="bottom|start"
        android:layout_margin="16dp" >

        <TextView
            android:layout_width="wrap_content"
            android:layout_height="wrap_content"
            android:text="@string/app_name"
            android:textAppearance="@style/TextAppearance.AppCompat.Body1"/>

        <TextView
            android:layout_width="wrap_content"
            android:layout_height="wrap_content"
            android:text="@string/user_name"/>

    </LinearLayout>

</FrameLayout>
导航抽屉从一个菜单资源文件得到它的选项列表。响应的代码与向应用条增加一组选项的代码是类似的。在res文件夹中创建一个menu文件夹,在该文件夹中创建一个menu_nav.xml的菜单资源文件。
需要先在string.xml中增加一些字符串资源:
    <string name="nav_inbox">Mesagez</string>
    <string name="nav_drafts">Draftz</string>
    <string name="nav_sent">Sent mesagez</string>
    <string name="nav_trash">In da trash</string>
    <string name="nav_support">Support</string>
    <string name="nav_help">Halp</string>
    <string name="nav_feedback">Giv us feedback</string>
接下来就可以开始创建菜单资源文件了,按你希望的显示顺序增加选项,下面是完整的menu_nav.xml的代码。
<?xml version="1.0" encoding="utf-8"?>
<menu xmlns:android="http://schemas.android.com/apk/res/android">
    <group android:checkableBehavior="single">
        <item
            android:id="@+id/nav_inbox"
            android:icon="@android:drawable/sym_action_email"
            android:title="@string/nav_inbox"/>
        <item
            android:id="@+id/nav_drafts"
            android:icon="@android:drawable/ic_menu_edit"
            android:title="@string/nav_drafts"/>
        <item
            android:id="@+id/nav_sent"
            android:icon="@android:drawable/ic_menu_send"
            android:title="@string/nav_sent"/>
        <item
            android:id="@+id/nav_trash"
            android:icon="@android:drawable/ic_menu_delete"
            android:title="@string/nav_trash"/>
    </group>
    <item android:title="@string/nav_support">
        <menu>
            <item
                android:id="@+id/nav_help"
                android:icon="@android:drawable/ic_menu_help"
                android:title="@string/nav_help"/>
            <item
                android:id="@+id/nav_feedback"
                android:icon="@android:drawable/sym_action_email"
                android:title="@string/nav_feedback"/>
        </menu>
    </item>
</menu>
向活动布局中增加一个抽屉布局,作为它的根元素。这个抽屉布局需要包含两个内容:一个包含活动内容的视图或视图组作为它的第一个元素,以及一个定义抽屉的导航视图作为它的第二个元素。
完整的activity_main.xml代码:
<?xml version="1.0" encoding="utf-8"?>
<androidx.drawerlayout.widget.DrawerLayout
    xmlns:android="http://schemas.android.com/apk/res/android"
    xmlns:app="http://schemas.android.com/apk/res-auto"
    android:id="@+id/drawer_layout"
    android:layout_width="match_parent"
    android:layout_height="match_parent">

    <LinearLayout
        android:layout_width="match_parent"
        android:layout_height="match_parent"
        android:orientation="vertical" >

        <include
            layout="@layout/toolbar_main"
            android:id="@+id/toolbar" />

        <FrameLayout
            android:id="@+id/content_frame"
            android:layout_height="match_parent"
            android:layout_width="match_parent" />

    </LinearLayout>

    <com.google.android.material.navigation.NavigationView
        android:id="@+id/nav_view"
        android:layout_width="wrap_content"
        android:layout_height="match_parent"
        android:layout_gravity="start"
        app:headerLayout="@layout/nav_header"
        app:menu="@menu/menu_nav"/>

</androidx.drawerlayout.widget.DrawerLayout>
下面更新MainActivity
package com.hafd.catchat;

import androidx.appcompat.app.AppCompatActivity;
import androidx.appcompat.widget.Toolbar;
import androidx.fragment.app.Fragment;
import androidx.fragment.app.FragmentTransaction;
import android.os.Bundle;

public class MainActivity extends AppCompatActivity {

    @Override
    protected void onCreate(Bundle savedInstanceState) {
        super.onCreate(savedInstanceState);
        setContentView(R.layout.activity_main);
        Toolbar toolbar = (Toolbar) findViewById(R.id.toolbar);
        setSupportActionBar(toolbar);

        Fragment fragment = new InboxFragment();
        FragmentTransaction ft = getSupportFragmentManager().beginTransaction();
        ft.add(R.id.content_frame, fragment);
        ft.commit();
    }
}
六、增加抽屉开关
首先增加两个字符串资源来描述打开抽屉和关闭抽屉。
    <string name="nav_open_drawer">Open navigation drawer</string>
    <string name="nav_close_drawer">Close navigation drawer</string>
完整的MainActivity
package com.hafd.catchat;

import androidx.annotation.NonNull;
import androidx.appcompat.app.ActionBarDrawerToggle;
import androidx.appcompat.app.AppCompatActivity;
import androidx.appcompat.widget.Toolbar;
import androidx.core.view.GravityCompat;
import androidx.drawerlayout.widget.DrawerLayout;
import androidx.fragment.app.Fragment;
import androidx.fragment.app.FragmentTransaction;

import android.content.Intent;
import android.os.Bundle;
import android.view.Gravity;
import android.view.MenuItem;

import com.google.android.material.navigation.NavigationView;

public class MainActivity extends AppCompatActivity implements NavigationView.OnNavigationItemSelectedListener {

    @Override
    protected void onCreate(Bundle savedInstanceState) {
        super.onCreate(savedInstanceState);
        setContentView(R.layout.activity_main);
        Toolbar toolbar = (Toolbar) findViewById(R.id.toolbar);
        setSupportActionBar(toolbar);

        //增加一个抽屉开关
        DrawerLayout drawer = (DrawerLayout)findViewById(R.id.drawer_layout);
        ActionBarDrawerToggle toggle = new ActionBarDrawerToggle(this, drawer, toolbar, R.string.nav_open_drawer, R.string.nav_close_drawer);
        drawer.addDrawerListener(toggle);
        toggle.syncState();
        //将活动注册为导航视图的一个监听器
        NavigationView navigationView = (NavigationView)findViewById(R.id.nav_view);
        navigationView.setNavigationItemSelectedListener(this);

        Fragment fragment = new InboxFragment();
        FragmentTransaction ft = getSupportFragmentManager().beginTransaction();
        ft.add(R.id.content_frame, fragment);
        ft.commit();
    }

    //用户单击某一项时会调用这个方法
    @Override
    public boolean onNavigationItemSelected(@NonNull MenuItem item) {
        int id = item.getItemId();
        Fragment fragment = null;
        Intent intent = null;

        if (id == R.id.nav_drafts)fragment = new DraftsFragment();
        else if (id == R.id.nav_sent)fragment = new SentItemsFragment();
        else if (id == R.id.nav_trash)fragment = new TrashFragment();
        else if (id == R.id.nav_help)intent = new Intent(this, HelpActivity.class);
        else if (id == R.id.nav_feedback)intent = new Intent(this, FeedbackActivity.class);
        else fragment = new InboxFragment();

        //根据用户在抽屉中选择的选项,显示相应的片段和活动
        if (fragment != null) {
            FragmentTransaction ft = getSupportFragmentManager().beginTransaction();
            ft.replace(R.id.content_frame, fragment);
            ft.commit();
        }else startActivity(intent);

        DrawerLayout drawer = (DrawerLayout) findViewById(R.id.drawer_layout);
        //用户单击某一项时关闭抽屉
        drawer.closeDrawer(GravityCompat.START);
        return true;
    }

    //后退时,关闭抽屉
    @Override
    public void onBackPressed() {
        DrawerLayout drawer = (DrawerLayout)findViewById(R.id.drawer_layout);
        if (drawer.isDrawerOpen(GravityCompat.START))drawer.closeDrawer(GravityCompat.START);
        else super.onBackPressed();
    }
}
试一试
