Netty场景及其原理
- Netty简化Java NIO的类库的使用,包括Selector、 ServerSocketChannel、 SocketChannel、ByteBuffer,解决了断线重连、 网络闪断、心跳处理、半包读写、 网络拥塞和异常流的处理等。Netty拥有高性能、 吞吐量更高,延迟更低,减少资源消耗,最小化不必要的内存复制等优点。
- Netty通过都作为基础的TCP/UDP的基础通信组件如Dubbo、RocketMQ、Lettuce、ServiceComb等。
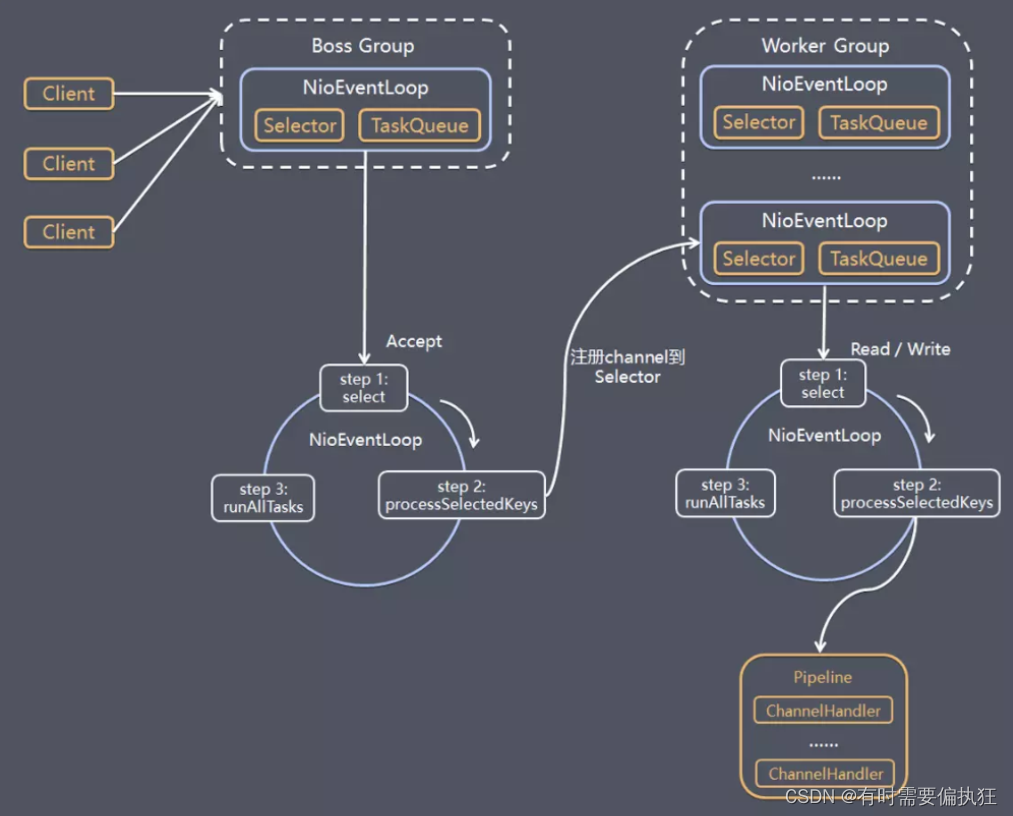
Netty Ractor线程模型
Reactor可以理解为Thread通过死循环的方式处理IO复用返回的事件列表(Socket的Read、Write)。
Netty内部会使用多个Ractor,也就是意味着会使用多Epoll同时运行。
while (true) {
    eventKeys = epoll.pool(timeOut);
    process(eventKeys);
}
NioEventLoop
Ractor的实现,继承SingleThreadEventLoop,内部Hold Thread和一个BlockQueue,会死循环执行io.netty.channel.nio.NioEventLoop#run处理通过io.netty.channel.nio.NioEventLoop#register注册的事件。
    private final Queue<Runnable> taskQueue;// taskQueue
    private final Thread thread; // 用于执行任务的单线程
    protected SingleThreadEventExecutor(
            EventExecutorGroup parent, ThreadFactory threadFactory, boolean addTaskWakesUp, int maxPendingTasks,
            RejectedExecutionHandler rejectedHandler) {
         // ........

        // 线程工厂生成一个线程,并添加Runnable任务,最终内部执行SingleThreadEventExecutor的run方法
        // run将在子类中覆写
        thread = threadFactory.newThread(new Runnable() {
            @Override
            public void run() {
                boolean success = false;
                updateLastExecutionTime();
                try {
                    SingleThreadEventExecutor.this.run();// 执行父类中的run,多态多态啊
                    success = true;
                } catch (Throwable t) {
                    logger.warn("Unexpected exception from an event executor: ", t);
                } finally {
                   // ......
            }
        });
          //....................
    }
SingleThreadEventExecutor.this.run()
     for (;;) {
            try {
                switch (selectStrategy.calculateStrategy(selectNowSupplier, hasTasks())) {
                    case SelectStrategy.CONTINUE:
                        continue;
                    case SelectStrategy.SELECT:
                        select(wakenUp.getAndSet(false));
                        // ....
                        if (wakenUp.get()) {
                            selector.wakeup();
                        }
                    default:
                        // fallthrough
                }

                cancelledKeys = 0;
                needsToSelectAgain = false;
                final int ioRatio = this.ioRatio;
                if (ioRatio == 100) {
                    try {
                        processSelectedKeys(); // 处理Selctor就绪的任务
                    } finally {
                        // Ensure we always run tasks.
                        runAllTasks(); // 事件循环主要,每次EventLoop完成后都执行一次,可以从外部添加Task
                    }
                } else {
                    final long ioStartTime = System.nanoTime();
                    try {
                        processSelectedKeys();
                    } finally {
                        // Ensure we always run tasks.
                        final long ioTime = System.nanoTime() - ioStartTime;
                        runAllTasks(ioTime * (100 - ioRatio) / ioRatio);
                    }
                }
            } catch (Throwable t) {
                handleLoopException(t);
            }
           // ..........
        }
每新建一个Channel,只会选择只选择一个 NioEventLoop 与其绑定。所以说Channel生命周期的所有事件处理都是线程独立的,不同的 NioEventLoop线程之间不会发生任何交集。
- select(wakenUp.getAndSet(false)),不断地轮询是否有IO事件发生,并且在轮询的过程中不断检查是否有定时任务和普通任务,保证了netty的任务队列中的任务得到有效执行,轮询过程顺带用一个计数器避开了了jdk空轮询的bug,过程清晰明了
Netty的任务分为三种:
-
普通任务:通过 NioEventLoop 的 execute() 方法向任务队列 taskQueue 中添加任务。例如 Netty 在写数据时会封装 WriteAndFlushTask 提交给 taskQueue。taskQueue 的实现类是多生产者单消费者队列 MpscChunkedArrayQueue,在多线程并发添加任务时,可以保证线程安全。
// NioEventLoop 继承 SingleThreadEventLoop 实现了Execute接口 public void NioEventLoop#execute(Runnable task) { boolean inEventLoop = inEventLoop(); addTask(task); // 添加任务到阻塞队列中,在run方法中执行完IO的Select任务,就会执行task,其中schame提交的定时任务也会在这里执行 } -
定时任务:通过调用 NioEventLoop 的 schedule() 方法向定时任务队列 scheduledTaskQueue 添加一个定时任务,用于周期性执行该任务。例如,心跳消息发送等。定时任务队列 scheduledTaskQueue 采用优先队列 PriorityQueue 实现。
-
尾部队列:tailTasks 相比于普通任务队列优先级较低,在每次执行完 taskQueue 中任务后会去获取尾部队列中任务执行。尾部任务并不常用,主要用于做一些收尾工作,例如统计事件循环的执行时间、监控信息上报等。
EventLoopGroup
可持有多个NioEventLoop和一个Exectors来全异步处理请求,EventLoopGroup bossGroup = new NioEventLoopGroup(1);
NioEventLoopGroup(int nThreads,
                  Executor executor,
                  EventExecutorChooserFactory chooserFactory,
                  final SelectorProvider selectorProvider,
                  final SelectStrategyFactory selectStrategyFactory,
                  final RejectedExecutionHandler rejectedExecutionHandler)
nThread: 确定使用多少个NioEnventLoop,每个EventLoop会占用一个Thread
      children = new EventExecutor[nThreads];
        for (int i = 0; i < nThreads; i ++) {
            boolean success = false;
            try {
                children[i] = newChild(executor, args);
                success = true;
            } catch (Exception e) {
                // TODO: Think about if this is a good exception type
                throw new IllegalStateException("failed to create a child event loop", e);
            } finally {
            }
        }
/*
1、executor:异步执行的线程池,不设置则默认使用new ThreadPerTaskExecutor(newDefaultThreadFactory()),线程池的名字为       DefaultThreadFactory-#子增值

2、selectorProvider:生成IO复用类的工厂,默认使用SelectorProvider.provider()

3、selectStrategyFactory:默认是DefaultSelectStrategy.INSTANCE控制Select几个方法执行的策略,如果有就绪事件则直接处理,否则   执行select等待

4、rejectedExecutionHandler:默认是io.netty.util.concurrent.RejectedExecutionHandlers直接抛出异常,EventLoop是单个Thread,除了执行Epoll.pool外,还需要执行传入的Task,如果阻塞队列满了,或者Task执行失败,则会调用此方法。
     Object... args传参,调用方和被调用方前后定义好契约,在使用的时候可以使用Index访问,减少形参的编写。
    protected EventLoop newChild(Executor executor, Object... args) throws Exception {
        return new NioEventLoop(this, executor, (SelectorProvider) args[0],
            ((SelectStrategyFactory) args[1]).newSelectStrategy(), (RejectedExecutionHandler) args[2]);
    }
*/
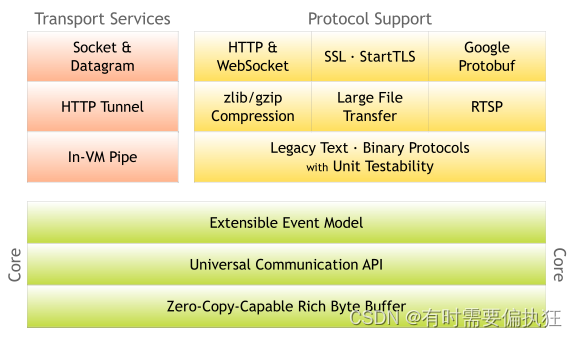
https://netty.io/
The Netty project is an effort to provide an asynchronous event-driven network application framework and tooling for the rapid development of maintainable high-performance and high-scalability protocol servers and clients.
In other words, Netty is an NIO client server framework that enables quick and easy development of network applications such as protocol servers and clients. It greatly simplifies and streamlines network programming such as TCP and UDP socket server development.
https://netty.io/3.8/guide/#architecture
ServerBootstrap、Bootstrap
阅读源代码,应该先从接口,抽象类开始搞起来,都是基于接口的编程模式执行的。
NioEventLoop-Reactor实现
EventLoop是reactor(定义selector->监听事件并注册回调方法->触发则调用对应的回调方法)模型的实现接口,具体的实现类有NioEventLoop、EpollEventLoop等,其中NioEventLoop使用最广泛,因此重点讲解此处的原理。以下是NioEventLoop类继承关系图,看似比较复杂,但是从关键的几个方法入手就比较简单。图中可以看出NioEventLoop最终需要实现Executor#excute方法,而excute方法会被外部类通过submit调用,进而执行Runnable任务(外部可以调用多次执行多个Runnable任务,但是最基本的事件循环任务是默认的任务,始终会执行)。不用多想Runnable任务肯定通过new Thread(Runnable).start的形式被调用,在某个线程中执行。因此如果要分析此类,我们应该重点关注excute方法,Thread如何创建、最终的Runable任务是如何被包装起来的。
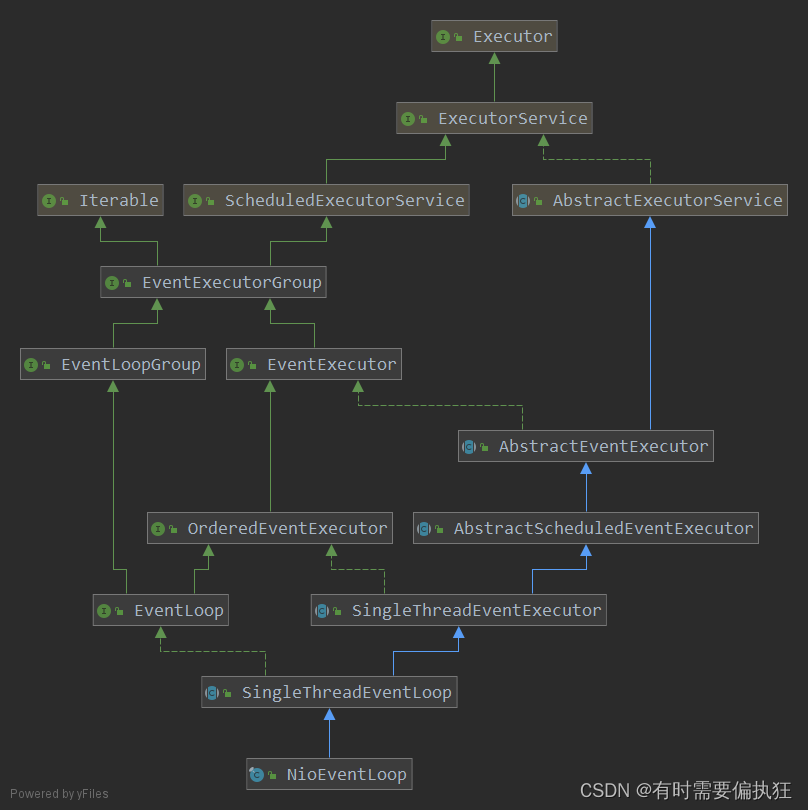
NioEventLoop继承SingleThreadEventExectExecutor,从名字中就可以看出,此任务是在单线程中执行的,其他所做的包装都是为了可以更加安全高效的执行任务,下面我们一一分析,首先看execute的具体实现。
execute具体实现
SingleThreadEventExecutor#execute对应具体的实现。
    private final Queue<Runnable> taskQueue;// taskQueue
    private final Thread thread; // 用于执行任务的单线程

@Override
    public void execute(Runnable task) {
        if (task == null) {
            throw new NullPointerException("task");
        }

        boolean inEventLoop = inEventLoop();// 当前线程正是执行EventLoop的Thread
        if (inEventLoop) {
            addTask(task); // 添加task
        } else {
            startThread(); // 这里会执行runnable方法
            addTask(task);
            if (isShutdown() && removeTask(task)) {
                reject();
            }
        }

        if (!addTaskWakesUp && wakesUpForTask(task)) {
            wakeup(inEventLoop);
        }
    }
public boolean inEventLoop() {
        return inEventLoop(Thread.currentThread());
    }
    private void startThread() {
        if (STATE_UPDATER.get(this) == ST_NOT_STARTED) {
            if (STATE_UPDATER.compareAndSet(this, ST_NOT_STARTED, ST_STARTED)) {
                thread.start();
            }
        }
    }
-
inEventLoop用来判断是否在运行的thread中添加新的task,如果是的,则直接将其添加到taskQueue中;否则startThread,并将task添加到taskQueue中。
-
startThread会通过cas操作判断thread是否已经start,如果没有,则启动。thread启动后会执行selector任务和用户自定义任务。如果在用户自定义任务中再创建任务,则inEventLoop返回true。
-
thread是SingleThreadEventExecutor最重要的filed,这里仅仅包含一个thread,因此全部的任务都需要在此thread内部执行,当SingleThreadEventExecutor被构造的时候,会初始化thread,thread中的Runnable包装了
SingleThreadEventExecutor.this.run()方法,主要实现逻辑在这个方法中,而SingleThreadEventExecutor中protected abstract void run()是抽象方法,具体的实现在NioEventLoop中,继续分析具体实现。protected SingleThreadEventExecutor( EventExecutorGroup parent, ThreadFactory threadFactory, boolean addTaskWakesUp, int maxPendingTasks, RejectedExecutionHandler rejectedHandler) { // ........ // 线程工厂生成一个线程,并添加Runnable任务,最终内部执行SingleThreadEventExecutor的run方法 // run将在子类中覆写 thread = threadFactory.newThread(new Runnable() { @Override public void run() { boolean success = false; updateLastExecutionTime(); try { SingleThreadEventExecutor.this.run();// 执行父类中的run,多态多态啊 success = true; } catch (Throwable t) { logger.warn("Unexpected exception from an event executor: ", t); } finally { // ...... } }); //.................... }-
NioEventLoop#run才是最终的任务,其过程如下
select(wakenUp.getAndSet(false))是IO复用器,其会返回就绪的事件,并根据返回的结果处理processSelectedKeys()。runAllTasks()将执行其他的任务,这个和前面的taskQueue域息息相关。也就是说这个thread中不仅仅可以处理selector的IO复用任务,还可以中执行一些位于taskQueue中的Other Tasks。因此多出了一个变量ioRatio,来控制IO复用任务和其他任务分别占用thread的比例。当ioRatio==100的时候,则执行processSelectedKeys后,并执行全部的Other Tasks,如果Other Tasks中的某个task比较耗时,那么会影响selector的效率,进而影响Netty的响应速度,所以ioRatio默认为50,这样处理完processSelectedKeys后,可以控制执行Other Tasks的时间。@Override protected void run() { for (;;) { try { switch (selectStrategy.calculateStrategy(selectNowSupplier, hasTasks())) { case SelectStrategy.CONTINUE: continue; case SelectStrategy.SELECT: select(wakenUp.getAndSet(false)); // 'wakenUp.compareAndSet(false, true)' is always evaluated // before calling 'selector.wakeup()' to reduce the wake-up // overhead. (Selector.wakeup() is an expensive operation.) // // However, there is a race condition in this approach. // The race condition is triggered when 'wakenUp' is set to // true too early. // // 'wakenUp' is set to true too early if: // 1) Selector is waken up between 'wakenUp.set(false)' and // 'selector.select(...)'. (BAD) // 2) Selector is waken up between 'selector.select(...)' and // 'if (wakenUp.get()) { ... }'. (OK) // // In the first case, 'wakenUp' is set to true and the // following 'selector.select(...)' will wake up immediately. // Until 'wakenUp' is set to false again in the next round, // 'wakenUp.compareAndSet(false, true)' will fail, and therefore // any attempt to wake up the Selector will fail, too, causing // the following 'selector.select(...)' call to block // unnecessarily. // // To fix this problem, we wake up the selector again if wakenUp // is true immediately after selector.select(...). // It is inefficient in that it wakes up the selector for both // the first case (BAD - wake-up required) and the second case // (OK - no wake-up required). if (wakenUp.get()) { selector.wakeup(); } default: // fallthrough } cancelledKeys = 0; needsToSelectAgain = false; final int ioRatio = this.ioRatio; if (ioRatio == 100) { try { processSelectedKeys(); // 处理Selctor就绪的任务 } finally { // Ensure we always run tasks. runAllTasks(); // 事件循环主要,每次EventLoop完成后都执行一次,可以从外部添加Task } } else { final long ioStartTime = System.nanoTime(); try { processSelectedKeys(); } finally { // Ensure we always run tasks. final long ioTime = System.nanoTime() - ioStartTime; runAllTasks(ioTime * (100 - ioRatio) / ioRatio); } } } catch (Throwable t) { handleLoopException(t); } // .......... } }
-
-
select(wakenUp.getAndSet(false));首先,通过
openSelector()方法创建一个新的selector,然后执行一个死循环,只要执行过程中出现过一次并发修改selectionKeys异常,就重新开始转移具体的转移步骤为
1. 拿到有效的key
2. 取消该key在旧的selector上的事件注册
3. 将该key对应的channel注册到新的selector上
4. 重新绑定channel和新的key的关系
转移完成之后,就可以将原有的selector废弃,后面所有的轮询都是在新的selector进行
最后,我们总结reactor线程select步骤做的事情:不断地轮询是否有IO事件发生,并且在轮询的过程中不断检查是否有定时任务和普通任务,保证了netty的任务队列中的任务得到有效执行,轮询过程顺带用一个计数器避开了了jdk空轮询的bug,过程清晰明了
由于篇幅原因,下面两个过程将分别放到一篇文章中去讲述,尽请期待
-
processSelectedKeys()中是处理网络事件的全部操作,这是最重要的方法,从这里可以看出Netty是如何封装select的。那就看看到底select是如何处理的。
private void processSelectedKeys() { if (selectedKeys != null) { processSelectedKeysOptimized(selectedKeys.flip()); } else { processSelectedKeysPlain(selector.selectedKeys()); } } private SelectedSelectionKeySet selectedKeys; // 到底就绪的keys是如何被调用的哦? private Selector openSelector() { final Selector selector; try { selector = provider.openSelector(); } catch (IOException e) { throw new ChannelException("failed to open a new selector", e); } if (DISABLE_KEYSET_OPTIMIZATION) { return selector; } final SelectedSelectionKeySet selectedKeySet = new SelectedSelectionKeySet(); Object maybeSelectorImplClass = AccessController.doPrivileged(new PrivilegedAction<Object>() { @Override public Object run() { try { return Class.forName( "sun.nio.ch.SelectorImpl", false, PlatformDependent.getSystemClassLoader()); } catch (ClassNotFoundException e) { return e; } catch (SecurityException e) { return e; } } }); if (!(maybeSelectorImplClass instanceof Class) || // ensure the current selector implementation is what we can instrument. !((Class<?>) maybeSelectorImplClass).isAssignableFrom(selector.getClass())) { if (maybeSelectorImplClass instanceof Exception) { Exception e = (Exception) maybeSelectorImplClass; logger.trace("failed to instrument a special java.util.Set into: {}", selector, e); } return selector; } final Class<?> selectorImplClass = (Class<?>) maybeSelectorImplClass; Object maybeException = AccessController.doPrivileged(new PrivilegedAction<Object>() { @Override public Object run() { try { Field selectedKeysField = selectorImplClass.getDeclaredField("selectedKeys"); Field publicSelectedKeysField = selectorImplClass.getDeclaredField("publicSelectedKeys"); selectedKeysField.setAccessible(true); publicSelectedKeysField.setAccessible(true); selectedKeysField.set(selector, selectedKeySet); publicSelectedKeysField.set(selector, selectedKeySet); return null; } catch (NoSuchFieldException e) { return e; } catch (IllegalAccessException e) { return e; } catch (RuntimeException e) { // JDK 9 can throw an inaccessible object exception here; since Netty compiles // against JDK 7 and this exception was only added in JDK 9, we have to weakly // check the type if ("java.lang.reflect.InaccessibleObjectException".equals(e.getClass().getName())) { return e; } else { throw e; } } } }); if (maybeException instanceof Exception) { selectedKeys = null; Exception e = (Exception) maybeException; logger.trace("failed to instrument a special java.util.Set into: {}", selector, e); } else { selectedKeys = selectedKeySet; logger.trace("instrumented a special java.util.Set into: {}", selector); } return selector; } private void processSelectedKeysOptimized(SelectionKey[] selectedKeys) { for (int i = 0;; i ++) { final SelectionKey k = selectedKeys[i]; if (k == null) { break; } // null out entry in the array to allow to have it GC'ed once the Channel close // See https://github.com/netty/netty/issues/2363 selectedKeys[i] = null; final Object a = k.attachment(); if (a instanceof AbstractNioChannel) { processSelectedKey(k, (AbstractNioChannel) a); } else { @SuppressWarnings("unchecked") NioTask<SelectableChannel> task = (NioTask<SelectableChannel>) a; processSelectedKey(k, task); } if (needsToSelectAgain) { // null out entries in the array to allow to have it GC'ed once the Channel close // See https://github.com/netty/netty/issues/2363 for (;;) { i++; if (selectedKeys[i] == null) { break; } selectedKeys[i] = null; } selectAgain(); // Need to flip the optimized selectedKeys to get the right reference to the array // and reset the index to -1 which will then set to 0 on the for loop // to start over again. // // See https://github.com/netty/netty/issues/1523 selectedKeys = this.selectedKeys.flip(); i = -1; } } } // 处理SelectionKey的最终方法 private static void processSelectedKey(SelectionKey k, NioTask<SelectableChannel> task) { int state = 0; try { task.channelReady(k.channel(), k); state = 1; } catch (Exception e) { k.cancel(); invokeChannelUnregistered(task, k, e); state = 2; } finally { switch (state) { case 0: k.cancel(); invokeChannelUnregistered(task, k, null); break; case 1: if (!k.isValid()) { // Cancelled by channelReady() invokeChannelUnregistered(task, k, null); } break; } } } -
SingleThreadEventExecutor#runAllTasks(),task全部存储在taskQueue中,这里通过for循环执行全部的Task。runAllTasks(long timeoutNanos)则会记录任务运行的时候,如果超时则退出,防止Task执行时间过长。到此execute内部大概的实现逻辑讲清楚了,明白任务都是在execute处理,先处理selector事件,然后处理用户添加的任务。
protected boolean runAllTasks() {
        boolean fetchedAll;
        do {
            fetchedAll = fetchFromScheduledTaskQueue();
            Runnable task = pollTask();// 从taskQueue头部获取任务
            if (task == null) {
                return false;
            }

            for (;;) {
                try {
                    task.run();// 执行task
                } catch (Throwable t) {
                    logger.warn("A task raised an exception.", t);
                }

                task = pollTask();
                if (task == null) {
                    break;
                }
            }
        } while (!fetchedAll); // keep on processing until we fetched all scheduled tasks.

        lastExecutionTime = ScheduledFutureTask.nanoTime();
        return true;
    }
    private boolean fetchFromScheduledTaskQueue() {
        long nanoTime = nanoTime();
        Runnable scheduledTask  = pollScheduledTask(nanoTime);
        while (scheduledTask != null) {
            if (!taskQueue.offer(scheduledTask)) {
                // No space left in the task queue add it back to the scheduledTaskQueue so we pick it up again.
                scheduledTaskQueue().add((ScheduledFutureTask<?>) scheduledTask);
                return false;
            }
            scheduledTask  = pollScheduledTask(nanoTime);
        }
        return true;
    }
protected boolean runAllTasks(long timeoutNanos) {
        fetchFromScheduledTaskQueue();
        Runnable task = pollTask();
        if (task == null) {
            return false;
        }

        final long deadline = ScheduledFutureTask.nanoTime() + timeoutNanos;
        long runTasks = 0;
        long lastExecutionTime;
        for (;;) {
            try {
                task.run();
            } catch (Throwable t) {
                logger.warn("A task raised an exception.", t);
            }

            runTasks ++;

            // Check timeout every 64 tasks because nanoTime() is relatively expensive.
            // XXX: Hard-coded value - will make it configurable if it is really a problem.
            if ((runTasks & 0x3F) == 0) {
                lastExecutionTime = ScheduledFutureTask.nanoTime();
                if (lastExecutionTime >= deadline) {
                    break;
                }
            }

            task = pollTask();
            if (task == null) {
                lastExecutionTime = ScheduledFutureTask.nanoTime();
                break;
            }
        }

        this.lastExecutionTime = lastExecutionTime;
        return true;
    }
-
NioEventLoopGroup
从命名可以看出是用来管理NioEventLoop集合的,在多个线程里面跑多个EventLoop。分析这个也很关键。
Channel
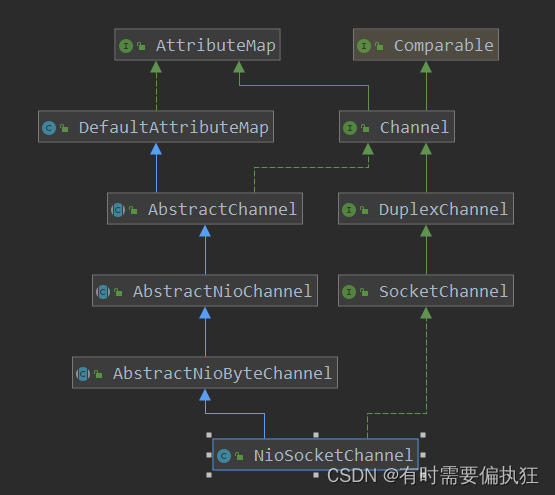
Channel的具体实现,内部包含了很多抽象类,Channel对应一条具体的连接
NioServerSocketChannel
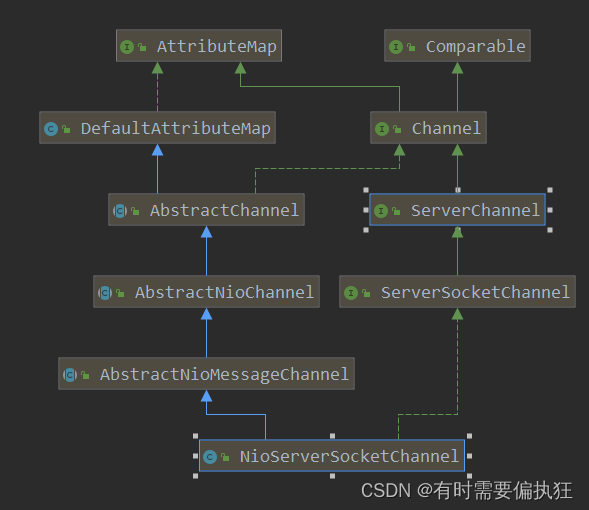
NioServerSocketChannel是Channel的具体实现,内部包含了很多抽象类,Channel对应一条具体的连接。包含ChannelHandler
ChannelHandler
ChannelHandler
Netty各种编码的处理最终肯定都实现此类。
ChannelHandler
定义了Handler最基本接口。
void handlerAdded(ChannelHandlerContext ctx) throws Exception;
void handlerRemoved(ChannelHandlerContext ctx) throws Exception;
void exceptionCaught(ChannelHandlerContext ctx, Throwable cause) throws Exception;
    @Inherited
    @Documented
    @Target(ElementType.TYPE)
    @Retention(RetentionPolicy.RUNTIME)
    @interface Sharable {
        // no value
    }
- ChannelHandler接口含有三个方法,分别对应ChannelHandler在成功添加、成功移除、发生异常的时候调用。
- Sharable注解后续好好学习?????
ChannelInboundHandler
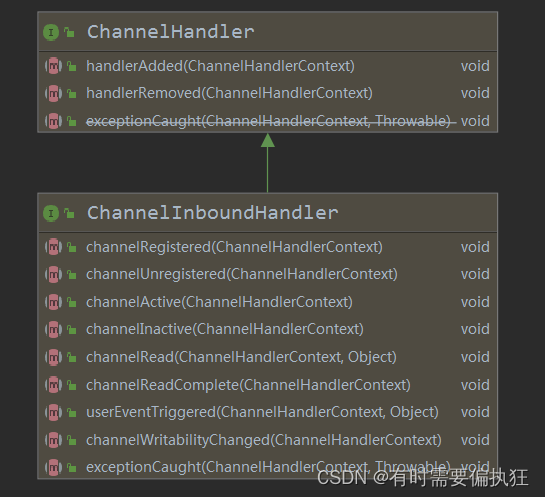
这就是面向接口的抽象编程,高度抽象,使得类与类直接可以做到松耦合。继承ChannelHandler接口,并增加了可读事件需要实现的几个方法。分别对应Handler被成功Register、成功Unregister、Read、ReadComplete等。
ChannelOutboundHandler
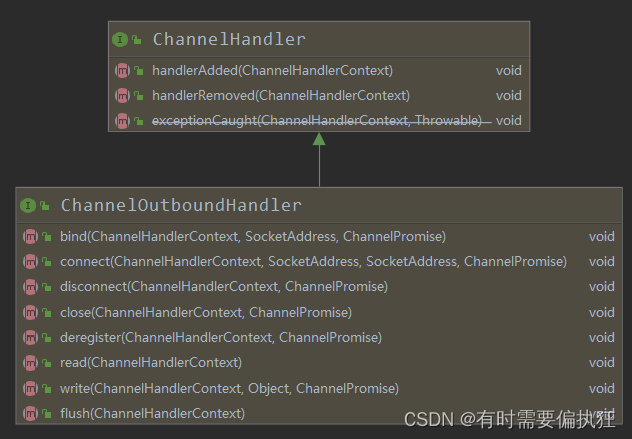
这就是面向接口的抽象编程,高度抽象,使得类与类直接可以做到松耦合。继承ChannelHandler接口,并增加了可写事件需要实现的几个方法。当bind成功、connect成功或者close的时候,对应的回调方法会被执行。
ChannelHandlerContext
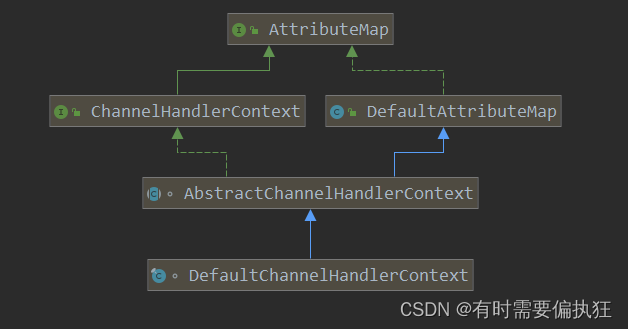
每个ChannelHandler最终会存放在ChannelHandlerContext中,其中DefaultChannelHandlerContext是一种接口的一种实现,为了让Pipe和ChannelHandler可以交互,通过Context类将二者通过组合模式弄到一起。最重要的是AbstractChannelHandlerContext中包含了下面两个Filed,通过者两个域,最终将Pipe中的Handler通过双向链表连接在一起。
	volatile AbstractChannelHandlerContext next;//next和prev构成双向链表存储handler
	volatile AbstractChannelHandlerContext prev;
    private final boolean inbound; // 当前Handler属于inbound还是outbound判断的方式也很简单
    private final boolean outbound;
    private final DefaultChannelPipeline pipeline;// 存储当前pipe的引用 N
    private final String name; // Hander的名字必须唯一
    private final boolean ordered;
private static boolean isInbound(ChannelHandler handler) {
        return handler instanceof ChannelInboundHandler;
    }

    private static boolean isOutbound(ChannelHandler handler) {
        return handler instanceof ChannelOutboundHandler;
    }
判断类型也很简单,直接通过instanceof判断继承的类型即可。
DefaultChannelHandlerContext中存放了handler的private final ChannelHandler handler句柄,客户端实现对应的handler方法将存储在这里,最后被调用。
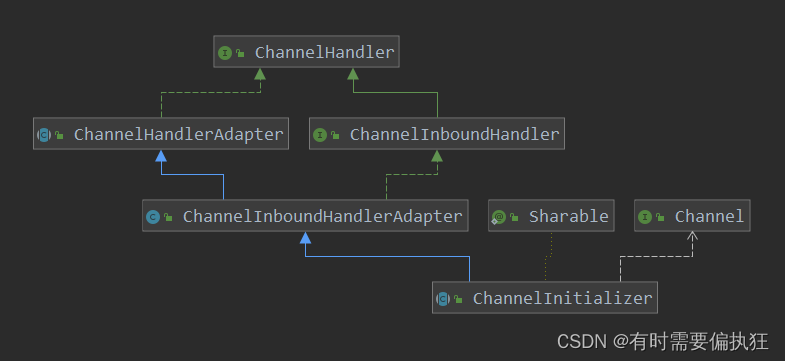
每个有效连接会是一个Channel, Channel存储了和连接相关的全部信息,具体的实现包括NioSocket和NioServerSocketChannel,ChannelInitializer用于辅助初始化Channel。这里面的实现都包括大量的成员域。
逻辑相当的复杂。
包括如下重要:
EventLoop eventLoop(); // Channel位于哪个事件循环
ChannelPipeline pipeline();// Channel对应的pipeline
Pipe管道,顾名思义这个类就用来存储对应的处理方法的,当某个事件就绪后,会依次调用这个里面的方法处理。
在Netty中一条有效连接(客户端和服务器某个端口的成功连接)叫做Channel,当Channel中事件就绪后调用的处理逻辑叫做ChannelPipeline里面存放的都是ChannelHandler,使用双向链表将ChannelHandler连接起来。其中双向链表的节点叫做ChannelHandlerContext
构造方法是如何传递进去的?
Pipeline中会存储AbstractChannelHandlerContext,根据传入的Handler来辨别是inbound还是outbound。
ChannelPipeline
每个Channel就绪事件可分为inbound event(对应可读,读入之后调用的Handler对应ChannelInboundHandler)和outbound event(可写,写出之前调用的Handler对应ChannelOutboundHandler)。ChannelPipeline称为管道,通过双向链表存储了这些ChannelHandler(包装在ChannelHandlerContext中)类。最后事件就绪将遍历Pipe上相应的Handler处理。
ChannelPipeline
定义了Pipe抽象的方法,有如下重要方法:
// 链表结尾添加hander
ChannelPipeline addLast(String name, ChannelHandler handler);
// 链表头部添加hander
ChannelPipeline addFirst(String name, ChannelHandler handler);
DefaultChannelPipeline
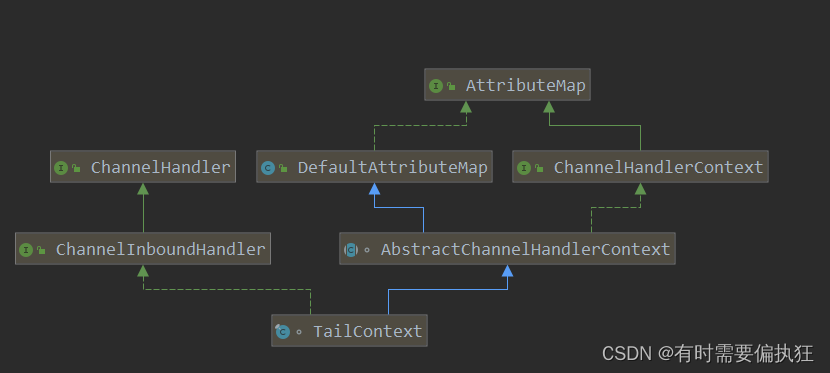
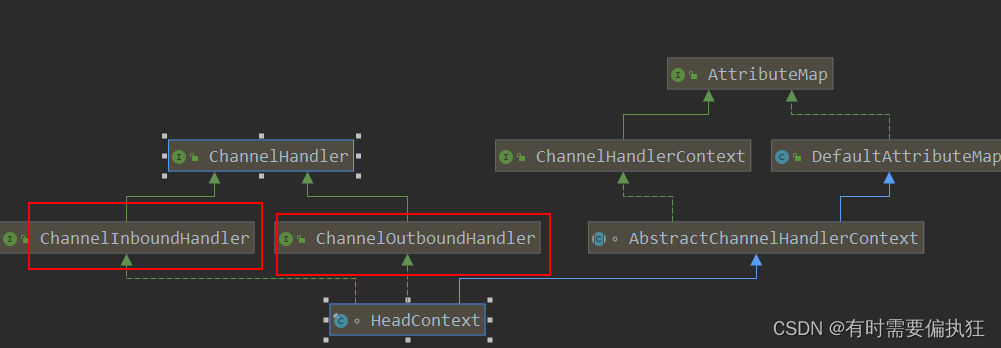
ChannelPipeline的具体实现,内部定义了双向链表的头节点和尾部节点。后续每次将Handler添加到DefaultChannelPipeline上都会将Handler包装成ChannelHandlerContext并插入到双向链表中,下面将详细分析头节点、尾部节点以及增加和删除Handler的过程。
在这里插入图片描述
    final AbstractChannelHandlerContext head;// 尾节点
    final AbstractChannelHandlerContext tail;// 头节点
    private final Channel channel; // 关联Pipe对应的channel
    protected DefaultChannelPipeline(Channel channel) {
        this.channel = ObjectUtil.checkNotNull(channel, "channel");

        tail = new TailContext(this);//
        head = new HeadContext(this);

        head.next = tail;
        tail.prev = head;
    }
     //内部类,标记头结点
    final class HeadContext extends AbstractChannelHandlerContext
            implements ChannelOutboundHandler, ChannelInboundHandler {

    }
    //内部类,标记尾结点
	final class TailContext extends AbstractChannelHandlerContext implements ChannelInboundHandler {

        TailContext(DefaultChannelPipeline pipeline) {
            super(pipeline, null, TAIL_NAME, true, false);
            setAddComplete();
        }
   }
- 当DefaultChannelPipeline构造的时候,会自动创建tail和head节点,后续的Handler都加入这个双向链表。具体细节地方先不深究,这里先大概了解原理先。
    public final ChannelPipeline addLast(String name, ChannelHandler handler) {
        return addLast(null, name, handler);
    }
@Override
    public final ChannelPipeline addLast(EventExecutorGroup group, String name, ChannelHandler handler) {
        final AbstractChannelHandlerContext newCtx;
        synchronized (this) {
            checkMultiplicity(handler);

            newCtx = newContext(group, filterName(name, handler), handler);

            addLast0(newCtx);

            // If the registered is false it means that the channel was not registered on an eventloop yet.
            // In this case we add the context to the pipeline and add a task that will call
            // ChannelHandler.handlerAdded(...) once the channel is registered.
            if (!registered) {
                newCtx.setAddPending();
                callHandlerCallbackLater(newCtx, true);
                return this;
            }

            EventExecutor executor = newCtx.executor();
            if (!executor.inEventLoop()) {
                newCtx.setAddPending();
                executor.execute(new Runnable() {
                    @Override
                    public void run() {
                        callHandlerAdded0(newCtx);
                    }
                });
                return this;
            }
        }
        callHandlerAdded0(newCtx);
        return this;
    }

    private void addLast0(AbstractChannelHandlerContext newCtx) {
        AbstractChannelHandlerContext prev = tail.prev;
        newCtx.prev = prev;
        newCtx.next = tail;
        prev.next = newCtx;
        tail.prev = newCtx;
    }
-
从上面可以看出addLast添加一个Handler都会经过以下几步骤:
-
checkMultiplicity,首先判断Handler是否之前已经加入过链表,如果不为Sharable,且之前已经加入,则抛出异常。isSharable()的逻辑也比较简单,通过反射的方式或者Handler是否加了@Sharable注解。为了性能的极致,isSharable()中竟然还使用了获取Map缓存状态,减少反射的开支。
学习什么是WeakHashMap?
学习ThreadLocal?private static void checkMultiplicity(ChannelHandler handler) { if (handler instanceof ChannelHandlerAdapter) { ChannelHandlerAdapter h = (ChannelHandlerAdapter) handler; if (!h.isSharable() && h.added) { throw new ChannelPipelineException( h.getClass().getName() + " is not a @Sharable handler, so can't be added or removed multiple times."); } h.added = true; } } public boolean isSharable() { /** * Cache the result of {@link Sharable} annotation detection to workaround a condition. We use a * {@link ThreadLocal} and {@link WeakHashMap} to eliminate the volatile write/reads. Using different * {@link WeakHashMap} instances per {@link Thread} is good enough for us and the number of * {@link Thread}s are quite limited anyway. * * See <a href="https://github.com/netty/netty/issues/2289">#2289</a>. */ Class<?> clazz = getClass();//获取the runtime class of this Object Map<Class<?>, Boolean> cache = InternalThreadLocalMap.get().handlerSharableCache(); // 获取存储在当前线程ThreadLocal中的WeakHashMap,防止竞争关系,因为Handler通常会在一个线程中加。这里需要 Boolean sharable = cache.get(clazz);//从WeakHashMap中获取状态 if (sharable == null) {//没有缓存,则获取状态并缓存。 sharable = clazz.isAnnotationPresent(Sharable.class);//通过反射获取注解 cache.put(clazz, sharable); } return sharable; } -
newContext,则会通过Handler并创建DefaultChannelHandlerContext。filterName用于确保Handler的名字是唯一的。
newCtx = newContext(group, filterName(name, handler), handler);
private AbstractChannelHandlerContext newContext(EventExecutorGroup group, String name, ChannelHandler handler) {
        return new DefaultChannelHandlerContext(this, childExecutor(group), name, handler);
    }
    DefaultChannelHandlerContext(
            DefaultChannelPipeline pipeline, EventExecutor executor, String name, ChannelHandler handler) {
        super(pipeline, executor, name, isInbound(handler), isOutbound(handler));
        if (handler == null) {
            throw new NullPointerException("handler");
        }
        this.handler = handler;
    }
通过handler会构造DefaultChannelHandlerContext,
isInbound(handler), isOutbound(handler)则用于判断当前Handler对应in event还是out event。通过Handler继承哪个类直接判断属于什么类型。private static boolean isInbound(ChannelHandler handler) { return handler instanceof ChannelInboundHandler; } private static boolean isOutbound(ChannelHandler handler) { return handler instanceof ChannelOutboundHandler; } -
addLast0(newCtx),将DefaultChannelHandlerContext加入双向链表保存。
private void addLast0(AbstractChannelHandlerContext newCtx) { AbstractChannelHandlerContext prev = tail.prev; newCtx.prev = prev; newCtx.next = tail; prev.next = newCtx; tail.prev = newCtx; } -
后续的逻辑则用于执行Handler加入成功之后的回调方法,这个回调方法在客户端实现Handler类的时候通过Override接口方法,则在这里就会被成功调用,可以用于记录日志信息。这就是通过接口编程的好处,这里是面向接口的编程。回调方法的调用形式有两种,如果在EventLoop线程中添加的Handler,则会将添加成功的回调方法封装成Task任务的模式。
-
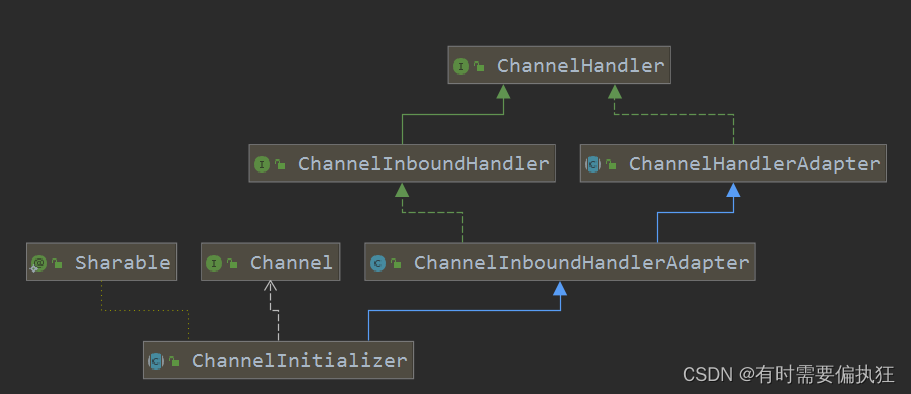
ChannelInitializer
前面已经很清楚的讲解了Channel、ChannelHandler、ChannelPipe,而这里的ChannelInitializer属于工具类,用客户更加方便的初始化Channel。
new ChannelInitializer<SocketChannel>() {
                    @Override
                    public void initChannel(SocketChannel ch) throws Exception {
                        ch.pipeline()
                            .addLast(defaultEventExecutorGroup, HANDSHAKE_HANDLER_NAME, handshakeHandler)
                            .addLast(defaultEventExecutorGroup,
                                encoder,
                                new NettyDecoder(),
                                new IdleStateHandler(0, 0, nettyServerConfig.getServerChannelMaxIdleTimeSeconds()),
                                connectionManageHandler,
                                serverHandler
                            );
                    }
                }
重点在于这里的ChannelInitializer构造,复写的initChannel方法将会被父类的channelRegistered调用。
ByteBuf
解决粘包问题
LineBasedFrameDecoder


![linux使用操作[1]](https://img-blog.csdnimg.cn/c2be5a64cbe543d1b7a7cc8f4b20dc87.png)
