文章目录
- 前言
- 效果图
- 正文
- toolbar 用于定义应用程序的导航栏
- app_bar
- drawer_layout 用于创建侧边栏导航
- nav_header_draw
- app:menu="@menu/activity_main_drawer"
前言
本篇内容主要是自己实现侧边栏后的一些总结,部分理论来着网络和ai助手,如有错误,欢迎大佬指点
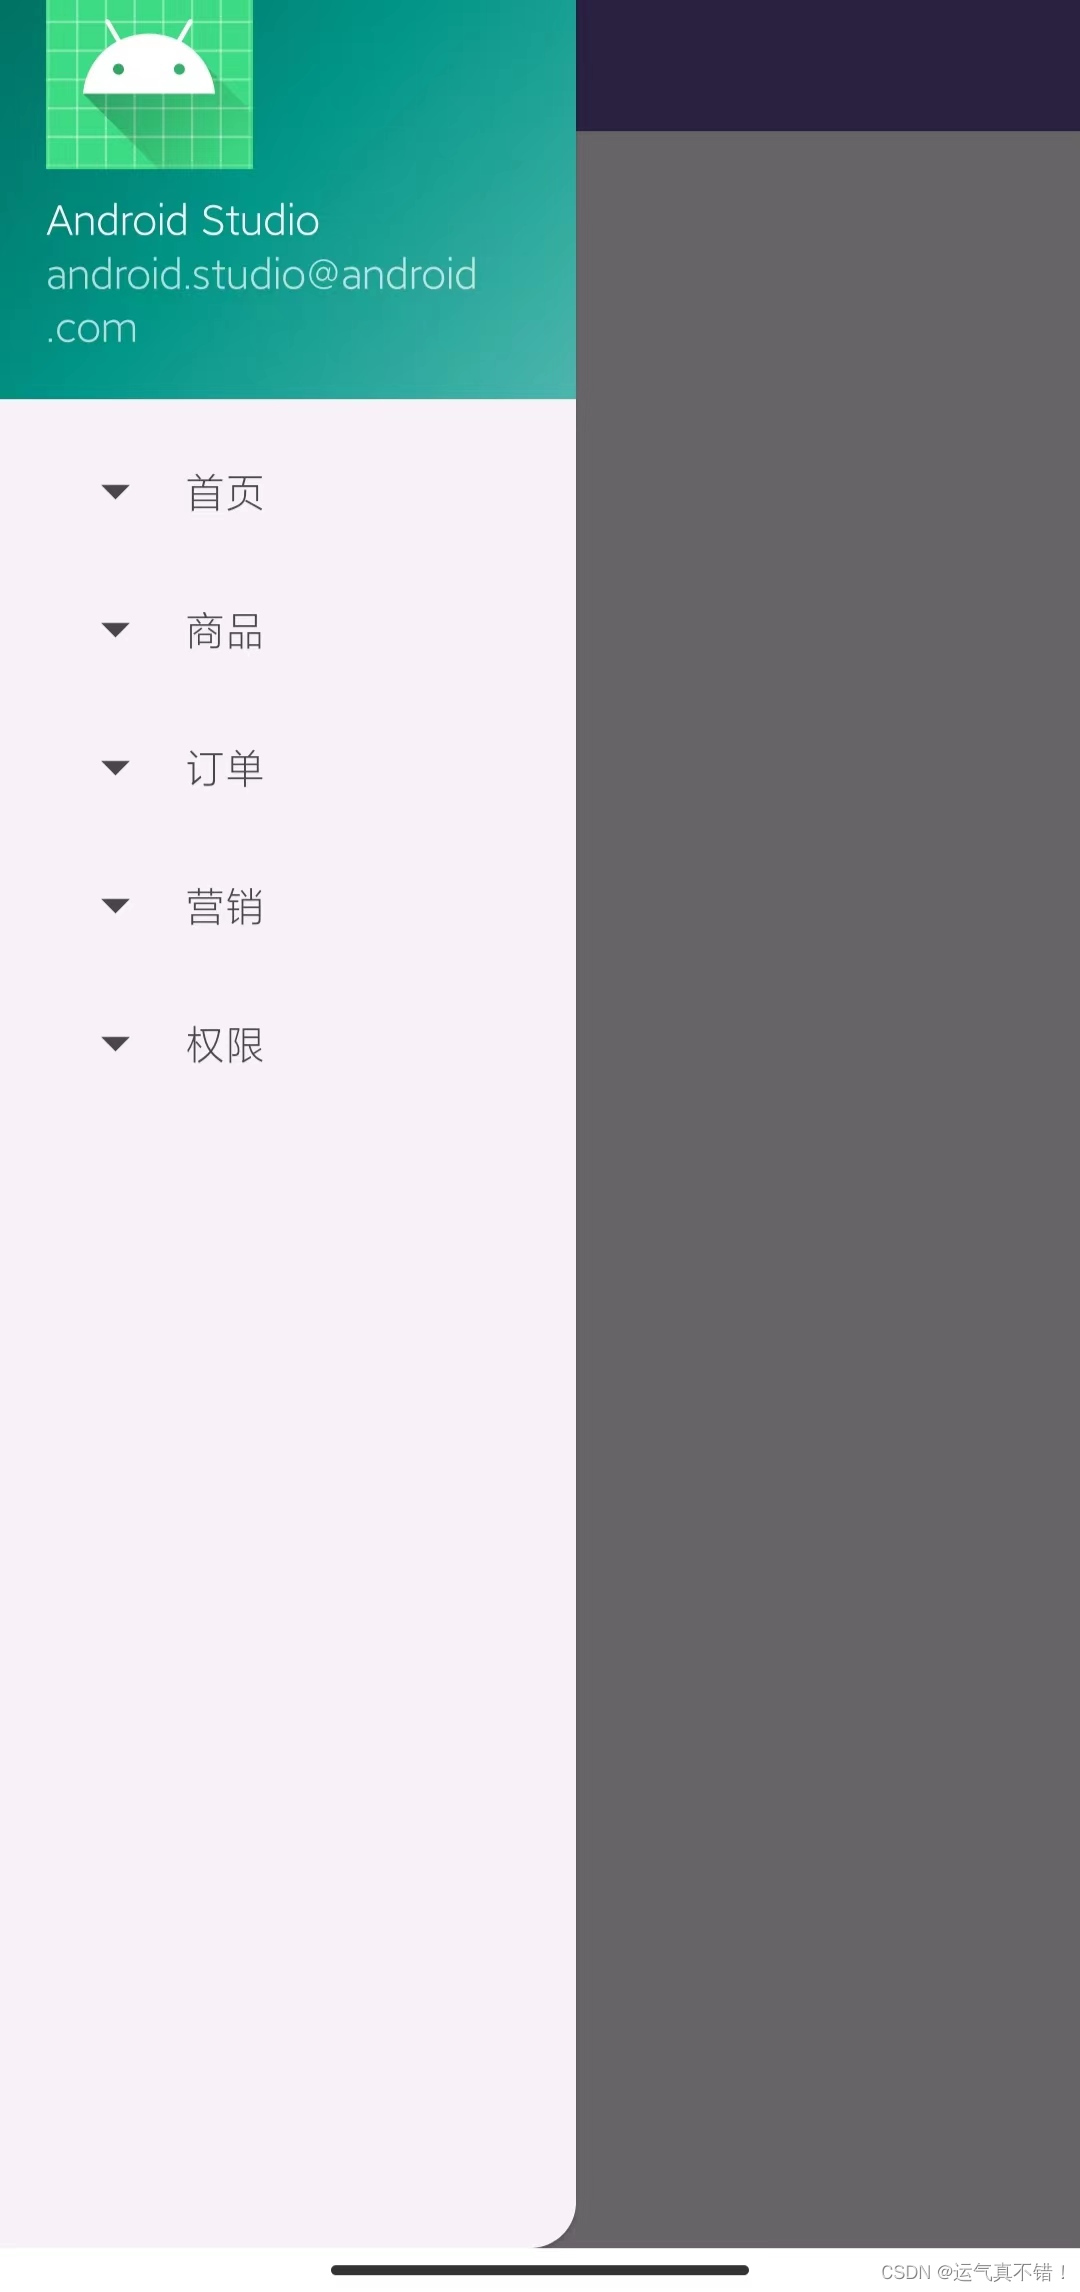
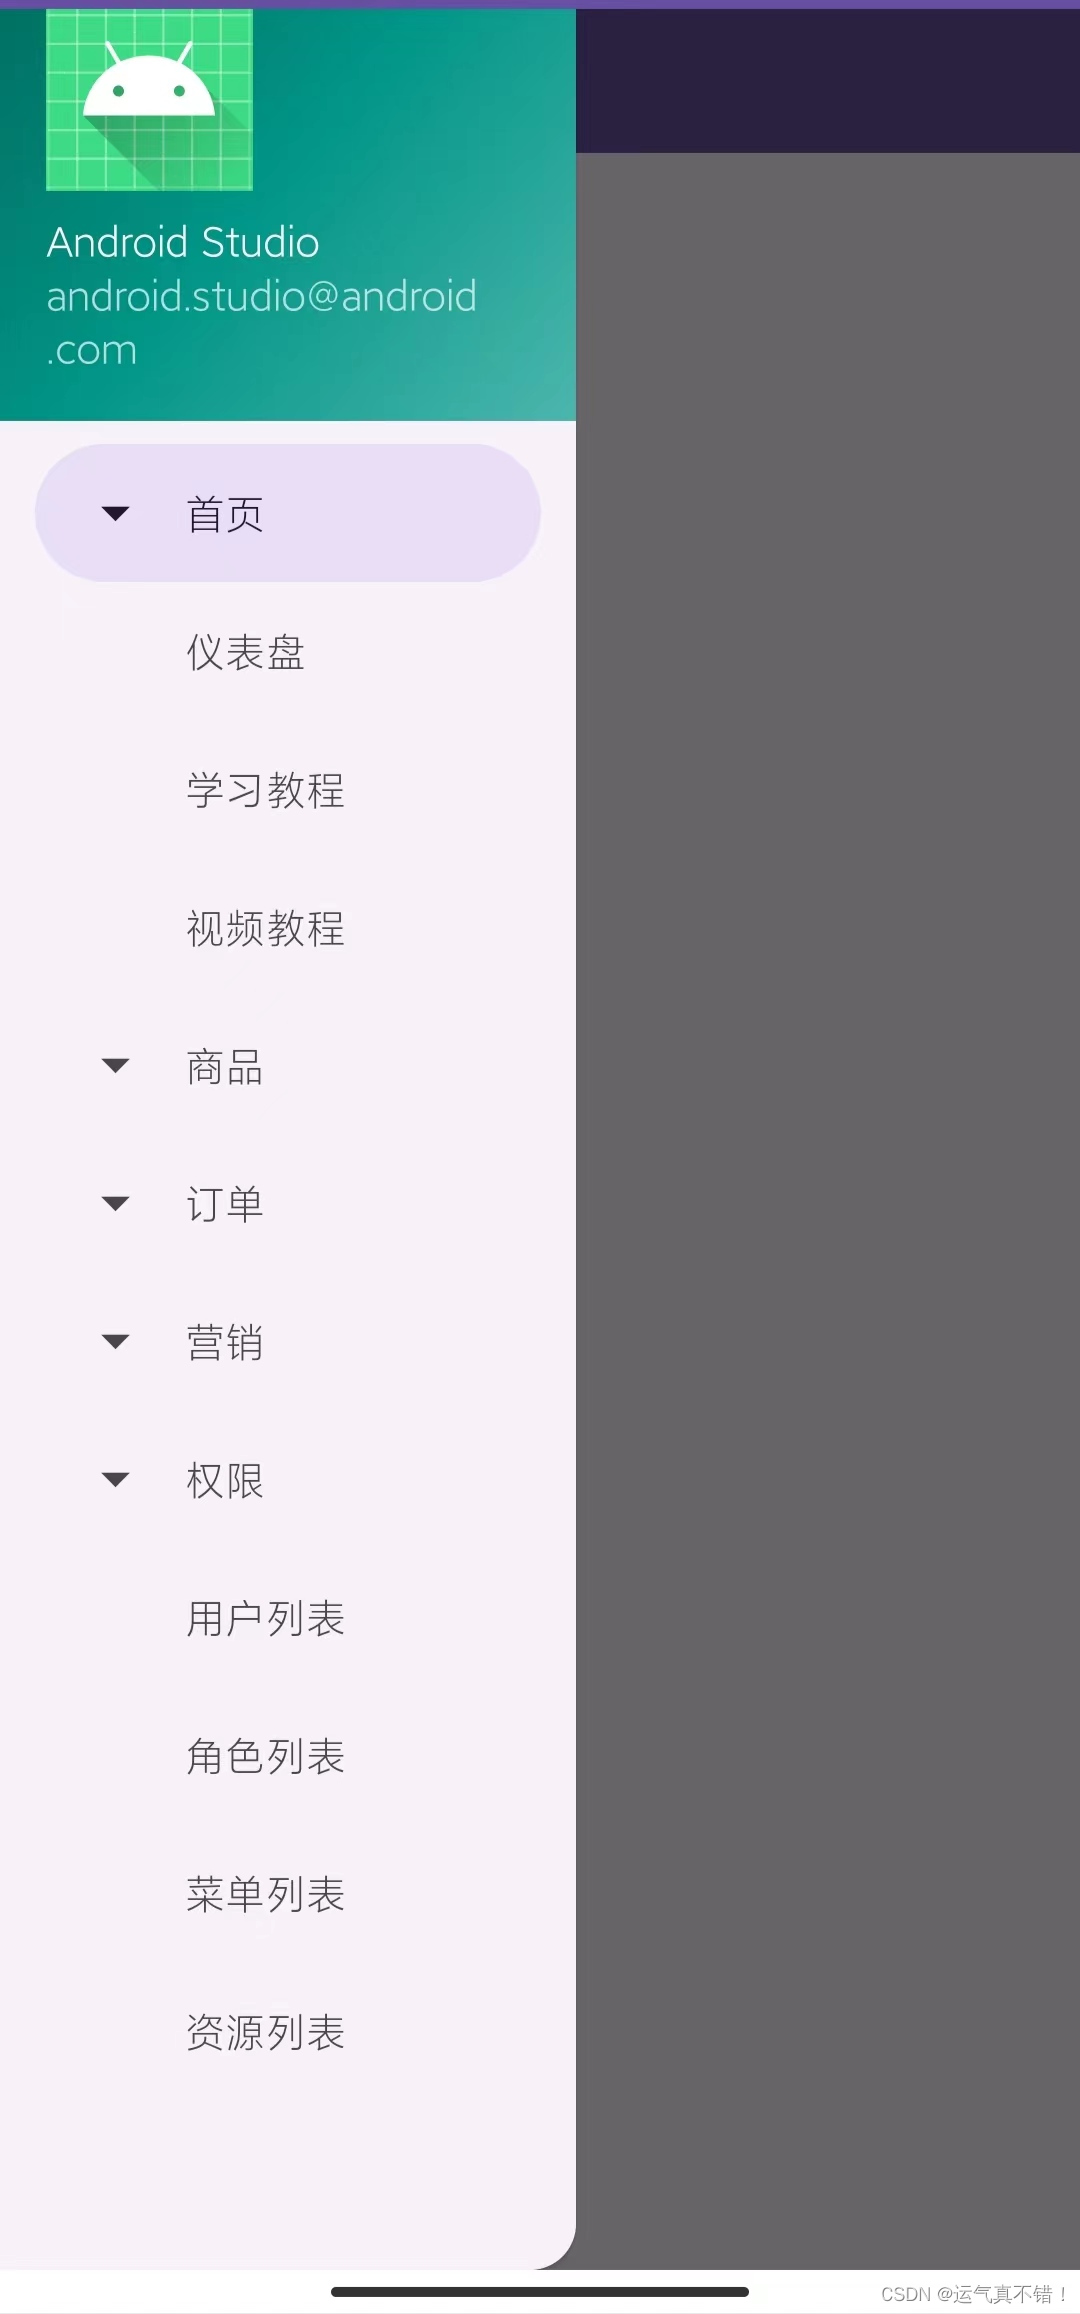
效果图

正文
我刚开始没有找到很合适新手的实例,所有我尝试了Android studio自带侧边栏的布局

但是使用过后,我发现他有一些东西是我不想要的,我就把我不要的东西删掉,保留我想要的,我的侧边栏是全局侧边栏,就做了一个侧边栏activity来复用,多个fragment复用一个侧边栏activity,目前看到比较多的也就是这种形式实现全局侧边栏了,如果和我刚开始一样,对侧边栏没有任何基础的情况下可以试下我的方法或者看我这篇博客,这篇博客将会讲出我所知道的全局侧边栏的实现方法
我用的是NavigationView实现的,在用NavigationView实现时发现侧边栏主要包含这些部分的内容,接下来我们就一个个部分来讲

toolbar 用于定义应用程序的导航栏
这个xml主要作用是定义了一个侧边栏布局,其中包含一个Toolbar作为应用的主标题栏,以及一个AppBarLayout为这个栏提供了背景和行为
AppBarLayout 用于组合一个或多个应用程序栏,并且可以为这些栏提供背景和行为
Toolbar 可以作为应用的主标题栏,并包含一组菜单项和自定义操作
<?xml version="1.0" encoding="utf-8"?>
<LinearLayout xmlns:android="http://schemas.android.com/apk/res/android"
    xmlns:app="http://schemas.android.com/apk/res-auto"
    xmlns:tools="http://schemas.android.com/tools"
    android:layout_width="match_parent"
    android:layout_height="wrap_content"
    tools:context=".DrawerActivity">

    <com.google.android.material.appbar.AppBarLayout
        android:layout_width="match_parent"
        android:layout_height="wrap_content"
        android:theme="@style/Theme.MyMall.AppBarOverlay">

        <androidx.appcompat.widget.Toolbar
            android:id="@+id/toolbar"
            android:layout_width="match_parent"
            android:layout_height="50dp"
            android:background="?attr/colorPrimary"
            app:popupTheme="@style/Theme.MyMall.PopupOverlay" />

    </com.google.android.material.appbar.AppBarLayout>
</LinearLayout>
app_bar
这段代码定义了一个具有侧边栏的布局,侧边栏中包含一个工具条,而内容区域则是一个可以滚动的帧布局
<androidx.coordinatorlayout.widget.CoordinatorLayout>是Android的一个布局,它可以协调在其内部的其他各种布局和视图的行为,例如AppBarLayout和Scrolling UI组件
这个xml中引入了tool_bar.xm
在<LinearLayout>中还有一个<FrameLayout>元素,它的滚动行为设置为@string/appbar_scrolling_view_behavior。这个滚动行为使得当这个视图(FrameLayout)滚动时,AppBarLayout会跟着滚动
<?xml version="1.0" encoding="utf-8"?>
<androidx.coordinatorlayout.widget.CoordinatorLayout xmlns:android="http://schemas.android.com/apk/res/android"
    xmlns:app="http://schemas.android.com/apk/res-auto"
    xmlns:tools="http://schemas.android.com/tools"
    android:layout_width="match_parent"
    android:layout_height="match_parent"
    tools:context=".DrawerActivity">

    <LinearLayout
        android:layout_width="match_parent"
        android:layout_height="match_parent"
        android:orientation="vertical">

        <include
            layout="@layout/tool_bar"
            android:layout_width="match_parent"
            android:layout_height="wrap_content" />

        <FrameLayout
            android:id="@+id/flContent"
            app:layout_behavior="@string/appbar_scrolling_view_behavior"
            android:layout_width="match_parent"
            android:layout_height="match_parent" />

    </LinearLayout>
</androidx.coordinatorlayout.widget.CoordinatorLayout>
drawer_layout 用于创建侧边栏导航
这个xml是连接activity的,使用了<androidx.drawerlayout.widget.DrawerLayout>布局,用于创建侧边栏导航
android:fitsSystemWindows="true":这个属性指示该布局会填充系统窗口,通常用于创建全屏体验。
tools:openDrawer="start":这是在工具栏中打开侧边栏的指示。
xml中有NavigationView和一个include
- NavigationView用于创建侧边栏的导航视图,其中包含:
app:headerLayout="@layout/nav_header_draw"指定导航视图的头部布局
app:menu="@menu/activity_main_drawer"指定导航视图的菜单资源
android:layout_gravity="start":属性指定了导航视图应从左侧开始。 - include中引用了app_bar_draw
<?xml version="1.0" encoding="utf-8"?>
<androidx.drawerlayout.widget.DrawerLayout xmlns:android="http://schemas.android.com/apk/res/android"
    xmlns:app="http://schemas.android.com/apk/res-auto"
    xmlns:tools="http://schemas.android.com/tools"
    android:id="@+id/drawer_layout"
    android:layout_width="match_parent"
    android:layout_height="match_parent"
    android:fitsSystemWindows="true"
    tools:openDrawer="start">

    <include
        android:id="@+id/app_bar_draw"
        layout="@layout/app_bar_draw"
        android:layout_width="match_parent"
        android:layout_height="match_parent" />

    <com.google.android.material.navigation.NavigationView
        android:id="@+id/nav_view"
        android:layout_width="200dp"
        android:layout_height="match_parent"
        android:layout_gravity="start"
        android:fitsSystemWindows="true"
        app:headerLayout="@layout/nav_header_draw"
        app:menu="@menu/activity_main_drawer" />
</androidx.drawerlayout.widget.DrawerLayout>
nav_header_draw
这个xml就是侧边栏的这个位置
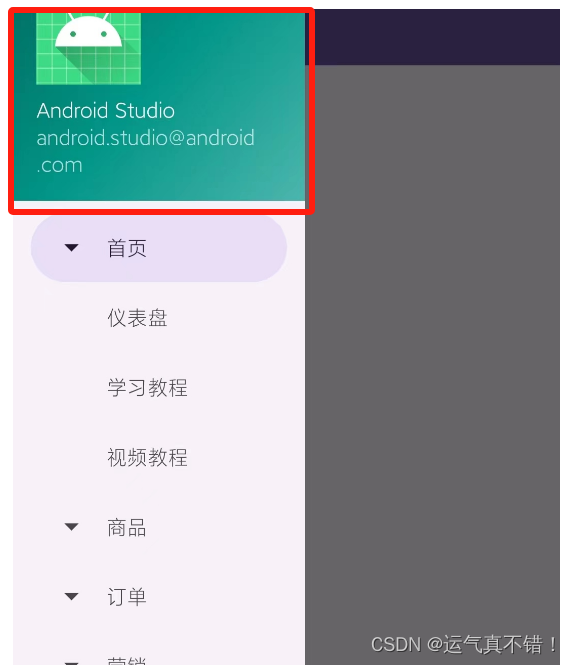
看自己是否需要,我用的默认的xml文件,可以根据自己的需求调整
<?xml version="1.0" encoding="utf-8"?>
<LinearLayout xmlns:android="http://schemas.android.com/apk/res/android"
    xmlns:app="http://schemas.android.com/apk/res-auto"
    android:layout_width="match_parent"
    android:layout_height="@dimen/nav_header_height"
    android:background="@drawable/side_nav_bar"
    android:gravity="bottom"
    android:orientation="vertical"
    android:paddingLeft="@dimen/activity_horizontal_margin"
    android:paddingTop="@dimen/activity_vertical_margin"
    android:paddingRight="@dimen/activity_horizontal_margin"
    android:paddingBottom="@dimen/activity_vertical_margin"
    android:theme="@style/ThemeOverlay.AppCompat.Dark">

    <ImageView
        android:id="@+id/imageView"
        android:layout_width="wrap_content"
        android:layout_height="wrap_content"
        android:contentDescription="@string/nav_header_desc"
        android:paddingTop="@dimen/nav_header_vertical_spacing"
        app:srcCompat="@mipmap/ic_launcher_round" />

    <TextView
        android:layout_width="match_parent"
        android:layout_height="wrap_content"
        android:paddingTop="@dimen/nav_header_vertical_spacing"
        android:text="@string/nav_header_title"
        android:textAppearance="@style/TextAppearance.AppCompat.Body1" />

    <TextView
        android:id="@+id/textView"
        android:layout_width="wrap_content"
        android:layout_height="wrap_content"
        android:text="@string/nav_header_subtitle" />
</LinearLayout>
app:menu=“@menu/activity_main_drawer”
关于drawer_layout的菜单资源,我写了一个可以折叠展开二级菜单的item
<menu
    xmlns:android="http://schemas.android.com/apk/res/android">

    <group android:checkableBehavior="single">
        <item
            android:id="@+id/FirstAge"
            android:title="首页"
            android:visible="true"
            android:icon="@drawable/baseline_arrow_drop_down_24" />

        <item
            android:id="@+id/Dashboard"
            android:checked="false"
            android:title="仪表盘"
            android:visible="false"
            />
        <item
            android:id="@+id/StudyTutorial"
            android:checked="false"
            android:title="学习教程"
            android:visible="false" />
        <item
            android:id="@+id/VideoTutorials"
            android:checked="false"
            android:title="视频教程"
            android:visible="false" />
    </group>

    <group android:checkableBehavior="single">
        <item
            android:id="@+id/Commodity"
            android:title="商品"
            android:visible="true"
            android:icon="@drawable/baseline_arrow_drop_down_24"/>
        <item
            android:id="@+id/ProductList"
            android:checked="false"
            android:title="商品列表"
            android:visible="false"/>
        <item
            android:id="@+id/AddProduct"
            android:checked="false"
            android:title="添加商品"
            android:visible="false"/>
        <item
            android:id="@+id/Category"
            android:checked="false"
            android:title="商品分类"
            android:visible="false"/>
        <item
            android:id="@+id/ProductType"
            android:checked="false"
            android:title="商品类型"
            android:visible="false"/>
        <item
            android:id="@+id/Branding"
            android:checked="false"
            android:title="品牌管理"
            android:visible="false"/>
    </group>

    <group android:checkableBehavior="single">
        <item
            android:id="@+id/OrderForGoods"
            android:title="订单"
            android:visible="true"
            android:icon="@drawable/baseline_arrow_drop_down_24"/>
        <item
            android:id="@+id/Orderlist"
            android:checked="false"
            android:title="订单列表"
            android:visible="false"/>
        <item
            android:id="@+id/OrderSettings"
            android:checked="false"
            android:title="订单设置"
            android:visible="false"/>
        <item
            android:id="@+id/ReturnApplicationProcessing"
            android:checked="false"
            android:title="退货申请处理"
            android:visible="false"/>
        <item
            android:id="@+id/ReturnReasonSettings"
            android:checked="false"
            android:title="退货原因设置"
            android:visible="false"/>
    </group>
    <group android:checkableBehavior="single">
        <item
            android:id="@+id/Marketing"
            android:title="营销"
            android:visible="true"
            android:icon="@drawable/baseline_arrow_drop_down_24"/>
        <item
            android:id="@+id/ListOfFlashKillingActivities"
            android:checked="false"
            android:title="秒杀活动列表"
            android:visible="false"/>
        <item
            android:id="@+id/CouponList"
            android:checked="false"
            android:title="优惠券列表"
            android:visible="false"/>
        <item
            android:id="@+id/BrandRecommendation"
            android:checked="false"
            android:title="品牌推荐"
            android:visible="false"/>
        <item
            android:id="@+id/NewProductRecommendation"
            android:checked="false"
            android:title="新品推荐"
            android:visible="false"/>
        <item
            android:id="@+id/PopularRecommendation"
            android:checked="false"
            android:title="人气推荐"
            android:visible="false"/>
        <item
            android:id="@+id/SpecialRecommendation"
            android:checked="false"
            android:title="专题推荐"
            android:visible="false"/>
        <item
            android:id="@+id/AdvertisingList"
            android:checked="false"
            android:title="广告列表"
            android:visible="false"/>
    </group>
    <group android:checkableBehavior="single">
        <item
            android:id="@+id/LimitsOfAuthority"
            android:title="权限"
            android:visible="true"
            android:icon="@drawable/baseline_arrow_drop_down_24"/>
        <item
            android:id="@+id/UserList"
            android:checked="false"
            android:title="用户列表"
            android:visible="false"/>
        <item
            android:id="@+id/RoleList"
            android:checked="false"
            android:title="角色列表"
            android:visible="false"/>
        <item
            android:id="@+id/MenuList"
            android:checked="false"
            android:title="菜单列表"
            android:visible="false"/>
        <item
            android:id="@+id/ResourceList"
            android:checked="false"
            android:title="资源列表"
            android:visible="false"/>
    </group>
</menu>


