Supervisor进程管理
概述:supervisor 是一个用 python 语言编写的进程管理工具,它可以很方便的监听、启动、停止、重启一个或多个进程。当一个进程意外被杀死,supervisor 监听到进程死后,可以很方便的让进程自动恢复,不再需要程序员或系统管理员自己编写代码来控制。
1.构成要素
-
Supervisord:
- supervisor的服务端:运行supervisor时会启动一个进程supervisord;
- 它负责启动所管理的进程,并将所管理的进程作为自己的子进程来启动;
- 而且可以在所管理的进程出现崩溃时自动重启;
-
supervisorctl
-
supervisor 的客户端:supervisorctl 是命令行管理工具,可以用命令来进行子进程的管理
-
supervisorctl 常见命令
命令 含义 supervisorctl status 查看所有子进程的服务状态 supervisorctl restart 重启所有子进程服务 supervisorctl restart name 重启子进程名字为 name 的服务 supervisorctl start name 开启子进程为 name 的服务 supervisorctl stop all 关闭所有子进程服务 supervisorctl stop name 停止子进程为 name 的服务 supervisorctl shutdown 关闭所有的子进程服务,同时关闭supervisor工具本身 supervisorctl reload 重载配置文件,重启所有子进程服务 supervisorctl update 更新所有服务,一般用在添加新服务后 supervisorctl update name 更新子进程名字为 name 的服务
-
-
echo_supervisord_conf
-
echo_supervisord_conf是Supervisor的一个内置命令,用于生成Supervisor配置文件的模板。使用该命令可以快速生成一个示例的Supervisor配置文件,然后根据需要进行修改和扩展。 -
要使用
echo_supervisord_conf命令,您需要执行以下步骤:# 1. 打开终端或命令行窗口。 # 2. 运行以下命令: echo_supervisord_conf > supervisord.conf这会将Supervisor的模板配置文件输出到名为
supervisord.conf的文件中。-
打开生成的
supervisord.conf文件,您将看到一个模板配置文件的内容。该文件包含了一些示例的配置段,如
[unix_http_server]、[supervisord]、[supervisorctl],以及一些默认设置的注释说明。 -
根据您的实际需求,在
supervisord.conf文件中进行修改和扩展,添加您自己的进程配置。您可以指定进程的命令、日志文件路径、启动和停止脚本等。 -
保存修改后的
supervisord.conf文件。
现在,您可以使用生成的
supervisord.conf文件作为Supervisor的配置文件,并通过supervisord命令启动Supervisor,以管理您的进程。请确保在启动supervisord前已经安装好了Supervisor,并将supervisord命令添加到系统的服务启动项或以守护进程的方式运行。 -
-
产生的模板文件
; Sample supervisor config file.
;
; For more information on the config file, please see:
; http://supervisord.org/configuration.html
;
; Notes:
;  - Shell expansion ("~" or "$HOME") is not supported.  Environment
;    variables can be expanded using this syntax: "%(ENV_HOME)s".
;  - Quotes around values are not supported, except in the case of
;    the environment= options as shown below.
;  - Comments must have a leading space: "a=b ;comment" not "a=b;comment".
;  - Command will be truncated if it looks like a config file comment, e.g.
;    "command=bash -c 'foo ; bar'" will truncate to "command=bash -c 'foo ".
;
; Warning:
;  Paths throughout this example file use /tmp because it is available on most
;  systems.  You will likely need to change these to locations more appropriate
;  for your system.  Some systems periodically delete older files in /tmp.
;  Notably, if the socket file defined in the [unix_http_server] section below
;  is deleted, supervisorctl will be unable to connect to supervisord.

[unix_http_server]
file=/tmp/supervisor.sock   ; the path to the socket file
;chmod=0700                 ; socket file mode (default 0700)
;chown=nobody:nogroup       ; socket file uid:gid owner
;username=user              ; default is no username (open server)
;password=123               ; default is no password (open server)

; Security Warning:
;  The inet HTTP server is not enabled by default.  The inet HTTP server is
;  enabled by uncommenting the [inet_http_server] section below.  The inet
;  HTTP server is intended for use within a trusted environment only.  It
;  should only be bound to localhost or only accessible from within an
;  isolated, trusted network.  The inet HTTP server does not support any
;  form of encryption.  The inet HTTP server does not use authentication
;  by default (see the username= and password= options to add authentication).
;  Never expose the inet HTTP server to the public internet.

;[inet_http_server]         ; inet (TCP) server disabled by default
;port=127.0.0.1:9001        ; ip_address:port specifier, *:port for all iface
;username=user              ; default is no username (open server)
;password=123               ; default is no password (open server)

[supervisord]
logfile=/tmp/supervisord.log ; main log file; default $CWD/supervisord.log
logfile_maxbytes=50MB        ; max main logfile bytes b4 rotation; default 50MB
logfile_backups=10           ; # of main logfile backups; 0 means none, default 10
loglevel=info                ; log level; default info; others: debug,warn,trace
pidfile=/tmp/supervisord.pid ; supervisord pidfile; default supervisord.pid
nodaemon=false               ; start in foreground if true; default false
minfds=1024                  ; min. avail startup file descriptors; default 1024
minprocs=200                 ; min. avail process descriptors;default 200
;umask=022                   ; process file creation umask; default 022
;user=supervisord            ; setuid to this UNIX account at startup; recommended if root
;identifier=supervisor       ; supervisord identifier, default is 'supervisor'
;directory=/tmp              ; default is not to cd during start
;nocleanup=true              ; don't clean up tempfiles at start; default false
;childlogdir=/tmp            ; 'AUTO' child log dir, default $TEMP
;environment=KEY="value"     ; key value pairs to add to environment
;strip_ansi=false            ; strip ansi escape codes in logs; def. false

; The rpcinterface:supervisor section must remain in the config file for
; RPC (supervisorctl/web interface) to work.  Additional interfaces may be
; added by defining them in separate [rpcinterface:x] sections.

[rpcinterface:supervisor]
supervisor.rpcinterface_factory = supervisor.rpcinterface:make_main_rpcinterface

; The supervisorctl section configures how supervisorctl will connect to
; supervisord.  configure it match the settings in either the unix_http_server
; or inet_http_server section.

[supervisorctl]
serverurl=unix:///tmp/supervisor.sock ; use a unix:// URL  for a unix socket
;serverurl=http://127.0.0.1:9001 ; use an http:// url to specify an inet socket
;username=chris              ; should be same as in [*_http_server] if set
;password=123                ; should be same as in [*_http_server] if set
;prompt=mysupervisor         ; cmd line prompt (default "supervisor")
;history_file=~/.sc_history  ; use readline history if available

; The sample program section below shows all possible program subsection values.
; Create one or more 'real' program: sections to be able to control them under
; supervisor.

;[program:theprogramname]
;command=/bin/cat              ; the program (relative uses PATH, can take args)
;process_name=%(program_name)s ; process_name expr (default %(program_name)s)
;numprocs=1                    ; number of processes copies to start (def 1)
;directory=/tmp                ; directory to cwd to before exec (def no cwd)
;umask=022                     ; umask for process (default None)
;priority=999                  ; the relative start priority (default 999)
;autostart=true                ; start at supervisord start (default: true)
;startsecs=1                   ; # of secs prog must stay up to be running (def. 1)
;startretries=3                ; max # of serial start failures when starting (default 3)
;autorestart=unexpected        ; when to restart if exited after running (def: unexpected)
;exitcodes=0                   ; 'expected' exit codes used with autorestart (default 0)
;stopsignal=QUIT               ; signal used to kill process (default TERM)
;stopwaitsecs=10               ; max num secs to wait b4 SIGKILL (default 10)
;stopasgroup=false             ; send stop signal to the UNIX process group (default false)
;killasgroup=false             ; SIGKILL the UNIX process group (def false)
;user=chrism                   ; setuid to this UNIX account to run the program
;redirect_stderr=true          ; redirect proc stderr to stdout (default false)
;stdout_logfile=/a/path        ; stdout log path, NONE for none; default AUTO
;stdout_logfile_maxbytes=1MB   ; max # logfile bytes b4 rotation (default 50MB)
;stdout_logfile_backups=10     ; # of stdout logfile backups (0 means none, default 10)
;stdout_capture_maxbytes=1MB   ; number of bytes in 'capturemode' (default 0)
;stdout_events_enabled=false   ; emit events on stdout writes (default false)
;stdout_syslog=false           ; send stdout to syslog with process name (default false)
;stderr_logfile=/a/path        ; stderr log path, NONE for none; default AUTO
;stderr_logfile_maxbytes=1MB   ; max # logfile bytes b4 rotation (default 50MB)
;stderr_logfile_backups=10     ; # of stderr logfile backups (0 means none, default 10)
;stderr_capture_maxbytes=1MB   ; number of bytes in 'capturemode' (default 0)
;stderr_events_enabled=false   ; emit events on stderr writes (default false)
;stderr_syslog=false           ; send stderr to syslog with process name (default false)
;environment=A="1",B="2"       ; process environment additions (def no adds)
;serverurl=AUTO                ; override serverurl computation (childutils)

; The sample eventlistener section below shows all possible eventlistener
; subsection values.  Create one or more 'real' eventlistener: sections to be
; able to handle event notifications sent by supervisord.

;[eventlistener:theeventlistenername]
;command=/bin/eventlistener    ; the program (relative uses PATH, can take args)
;process_name=%(program_name)s ; process_name expr (default %(program_name)s)
;numprocs=1                    ; number of processes copies to start (def 1)
;events=EVENT                  ; event notif. types to subscribe to (req'd)
;buffer_size=10                ; event buffer queue size (default 10)
;directory=/tmp                ; directory to cwd to before exec (def no cwd)
;umask=022                     ; umask for process (default None)
;priority=-1                   ; the relative start priority (default -1)
;autostart=true                ; start at supervisord start (default: true)
;startsecs=1                   ; # of secs prog must stay up to be running (def. 1)
;startretries=3                ; max # of serial start failures when starting (default 3)
;autorestart=unexpected        ; autorestart if exited after running (def: unexpected)
;exitcodes=0                   ; 'expected' exit codes used with autorestart (default 0)
;stopsignal=QUIT               ; signal used to kill process (default TERM)
;stopwaitsecs=10               ; max num secs to wait b4 SIGKILL (default 10)
;stopasgroup=false             ; send stop signal to the UNIX process group (default false)
;killasgroup=false             ; SIGKILL the UNIX process group (def false)
;user=chrism                   ; setuid to this UNIX account to run the program
;redirect_stderr=false         ; redirect_stderr=true is not allowed for eventlisteners
;stdout_logfile=/a/path        ; stdout log path, NONE for none; default AUTO
;stdout_logfile_maxbytes=1MB   ; max # logfile bytes b4 rotation (default 50MB)
;stdout_logfile_backups=10     ; # of stdout logfile backups (0 means none, default 10)
;stdout_events_enabled=false   ; emit events on stdout writes (default false)
;stdout_syslog=false           ; send stdout to syslog with process name (default false)
;stderr_logfile=/a/path        ; stderr log path, NONE for none; default AUTO
;stderr_logfile_maxbytes=1MB   ; max # logfile bytes b4 rotation (default 50MB)
;stderr_logfile_backups=10     ; # of stderr logfile backups (0 means none, default 10)
;stderr_events_enabled=false   ; emit events on stderr writes (default false)
;stderr_syslog=false           ; send stderr to syslog with process name (default false)
;environment=A="1",B="2"       ; process environment additions
;serverurl=AUTO                ; override serverurl computation (childutils)

; The sample group section below shows all possible group values.  Create one
; or more 'real' group: sections to create "heterogeneous" process groups.

;[group:thegroupname]
;programs=progname1,progname2  ; each refers to 'x' in [program:x] definitions
;priority=999                  ; the relative start priority (default 999)

; The [include] section can just contain the "files" setting.  This
; setting can list multiple files (separated by whitespace or
; newlines).  It can also contain wildcards.  The filenames are
; interpreted as relative to this file.  Included files *cannot*
; include files themselves.

;[include]
;files = relative/directory/*.ini
-
2.安装
本部分主要介绍ubuntu系统中进行安装的方式,其他系统中百度亦可;
2.1 使用 apt 安装
更新软件包列表:
sudo apt update安装Supervisor:
sudo apt install supervisor启动Supervisor服务:
sudo systemctl start supervisor验证Supervisor是否已经启动:
sudo systemctl status supervisor
2.2 使用pip安装
# supervisor是基于python写的,所以使用pip来安装即可。
pip install supervisor
或者
pip3 install supervisor

# 默认生成文件的路径
# supervisord 路径
/usr/local/bin/supervisord
# supervisorctl 路径
/usr/local/bin/supervisorctl
# echo_supervisord_conf 路径
/usr/local/bin/echo_supervisord_conf
如上路径,我们也可以通过whereis supervisord、whereis supervisorctl、whereis echo_supervisord_conf得到
验证是否安装成功supervisorctl --help
3.配置详解
supervisor 进程管理服务程序安装完毕后,会在系统同中生成两个配置文件:
主进程配置文件:/etc/supervisor/supervisord.conf
子进程配置文件: /etc/supervisor/conf.d;子进程可能有多个配置文件;
3.1 默认主配置文件
supervisor 进程默认产生的配置文件如下所示;
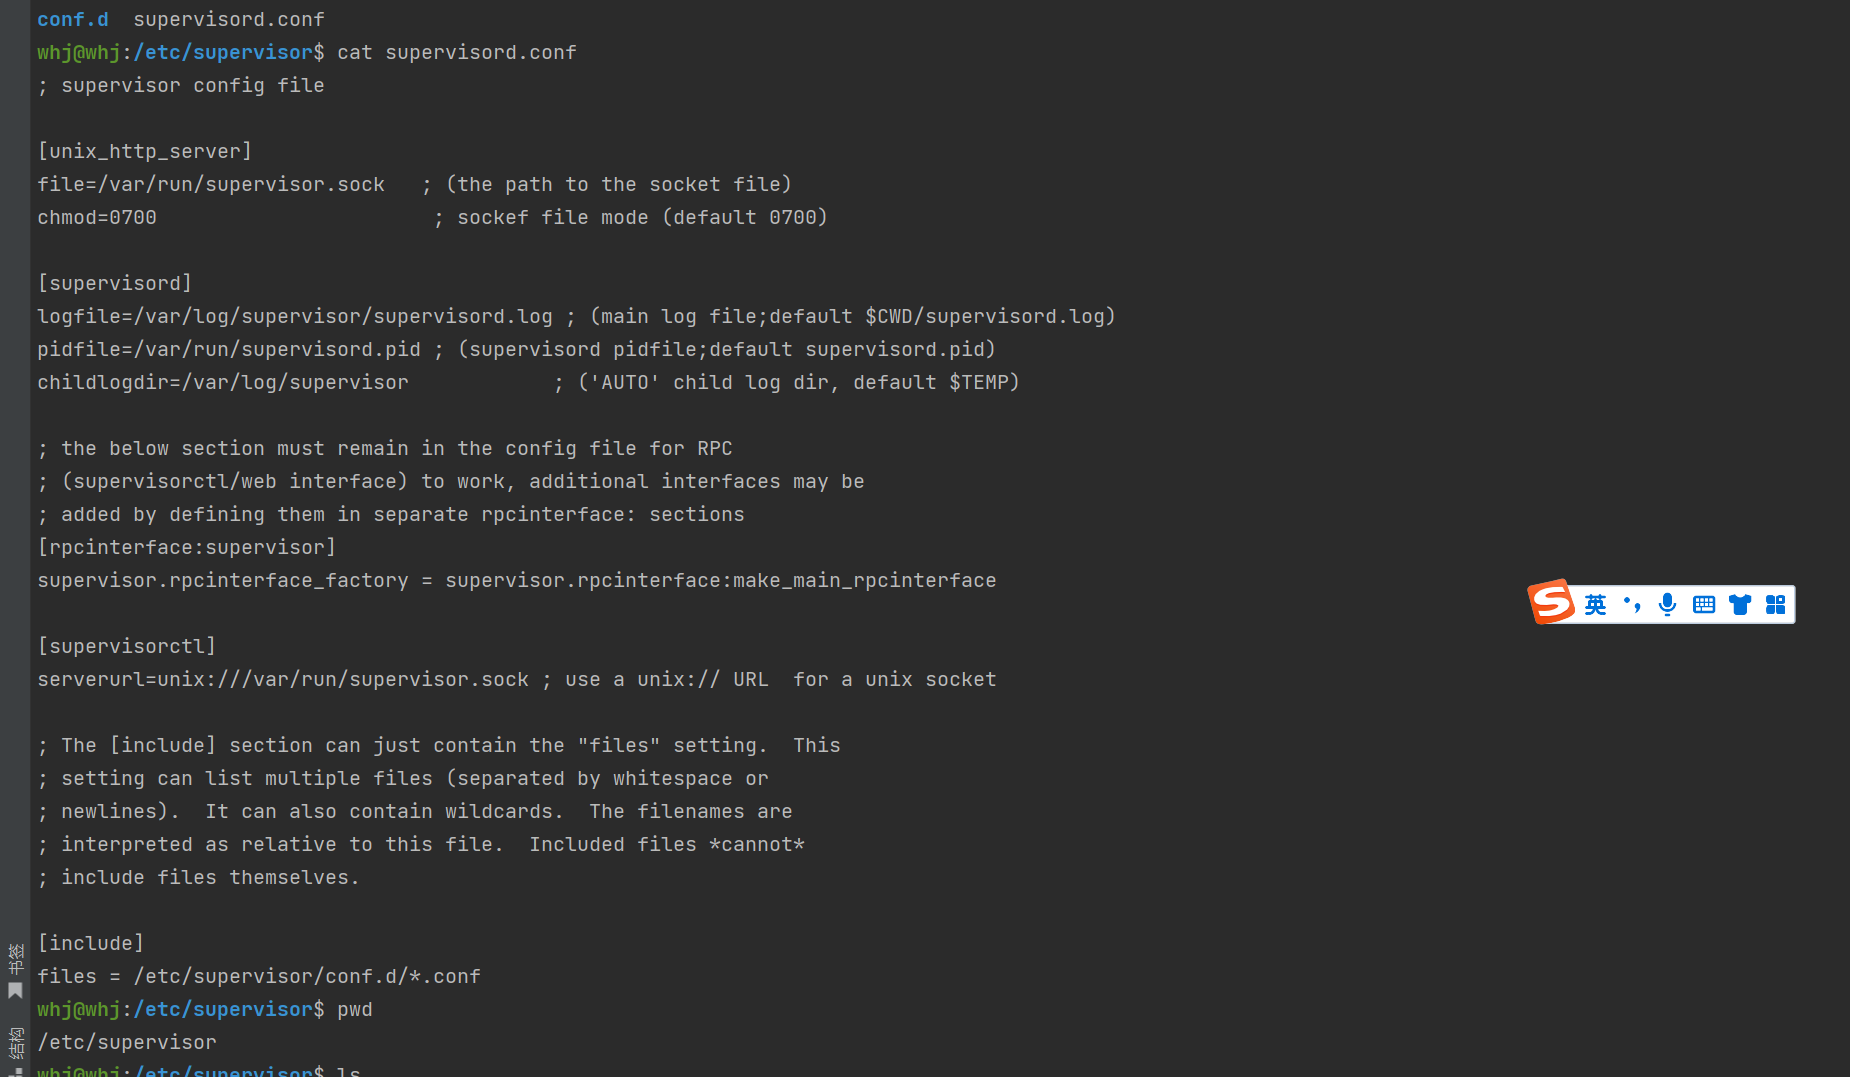
内容详解
; supervisor config file

[unix_http_server]  ; 将unix_http_server 下的 file 路径改成如下内容
file=/var/run/supervisor.sock   ; (the path to the socket file)
chmod=0700                       ; sockef file mode (default 0700)

;unix_http_server 下的 file 路径改成如下内容
[supervisord]
logfile=/var/log/supervisor/supervisord.log ; (main log file;default $CWD/supervisord.log)
pidfile=/var/run/supervisord.pid ; (supervisord pidfile;default supervisord.pid)
childlogdir=/var/log/supervisor            ; ('AUTO' child log dir, default $TEMP)

;以下部分必须保留在RPC的配置文件中
;(supervisorctl/web接口)要工作,可以使用其他接口
;通过在单独的rpcinterface:节中定义它们来添加
[rpcinterface:supervisor]
supervisor.rpcinterface_factory = supervisor.rpcinterface:make_main_rpcinterface

;supervisor 客户端
[supervisorctl]
serverurl=unix:///var/run/supervisor.sock ; use a unix:// URL  for a unix socket


;[include]部分可以只包含“files”设置。这
;设置可以列出多个文件(用空格或
;换行符)。它还可以包含通配符。文件名为
;解释为相对于此文件。包含的文件*不能*
;包括文件本身。
[include]  ; 包括路径下的所有文件;
files = /etc/supervisor/conf.d/*.conf
上面的路径只是推荐路径,可以根据自己的想法指向不同的路径;
# 创建文件
#touch /var/run/supervisor.sock  # 依据配置文件自动创建

mkdir /var/log/supervisor
touch /var/log/supervisor/supervisord.log

#touch /var/run/supervisord.pid  # 依据配置文件自动创建
mkdir /etc/supervisor/conf.d
# 添加权限
#chmod 777 /var/run
#chmod 777 /var/log
3.2 子进程服务常用的配置解析
**说明:**更详细的配置参考模板部分的信息,使用的时候通常将该文件放在conf.d目录下;
[program:your_program_name]
command=/path/to/your_executable --arg1=value1 --arg2=value2  ; 子进程的启动命令及参数
directory=/path/to/your_working_directory                  ; 子进程的工作目录
user=your_username                                        ; 子进程运行的用户
autostart=true                                            ; 设置为自动启动子进程
autorestart=true                                          ; 允许自动重启
startretries=3                                            ; 启动重试次数
redirect_stderr=true                                      ; 将标准错误输出重定向到Supervisor日志
stdout_logfile=/path/to/your_stdout_log_file               ; 子进程的标准输出日志路径
4. 配置案例
主要用来描述并编写常见的supervisor相关的系统,主要有django、flask、python 脚本、nginx、mysql、docker等常见进程工具的部署后的进程监控的配置;
4.1 django 程序监控的配置
[program:your_django_program]
command=/path/to/your_virtualenv/bin/gunicorn your_django_project.wsgi:application --bind 127.0.0.1:8000  ; Django程序的启动命令
directory=/path/to/your_django_project                  ; Django程序的根目录
user=your_username                                      ; Django程序运行的用户
autostart=true                                          ; 设置为自动启动
autorestart=true                                        ; 允许自动重启
startretries=3                                          ; 启动重试次数
redirect_stderr=true                                    ; 将标准错误输出重定向到Supervisor日志
stdout_logfile=/path/to/your_stdout_log_file             ; 标准输出日志路径
environment=PATH="/path/to/your_virtualenv/bin"          ; 设置虚拟环境的路径
执行如下命令;
# 复制文件到指定的目录
sudo ./my_app.conf /etc/supervisor/conf.d/
读取并更新配置文件
# 读取
sudo supervisorctl reread
# 更新配置文件
sudo supervisorctl update
# 启动
sudo supervisorctl start my_app
4.2 flask 配置
-
创建一个新的Supervisor配置文件,例如
your_flask_program.conf。 -
在配置文件中添加以下配置:
[program:your_flask_program] command=/path/to/your_virtualenv/bin/gunicorn your_flask_app:app --bind 127.0.0.1:8000 ; Flask程序的启动命令 directory=/path/to/your_flask_app ; Flask程序的根目录 user=your_username ; Flask程序运行的用户 autostart=true ; 设置为自动启动 autorestart=true ; 允许自动重启 startretries=3 ; 启动重试次数 redirect_stderr=true ; 将标准错误输出重定向到Supervisor日志 stdout_logfile=/path/to/your_stdout_log_file ; 标准输出日志路径 environment=PATH="/path/to/your_virtualenv/bin" ; 设置虚拟环境的路径-
在上述配置中,将
/path/to/your_virtualenv替换为您的虚拟环境的路径,将your_flask_app替换为您的Flask应用程序的目录名称,将your_flask_app:app替换为您的Flask应用程序的app对象所在的模块和变量名。 -
根据实际需要修改
--bind参数以指定Gunicorn绑定的地址和端口。 -
使用
export命令设置虚拟环境的路径。 -
通过
supervisorctl命令启动Supervisor,并指定刚刚创建的配置文件:supervisorctl -c /path/to/your_supervisor.conf 这样,Supervisor将在指定的虚拟环境中启动并监控Flask应用程序。 请确保在启动Supervisor之前,虚拟环境已安装好,并存储了Flask程序所需的依赖。 在使用Supervisor监控Flask程序时,请确保在虚拟环境中正确安装了Gunicorn,并提供了有效的启动命令和相关配置。
-
-
方式二
[program:my_app]
command=/home/whj/data/envs/learn_code/bin/gunicorn -b 0.0.0.0:9000 -w 3 app:app
directory=/home/whj/data/code/learn_code/ubuntu_code/learn
user=whj
autostart=true
autorestart=true
redirect_stderr=true
stdout_logfile=/home/whj/data/log/my_log.log
执行如下命令;
# 复制文件到指定的目录
sudo ./my_app.conf /etc/supervisor/conf.d/
读取并更新配置文件
# 读取
sudo supervisorctl reread
# 更新配置文件
sudo supervisorctl update
# 启动
sudo supervisorctl start my_app
4.3 python脚本的监控
假设服务名称为test。启动文件为py类文件entry.py
[program:my_my]  ;指定名称
command=/home/whj/data/envs/learn_code/bin/python print_sleep.py    ; 启动路径
directory=/home/whj/data/code/learn_code/ubuntu_code/learn			; 代码路径
user=whj
autostart=true
autorestart=true
redirect_stderr=true
stdout_logfile=/home/whj/data/log/my_py.log  ; 指定日志输出
supervisor 未启动的时候使用如下命令启动
# 读取配置文件
sudo suppervisorctl reread
# 更新配置文件
sudo suppervisorctl update
# 服务启动
sudo supervisorctl start my_my  # 指定启动的名称,通常执行完成 update 之后服务已经会启动了,本句命令也可以用作检验使用;
4.4 docker监控
Supervisor 可以监控和管理 Docker 容器的状态,通过使用 Supervisor 的program配置项,指定Docker命令启动和停止容器。
以下是监控Docker容器状态的一般步骤:
- 安装Supervisor:使用适合您的系统的方法安装Supervisor。
- 创建Supervisor配置文件:创建Supervisor的配置文件,例如
docker.conf。
[program:mydockercontainer]
command=docker run --name mycontainer myimage
autostart=true
autorestart=true
在上述配置中,mydockercontainer是容器的名称,command指定了启动容器的Docker命令。
可以根据实际需要,在command中添加其他选项,如端口映射、环境变量等。
- 更新Supervisor配置:运行以下命令更新Supervisor的配置。
$ supervisorctl reread
$ supervisorctl update
- 启动Docker容器:运行以下命令启动Docker容器。
$ supervisorctl start mydockercontainer
现在,Supervisor会监控Docker容器的状态,并在需要时自动重启容器。
如果需要停止或重启Docker容器,可以使用以下命令:
$ supervisorctl stop mydockercontainer
$ supervisorctl restart mydockercontainer
通过配置Supervisor来管理和监控Docker容器,可以确保容器的稳定运行,并在崩溃或停止时自动重启。此外,Supervisor还提供了其他功能,如日志管理和进程管控等,可以进一步提高对Docker容器的监控和管理能力。
5.supervisor 开机自动启动
一般使用supervisor开机自动启动服务,路径/usr/lib/systemd/system/supervisor.service;
[Unit]
Description=Supervisor process control system for UNIX
Documentation=http://supervisord.org
After=network.target

[Service]
ExecStart=/usr/bin/supervisord -n -c /etc/supervisor/supervisord.conf
ExecStop=/usr/bin/supervisorctl $OPTIONS shutdown
ExecReload=/usr/bin/supervisorctl -c /etc/supervisor/supervisord.conf $OPTIONS reload
KillMode=process
Restart=on-failure
RestartSec=50s

[Install]
WantedBy=multi-user.target
使用 apt 安装的时候默认存在该文件;
# 设置开机自动启动
systemctl enable supervisor
# 检查配置是否成功
systemctl is-enabled supervisor.service

继续努力,终成大器!

