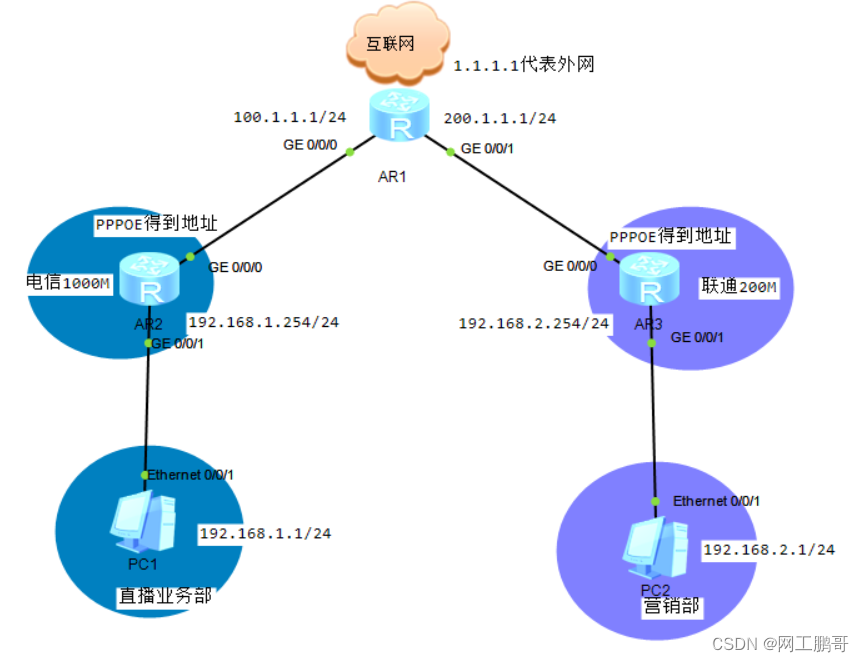
- 实验需求
- 配置IP地址
- 使用PPPOE拨号上网
- 设置路由让直播业务部和营销部都可以访问外网
- 实验拓扑
- 实验步骤
- 配置 R1地址池
- 电信链路:
[Huawei]undo info-center enable
Info: Information center is disabled.
[Huawei]sysname r1
[r1]ip pool zhibo //配置地址池名为zhibo
Info: It's successful to create an IP address pool.
[r1-ip-pool-zhibo]network 100.1.1.0 mask 24 //客户端通过拨号所获取的网段地址
[r1-ip-pool-zhibo]gateway-list 100.1.1.1 //配置分配的网关地址
[r1-ip-pool-zhibo]quit
- 联通链路:
[r1]ip pool yingxiao //配置地址池名为yingxiao
Info: It's successful to create an IP address pool.
[r1-ip-pool-yingxiao]network 200.1.1.0 mask 24 //客户端通过拨号所获取的网段地址
[r1-ip-pool-yingxiao]gateway-list 200.1.1.1 //配置分配的网关地址
[r1-ip-pool-yingxiao]quit
- 配置R2、R3拨号使用的用户名和密码
[r1]aaa
[r1-aaa]local-user zhibo password cipher zhibo //创建用户名为zhibo、密码为zhibo的账号
Info: Add a new user.
[r1-aaa]local-user zhibo service-type ppp //设置用户名为zhibo的服务类型为ppp
[r1-aaa]local-user yingxiao password cipher yingxiao //创建用户名为yingxiao、密码为yingxiao的账号
Info: Add a new user.
[r1-aaa]local-user yingxiao service-type ppp
[r1-aaa]quit
- 配置VT接口,用于PPPoE认证并分配地址
[r1]interface Virtual-Template 1 //创建vt接口1
[r1-Virtual-Template1]ip address 100.1.1.1 24 //将网关地址配置在VT接口
[r1-Virtual-Template1]ppp authentication-mode chap //配置ppp的认证类型为chap
[r1-Virtual-Template1]remote address pool zhibo //调用为客户端分配地址的地址池zhibo
[r1-Virtual-Template1]quit
[r1]interface Virtual-Template 2 //创建vt接口2
[r1-Virtual-Template2]ip address 200.1.1.1 24
[r1-Virtual-Template2]ppp authentication-mode chap
[r1-Virtual-Template2]remote address pool yingxiao
[r1-Virtual-Template2]quit
- 在以太网接口使能PPPoE功能并绑定VT接口
[r1]interface g0/0/0
[r1-GigabitEthernet0/0/0]pppoe-server bind virtual-template 1 //设置本设备为pppoe的服务端,并且关联VT接口
[r1-GigabitEthernet0/0/0]quit
[r1]interface g0/0/1
[r1-GigabitEthernet0/0/1]pppoe-server bind virtual-template 2
- 配置R2、R3的PPPoE client拨号功能
R2:
<Huawei>system-view
Enter system view, return user view with Ctrl+Z.
[Huawei]undo info-center enable
Info: Information center is disabled.
[Huawei]sysname r2
[r2]interface Dialer 0
[r2-Dialer0]dialer user user1
[r2-Dialer0]dialer bundle 1
[r2-Dialer0]ppp chap user zhibo
[r2-Dialer0]ppp chap password cipher zhibo
[r2-Dialer0]ip address ppp-negotiate
[r2-Dialer0]quit
R3:
<Huawei>system-view
Enter system view, return user view with Ctrl+Z.
[Huawei]undo info-center enable
Info: Information center is disabled.
[Huawei]sysname r2
[r3]interface Dialer 0
[r3-Dialer0]dialer user user1
[r3-Dialer0]dialer bundle 1
[r3-Dialer0]ppp chap user yingxiao
[r3-Dialer0]ppp chap password cipher yingxiao
[r3-Dialer0]ip address ppp-negotiate
[r3-Dialer0]quit
- 建立PPPoE会话
[r2]interface g0/0/0
[r2-GigabitEthernet0/0/0]pppoe-client dial-bundle-number 1
[r2-GigabitEthernet0/0/0]quit
[r3]interface g0/0/0
[r3-GigabitEthernet0/0/0]pppoe-client dial-bundle-number 1
[r3-GigabitEthernet0/0/0]quit
- 查看客户端是否通过PPPoE获取IP地址
[r2]display ip interface brief
*down: administratively down
^down: standby
(l): loopback
(s): spoofing
The number of interface that is UP in Physical is 4
The number of interface that is DOWN in Physical is 1
The number of interface that is UP in Protocol is 2
The number of interface that is DOWN in Protocol is 3
Interface IP Address/Mask Physical Protocol
Dialer0 100.1.1.254/32 up up(s)
GigabitEthernet0/0/0 unassigned up down
GigabitEthernet0/0/1 unassigned up down
GigabitEthernet0/0/2 unassigned down down
NULL0 unassigned up up(s)
[r3]display ip interface brief
*down: administratively down
^down: standby
(l): loopback
(s): spoofing
The number of interface that is UP in Physical is 4
The number of interface that is DOWN in Physical is 1
The number of interface that is UP in Protocol is 2
The number of interface that is DOWN in Protocol is 3
Interface IP Address/Mask Physical Protocol
Dialer0 200.1.1.254/32 up up(s)
GigabitEthernet0/0/0 unassigned up down
GigabitEthernet0/0/1 unassigned up down
GigabitEthernet0/0/2 unassigned down down
NULL0 unassigned up up(s)
可以看到都获取到了IP地址
- 配置R2的G0/0/1和R3的G0/0/1的IP地址
[r2]interface g0/0/1
[r2-GigabitEthernet0/0/1]ip address 192.168.1.254 24
[r2-GigabitEthernet0/0/1]quit
[r3]interface g0/0/1
[r3-GigabitEthernet0/0/1]ip address 192.168.2.254 24
[r3-GigabitEthernet0/0/1]quit
- 配置主机IP地址

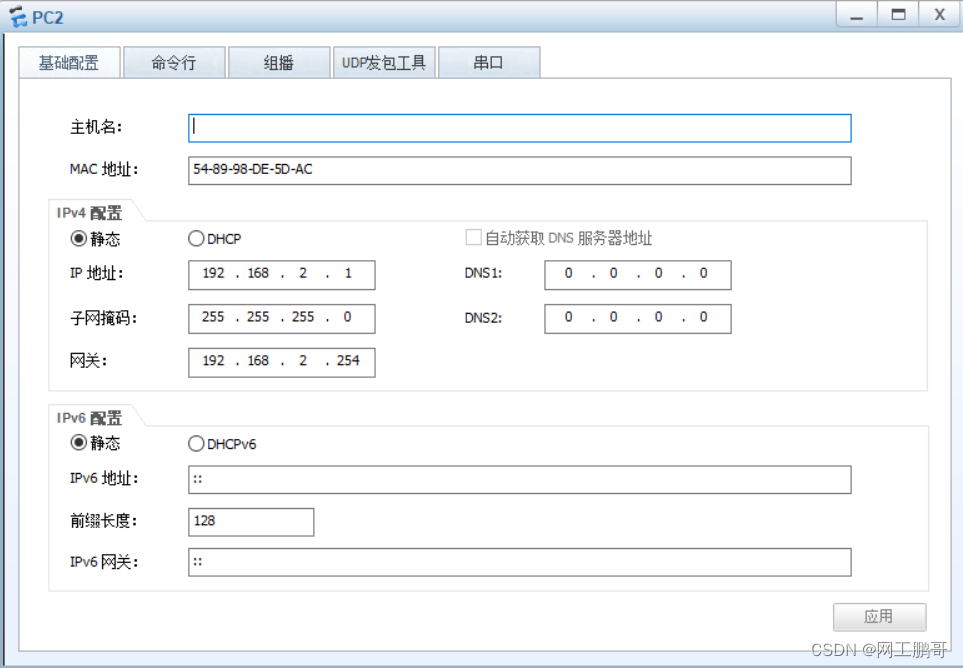
- 配置NAT,让私网能去访问公网
[r2]acl 2000
[r2-acl-basic-2000]rule permit source 192.168.1.0 0.0.0.255
[r2-acl-basic-2000]quit
[r2]interface Dialer 0
[r2-Dialer0]nat outbound 2000
[r3]acl 2000
[r3-acl-basic-2000]rule permit source 192.168.2.0 0.0.0.255
[r3-acl-basic-2000]quit
[r3]interface Dialer 0
[r3-Dialer0]nat outbound 2000
[r3-Dialer0]quit
- 配置静态路由
R2:
[r2]ip route-static 1.1.1.0 24 100.1.1.1
R3:
[r3]ip route-static 1.1.1.0 24 200.1.1.1
- 实验调试
- PC1访问外网
PC>ping 1.1.1.1
Ping 1.1.1.1: 32 data bytes, Press Ctrl_C to break
From 1.1.1.1: bytes=32 seq=1 ttl=255 time=16 ms
From 1.1.1.1: bytes=32 seq=2 ttl=255 time=16 ms
From 1.1.1.1: bytes=32 seq=3 ttl=255 time=15 ms
From 1.1.1.1: bytes=32 seq=4 ttl=255 time=16 ms
From 1.1.1.1: bytes=32 seq=5 ttl=255 time=16 ms
--- 1.1.1.1 ping statistics ---
5 packet(s) transmitted
5 packet(s) received
0.00% packet loss
round-trip min/avg/max = 15/15/16 ms
- PC2访问外网
PC>ping 1.1.1.1
Ping 1.1.1.1: 32 data bytes, Press Ctrl_C to break
From 1.1.1.1: bytes=32 seq=1 ttl=255 time<1 ms
From 1.1.1.1: bytes=32 seq=2 ttl=255 time=15 ms
From 1.1.1.1: bytes=32 seq=3 ttl=255 time=16 ms
From 1.1.1.1: bytes=32 seq=4 ttl=255 time=16 ms
From 1.1.1.1: bytes=32 seq=5 ttl=255 time=15 ms
--- 1.1.1.1 ping statistics ---
5 packet(s) transmitted
5 packet(s) received
0.00% packet loss
round-trip min/avg/max = 0/12/16 ms


