目录
- 前言
- 总体设计
- 系统整体结构图
- 系统流程图
- 运行环境
- 模块实现
- 1. 数据预处理
- 2. 数据增强
- 3. 模型构建
- 4. 模型训练及保存
- 5. 模型评估
- 6. 模型测试
- 1)权限注册
- 2)模型导入
- 3)总体模型构建
- 4)处理视频中的预览帧数据
- 5)处理图片数据
- 6)多页面设置
- 7)布局文件代码
- 相关其它博客
- 工程源代码下载
- 其它资料下载

前言
本项目依赖于Keras深度学习模型,旨在对手语进行分类和实时识别。为了实现这一目标,项目结合了OpenCV库的相关算法,用于捕捉手部的位置,从而能够对视频流和图像中的手语进行实时识别。
首先,项目使用OpenCV库中的算法来捕捉视频流或图像中的手部位置。这可以涉及到肤色检测、运动检测或者手势检测等技术,以精确定位手语手势。
接下来,项目利用CNN深度学习模型,对捕捉到的手语进行分类,经过训练,能够将不同的手语手势识别为特定的类别或字符。
在实时识别过程中,视频流或图像中的手语手势会传递给CNN深度学习模型,模型会进行推断并将手势识别为相应的类别。这使得系统能够实时地识别手语手势并将其转化为文本或其他形式的输出。
总的来说,本项目结合了计算机视觉和深度学习技术,为手语识别提供了一个实时的解决方案。这对于听觉障碍者和手语使用者来说是一个有益的工具,可以帮助他们与其他人更轻松地进行交流和理解。
总体设计
本部分包括系统整体结构图和系统流程图。
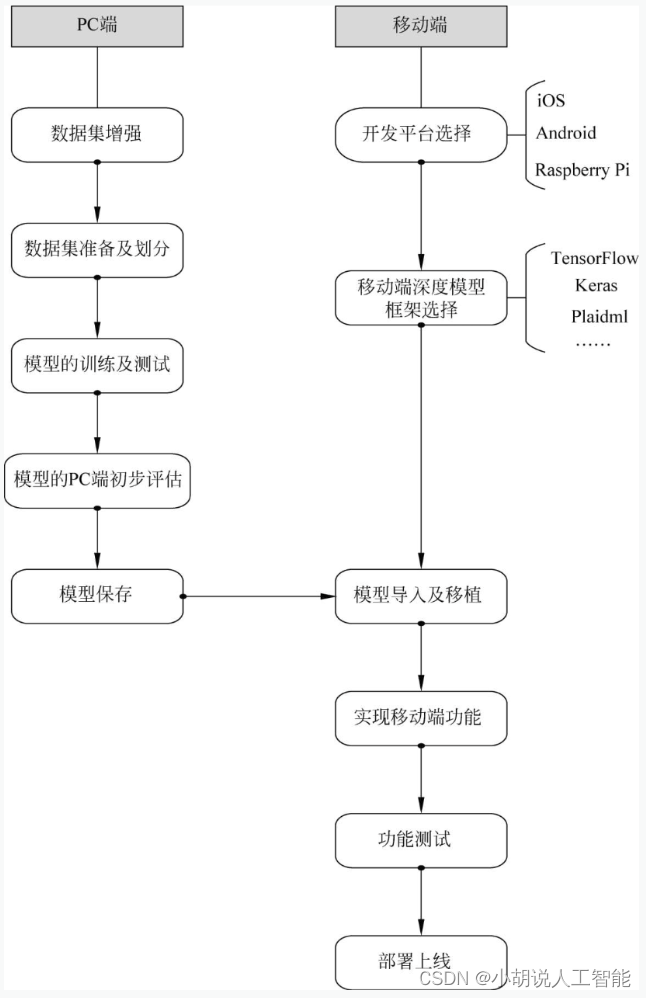
系统整体结构图
系统整体结构如图所示。
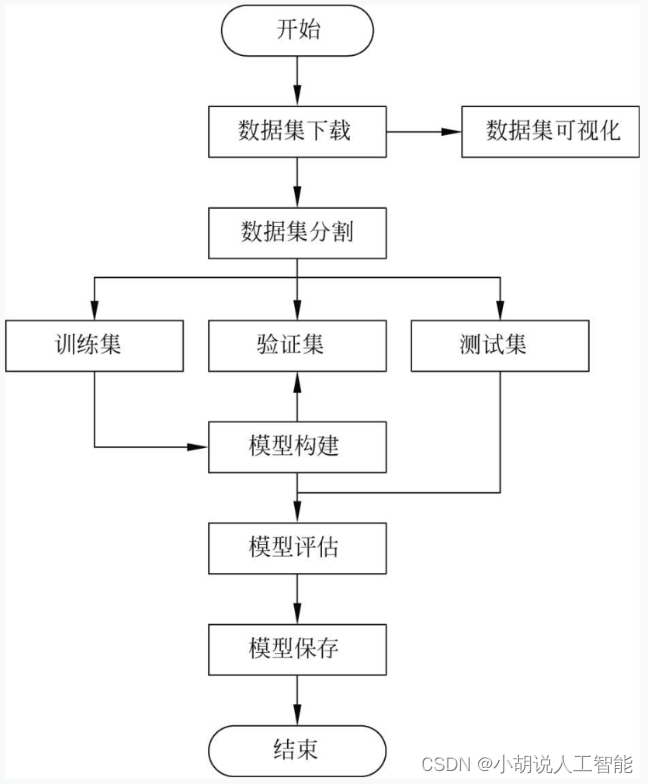
系统流程图
系统流程如图所示。
运行环境
本部分包括 Python 环境、TensorFlow环境、 Keras环境和Android环境。
模块实现
本项目包括6个模块:数据预处理、数据增强、模型构建、模型训练及保存、模型评估和模型测试,下面分别介绍各模块的功能及相关代码。
1. 数据预处理
在Kaggle上下载相应的数据集,下载地址为https://www.kaggle.com/ardamavi/sign-language-digits-dataset。
详见博客。
2. 数据增强
为方便展示生成图片的效果及对参数进行微调,本项目未使用keras直接训练生成器,而是先生成一个增强过后的数据集,再应用于模型训练。
详见博客。
3. 模型构建
数据加载进模型之后,需要定义模型结构,并优化损失函数。
详见博客。
4. 模型训练及保存
本部分包括模型训练和模型保存的相关代码。
详见博客。
5. 模型评估
由于网络上缺乏手语识别相关模型,为方便在多种模型中选择最优模型,以及进行模型的调优,模型应用于安卓工程之前,需要先在PC设备上使用Python文件进行初步的运行测试,以便验证本方案的手语识别策略是否可行并选择最优的分类模型。
详见博客。
6. 模型测试
评估整体模型可行性后,将手语识别模型应用于Android Studio工程中,完成APP。具体步骤如下。
1)权限注册
首先,为分别实现在视频和相片中识别手语,注册两个activity活动;其次,实现调用摄像头,在AndroidManifest.xml中进行摄像头权限及存储权限的申请。为了访问SD卡,注册FileProvider; 最后规定程序入口以及启动方式。
相关代码如下:
<?xml version="1.0" encoding="utf-8"?>
<manifest xmlns:android="http://schemas.android.com/apk/res/android"
    package="com.example.cameraapp">
    <uses-permission android:name="android.permission.CAMERA" />
  	<uses-permission android:name="android.permission.WRITE_EXTERNAL_STORAGE"/>
    <uses-feature android:name="android.hardware.camera" />
    <application
        android:allowBackup="true"
        android:icon="@mipmap/ic_launcher"
        android:label="@string/app_name"
        android:roundIcon="@mipmap/ic_launcher_round"
        android:supportsRtl="true"
        android:theme="@style/AppTheme">
        <activity android:name=".MainActivity"
            android:screenOrientation="landscape">
            android:label="手语实时识别">
            <intent-filter>
                <action android:name="android.intent.action.MAIN" />
                <category android:name="android.intent.category.LAUNCHER" />
            </intent-filter>
        </activity>
        <activity
            android:name="com.example.cameraapp.Second"
            android:label="图片识别">
            <intent-filter>
                <action android:name="com.litreily.SecondActivity"/>
                <category android:name="android.intent.category.DEFAULT"/>
            </intent-filter>
        </activity>
        <provider
            android:name="androidx.core.content.FileProvider"
            android:authorities="com.example.cameraapp.fileprovider"
            android:exported="false"
            android:grantUriPermissions="true">
            <meta-data
                android:name="android.support.FILE_PROVIDER_PATHS"
                android:resource="@xml/file_paths" />
        </provider>
    </application>
</manifest>
2)模型导入
模型导入相关操作如下。
(1) 将训练好的.pb文件放入app/src/main/assets下。若不存在assets目录,则右击菜单项main→new→Directory,输入assets创建目录。
(2) 新建类PredictionTF.java,在该类中加载so库,调用TensorFlow模型得到预测结果。
(3)在MainActivity.java中声明模型存放路径,建立PredictTF对象,调用PredictionTF类,并输入相应类进行应用。相关代码如下:
//加载模型
String MODEL_FILE = "file:///android_asset/trained_model_imageDataGenerator.pb";  //模型地址
PredictTF tf =new PredictTF(getAssets(),MODEL_FILE);
(4) 在MainActivity.java的onCreate()方法中中加载OpenCV库,相关代码如下:
//加载OpenCV库
private void staticLoadCVLibraries(){
    boolean load = OpenCVLoader.initDebug();
    if(load) {
        Log.i("CV", "Open CV Libraries loaded...");
    }
}
3)总体模型构建
在PredictTF内构建预测所需的相应函数,具体步骤如下。
(1)加载so库并声明所需的属性,相关代码如下:
private static final String TAG = "PredictTF";
TensorFlowInferenceInterface tf;
static {  //加载libtensorflow_inference.so库文件
    System.loadLibrary("tensorflow_inference");
    Log.e(TAG, "libtensorflow_inference.so库加载成功");
}
//PATH TO OUR MODEL FILE AND NAMES OF THE INPUT AND OUTPUT NODES
//各节点名称
private String INPUT_NAME = "conv2d_1_input";
private String OUTPUT_NAME = "output_1";
float[] PREDICTIONS = new float[10];   //手语分类模型的输出
private int[] INPUT_SIZE = {64, 64, 1};   //模型的输入形状
(2)使用OpenCV进行手部位置的捕捉
将不符合肤色检测阈值的区域涂黑,相关代码如下:
      //肤色识别
private Mat skin(Mat frame) {
    int iLowH = 0;
    int iHighH = 20;
    int iLowS = 40;
    int iHighS = 255;
    int iLowV = 80;
    int iHighV = 255;
    Mat hsv=new Mat();
    Imgproc.cvtColor(frame,hsv,Imgproc.COLOR_RGBA2BGR);  //将输入图片转为灰度图
    Imgproc.cvtColor(hsv,hsv,Imgproc.COLOR_BGR2HSV);
    Mat skinMask=new Mat();
    Core.inRange(hsv, new Scalar(iLowH, iLowS, iLowV), new Scalar(iHighH, iHighS, iHighV),skinMask);
    Imgproc.GaussianBlur(skinMask,skinMask,new Size(5,5),0);  //高斯滤波
    Mat skin=new Mat();
    bitwise_and(frame,frame,skin,skinMask);  //将不符合肤色阈值的区域涂黑
    return skin;
}
在predict函数中将提取到的区域进行高斯滤波以及二值化,并使用findContour函数进行轮廓提取。对比轮廓大小,忽略面积小于阈值的连通域。最后使用boundingRect函数提取原图。
相关代码如下:
//载入位图并转为openCV的Mat对象
Bitmap bitmap = BitmapFactory.decodeFile(imagePath);
Mat frame = new Mat();
if (imagePath == null) {System.out.print("imagePath is null");}
Utils.bitmapToMat(bitmap, frame);
Core.flip(frame,frame,1);   //水平镜像翻转
//图片预处理
frame=skin(frame);          //肤色识别
//Mat frame1=new Mat();
Imgproc.cvtColor(frame,frame,Imgproc.COLOR_BGR2GRAY);       //转化为灰度图
Mat frame1=new Mat();
Imgproc.GaussianBlur(frame,frame1,new Size(5,5),0);      //高斯滤波
double res=Imgproc.threshold(frame1, frame1,50, 255, Imgproc.THRESH_BINARY);      //二值化
//Imgproc.cvtColor(frame,frame,);
//提取所有轮廓
List<MatOfPoint> contours=new ArrayList<MatOfPoint>();
Mat hierarchy = new Mat();
Imgproc.findContours(frame1, contours, hierarchy,
Imgproc.RETR_EXTERNAL,
Imgproc.CHAIN_APPROX_SIMPLE);       //轮廓提取
//找到最大区域并填充
int max_idx= 0;
List<Double> area=new ArrayList<>();
for (int i=0;i < contours.size();i++) {
    area.add(Imgproc.contourArea((contours).get(i)));
    //max_idx = area.indexOf(Collections.max(area));
}
max_idx = area.indexOf(Collections.max(area));
//得到矩形
Rect rect= Imgproc.boundingRect(contours.get(max_idx));
//提取相关区域
String mess;
mess= String.valueOf(frame.channels());
Log.i("CV", "the type of frame is:"+mess);
Mat chepai_raw = new Mat(frame,rect);    //提取相关区域
Mat cheapi=new Mat();
Core.flip(chepai_raw,cheapi,1);       //水平镜面反转
(3)将OpenCV提取到的区域输入至手语分类模型中
将提取到的bitmpa位图转换成一维数组以供模型输入,相关代码如下:
Bitmap input = Bitmap.createBitmap(cheapi.cols(),
cheapi.rows(),
Bitmap.Config.ARGB_8888);
Utils.matToBitmap(cheapi,input);
float[] input_data=bitmapToFloatArray(input,64,64);
Bitmap.createBitmap()函数定义相关代码如下:
    //将bitmap转化为一维浮点数组
   //本函数修改自https://blog.csdn.net/chaofeili/article/details/89374324
   public static float[] bitmapToFloatArray(Bitmap bitmap,int rx, int ry){
        int height = bitmap.getHeight();
        int width = bitmap.getWidth();
        //计算缩放比例
        float scaleWidth = ((float) rx) / width;
        float scaleHeight = ((float) ry) / height;
        Matrix matrix = new Matrix();
        matrix.postScale(scaleWidth, scaleHeight);
        bitmap=Bitmap.createBitmap(bitmap,0,0,width,height, matrix, true);
        height = bitmap.getHeight();
        width = bitmap.getWidth();
        float[] result = new float[height*width];
        int k = 0;
        //行优先
        for(int j = 0;j < height;j++){
            for (int i = 0;i < width;i++){
                int argb = bitmap.getPixel(i,j);
                int r = Color.red(argb);
                int g = Color.green(argb);
                int b = Color.blue(argb);
                int a = Color.alpha(argb);
                //由于是灰度图,所以r,g,b分量是相等的
                assert(r==g && g==b);
//Log.i(TAG,i+","+j+":argb = "+argb+", a="+a+", r="+r+", g="+g+", b="+b);
                result[k++] = r / 255.0f;
            }
        }
        return result;
    }
由于原数据集存在标签错误的情况,需要为标签纠错提供正确的映射字典,相关代码如下:
Map<Integer, Integer> label_map=new HashMap<Integer, Integer>();
label_map.put(0,9);label_map.put(1,0);label_map.put(2,7);
label_map.put(3,6);label_map.put(4,1);
label_map.put(5,8);label_map.put(6,4);
label_map.put(7,3);label_map.put(8,2);label_map.put(9,5);     //标签纠错
开始应用模型并得到预测的结果,相关代码如下:
    //开始应用模型
tf = new TensorFlowInferenceInterface(getAssets(),MODEL_PATH);   //加载模型
tf.feed(INPUT_NAME, input_data, 1, 64, 64, 1);
tf.run(new String[]{OUTPUT_NAME});
//copy the output into the PREDICTIONS array
tf.fetch(OUTPUT_NAME,PREDICTIONS);
//Obtained highest prediction
Object[] results = argmax(PREDICTIONS);  //找到预测置信度最大的类作为分类结果
int class_index = (Integer) results[0];
float confidence = (Float) results[1];
/*try{
    final String conf = String.valueOf(confidence * 100).substring(0,5);
    //Convert predicted class index into actual label name
    final String label = ImageUtils.getLabel(getAssets().open("labels.json"),class_index);
    //Display result on UI
    runOnUiThread(new Runnable() {
        @Override
        public void run() {
            resultView.setText(label + " : " + conf + "%");
        }
    });
} catch (Exception e){
}//*/
int label=label_map.get(class_index);         //标签纠错
results [0]=label;
预测函数相关代码如下:
private Object[] perdict (Bitmap bitmap){
    //载入位图并转为openCV的Mat对象
    //Bitmap bitmap = BitmapFactory.decodeFile(imagePath);
    Mat frame = new Mat();
    //if (imagePath == null) {System.out.print("imagePath is null");}
    Utils.bitmapToMat(bitmap, frame);
    //Core.flip(frame,frame,1);   //水平镜像翻转
    //图片预处理
    Mat frame2=new Mat();
    frame2=skin(frame);          //肤色识别
    Imgproc.cvtColor(frame2,frame2,Imgproc.COLOR_BGR2GRAY);  //转化为灰度图
    Mat frame1=new Mat();
    Imgproc.GaussianBlur(frame2,frame1,new Size(5,5),0);      //高斯滤波
    double res=Imgproc.threshold(frame1, frame1,50, 255, Imgproc.THRESH_BINARY);      //二值化
    //提取所有轮廓
    List<MatOfPoint> contours=new ArrayList<MatOfPoint>();
    Mat hierarchy = new Mat();
    Imgproc.findContours(frame1, contours, hierarchy, Imgproc.RETR_EXTERNAL, Imgproc.CHAIN_APPROX_SIMPLE);       //轮廓提取
    //找到最大区域并填充
    int max_idx= 0;
    List<Double> area=new ArrayList<>();
    for (int i=0;i < contours.size();i++) {
        area.add(Imgproc.contourArea((contours).get(i)));
       }
    max_idx = area.indexOf(Collections.max(area));
    //得到矩形
    Rect rect= Imgproc.boundingRect(contours.get(max_idx));
    //提取相关区域
    String mess;
    Imgproc.cvtColor(frame,frame,Imgproc.COLOR_BGR2GRAY);//将原图转化为灰度图
    mess= String.valueOf(frame.channels());
    Log.i("CV", "the type of frame is:"+mess);
    Mat chepai_raw = new Mat(frame,rect);
    mess= String.valueOf(chepai_raw.channels());
    Log.i("CV", "the type of chepai_raw is:"+mess);
    Mat cheapi=new Mat();
    Core.flip(chepai_raw,cheapi,1);       //水平镜面反转
    //将提取的区域转为一维浮点数组输入模型
    Bitmap input = Bitmap.createBitmap(cheapi.cols(), cheapi.rows(), Bitmap.Config.ARGB_8888);
    Utils.matToBitmap(cheapi,input);
    float[] input_data=bitmapToFloatArray(input,64,64);
    Map<Integer, Integer> label_map=new HashMap<Integer, Integer>();
    //{0:9,1:0, 2:7, 3:6, 4:1, 5:8, 6:4, 7:3, 8:2, 9:5};
    label_map.put(0,9);label_map.put(1,0);label_map.put(2,7);label_map.put(3,6);label_map.put(4,1);
    label_map.put(5,8);label_map.put(6,4);label_map.put(7,3);label_map.put(8,2);label_map.put(9,5);     //标签纠错
    //开始应用模型
    tf=new TensorFlowInferenceInterface(getAssets(),MODEL_PATH);  //加载模型
    tf.feed(INPUT_NAME, input_data, 1, 64, 64, 1);
    tf.run(new String[]{OUTPUT_NAME});
    //copy the output into the PREDICTIONS array
    tf.fetch(OUTPUT_NAME,PREDICTIONS);
    //选择预测结果中置信度最大的类别
    Object[] results = argmax(PREDICTIONS);
    int class_index = (Integer) results[0];
    float confidence = (Float) results[1];
    /*try{
        final String conf = String.valueOf(confidence * 100).substring(0,5);
        //将预测的结果转化为0~9的标签
        final String label = ImageUtils.getLabel(getAssets().open("labels.json"),class_index);
        //显示结果
        runOnUiThread(new Runnable() {
            @Override
            public void run() {
                resultView.setText(label + " : " + conf + "%");
            }
        });
    } catch (Exception e){
    }
    int label=label_map.get(class_index);         //标签纠错
    results [0]=label;
    return results;
}
4)处理视频中的预览帧数据
处理预览帧是对相机预览时的每一帧数据进行处理,识别特定帧中的手语类型,具体步骤如下:
(1)新建处理预览帧所需的CameraPreview类以及ProcessWithThreadPool类
(2)绑定开始预览相机视频时的事件
修改mainActivity,在新建的方法startPreview()中添加初始化相机预览的代码,最后在stopPreview()方法中停止相机预览,通过removeAllViews()将相机预览移除时,会触发CameraPreview类中的相关结束方法,关闭相机预览。相关代码如下:
public void startPreview() {
        //加载模型
StringMODEL_FILE="file:///android_asset/trained_model_imageDataGenerator.pb";
       //模型地址
        PredictTF tf =new PredictTF(getAssets(),MODEL_FILE);
        //新建相机预览对象
        final CameraPreview mPreview = new CameraPreview(this,tf);
        //新建可视布局
        FrameLayout preview = (FrameLayout) findViewById(R.id.camera_preview);
        preview.addView(mPreview);
        //调用并初始化摄像头
        SettingsFragment.passCamera(mPreview.getCameraInstance());
        PreferenceManager.setDefaultValues(this, R.xml.preferences, false);  SettingsFragment.setDefault(PreferenceManager.getDefaultSharedPreferences(this));        SettingsFragment.init(PreferenceManager.getDefaultSharedPreferences(this));
        //设置开始按钮监听器
        Button buttonSettings = (Button) findViewById(R.id.button_settings);
        buttonSettings.setOnClickListener(new View.OnClickListener() {
            @Override
            public void onClick(View v) {
getFragmentManager().beginTransaction().replace(R.id.camera_preview, new SettingsFragment()).addToBackStack(null).commit();
            }
        });
    }
public void stopPreview() {
    //移除相机预览界面
    FrameLayout preview = (FrameLayout) findViewById(R.id.camera_preview);
    preview.removeAllViews();
}
在mainActivity中,onCreate()方法中使用两个按钮绑定上述方法,相关代码如下:
protected void onCreate(Bundle savedInstanceState) {
    super.onCreate(savedInstanceState);
    setContentView(R.layout.activity_main);
    //加载OpenCV库
    staticLoadCVLibraries();
    //绑定相机预览开始按钮
    Button buttonStartPreview = (Button) findViewById(R.id.button_start_preview);
    buttonStartPreview.setOnClickListener(new View.OnClickListener() {
        @Override
        public void onClick(View v) {
            startPreview();
        }
    });
    //绑定相机预览停止按钮
    Button buttonStopPreview = (Button) findViewById(R.id.button_stop_preview);
    buttonStopPreview.setOnClickListener(new View.OnClickListener() {
        @Override
        public void onClick(View v) {
            stopPreview();
        }
    });
}
(3)实时处理帧数据
在CameraPreview类中新增Camera.PreviewCallback接口声明,以实现此接口下的onPreviewFrame()方法,此方法用于获取每一帧的数据。相关代码如下:
public class CameraPreview extends SurfaceView implements SurfaceHolder.Callback, Camera.PreviewCallback{}
实现onPreviewFrame()方法,调用PredictTF类进行进行手语的识别,相关代码如下:
public void onPreviewFrame(byte[] data, Camera camera) {
    switch (processType) {
        case PROCESS_WITH_HANDLER_THREAD:
            processFrameHandler.obtainMessage(ProcessWithHandlerThread.WHAT_PROCESS_FRAME, data).sendToTarget();
            break;
        case PROCESS_WITH_QUEUE:
            try {
                frameQueue.put(data);
            } catch (InterruptedException e) {
                e.printStackTrace();
            }
            break;
        case PROCESS_WITH_ASYNC_TASK:
            new ProcessWithAsyncTask().execute(data);
            break;
        case PROCESS_WITH_THREAD_POOL:
            processFrameThreadPool.post(data);
            try {
                //延时3s处理
                Thread.sleep(500);  //手掌位置捕捉的延时
                NV21ToBitmap transform = new NV21ToBitmap(getContext().getApplicationContext());
                Bitmap bitmap= transform.nv21ToBitmap(data,1920,1080);
                String num;
                Object[] results=tf.perdict(bitmap);
                if (results!=null) {
                    num = "result:" + results[0].toString() + "  confidence:" + results[1].toString();
                    Toast.makeText(getContext().getApplicationContext(), num, Toast.LENGTH_SHORT).show();
                    Thread.sleep(3000);  //如果监测到有效手语,则进行延时
                }
             } catch (InterruptedException e) {
                e.printStackTrace();
            }
            break;
        default:
            throw new IllegalStateException("Unexpected value: " + processType);
             //*/
    }
}
5)处理图片数据
本部分包括调用摄像头获取图片、从相册中选择图片、对图片进行预测和显示。
(1)调用摄像头获取图片。
file对象用于存放摄像:头拍摄的照片,存放在当前应用缓存数据的位置,并调用getUriForFile()方法获取此目录。
为了兼容低版本,随后进行判断:如果系统版本低于Android7.0,则调用Uri的formFlie ()方法将File对象转为Uri对象;否则调用FileProvider对象的getUriForFile ()方法将File对象转换成Uri对象。
构建Intent对象,将action指定为android.media.action.IMAGE_CAPTURE,再调用putExtra ()方法指定图片的输出地址,调用startActivityForResul ()方法打开相机程序,成功后返回TAKE_PHOTO进行下一步处理。相关代码如下:
//创建File对象,用于存储拍照后的图片
    File outputImage = new File(getExternalCacheDir(), "output_image.jpg");
    try {
        if (outputImage.exists()) {
            outputImage.delete();
        }
        outputImage.createNewFile();
    } catch (IOException e) {
        e.printStackTrace();
    }
    if (Build.VERSION.SDK_INT < 24) {
        imageUri = Uri.fromFile(outputImage);
    } else {
        imageUri=FileProvider.getUriForFile(Second.this,"com.example.cameraapp.fileprovider", outputImage);
    }
    //启动相机程序
    Intent intent = new Intent("android.media.action.IMAGE_CAPTURE");
    intent.putExtra(MediaStore.EXTRA_OUTPUT, imageUri);
    startActivityForResult(intent, TAKE_PHOTO);
}
新增file_paths.xml文件,相关代码如下:
<?xml version="1.0" encoding="utf-8"?>
<paths xmlns:android="http://schemas.android.com/apk/res/android">
    <external-path name="my_images"  path="/" />
</paths>
在Androidfest.xml文件中注册fileProvider,相关代码如下:
<provider
    android:name="androidx.core.content.FileProvider"
    android:authorities="com.example.cameraapp.fileprovider"
    android:exported="false"
    android:grantUriPermissions="true">
    <meta-data
        android:name="android.support.FILE_PROVIDER_PATHS"
        android:resource="@xml/file_paths" />
</provider>
(2) 从相册中选择图片
在AndroidManifest.xml文件中申请WRITE_EXTERNAL_STORAGE权限,因为从相册中选择图片需要访问到手机的SD卡数据。
创建Intent对象,将action指定为android.intent.action.GET_CONTENT,调用startActivityForResult() 方法打开手机相册,成功后返回CHOOSE_PHOTO用于下一步处理。
相关代码如下:
private void openAlbum() {
    Intent intent = new Intent("android.intent.action.GET_CONTENT");
    intent.setType("image/*");
    startActivityForResult(intent, CHOOSE_PHOTO); // 打开相册
}
为了兼容低版本,用handleImageOnKitKat()和handleImageBeforeKitKat()函数分别对4.4以上及4.4版本以下手机的图片进行处理。
handleImageOnKitKat()是解析之前封装好的Uri对象,而handleImageBeforeKitKat()的Uri由于未进行封装,直接将Uri对象传入getImagePath()即可。相关代码如下:
private void handleImageOnKitKat(Intent data) {
    String imagePath = null;
    Uri uri = data.getData();
    Log.d("TAG", "handleImageOnKitKat: uri is " + uri);
    if (DocumentsContract.isDocumentUri(this, uri)) {
        // 如果是document类型的Uri,则通过document ID处理
        String docId = DocumentsContract.getDocumentId(uri);
        if("com.android.providers.media.documents".equals(uri.getAuthority())) {
            String id = docId.split(":")[1]; //解析数字格式的ID
            String selection = MediaStore.Images.Media._ID + "=" + id;
            imagePath = getImagePath(MediaStore.Images.Media.EXTERNAL_CONTENT_URI, selection);
        }
 else
if ("com.android.providers.downloads.documents".equals(uri.getAuthority())) {
            Uri contentUri=ContentUris.withAppendedId(Uri.parse("content://downloads/public_downloads"), Long.valueOf(docId));
            imagePath = getImagePath(contentUri, null);
        }
    } else if ("content".equalsIgnoreCase(uri.getScheme())) {
        //如果是content类型的Uri,则使用普通方式处理
        imagePath = getImagePath(uri, null);
    } else if ("file".equalsIgnoreCase(uri.getScheme())) {
        //如果是file类型的Uri,直接获取图片路径即可
        imagePath = uri.getPath();
    }
    displayImage(imagePath); //根据图片路径显示图片
}
private void handleImageBeforeKitKat(Intent data) {
    Uri uri = data.getData();
    String imagePath = getImagePath(uri, null);
    displayImage(imagePath);
}
(3) 对图片进行预测和显示
使用PredictTF对象相关方法预测出从相机或相册中获取的图片位图对象中的手势类型,并使用setImageBitmap函数显示。
相关代码如下:
protected void onActivityResult(int requestCode, int resultCode, Intent data) {
    super.onActivityResult(requestCode,resultCode, data);
   switch (requestCode)
 {
        case TAKE_PHOTO:
            if (resultCode == RESULT_OK) {
                try {  //将拍摄的照片显示出来并进行识别
Bitmapbitmap=BitmapFactory.decodeStream(getContentResolver().openInputStream(imageUri));
                    //识别图片
                    Object[] results=tf.perdict(bitmap);
                    String num;
                    num ="result:"+results[0].toString()+"  confidence:"+results[1].toString();
                    Toast.makeText(Second.this, num , Toast.LENGTH_SHORT).show();
                    //展示图片
                    picture.setImageBitmap(bitmap);
                } catch (Exception e) {
                    e.printStackTrace();
                }
            }
            break;
        case CHOOSE_PHOTO:
            if (resultCode == RESULT_OK) {
                //判断手机系统版本号
                if (Build.VERSION.SDK_INT >= 19) {
                    //4.4及以上系统使用这个方法处理图片
                    handleImageOnKitKat(data);
                } else {
                    //4.4以下系统使用这个方法处理图片
                    handleImageBeforeKitKat(data);
                }
            }
            break;
        default:
            break;
    }
}
6)多页面设置
创建完使用视频和图片进行预测的类别后,在AndroidManifest.xml文件中注册两个activity。其中在MainActivity.java中使用视频进行预测,Second.java中使 用图片进行预测。
相关代码如下:
<activity android:name=".MainActivity"
    android:screenOrientation="landscape">
    android:label="手语实时识别">
    <intent-filter>
        <action android:name="android.intent.action.MAIN" />
        <category android:name="android.intent.category.LAUNCHER" />
    </intent-filter>
</activity>
<activity
    android:name="com.example.cameraapp.Second"
    android:label="图片识别">
    <intent-filter>
        <action android:name="com.litreily.SecondActivity"/>
        <category android:name="android.intent.category.DEFAULT"/>
    </intent-filter>
</activity>
在每个页面设置跳转按钮及监听事件,通过setClass()方法设置跳转的页面,并使用startActivityForResult()方法启动跳转。
相关代码如下:
//设置跳转按钮
Button buttonSettings = (Button) findViewById(R.id.button_settings);
buttonSettings.setOnClickListener(new View.OnClickListener() {
    @Override
    public void onClick(View v){
        Intent intent2 =new Intent(); //新建Intent对象
        intent2.setClass(MainActivity.this, Second.class);
        startActivityForResult(intent2,0);   //返回前一页
    }
});
7)布局文件代码
布局文件相关代码如下:
activity.xml:
<?xml version="1.0" encoding="utf-8"?>
<LinearLayout xmlns:android="http://schemas.android.com/apk/res/android"
    android:layout_width="match_parent"
    android:layout_height="match_parent">
    <FrameLayout
        android:id="@+id/camera_preview"
        android:layout_width="0px"
        android:layout_height="fill_parent"
        android:layout_weight="1" />
    <LinearLayout
        android:layout_width="wrap_content"
        android:layout_height="wrap_content"
        android:layout_gravity="right"
        android:orientation="vertical">
        <Button
            android:id="@+id/button_settings"
            android:layout_width="wrap_content"
            android:layout_height="wrap_content"
            android:text="转到图片识别" />
        <Button
            android:id="@+id/button_start_preview"
            android:layout_width="wrap_content"
            android:layout_height="wrap_content"
            android:text="开始翻译" />
        <Button
            android:id="@+id/button_stop_preview"
            android:layout_width="wrap_content"
            android:layout_height="wrap_content"
            android:text="停止翻译" />
        <TextView
            android:id="@+id/info1"
            android:layout_width="wrap_content"
            android:layout_height="wrap_content"
            android:text="本次识别结果:" />
        <TextView
            android:id="@+id/textView"
            android:layout_width="wrap_content"
            android:layout_height="wrap_content" />
        <TextView
            android:id="@+id/info2"
            android:layout_width="wrap_content"
            android:layout_height="wrap_content"
            android:text="手部区域:" />
        <ImageView
            android:id="@+id/picture"
            android:layout_width="100dp"
            android:layout_height="80dp"
            android:layout_gravity="center_horizontal" />
        <TextView
            android:id="@+id/info3"
            android:layout_width="wrap_content"
            android:layout_height="wrap_content"
            android:text="句子翻译:" />
        <TextView
            android:id="@+id/translated_statement"
            android:layout_width="200dp"
            android:layout_height="wrap_content"
            android:singleLine="true"
            android:ellipsize="start"/>
    </LinearLayout>
</LinearLayout>
second.xml:
<?xml version="1.0" encoding="utf-8"?>
<LinearLayout xmlns:android="http://schemas.android.com/apk/res/android"
    android:orientation="vertical"
    android:layout_width="match_parent"
    android:layout_height="match_parent" >
    <Button
        android:id="@+id/take_photo"
        android:layout_width="match_parent"
        android:layout_height="wrap_content"
        android:text="拍照识别" />
    <Button
        android:id="@+id/choose_from_album"
        android:layout_width="match_parent"
        android:layout_height="wrap_content"
        android:text="从相册中选择" />
    <Button
        android:id="@+id/button_settings"
        android:layout_width="match_parent"
        android:layout_height="wrap_content"
        android:text="转到实时翻译" />
    <EditText
        android:layout_width="match_parent"
        android:layout_height="wrap_content" />
    <ImageView
        android:id="@+id/picture"
        android:layout_width="wrap_content"
        android:layout_height="wrap_content"
        android:layout_gravity="center_horizontal" />
</LinearLayout>
相关其它博客
基于Android+OpenCV+CNN+Keras的智能手语数字实时翻译——深度学习算法应用(含Python、ipynb工程源码)+数据集(一)
基于Android+OpenCV+CNN+Keras的智能手语数字实时翻译——深度学习算法应用(含Python、ipynb工程源码)+数据集(二)
基于Android+OpenCV+CNN+Keras的智能手语数字实时翻译——深度学习算法应用(含Python、ipynb工程源码)+数据集(三)
基于Android+OpenCV+CNN+Keras的智能手语数字实时翻译——深度学习算法应用(含Python、ipynb工程源码)+数据集(五)
工程源代码下载
详见本人博客资源下载页
其它资料下载
如果大家想继续了解人工智能相关学习路线和知识体系,欢迎大家翻阅我的另外一篇博客《重磅 | 完备的人工智能AI 学习——基础知识学习路线,所有资料免关注免套路直接网盘下载》
这篇博客参考了Github知名开源平台,AI技术平台以及相关领域专家:Datawhale,ApacheCN,AI有道和黄海广博士等约有近100G相关资料,希望能帮助到所有小伙伴们。

