多线程(二)
文章目录
- 多线程(二)
- 第一个多线程程序
- 观察线程
- sleep
- 创建线程
- 继承Thread类,重写run方法
- 实现Runnable, 重写run
- 继承Thread,重写run
- 实现Runnable,重写run
- 基于lambda表达式
- Thread的常见构造方法
- Thread几个常见属性
- setDaemon();
- isAlive();
续上文, 多线程(一),我们可以了解到,多线程和普通程序的区别:
- 每一个程序都是一个独立的执行流
- 多个线程之间都是“并发”执行的
第一个多线程程序
class MyTread extends Thread{
    @Override
    public void run() {
        //这个方法就是线程的入口方法
        while (true) {
            try {
                Thread.sleep(1000);
            } catch (InterruptedException e) {
                e.printStackTrace();
            }
            System.out.println("hello thread");
        }
    }
}

//演示创建线程
public class Demo1 {
    public static void main(String[] args) throws InterruptedException {
        Thread t = new MyTread();
        //start 和 run 都是 Thread 的成员
        //run 只是描述了线程的入口(线程主要做什么任务)
        //start 则是真正调用了系统API,在系统中创建线程,让线程再调用run
        //t.start();
        //t.run();
        t.start();
        while (true){
            System.out.println("hello main");
            Thread.sleep(1000);
        }
    }
}
通过运行这个程序,我们可以发现两个while循环在“同时执行”,可以看到打印结果是两边的日志在交替打印的:
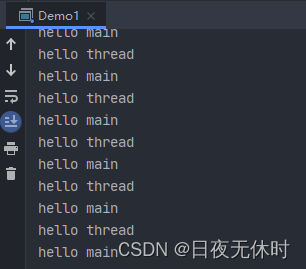
这也说明了:
每个线程都是一个独立执行的逻辑,也就是独立的执行流~
我们也可以形象的看作是:兵分两路,并发执行~
而 并发 => 并行 + 并发 => 并发编程的效果 => 充分使用多核cpu资源
不过当我们将main 函数的t.start();改成t.run();
public static void main(String[] args) throws InterruptedException {
        Thread t = new MyTread();
        //start 和 run 都是 Thread 的成员
        //run 只是描述了线程的入口(线程主要做什么任务)
        //start 则是真正调用了系统API,在系统中创建线程,让线程再调用run
        t.run();
        while (true){
            System.out.println("hello main");
            Thread.sleep(1000);
        }
    }
此时,代码中不会创建新的线程,就只有一个主线程,这个主线程只能依次执行循环,执行完一个在执行另外一个~,不过因为代码中是while(true),是不会循环结束的,所以代码也就无法走到hello main了。
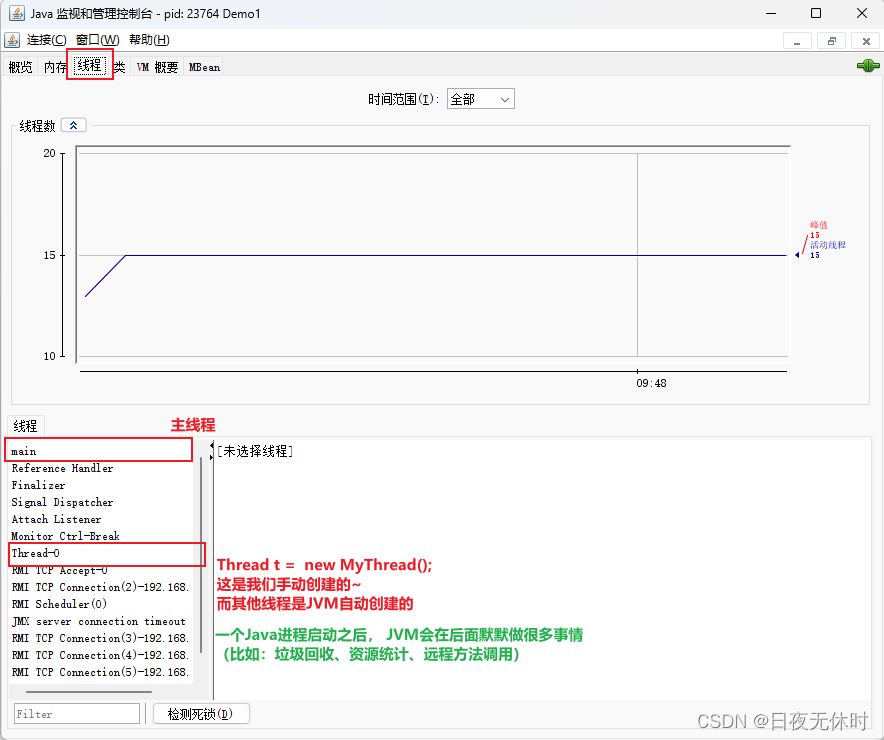
还有一个需要我们了解的:main这个线程是jvm自动创建的,和其他线程比起来并没有什么特殊的,在一个java进程中,至少都会有一个main线程。
观察线程
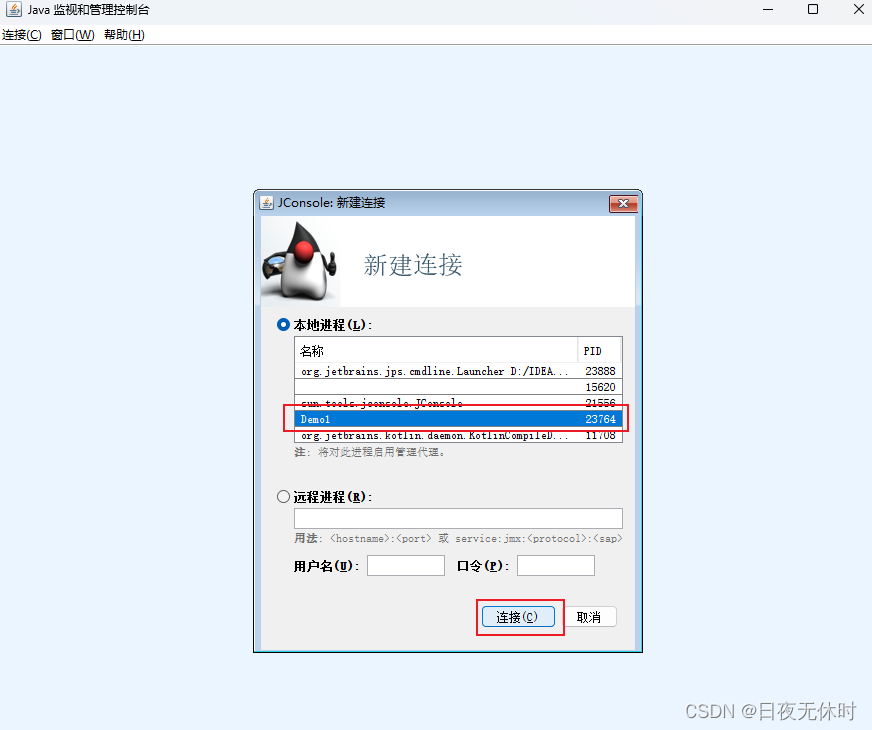
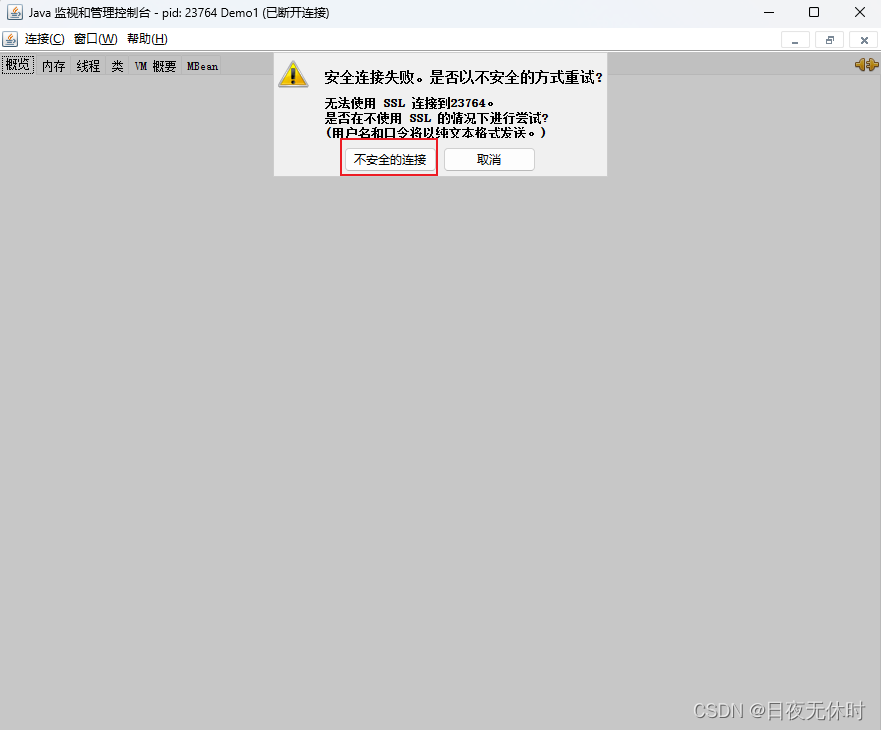
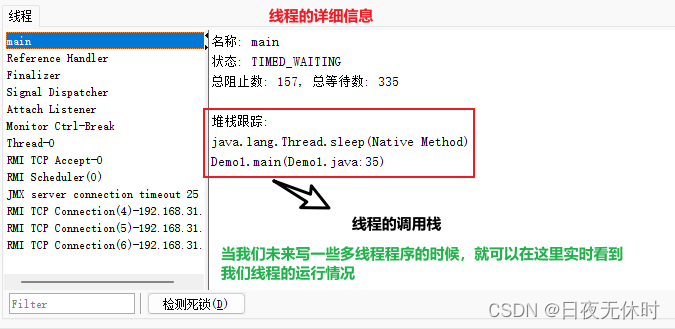
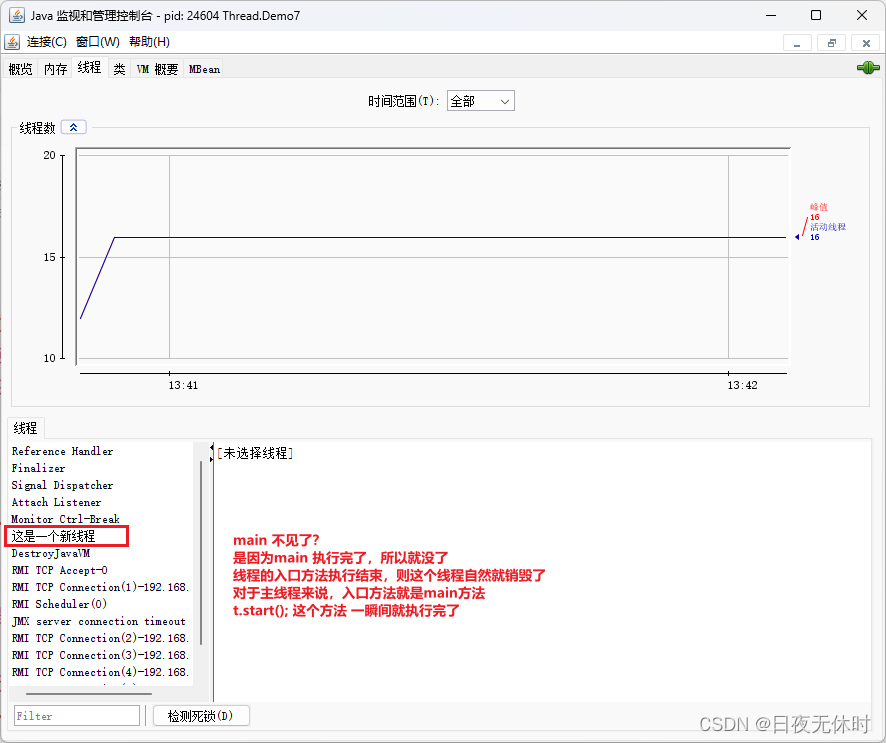
当我们多线程程序运行的时候,我们可以使用IDEA或者jconsole来观察该进程内的多线程情况~
这里我们主要介绍jconsole,jconsole是jdk自带的程序
而jconsole我们可以在jdk包里找到
-
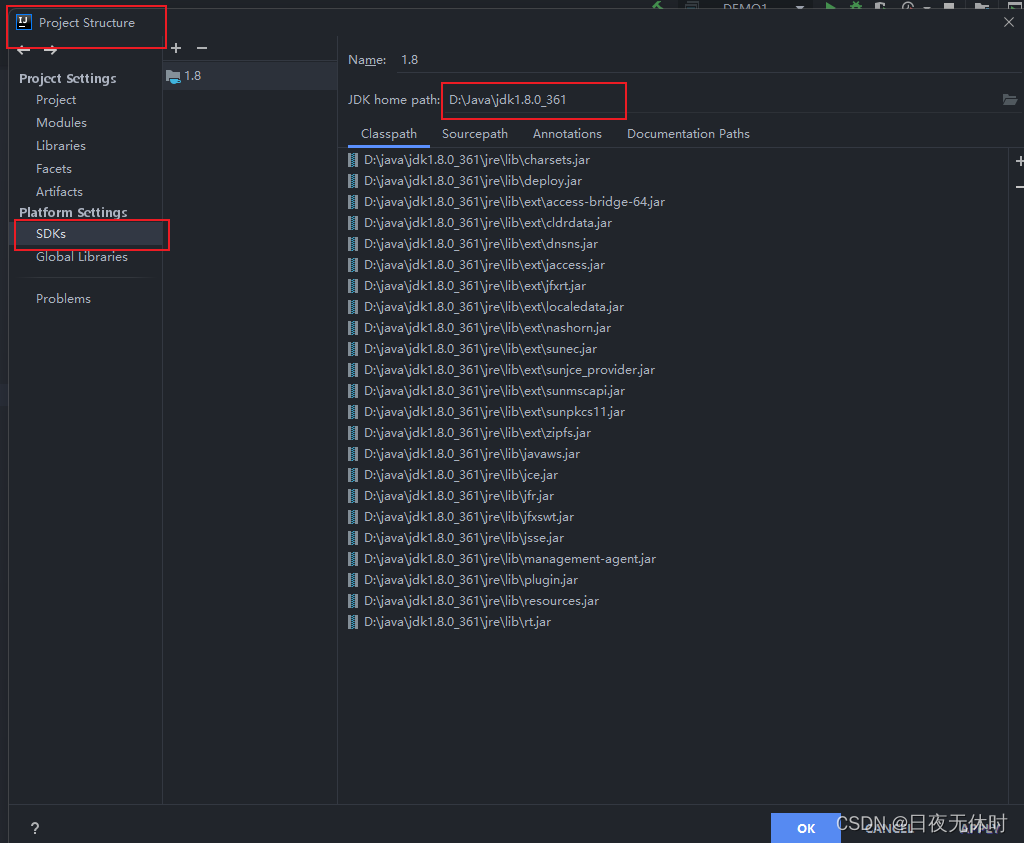
首先我们要先找到
jdk的安装地址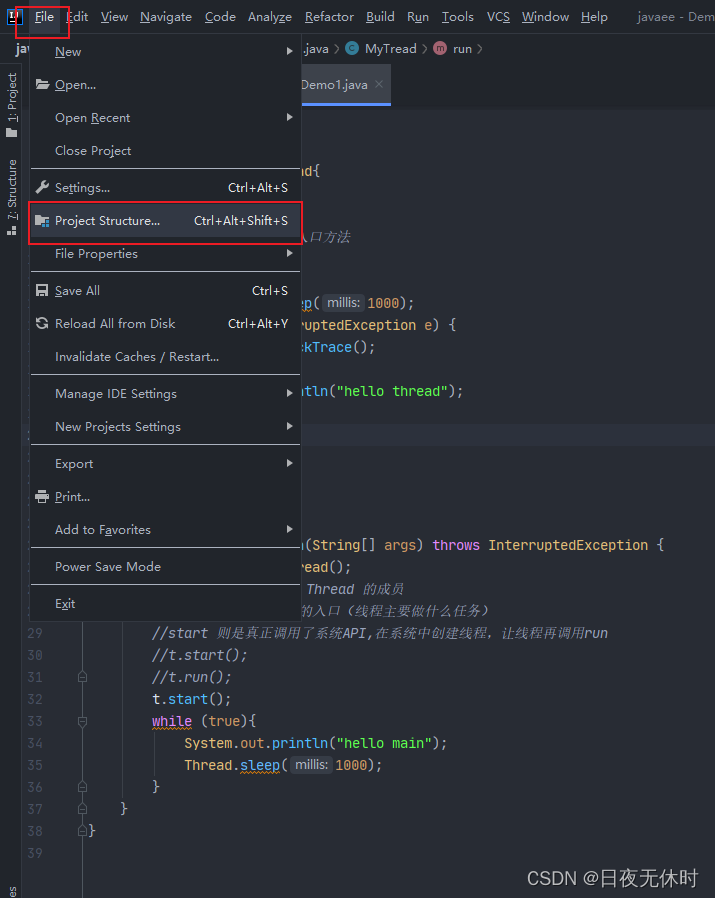
-
在地址处找到
jdk然后打开bin目录,然后再列表中找到jconsole.exe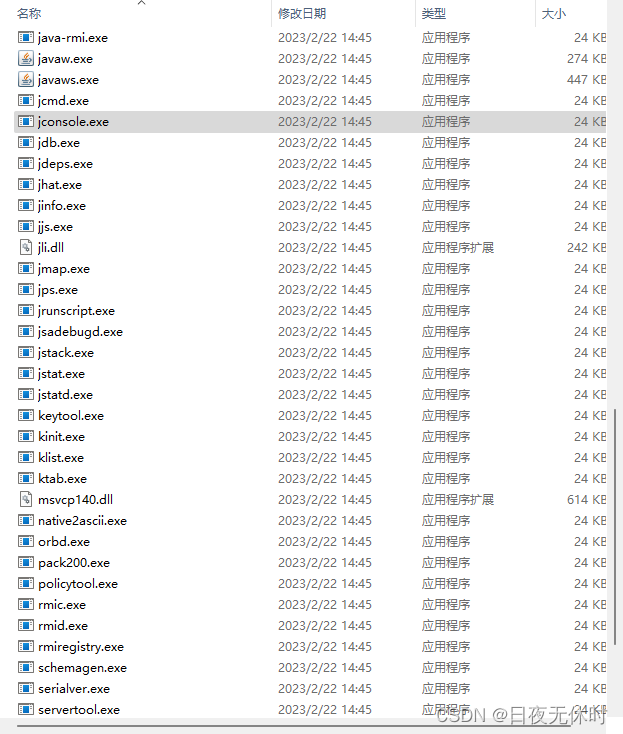
这里我们要注意的是:
- 在启动
jconsole.exe之前,我们得确保IDEA的程序已经跑起来了
sleep
上述的线程,我觉得他在while循环中转的太快了,想要他慢点~
那我们就可以使用Thread.sleep();,sleep是Thread的静态方法
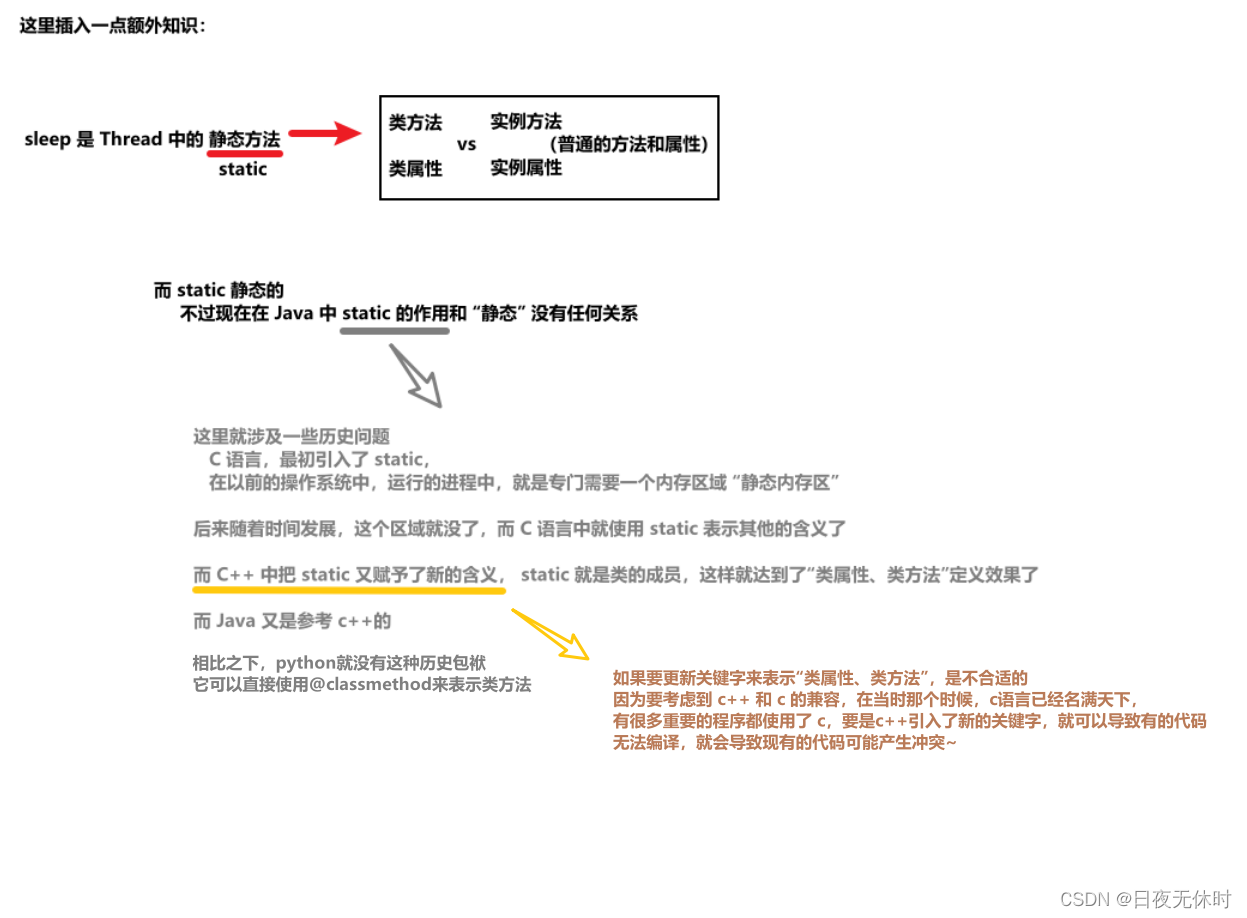
需要注意的是:我们使用sleep的时候汇报这样的错误
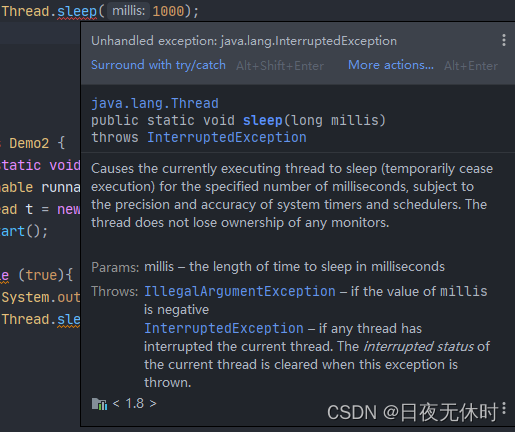
MyRunnable里的异常是受查异常,必须要显示处理,此处必须try catch,不能用throws,在这个代码中是重写父类的run,父类的run没有throws,子类方法也就不能也有。
而这个程序每秒所打印出来的内容,顺序都是不确定的。
因为这两线程都是休眠1000ms,当时间到后,谁先谁后是不一定的,这个过程可以视为“随机”
操作系统,对于多个线程的调度顺序,是不确定,随机的,而此处的随机不是数学上的概率均等的随机,是取决于 操作系统 对于线程调度的模块(调度器)来具体实现的~
创建线程
继承Thread类,重写run方法
package Thread.test_8_12;
class MyTread extends Thread{
    @Override
    public void run() {
        //这个方法就是线程的入口方法
        while (true) {
            try {
                Thread.sleep(1000);
            } catch (InterruptedException e) {
                e.printStackTrace();
            }
            System.out.println("hello thread");
        }
    }
}

//演示创建线程
public class Demo1 {
    public static void main(String[] args) throws InterruptedException {
        Thread t = new MyTread();
        //start 和 run 都是 Thread 的成员
        //run 只是描述了线程的入口(线程主要做什么任务)
        //start 则是真正调用了系统API,在系统中创建线程,让线程再调用run
        //t.start();
        //t.run();
        t.start();
        while (true){
            System.out.println("hello main");
            Thread.sleep(1000);
        }
    }
}
实现Runnable, 重写run
package Thread.test_8_12;
class MyRunnable implements Runnable{
    @Override
    public void run() {
        while (true) {
            System.out.println("hello world");
            try {
                Thread.sleep(1000);
            } catch (InterruptedException e) {
                e.printStackTrace();
            }
        }
    }
}

public class Demo2 {
    public static void main(String[] args) throws InterruptedException {
        Runnable runnable = new MyRunnable();
        Thread t = new Thread(runnable);
        t.start();

        while (true){
            System.out.println("hello main");
            Thread.sleep(1000);
        }
    }
}
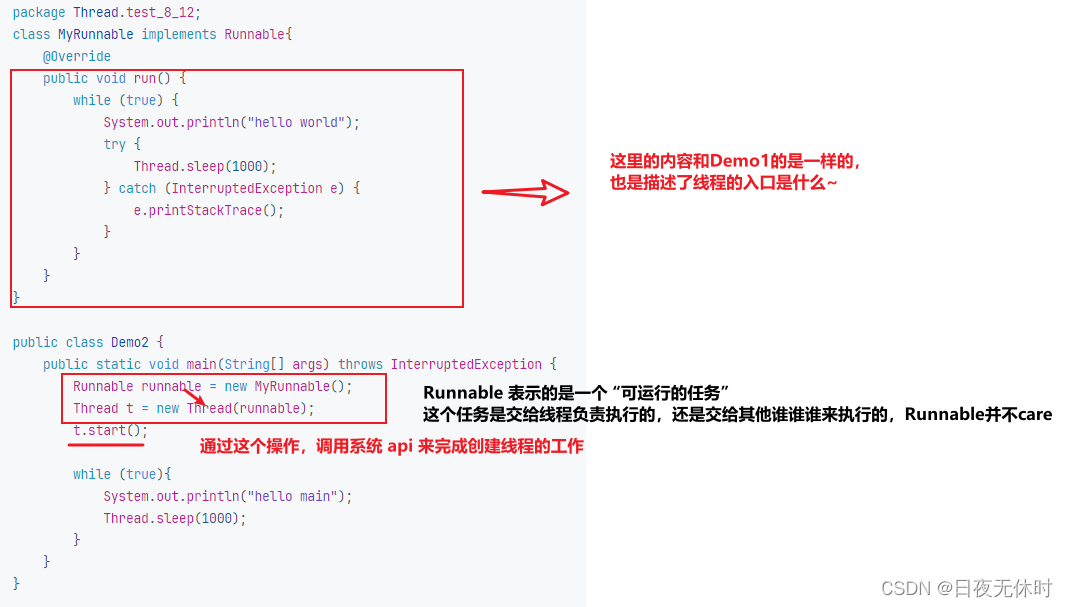
好处:
使用Runnable的写法,和直接继承Thread之间的区别就是:解耦合
使用Runnable接口重写run方法相对于直接继承Thread类的方式更加灵活、可扩展,并且能够实现解耦合。我们可以将任务逻辑与线程的实现分离,通过实现Runnable接口,我们能够更好地控制线程的行为并在需要时更好地管理和复用线程。
这里我们举个例子:
你老婆想要喝水,但是她又懒得去接水,于是她就会叫你或者你5岁孩子去接水。
而接水就是一个任务,你执行还是你孩子执行,这是没有本质区别的,那么此时我们就可以将接水这个任务单独提取为Runnable,后续是谁都可以轻轻松松完成这个任务~
但是如果任务变了呢?接水 -> 泡茶
那么此时这个任务就只能你来完成了,你那5岁孩子完成不来任务
那么这个任务就是和你这个线程有一定耦合关系的~
而我们创建一个线程,需要进行两个关键操作:
-
明确线程要执行的任务
任务本身,不一定和线程 概念 强相关的
- 这个任务只是单纯的执行一段代码,这个任务是使用单个线程执行还是多个线程执行,亦或是别的方式(信号处理函数/协程/线程池)都没什么区别~
- 任务本身,就可以将任务本身提取出来,此时就可随时把代码改成使用其他方式来执行这个任务~
-
调用系统的
api创建线程
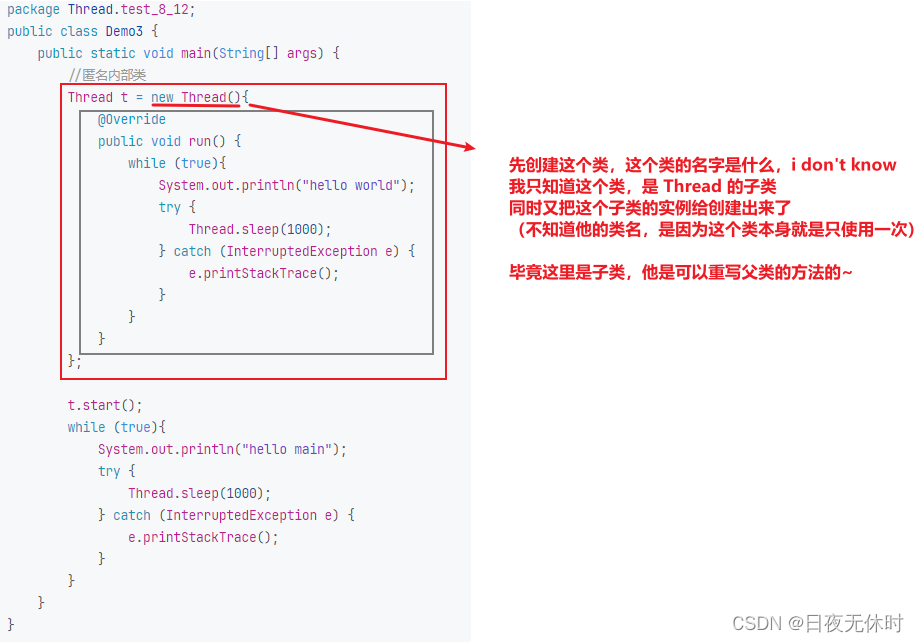
继承Thread,重写run
package Thread.test_8_12;
public class Demo3 {
    public static void main(String[] args) {
        //匿名内部类
        Thread t = new Thread(){
            @Override
            public void run() {
                while (true){
                    System.out.println("hello world");
                    try {
                        Thread.sleep(1000);
                    } catch (InterruptedException e) {
                        e.printStackTrace();
                    }
                }
            }
        };

        t.start();
        while (true){
            System.out.println("hello main");
            try {
                Thread.sleep(1000);
            } catch (InterruptedException e) {
                e.printStackTrace();
            }
        }
    }
}
**
**
实现Runnable,重写run
package Thread.test_8_12;
public class Demo4 {
    public static void main(String[] args) {
        Runnable runnable = new Runnable() {
            @Override
            public void run() {
                while (true) {
                    System.out.println("hello world");
                    try {
                        Thread.sleep(1000);
                    } catch (InterruptedException e) {
                        e.printStackTrace();
                    }
                }
            }
        };

        Thread t = new Thread(runnable);
        t.start();

        while (true){
            System.out.println("hello main");
            try {
                Thread.sleep(1000);
            } catch (InterruptedException e) {
                e.printStackTrace();
            }
        }
    }
}
基于lambda表达式
package Thread.test_8_12;
public class Demo6 {
    public static void main(String[] args) {
        Thread t = new Thread(()->{
            while (true){
                System.out.println("hello world");
                try {
                    Thread.sleep(1000);
                } catch (InterruptedException e) {
                    e.printStackTrace();
                }
            }
        });
        t.start();
        while (true){
            System.out.println("hello main");
            try {
                Thread.sleep(1000);
            } catch (InterruptedException e) {
                e.printStackTrace();
            }
        }
    }
}
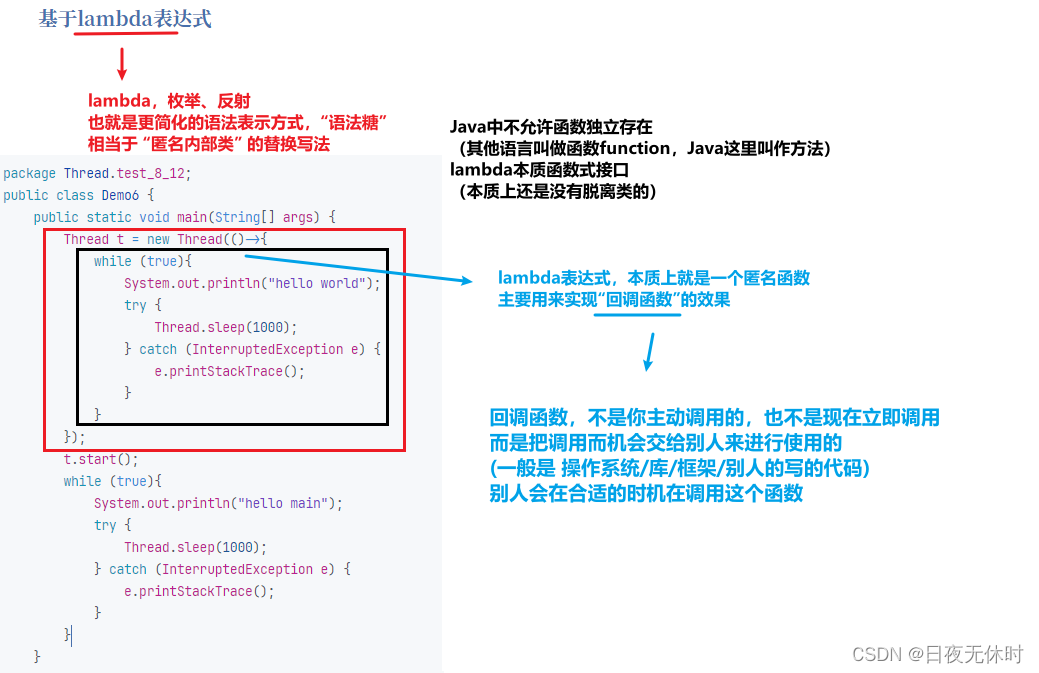
那为什么lambda表达式不用重写run方法?
实际上啊,lambda自身就是run方法
lambda:本身就是用来表示逻辑的,使用lambda就能描述出当前的线程要干嘛run方法:线程的入口,通俗来说就是:告诉线程你要干啥子~
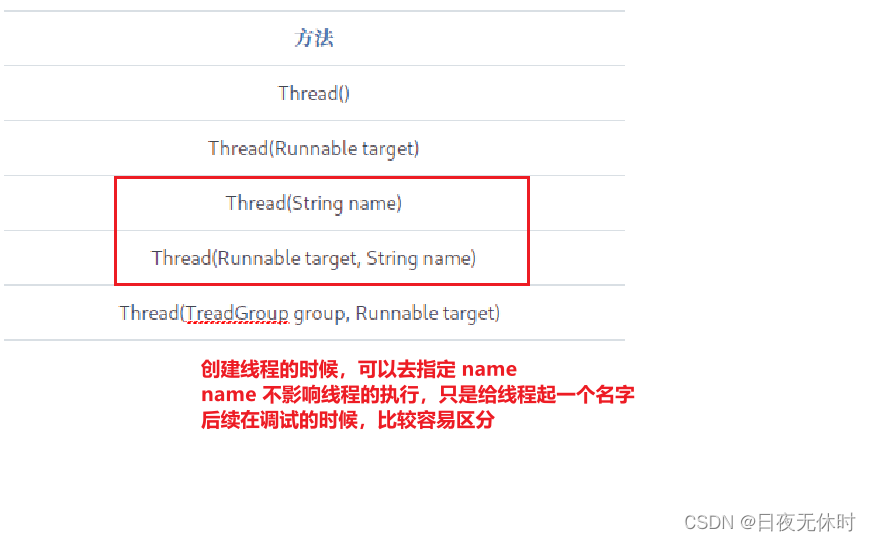
Thread的常见构造方法
| 方法 | 说明 |
|---|---|
| Thread() | 创建线程对象 |
| Thread(Runnable target) | 使用Runnable对象创建线程对象 |
| Thread(String name) | 创建线程对象,并命名 |
| Thread(Runnable target, String name) | 使用Runnable对象创建线程对象,并命名 |
| Thread(TreadGroup group, Runnable target) | 线程可以被用来分组管理,分好的几位线程组 |
public class Demo7 {
    public static void main(String[] args) {
        Thread t = new Thread(() -> {
            while (true) {
                System.out.println("hello thread");
                try {
                    Thread.sleep(1000);
                } catch (InterruptedException e) {
                    e.printStackTrace();
                }
            }
        }, "这是一个新线程");
        t.start();
    }
Thread几个常见属性
| 属性 | 获取方法 |
|---|---|
| ID | getId() |
| 名称 | getName() |
| 状态 | getState() |
| 优先级 | getPriority() |
| 是否后台进程 | isDaemon() |
| 是否存活 | isAlive() |
| 是否被中断 | isInterrupted() |
setDaemon();
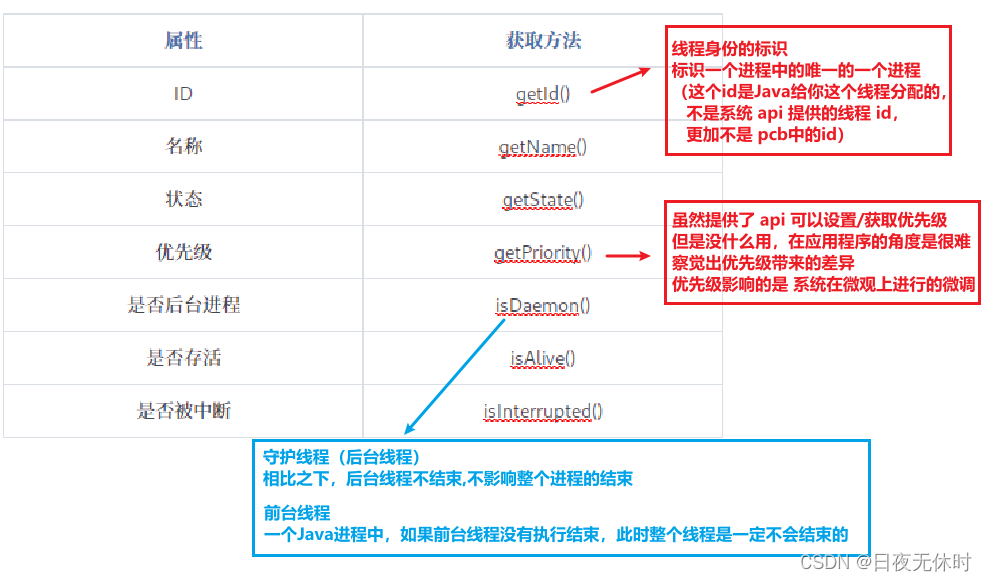
一般默认下,一个进程是前台线程~
public static void main(String[] args) {
        Thread t = new Thread(() -> {
            while (true) {
                System.out.println("hello thread");
                try {
                    Thread.sleep(1000);
                } catch (InterruptedException e) {
                    e.printStackTrace();
                }
            }
        }, "这是一个新线程");

        //设置 t 为后台线程
        t.setDaemon(true);
        t.start();
    }

调用setDaemon(true)方法,将t设置为后台线程。后台线程是一种特殊的线程,当所有前台线程(例如主线程)都结束时,后台线程会自动终止
改成后台线程之后,主线程飞快执行完了,此时就没有其他前台线程了,于是线程结束,t线程来不及执行,就 over 了~~
isAlive();
Thread 对象的生命周期,要比系统内核中的线程更长一些~
Thread对象还在,内核中的线程已经销毁了这样的情况(不求同年同月同日生,也不求i同年同月同日死)
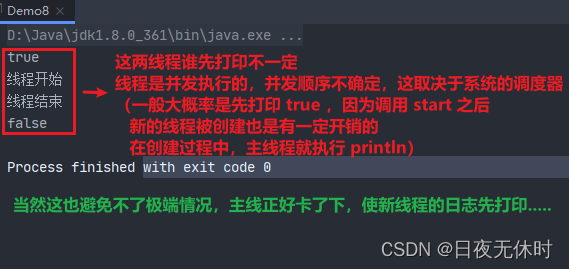
所以我们可以使用isAlive();来判定内核线程是不是已经没了,也就是回调函数执行完毕,线程就没了
package Thread;
public class Demo8 {
    public static void main(String[] args) {
        Thread t = new Thread(()->{
            System.out.println("线程开始");
            try {
                Thread.sleep(2000);
            } catch (InterruptedException e) {
                e.printStackTrace();
            }
            System.out.println("线程结束");
        });
        t.start();
        System.out.println(t.isAlive());
        try {
            Thread.sleep(3000);
        } catch (InterruptedException e) {
            e.printStackTrace();
        }
        System.out.println(t.isAlive());
    }
}
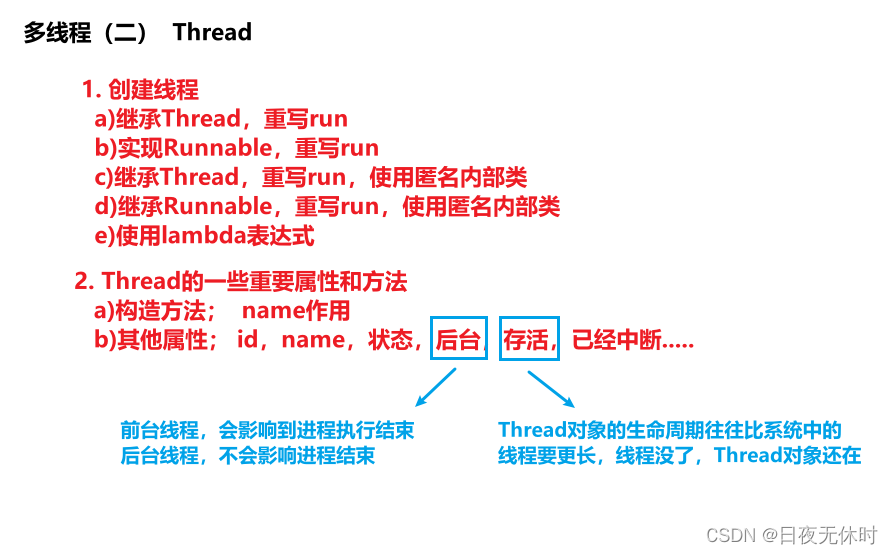
下面用一张图概括一下本篇文章所讲的内容~
至此,多线程(二)先写到这,后续会持续更新,敬请期待~
