🏆论文下载:paper
🏆代码下载:code
目录
🏆论文下载:paper
🏆代码下载:code
1.🌷🌷创新点
2.🌷🌷网络结构
2.1🍀🍀Backbone
2.2🍀🍀Protonet
2.3🍀🍀Prediction Head
2.4🍀🍀Masks Assembly
3.🌷🌷结果
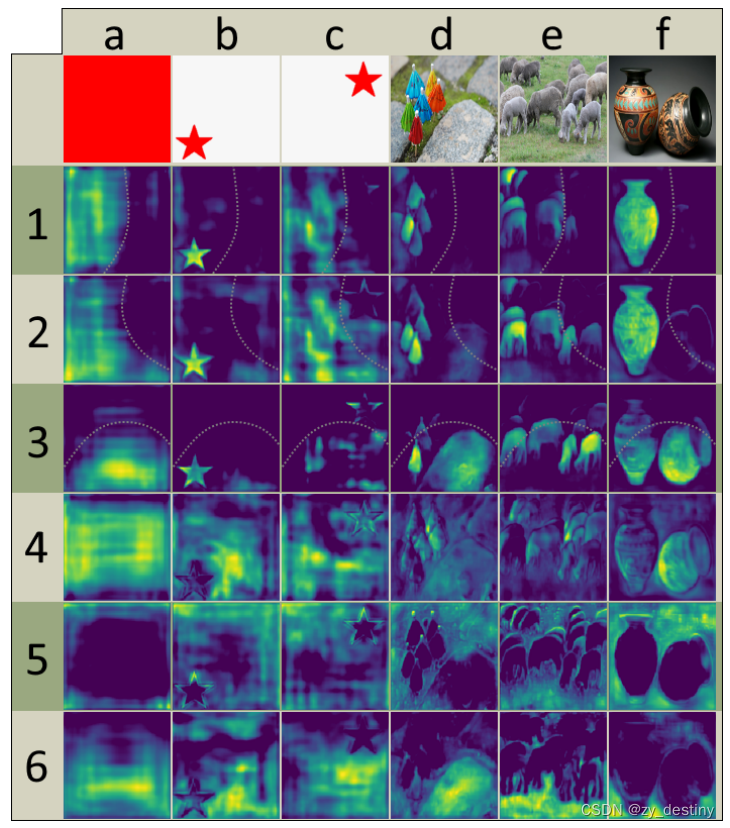
3.1🍀🍀prototypes表现
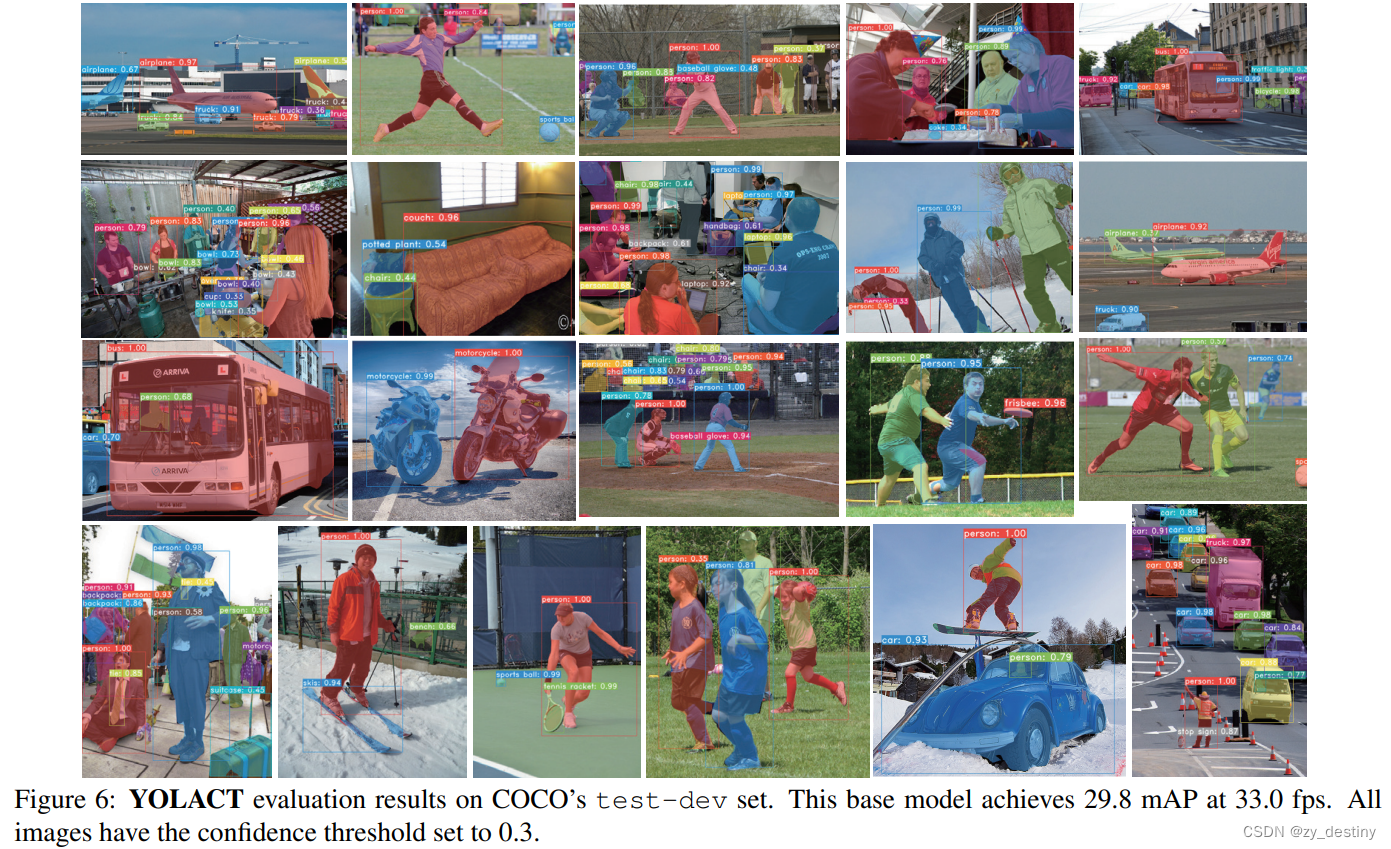
3.2🍀🍀coco结果
4.🌷🌷代码
整理不易,欢迎一键三连!!!
送你们一条美丽的--分割线--
YOLACT是比较经典的one-stage实例分割方法,属于anchor-base流派,即需要anchor计算。
YOLACT:You Only Look At CoefficienTs(系数复数)
摘要:我们提出了一个简单的用于实时实例分割的全卷积模型,在 MS COCO上实现了 29.8 mAP,在单个 Titan Xp 上达到 33.5 fps ,比以前任何竞争方法都要快得多。
此外,我们仅在一个训练后就得到了这个结果图形处理器。 我们通过将实例分割分成两个并行子任务来实现这一点:(1)生成一组原型掩码和(2)预测每个实例掩码系数。 然后,我们通过将原型与掩码系数线性组合来生成实例掩码。 我们发现因为这个过程不依赖于重新池化,所以这种方法可以产生非常高质量的掩模,并且免费表现出时间稳定性。 此外,我们分析了模型的出色表现,虽然是全卷积的,但是它们学会以翻译变体方式自行本地化实例。 最后,我们还提出了快速 NMS,它是标准 NMS 的快 12 毫秒的替代品,但仅有边际性能损失。
1.🌷🌷创新点
-
针对实例分割任务提出了一种简单的全卷积模型;
-
这个模型在COCO数据集用一块Titan Xp完成了29.8mAP和33.5fps的实时分割效果;
-
将任务分为两个平行的子任务。产生prototype masks和预测mask coefficients;
-
prototype masks
卷积层:在提取空间相关信息上效果显著。 -
mask coefficients
全连接层:在获取语义向量上效果显著。
-
-
利用矩阵计算对NMS进行加速
2.🌷🌷网络结构
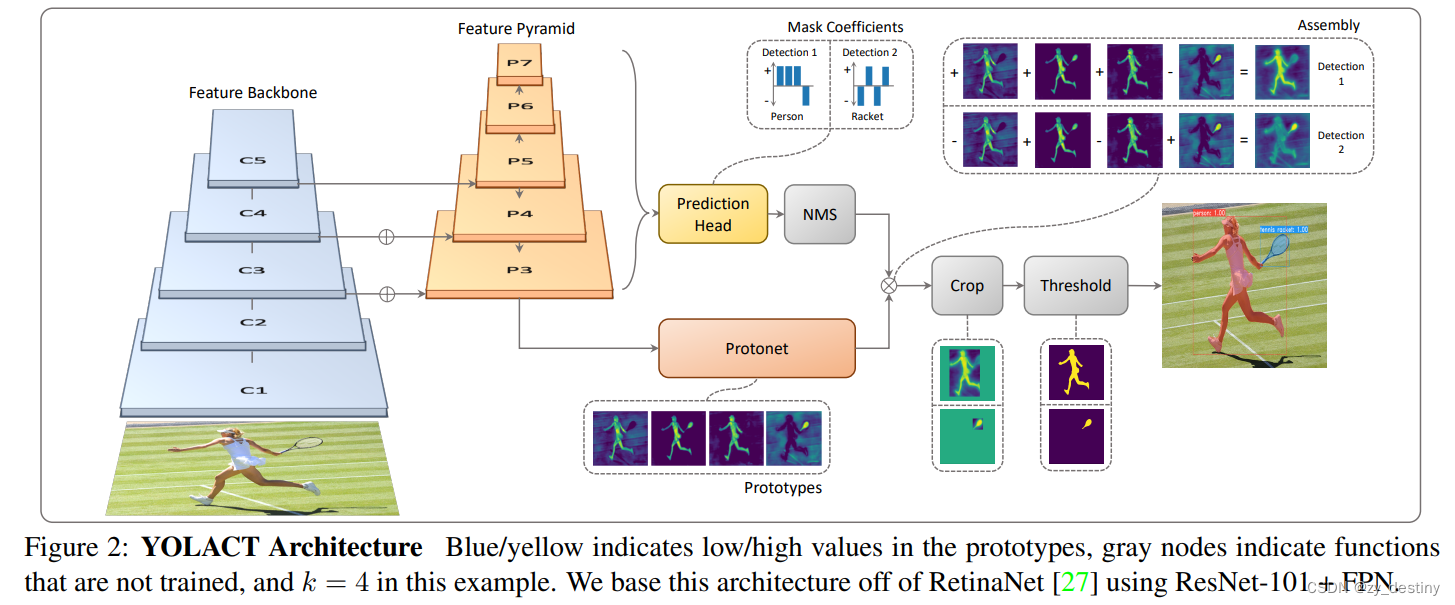
左侧(prototypes):蓝(低值)黄(高值)
中间(NMS/CROP/THRESHOLD):灰(没有训练的函数)
网络结构:RetinaNet ResNet-101+FPN
2.1🍀🍀Backbone
采用卷积神经网络(例如ResNet101)做特征提取,然后将提取到的特征输入到特征金字塔网络中进行不同层级特征提取。ResNet的网络结构如图所示。从图中可以看出,ResNet的卷积模块一共有5个从conv1,conv2_x到conv5_x,分别对应图1 YOLACT模型中的C1-C5,然后将提取到的特征输入到特征金字塔网络中。YOLACT采用了多尺度的特征图, 从而可以检测到不同尺寸的物体,也就是在大的特征图上检测小的物体,在小的特征图上检测大的物体。

* 特征金字塔模块的主要作用是获取深度更深的特征图,且含有多个不同尺度的特征图。
2.2🍀🍀Protonet

Protonet模块通过卷积和上采样获得Prototypes,Prototypes是多张mask的,mask中的亮(值大)的区域就是目标区域。最终通过线性组合生成的mask来获取每个实例的mask。
2.3🍀🍀Prediction Head

预测头在RetinaNet的基础上多回归了一个mask系数,输出预测框Bbox,类别信息conf以及掩码系数。利用此系数与Protonet中的mask线性组合。YOLACT利用特征金字塔中的特征图(5个尺度)每个特征图的每个点都生成3个目标框,为了避免太多冗余目标框,使用NMS非极大值抑制来进行目标框筛选。
2.4🍀🍀Masks Assembly

利用Prediction Head模块的mask系数与Protonet中的多张mask进行线性组合,每个目标得到一张mask。
损失函数:Lmask = BCE(M, Mgt)
3.🌷🌷结果
3.1🍀🍀prototypes表现
3.2🍀🍀coco结果
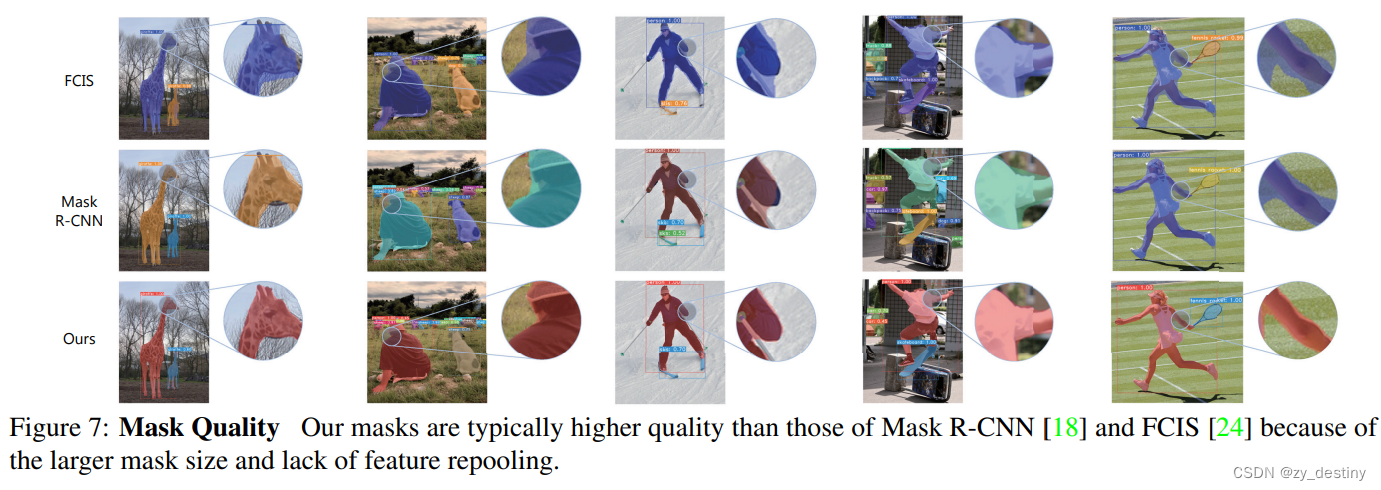
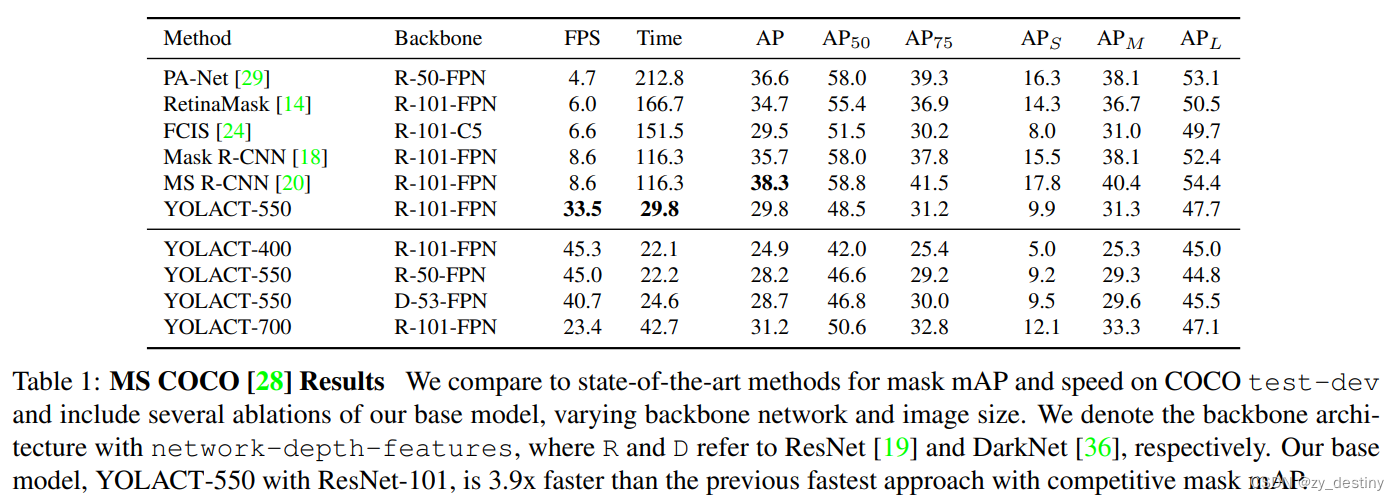

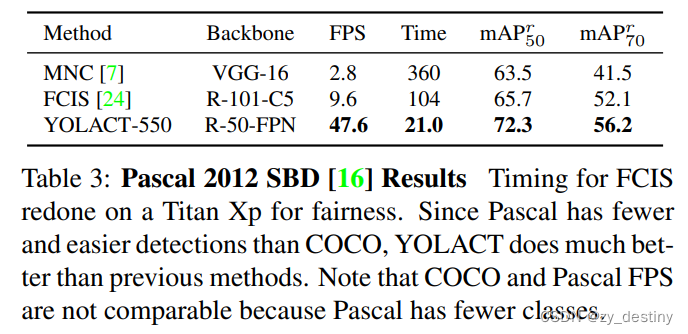
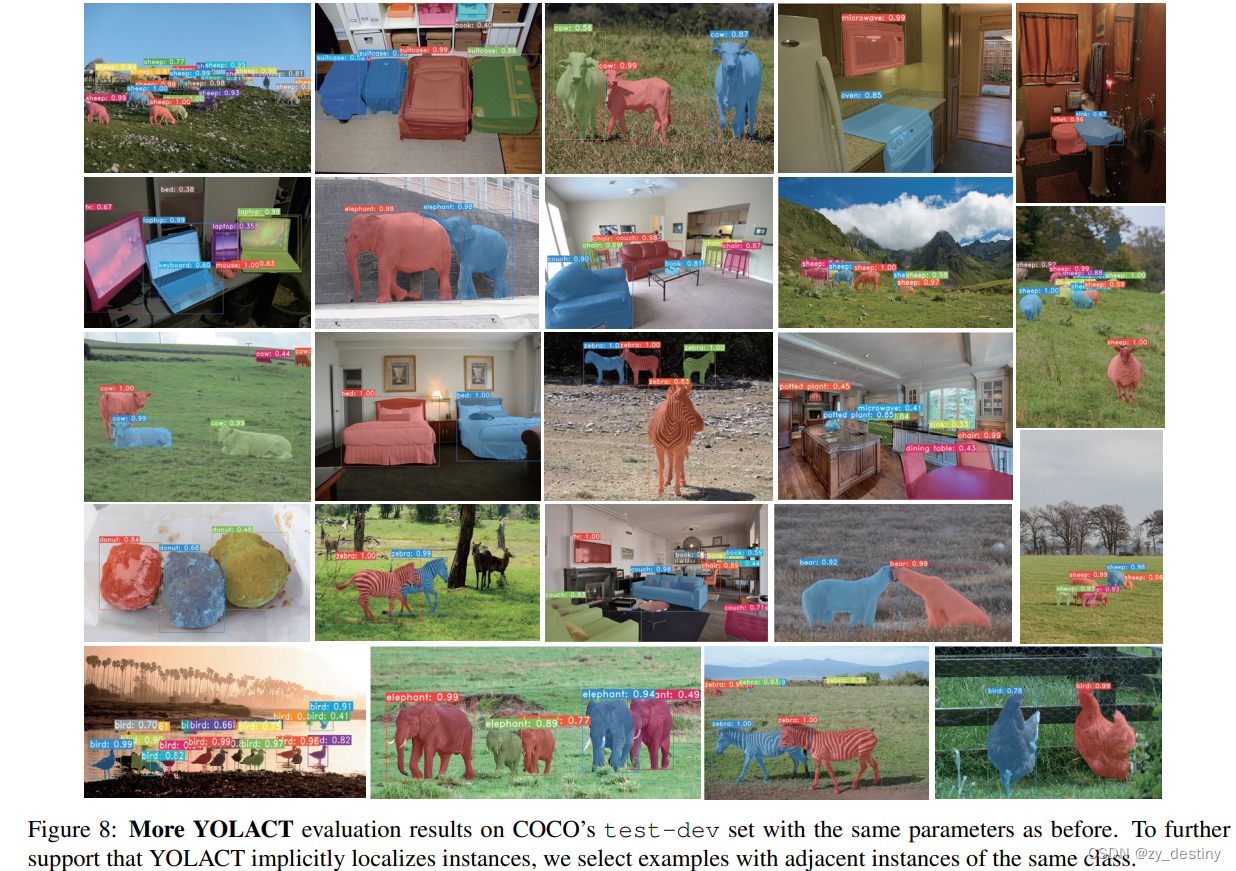
4.🌷🌷代码
YOLACT类的定义:
class Yolact(nn.Module):
    """
    You can set the arguments by changing them in the backbone config object in config.py.

    Parameters (in cfg.backbone):
        - selected_layers: The indices of the conv layers to use for prediction.
        - pred_scales:     A list with len(selected_layers) containing tuples of scales (see PredictionModule)
        - pred_aspect_ratios: A list of lists of aspect ratios with len(selected_layers) (see PredictionModule)
    """

    def __init__(self):
        super().__init__()

        self.backbone = construct_backbone(cfg.backbone)

        if cfg.freeze_bn:
            self.freeze_bn()

        # Compute mask_dim here and add it back to the config. Make sure Yolact's constructor is called early!
        if cfg.mask_type == mask_type.direct:
            cfg.mask_dim = cfg.mask_size**2
        elif cfg.mask_type == mask_type.lincomb:
            if cfg.mask_proto_use_grid:
                self.grid = torch.Tensor(np.load(cfg.mask_proto_grid_file))
                self.num_grids = self.grid.size(0)
            else:
                self.num_grids = 0

            self.proto_src = cfg.mask_proto_src

            if self.proto_src is None: in_channels = 3
            elif cfg.fpn is not None: in_channels = cfg.fpn.num_features
            else: in_channels = self.backbone.channels[self.proto_src]
            in_channels += self.num_grids

            # The include_last_relu=false here is because we might want to change it to another function
            self.proto_net, cfg.mask_dim = make_net(in_channels, cfg.mask_proto_net, include_last_relu=False)

            if cfg.mask_proto_bias:
                cfg.mask_dim += 1


        self.selected_layers = cfg.backbone.selected_layers
        src_channels = self.backbone.channels

        if cfg.use_maskiou:
            self.maskiou_net = FastMaskIoUNet()

        if cfg.fpn is not None:
            # Some hacky rewiring to accomodate the FPN
            self.fpn = FPN([src_channels[i] for i in self.selected_layers])
            self.selected_layers = list(range(len(self.selected_layers) + cfg.fpn.num_downsample))
            src_channels = [cfg.fpn.num_features] * len(self.selected_layers)


        self.prediction_layers = nn.ModuleList()
        cfg.num_heads = len(self.selected_layers)

        for idx, layer_idx in enumerate(self.selected_layers):
            # If we're sharing prediction module weights, have every module's parent be the first one
            parent = None
            if cfg.share_prediction_module and idx > 0:
                parent = self.prediction_layers[0]

            pred = PredictionModule(src_channels[layer_idx], src_channels[layer_idx],
                                    aspect_ratios = cfg.backbone.pred_aspect_ratios[idx],
                                    scales        = cfg.backbone.pred_scales[idx],
                                    parent        = parent,
                                    index         = idx)
            self.prediction_layers.append(pred)

        # Extra parameters for the extra losses
        if cfg.use_class_existence_loss:
            # This comes from the smallest layer selected
            # Also note that cfg.num_classes includes background
            self.class_existence_fc = nn.Linear(src_channels[-1], cfg.num_classes - 1)

        if cfg.use_semantic_segmentation_loss:
            self.semantic_seg_conv = nn.Conv2d(src_channels[0], cfg.num_classes-1, kernel_size=1)

        # For use in evaluation
        self.detect = Detect(cfg.num_classes, bkg_label=0, top_k=cfg.nms_top_k,
            conf_thresh=cfg.nms_conf_thresh, nms_thresh=cfg.nms_thresh)

    def save_weights(self, path):
        """ Saves the model's weights using compression because the file sizes were getting too big. """
        torch.save(self.state_dict(), path)

    def load_weights(self, path):
        """ Loads weights from a compressed save file. """
        state_dict = torch.load(path)

        # For backward compatability, remove these (the new variable is called layers)
        for key in list(state_dict.keys()):
            if key.startswith('backbone.layer') and not key.startswith('backbone.layers'):
                del state_dict[key]

            # Also for backward compatibility with v1.0 weights, do this check
            if key.startswith('fpn.downsample_layers.'):
                if cfg.fpn is not None and int(key.split('.')[2]) >= cfg.fpn.num_downsample:
                    del state_dict[key]
        self.load_state_dict(state_dict)

    def init_weights(self, backbone_path):
        """ Initialize weights for training. """
        # Initialize the backbone with the pretrained weights.
        self.backbone.init_backbone(backbone_path)

        conv_constants = getattr(nn.Conv2d(1, 1, 1), '__constants__')

        # Quick lambda to test if one list contains the other
        def all_in(x, y):
            for _x in x:
                if _x not in y:
                    return False
            return True

        # Initialize the rest of the conv layers with xavier
        for name, module in self.named_modules():
            # See issue #127 for why we need such a complicated condition if the module is a WeakScriptModuleProxy
            # Broke in 1.3 (see issue #175), WeakScriptModuleProxy was turned into just ScriptModule.
            # Broke in 1.4 (see issue #292), where RecursiveScriptModule is the new star of the show.
            # Note that this might break with future pytorch updates, so let me know if it does
            is_script_conv = False
            if 'Script' in type(module).__name__:
                # 1.4 workaround: now there's an original_name member so just use that
                if hasattr(module, 'original_name'):
                    is_script_conv = 'Conv' in module.original_name
                # 1.3 workaround: check if this has the same constants as a conv module
                else:
                    is_script_conv = (
                        all_in(module.__dict__['_constants_set'], conv_constants)
                        and all_in(conv_constants, module.__dict__['_constants_set']))

            is_conv_layer = isinstance(module, nn.Conv2d) or is_script_conv

            if is_conv_layer and module not in self.backbone.backbone_modules:
                nn.init.xavier_uniform_(module.weight.data)

                if module.bias is not None:
                    if cfg.use_focal_loss and 'conf_layer' in name:
                        if not cfg.use_sigmoid_focal_loss:
                            # Initialize the last layer as in the focal loss paper.
                            # Because we use softmax and not sigmoid, I had to derive an alternate expression
                            # on a notecard. Define pi to be the probability of outputting a foreground detection.
                            # Then let z = sum(exp(x)) - exp(x_0). Finally let c be the number of foreground classes.
                            # Chugging through the math, this gives us
                            #   x_0 = log(z * (1 - pi) / pi)    where 0 is the background class
                            #   x_i = log(z / c)                for all i > 0
                            # For simplicity (and because we have a degree of freedom here), set z = 1. Then we have
                            #   x_0 =  log((1 - pi) / pi)       note: don't split up the log for numerical stability
                            #   x_i = -log(c)                   for all i > 0
                            module.bias.data[0]  = np.log((1 - cfg.focal_loss_init_pi) / cfg.focal_loss_init_pi)
                            module.bias.data[1:] = -np.log(module.bias.size(0) - 1)
                        else:
                            module.bias.data[0]  = -np.log(cfg.focal_loss_init_pi / (1 - cfg.focal_loss_init_pi))
                            module.bias.data[1:] = -np.log((1 - cfg.focal_loss_init_pi) / cfg.focal_loss_init_pi)
                    else:
                        module.bias.data.zero_()

    def train(self, mode=True):
        super().train(mode)

        if cfg.freeze_bn:
            self.freeze_bn()

    def freeze_bn(self, enable=False):
        """ Adapted from https://discuss.pytorch.org/t/how-to-train-with-frozen-batchnorm/12106/8 """
        for module in self.modules():
            if isinstance(module, nn.BatchNorm2d):
                module.train() if enable else module.eval()

                module.weight.requires_grad = enable
                module.bias.requires_grad = enable

    def forward(self, x):
        """ The input should be of size [batch_size, 3, img_h, img_w] """
        _, _, img_h, img_w = x.size()
        cfg._tmp_img_h = img_h
        cfg._tmp_img_w = img_w

        with timer.env('backbone'):
            outs = self.backbone(x)

        if cfg.fpn is not None:
            with timer.env('fpn'):
                # Use backbone.selected_layers because we overwrote self.selected_layers
                outs = [outs[i] for i in cfg.backbone.selected_layers]
                outs = self.fpn(outs)

        proto_out = None
        if cfg.mask_type == mask_type.lincomb and cfg.eval_mask_branch:
            with timer.env('proto'):
                proto_x = x if self.proto_src is None else outs[self.proto_src]

                if self.num_grids > 0:
                    grids = self.grid.repeat(proto_x.size(0), 1, 1, 1)
                    proto_x = torch.cat([proto_x, grids], dim=1)

                proto_out = self.proto_net(proto_x)
                proto_out = cfg.mask_proto_prototype_activation(proto_out)

                if cfg.mask_proto_prototypes_as_features:
                    # Clone here because we don't want to permute this, though idk if contiguous makes this unnecessary
                    proto_downsampled = proto_out.clone()

                    if cfg.mask_proto_prototypes_as_features_no_grad:
                        proto_downsampled = proto_out.detach()

                # Move the features last so the multiplication is easy
                proto_out = proto_out.permute(0, 2, 3, 1).contiguous()

                if cfg.mask_proto_bias:
                    bias_shape = [x for x in proto_out.size()]
                    bias_shape[-1] = 1
                    proto_out = torch.cat([proto_out, torch.ones(*bias_shape)], -1)


        with timer.env('pred_heads'):
            pred_outs = { 'loc': [], 'conf': [], 'mask': [], 'priors': [] }

            if cfg.use_mask_scoring:
                pred_outs['score'] = []

            if cfg.use_instance_coeff:
                pred_outs['inst'] = []

            for idx, pred_layer in zip(self.selected_layers, self.prediction_layers):
                pred_x = outs[idx]

                if cfg.mask_type == mask_type.lincomb and cfg.mask_proto_prototypes_as_features:
                    # Scale the prototypes down to the current prediction layer's size and add it as inputs
                    proto_downsampled = F.interpolate(proto_downsampled, size=outs[idx].size()[2:], mode='bilinear', align_corners=False)
                    pred_x = torch.cat([pred_x, proto_downsampled], dim=1)

                # A hack for the way dataparallel works
                if cfg.share_prediction_module and pred_layer is not self.prediction_layers[0]:
                    pred_layer.parent = [self.prediction_layers[0]]

                p = pred_layer(pred_x)

                for k, v in p.items():
                    pred_outs[k].append(v)

        for k, v in pred_outs.items():
            pred_outs[k] = torch.cat(v, -2)

        if proto_out is not None:
            pred_outs['proto'] = proto_out

        if self.training:
            # For the extra loss functions
            if cfg.use_class_existence_loss:
                pred_outs['classes'] = self.class_existence_fc(outs[-1].mean(dim=(2, 3)))

            if cfg.use_semantic_segmentation_loss:
                pred_outs['segm'] = self.semantic_seg_conv(outs[0])

            return pred_outs
        else:
            if cfg.use_mask_scoring:
                pred_outs['score'] = torch.sigmoid(pred_outs['score'])

            if cfg.use_focal_loss:
                if cfg.use_sigmoid_focal_loss:
                    # Note: even though conf[0] exists, this mode doesn't train it so don't use it
                    pred_outs['conf'] = torch.sigmoid(pred_outs['conf'])
                    if cfg.use_mask_scoring:
                        pred_outs['conf'] *= pred_outs['score']
                elif cfg.use_objectness_score:
                    # See focal_loss_sigmoid in multibox_loss.py for details
                    objectness = torch.sigmoid(pred_outs['conf'][:, :, 0])
                    pred_outs['conf'][:, :, 1:] = objectness[:, :, None] * F.softmax(pred_outs['conf'][:, :, 1:], -1)
                    pred_outs['conf'][:, :, 0 ] = 1 - objectness
                else:
                    pred_outs['conf'] = F.softmax(pred_outs['conf'], -1)
            else:

                if cfg.use_objectness_score:
                    objectness = torch.sigmoid(pred_outs['conf'][:, :, 0])

                    pred_outs['conf'][:, :, 1:] = (objectness > 0.10)[..., None] \
                        * F.softmax(pred_outs['conf'][:, :, 1:], dim=-1)

                else:
                    pred_outs['conf'] = F.softmax(pred_outs['conf'], -1)

            return self.detect(pred_outs, self)
整理不易,欢迎一键三连!!!
送你们一条美丽的--分割线--
🌷🌷🍀🍀🌾🌾🍓🍓🍂🍂🙋🙋🐸🐸🙋🙋💖💖🍌🍌🔔🔔🍉🍉🍭🍭🍋🍋🍇🍇🏆🏆📸📸⛵⛵⭐⭐🍎🍎👍👍🌷🌷


